WINDOW / GLASS BACK WINDOW GLASS(for CrewMax) INSTALLATION
CAUTION / NOTICE / HINT
- HINT:
-
A bolt without a torque specification is shown in the standard bolt chart (see page General>SPECIFICATIONS>STANDARD BOLT>SPECIFIED TORQUE FOR STANDARD BOLTS).
PROCEDURE

 61576A
1.INSTALL UPPER CAB REAR PILLAR PLATE LH
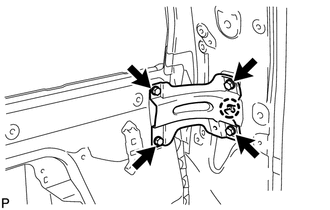
Align the positioning hole with the claw, and install the upper plate with the 4 bolts as shown in the illustration.
61575C
2.INSTALL UPPER CAB REAR PILLAR PLATE RH
- HINT:
-
Use the same procedures described for the LH side.
75573F
3.INSTALL BACK WINDOW OUTSIDE MOULDING
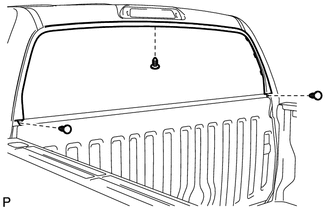
Install the outside moulding with the 3 clips.
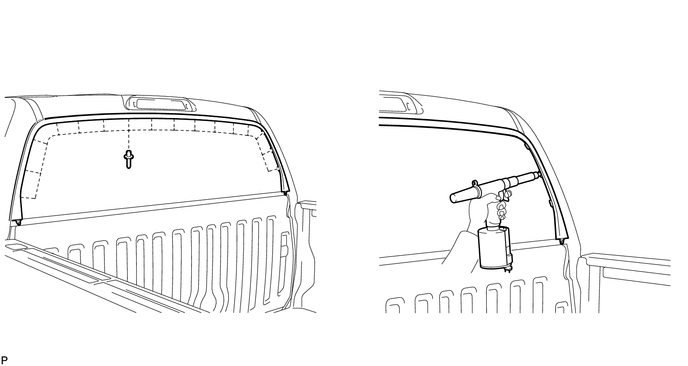
Using an air riveter or hand riveter with a nose piece, install the back window outside moulding with 16 new rivets.
- HINT:
-
If the rivet cannot be cut, pull it once and cut it.
- NOTICE:
- ·
 1.229,1.104 1.083,1.635 1.083,1.635 1.24,2.198 false 1.073,1.635 0.802,1.635 false 1.719,0.917 1.948,1.635 1.948,1.635 1.74,2.49 false 1.958,1.625 2.229,1.625 false 2.271,0.615 3.094,0.802 0.823,0.188 10 false INCORRECT 2.146,2.417 2.833,2.615 0.688,0.198 10 false CORRECT 0.323,1.542 0.781,1.74 0.458,0.198 10 false Riveter 2.26,1.531 2.865,1.708 0.604,0.177 10 false Mandrel
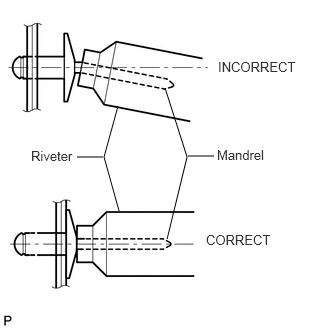
·Do not pry the rivet with the riveter, as this will cause damage to the riveter and mandrel.
·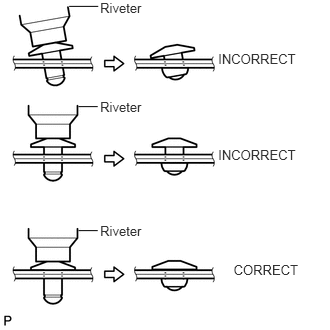 2.273,0.536 3.223,0.713 0.950,0.177 10 INCORRECT 2.273,1.527 3.223,1.704 0.950,0.177 10 INCORRECT 2.434,2.73 3.175,2.907 0.741,0.177 10 CORRECT 1.043,0 1.542,0.152 0.500,0.152 10 Riveter 1.043,1.033 1.542,1.185 0.500,0.152 10 Riveter 0.72,0.066 1.023,0.066 false 0.818,1.11 1.018,1.11 false 1.043,2.324 1.542,2.477 0.500,0.152 10 Riveter 0.818,2.402 1.018,2.402 false
Confirm that the rivets are seated properly against the moulding.
·Do not tilt the riveter when installing the rivet to the moulding.
·Do not leave any space between the rivet head and moulding.
·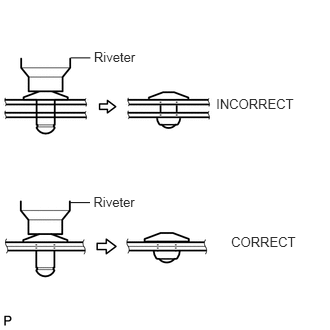 2.252,0.996 3.223,1.173 0.970,0.177 10 INCORRECT 2.408,2.434 3.140,2.611 0.732,0.177 10 CORRECT 0.978,0.515 1.499,0.685 0.521,0.171 10 Riveter 0.735,0.603 0.941,0.603 false 0.973,2.023 1.494,2.194 0.521,0.171 10 Riveter 0.731,2.111 0.937,2.111 false
Do not leave any space between the moulding and door frame. Firmly hold together the 2 items while installing the rivet.
85710J
4.INSTALL BACK DOOR POWER WINDOW REGULATOR MOTOR
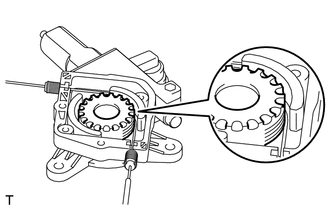
Install the drum and wire guide to the motor.
Install the cover with the 2 screws.
Apply MP grease to the rotating areas of the regulator motor.
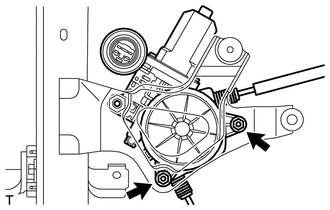
Install the motor with the 2 nuts.
- Torque:
- 5.9 N*m (60 kgf*cm, 52 in.*lbf)
69807A
5.INSTALL BACK DOOR POWER WINDOW REGULATOR SUB-ASSEMBLY
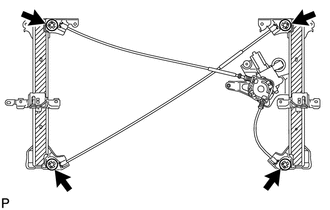
Apply MP grease to the sliding and rotating parts of the window regulator.
- NOTICE:
-
Do not apply grease to the spring of the window regulator.
Temporarily install the window regulator by attaching the 3 upper claws.
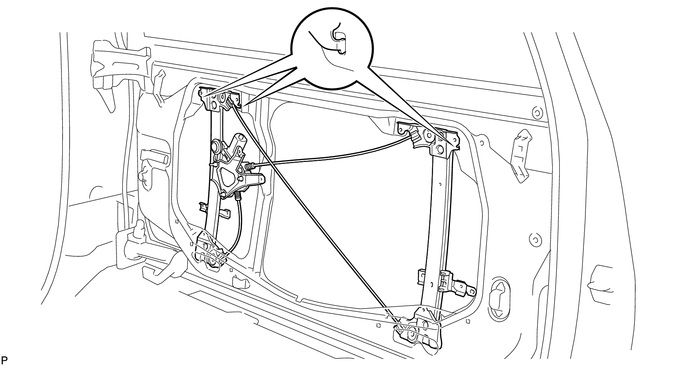
Loosely install the bolts onto the window regulator.
- NOTICE:
-
Be careful not to drop and deform the window regulator.
Tighten the 7 bolts in the order shown in the illustration.
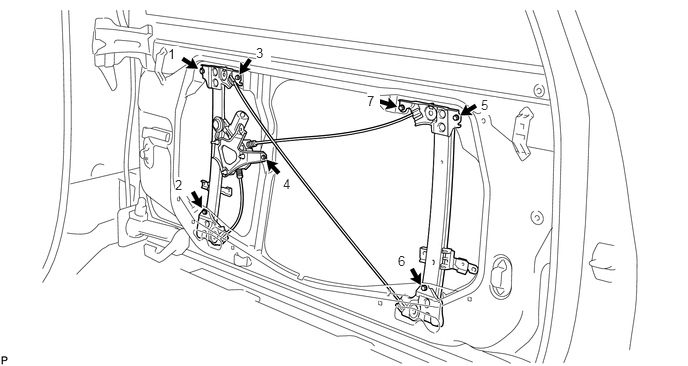
- Torque:
- 8.0 N*m (82 kgf*cm, 71 in.*lbf)
64811
6.INSTALL BACK WINDOW GLASS
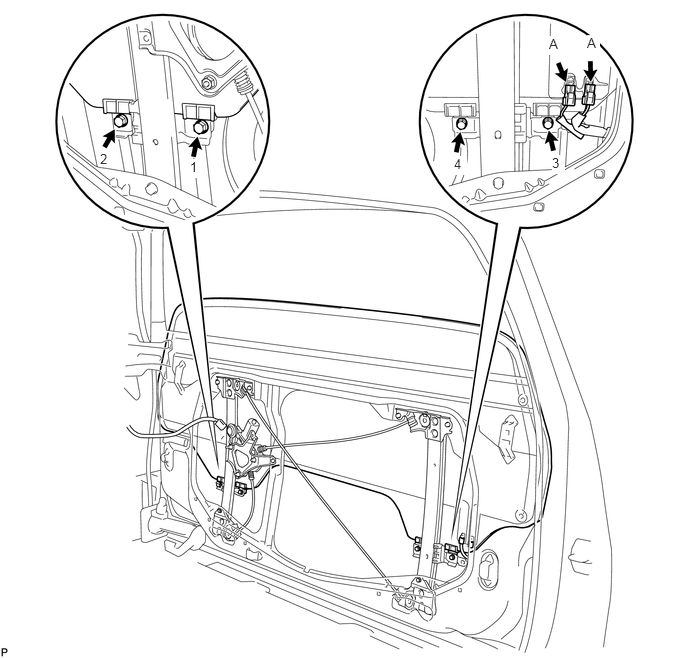
Temporarily install the back window glass to the window regulator with the 4 bolts.
Tighten the 4 bolts in the order shown in the illustration.
- Torque:
- 8.0 N*m (82 kgf*cm, 71 in.*lbf)
- NOTICE:
-
Do not damage the back window glass.
Connect the 2 defogger connectors labeled A.
68275A
7.INSTALL BACK DOOR GLASS RUN
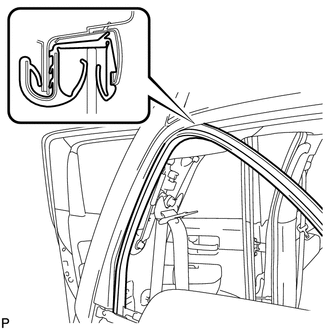
Install the glass run.
68291F
8.INSTALL INNER BACK DOOR GLASS WEATHERSTRIP
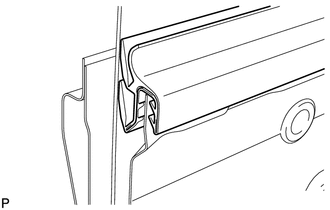
Install the inner weatherstrip.
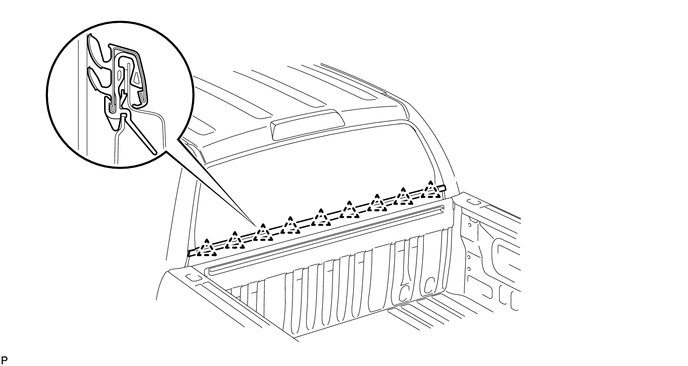
68290B
9.INSTALL OUTER BACK DOOR GLASS WEATHERSTRIP ASSEMBLY
Install the outer weatherstrip with the 9 clips.
67847G
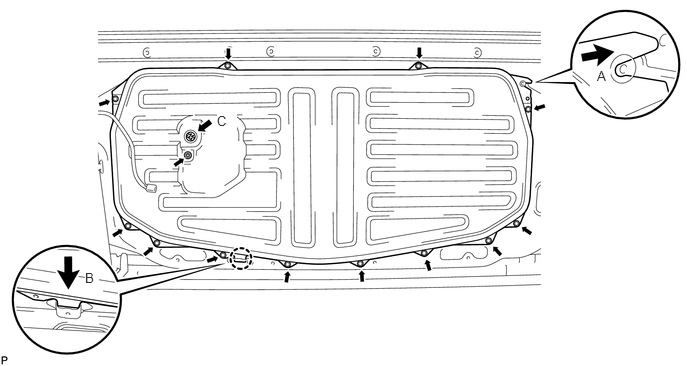
10.INSTALL BACK DOOR SERVICE HOLE COVER
Slide the cover to the right to engage the retainer labeled A.
Attach the claw labeled B to the body.
Install the 12 bolts and nut.
Install the back window regulator connector labeled C.
63310
11.INSTALL ROOF HEADLINING ASSEMBLY
Return the roof headlining to its original position. Refer to the following procedures (see page Vehicle Interior>INTERIOR>ROOF HEADLINING(for CrewMax)>INSTALLATION).
81240
12.INSTALL NO. 1 ROOM LIGHT ASSEMBLY
74610A
13.INSTALL ASSIST GRIP SUB-ASSEMBLY
62520P
14.INSTALL FRONT QUARTER TRIM PANEL ASSEMBLY LH
62510P
15.INSTALL FRONT QUARTER TRIM PANEL ASSEMBLY RH
62540
16.INSTALL LOWER QUARTER TRIM PANEL ASSEMBLY LH
62530
17.INSTALL LOWER QUARTER TRIM PANEL ASSEMBLY RH
73024
18.INSTALL FRONT SHOULDER BELT ANCHOR PLATE SUB-ASSEMBLY LH
73023
19.INSTALL FRONT SHOULDER BELT ANCHOR PLATE SUB-ASSEMBLY RH
- HINT:
-
Use the same procedures described for the LH side.
86150
20.INSTALL NO. 1 BOX SPEAKER ASSEMBLY
62332A
21.INSTALL REAR DOOR OPENING TRIM WEATHERSTRIP LH
62331A
22.INSTALL REAR DOOR OPENING TRIM WEATHERSTRIP RH
67918B
23.INSTALL REAR DOOR SCUFF PLATE LH
67917B
24.INSTALL REAR DOOR SCUFF PLATE RH
25.INSTALL REAR SEAT ASSEMBLY LH
26.INSTALL REAR SEAT ASSEMBLY RH
75554A
27.INSTALL REAR ROOF DRIP SIDE FINISH MOULDING LH
75553A
28.INSTALL REAR ROOF DRIP SIDE FINISH MOULDING RH
- HINT:
-
Use the same procedures described for the LH side.
28800
29.CONNECT CABLE TO NEGATIVE BATTERY TERMINAL