INTERIOR ROOF HEADLINING(for CrewMax) REMOVAL
PROCEDURE

 1.LOWER BACK WINDOW GLASS
- HINT:
-
Make sure to completely lower the back window glass so that the roof headlining can be removed from the rear of the vehicle.
2. PRECAUTION
- NOTICE:
-
After turning the ignition switch off, waiting time may be required before disconnecting the cable from the battery terminal. Therefore, make sure to read the disconnecting the cable from the battery terminal notice before proceeding with work (See page General>INTRODUCTION>REPAIR INSTRUCTION>PRECAUTION).
3.DISCONNECT CABLE FROM NEGATIVE BATTERY TERMINAL
- CAUTION:
-
Wait at least 90 seconds after disconnecting the cable from the negative (-) battery terminal to disable the SRS system.
- NOTICE:
-
When disconnecting the cable, some systems need to be initialized after the cable is reconnected (See page General>INTRODUCTION>REPAIR INSTRUCTION>INITIALIZATION).
4.REMOVE FRONT SEAT ASSEMBLY (for Manual Seat)
5.REMOVE FRONT SEAT ASSEMBLY (for Power Seat)
6.REMOVE FRONT SEAT ASSEMBLY (for Center Seat)
7.REMOVE REAR SEAT ASSEMBLY (for LH Side)
8.REMOVE REAR SEAT ASSEMBLY (for RH Side)
67914
9.REMOVE FRONT DOOR SCUFF PLATE LH
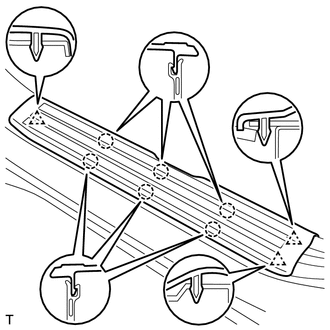
Detach the 6 claws and 3 clips, and remove the front door scuff plate LH.
67913
10.REMOVE FRONT DOOR SCUFF PLATE RH
- HINT:
-
Use the same procedure described for the LH side.
67918B
11.REMOVE REAR DOOR SCUFF PLATE LH
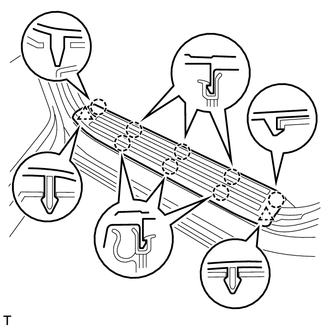
Detach the 8 claws and 2 clips, and remove the rear door scuff plate LH.
67917B
12.REMOVE REAR DOOR SCUFF PLATE RH
- HINT:
-
Use the same procedure described for the LH side.
62112
13.REMOVE COWL SIDE TRIM BOARD LH
62111C
14.REMOVE COWL SIDE TRIM BOARD RH
- HINT:
-
Use the same procedure described for the LH side.
62312B
15.REMOVE FRONT DOOR OPENING TRIM WEATHERSTRIP LH
Remove the front door opening trim weatherstrip LH.
62311B
16.REMOVE FRONT DOOR OPENING TRIM WEATHERSTRIP RH
- HINT:
-
Use the same procedure described for the LH side.
62332A
17.REMOVE REAR DOOR OPENING TRIM WEATHERSTRIP LH
Remove the rear door opening trim weatherstrip LH.
62331A
18.REMOVE REAR DOOR OPENING TRIM WEATHERSTRIP RH
- HINT:
-
Use the same procedure described for the LH side.
62212
19.REMOVE FRONT PILLAR GARNISH LH
62211
20.REMOVE FRONT PILLAR GARNISH RH
62414A
21.REMOVE LOWER CENTER PILLAR GARNISH LH
62413A
22.REMOVE LOWER CENTER PILLAR GARNISH RH
- HINT:
-
Use the same procedure described for the LH side.
62412
23.REMOVE CENTER PILLAR GARNISH LH
62411
24.REMOVE CENTER PILLAR GARNISH RH
- HINT:
-
Use the same procedure described for the LH side.
73024
25.REMOVE FRONT SHOULDER BELT ANCHOR PLATE SUB-ASSEMBLY LH
73023
26.REMOVE FRONT SHOULDER BELT ANCHOR PLATE SUB-ASSEMBLY RH
- HINT:
-
Use the same procedure described for the LH side.
86150
27.REMOVE NO. 1 BOX SPEAKER ASSEMBLY (w/ Woofer)
62540
28.REMOVE LOWER QUARTER TRIM PANEL ASSEMBLY LH
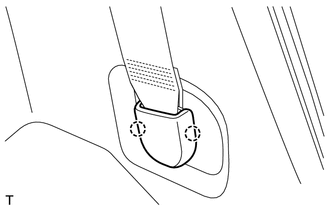
Detach the 2 claws and remove the cover.
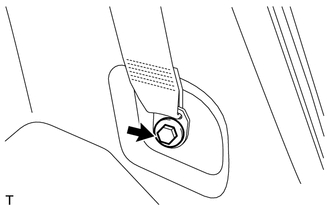
Loosen the bolt and disconnect the rear seat outer belt assembly.
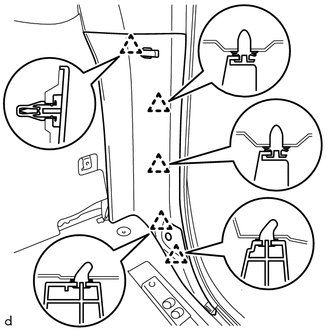
Detach the 5 clips and remove the lower quarter trim panel assembly LH.
62530
29.REMOVE LOWER QUARTER TRIM PANEL ASSEMBLY RH
- HINT:
-
Use the same procedure described for the LH side.
62520P
30.REMOVE FRONT QUARTER TRIM PANEL ASSEMBLY LH
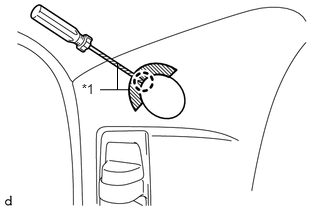
Apply protective tape as shown in the illustration.
| *1 | Protective Tape |
Using a screwdriver, detach the claw and open the cover.
- HINT:
-
Tape the screwdriver tip before use.
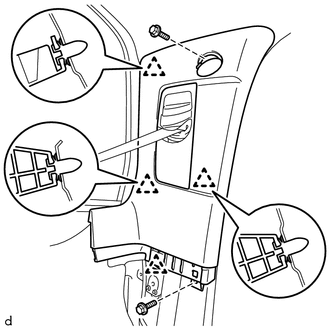
Remove the 2 bolts.
Detach the 4 clips and remove the front quarter trim panel assembly LH.
Pass the rear seat outer belt assembly through the hole of the front quarter trim panel assembly LH.
62510P
31.REMOVE FRONT QUARTER TRIM PANEL ASSEMBLY RH
- HINT:
-
Use the same procedure described for the LH side.
73034
32.REMOVE REAR SHOULDER BELT ANCHOR PLATE SUB-ASSEMBLY LH
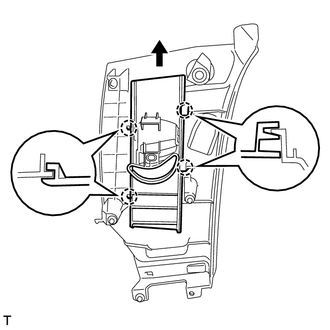
Detach the 4 claws of the rear shoulder belt anchor plate sub-assembly LH, and slide the rear shoulder belt anchor plate sub-assembly LH in the direction of the arrow to remove it.
73033
33.REMOVE REAR SHOULDER BELT ANCHOR PLATE SUB-ASSEMBLY RH
- HINT:
-
Use the same procedure described for the LH side.
63650A
34.REMOVE ROOF CONSOLE BOX ASSEMBLY
87834
35.REMOVE INNER REAR VIEW MIRROR STAY HOLDER COVER (w/ EC Mirror)
81240
36.REMOVE ROOM LIGHT ASSEMBLY
74320
37.REMOVE VISOR ASSEMBLY LH
74310
38.REMOVE VISOR ASSEMBLY RH
- HINT:
-
Use the same procedure described for the LH side.
74348
39.REMOVE VISOR HOLDER
74610A
40.REMOVE ASSIST GRIP SUB-ASSEMBLY
63310
41.REMOVE ROOF HEADLINING ASSEMBLY
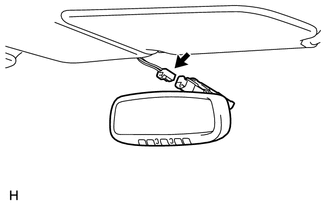
w/ EC Mirror:
Disconnect the connector.
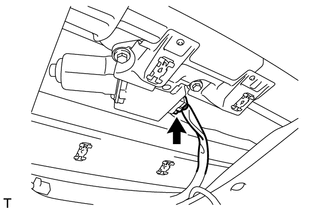
w/ Sliding Roof:
Disconnect the connector.
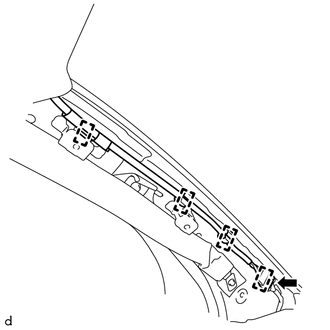
Disconnect the connector and detach the 4 wire harness clamps from the front pillar LH.
w/o Sliding Roof:
Detach the 4 clips and remove the roof headlining assembly.
w/ Sliding Roof:
Detach the 4 clips and 12 fasteners, and remove the roof headlining assembly.
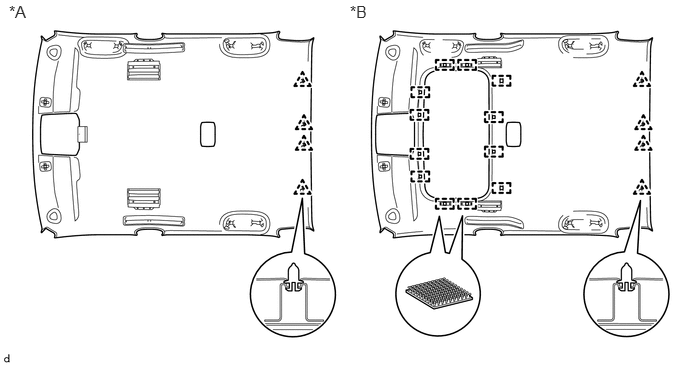
| *A | w/o Sliding Roof | *2 | w/ Sliding Roof |
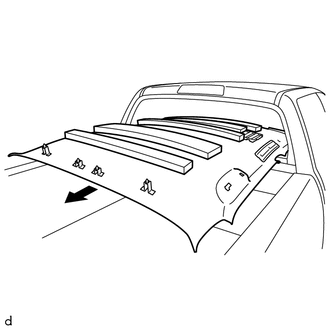
Take out the roof headlining assembly from the cabin as shown in the illustration.
- NOTICE:
-
Be careful not to damage the roof headlining assembly when taking it out.