DRIVE SHAFT / PROPELLER SHAFT FRONT DRIVE SHAFT ASSEMBLY INSTALLATION
PROCEDURE

 43420
1.INSTALL FRONT DRIVE SHAFT ASSEMBLY LH
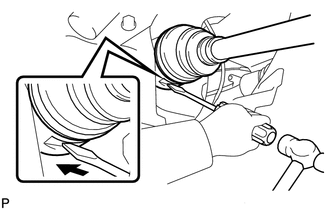
Coat the spline of the inboard joint with gear oil.
Align the inboard joint splines and install the drive shaft with a screwdriver and hammer.
- NOTICE:
- ·
Face the cut area of the front drive shaft hole snap ring downward.
·Do not damage the oil seal.
·Do not damage the inboard joint boot.
- HINT:
-
Confirm whether the drive shaft is securely driven in by checking the reaction force and sound.
43410
2.INSTALL FRONT DRIVE SHAFT ASSEMBLY RH
- HINT:
-
Use the same procedure for the RH side as for the LH side.
3.INSTALL FRONT AXLE ASSEMBLY LH
Push the front axle out of the vehicle to align the spline of the drive shaft with the front axle and insert the front axle.
- NOTICE:
- ·
Do not push the front axle further out of the vehicle than is necessary.
·Do not damage the outboard joint boot.
·Check for any foreign matter on the speed sensor rotor and insertion part.
·Do not damage the speed sensor rotor.
4.INSTALL FRONT AXLE ASSEMBLY RH
- HINT:
-
Use the same procedure for the RH side as for the LH side.
48069
5.INSTALL FRONT LOWER SUSPENSION ARM SUB-ASSEMBLY LH
48068
6.INSTALL FRONT LOWER SUSPENSION ARM SUB-ASSEMBLY RH
- HINT:
-
Use the same procedure for the RH side as for the LH side.
45047
7.INSTALL TIE ROD END SUB-ASSEMBLY LH
45046
8.INSTALL TIE ROD END SUB-ASSEMBLY RH
- HINT:
-
Use the same procedure for the RH side as for the LH side.
48810
9.INSTALL FRONT STABILIZER LINK ASSEMBLY LH
48820B
10.INSTALL FRONT STABILIZER LINK ASSEMBLY RH
- HINT:
-
Use the same procedure for the RH side as for the LH side.
89543
11.INSTALL FRONT SPEED SENSOR LH (w/ ABS)
89542
12.INSTALL FRONT SPEED SENSOR RH (w/ ABS)
- HINT:
-
Use the same procedure for the RH side as for the LH side.
43502H
13.INSTALL FRONT AXLE SHAFT NUT LH
Clean the threaded parts on the front drive shaft and axle shaft nut using a non-residue solvent.
- NOTICE:
- ·
Be sure to perform this work for a new front drive shaft.
·Keep the threaded parts free of oil and foreign objects.
Using a deep socket wrench 30 mm, install a new front axle shaft nut.
- Torque:
- 216 N*m (2203 kgf*cm, 159 ft.*lbf)
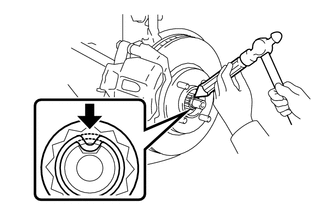
Using a chisel and hammer, stake the axle shaft nut.
43501H
14.INSTALL FRONT AXLE SHAFT NUT RH
- HINT:
-
Use the same procedure for the RH side as for the LH side.
15.ADD MANUAL TRANSAXLE OIL
16.ADD AUTOMATIC TRANSAXLE FLUID
17.INSPECT FOR OIL LEAK
51441C
18.INSTALL ENGINE UNDER COVER RH (for Plastic Type)
51442C
19.INSTALL ENGINE UNDER COVER LH (for Plastic Type)
51405A
20.INSTALL NO. 1 ENGINE UNDER COVER SUB-ASSEMBLY (for Metal Type)
21.INSTALL FRONT WHEEL
- Torque:
- 103 N*m (1050 kgf*cm, 76 ft.*lbf)
22.INSPECT AND ADJUST FRONT WHEEL ALIGNMENT