AXLE AND DIFFERENTIAL FRONT AXLE HUB INSTALLATION
CAUTION / NOTICE / HINT
- HINT:
- ·
Use the same procedure for the RH side as for the LH side.
·The procedure listed below is for the LH side.
PROCEDURE

 43502E
1.INSTALL FRONT AXLE HUB BEARING
43502C
2.INSTALL FRONT AXLE HUB SUB-ASSEMBLY
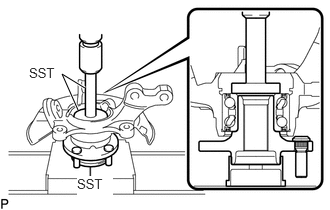
Using SST and a press, press the axle hub into the steering knuckle.
- SST
- 09950-70010 (09951-07100)
09950-60010 (09951-00580)
09608-32010
43502G
3.INSTALL FRONT AXLE HUB HOLE SNAP RING
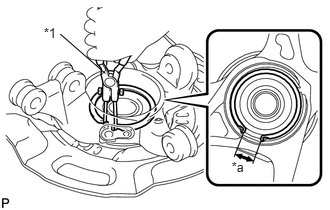
Using snap ring pliers, install a new axle hub hole snap ring, as shown in the illustration.
| *1 | Snap Ring Pliers |
| *a | Speed Sensor Installation Gap |
- NOTICE:
- ·
Do not overlap the end of the snap ring and the installation hole in the speed sensor on the knuckle side.
·Do not damage the magnetic rotor surface of the bearing when installing the snap ring.
4.INSTALL FRONT AXLE ASSEMBLY
Align the drive shaft splines and install the axle assembly.
- NOTICE:
- ·
Do not damage the lower ball joint.
·Do not damage the threads of the drive shaft.
·Do not damage the speed sensor rotor.
·Do not damage the drive shaft outboard joint boot.
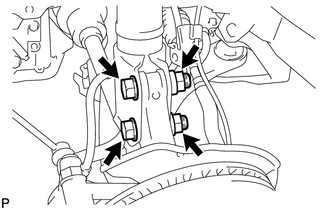
Install the front axle assembly onto the shock absorber with the 2 bolts and 2 nuts.
- Torque:
- 164 N*m (1672 kgf*cm, 121 ft.*lbf)
- HINT:
-
Keep the bolt from rotating while turning the nut.
48069
5.INSTALL FRONT LOWER SUSPENSION ARM
Install the lower arm onto the steering knuckle with a new castle nut.
- Torque:
- 98 N*m (999 kgf*cm, 72 ft.*lbf)
- NOTICE:
-
If the holes for the clip are not aligned, tighten the nut by a further turn of up to 60°.
Install a new clip.
45047
6.INSTALL TIE ROD END SUB-ASSEMBLY
Install the tie rod end sub-assembly onto the steering knuckle with a new castle nut.
- Torque:
- 49 N*m (500 kgf*cm, 36 ft.*lbf)
- NOTICE:
-
If the holes for the clip are not aligned, tighten the nut by a further turn of up to 60°.
Install a new cotter pin.
48810
7.INSTALL FRONT STABILIZER LINK ASSEMBLY
89543
8.INSTALL FRONT SPEED SENSOR (w/ ABS)
Install the speed sensor onto the steering knuckle with the bolt.
- Torque:
- 8.5 N*m (87 kgf*cm, 75 in.*lbf)
- NOTICE:
- ·
Check that the speed sensor tip and installation portion are free of foreign matter.
·Install the speed sensor without turning it from its original installation angle.
Install the flexible hose and speed sensor with the bolt.
- Torque:
- 29 N*m (300 kgf*cm, 22 ft.*lbf)
- NOTICE:
-
Install the flexible hose and speed sensor without twisting them.
9.INSPECT FRONT AXLE HUB BEARING BACKLASH
10.INSPECT FRONT AXLE HUB RUNOUT
43512
11.INSTALL FRONT DISC
12.INSTALL FRONT DISC BRAKE CALIPER ASSEMBLY
Install the disc brake caliper onto the steering knuckle.
- Torque:
- 107 N*m (1089 kgf*cm, 79 ft.*lbf)
43502H
13.INSTALL FRONT AXLE SHAFT NUT
14.INSTALL FRONT WHEEL
- Torque:
- 103 N*m (1050 kgf*cm, 76 ft.*lbf)
15.INSPECT AND ADJUST FRONT WHEEL ALIGNMENT
16. CHECK SPEED SENSOR SIGNAL (w/ ABS)
17. CHECK SPEED SENSOR SIGNAL (w/ VSC)