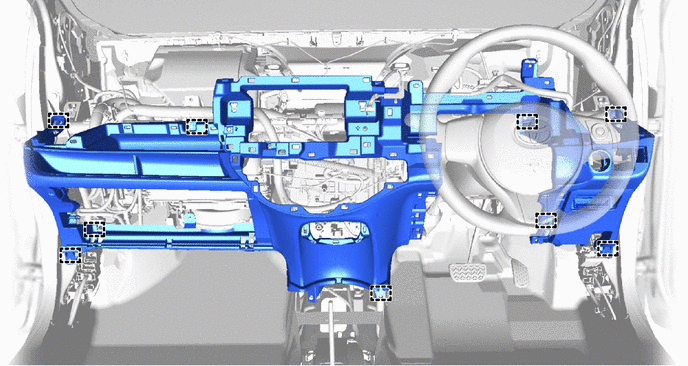
INTERIOR PANELS / TRIM LOWER INSTRUMENT PANEL REMOVAL
CAUTION / NOTICE / HINT
- HINT:
-
All bolts, screws and nuts relevant to installing and removing the instrument panel are shown, along with their alphabetic codes, in the table below.
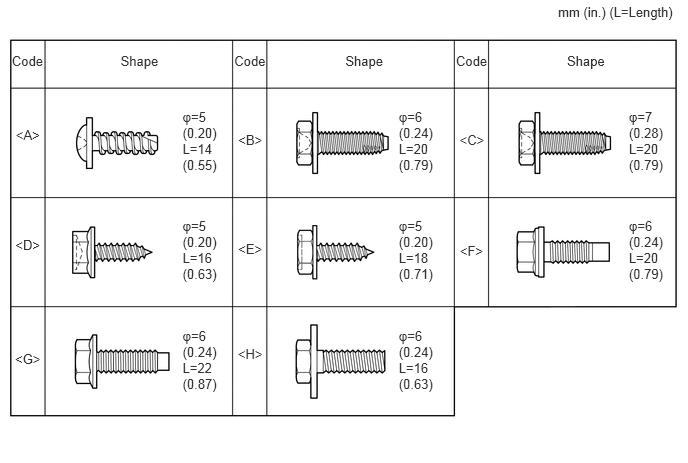 5.813,0.046 7.138,0.239 1.325,0.193 10 mm (in.) (L=Length) 1.902,1.135 2.354,1.800 0.452,0.665 10 φ=5 (0.20) L=14 (0.55) 0.123,0.554 0.478,0.716 0.355,0.162 10 Code 1.256,0.553 1.685,0.717 0.428,0.164 10 Shape 0.164,1.327 0.437,1.476 0.273,0.148 10 <A> 2.481,1.375 2.754,1.523 0.273,0.148 10 <B> 4.787,1.38 5.067,1.529 0.280,0.148 10 <C> 0.16,2.465 0.441,2.614 0.281,0.148 10 <D> 2.481,2.508 2.754,2.656 0.273,0.148 10 <E> 4.79,2.53 5.063,2.678 0.273,0.148 10 <F> 0.157,3.652 0.445,3.800 0.288,0.148 10 <G> 2.477,3.604 2.758,3.752 0.281,0.148 10 <H> 2.44,0.554 2.795,0.716 0.355,0.162 10 Code 3.597,0.553 4.025,0.717 0.428,0.164 10 Shape 4.749,0.554 5.104,0.716 0.355,0.162 10 Code 5.906,0.553 6.335,0.717 0.428,0.164 10 Shape 4.154,2.269 4.606,2.935 0.452,0.665 10 φ=5 (0.20) L=18 (0.71) 1.902,2.269 2.354,2.935 0.452,0.665 10 φ=5 (0.20) L=16 (0.63) 4.154,1.135 4.606,1.800 0.452,0.665 10 φ=6 (0.24) L=20 (0.79) 6.551,2.269 7.003,2.935 0.452,0.665 10 φ=6 (0.24) L=20 (0.79) 1.902,3.414 2.354,4.079 0.452,0.665 10 φ=6 (0.24) L=22 (0.87) 4.154,3.414 4.606,4.079 0.452,0.665 10 φ=6 (0.24) L=16 (0.63) 6.551,1.135 7.003,1.800 0.452,0.665 10 φ=7 (0.28) L=20 (0.79)
PROCEDURE

 55302A
1.REMOVE UPPER INSTRUMENT PANEL SUB-ASSEMBLY
67913
2.REMOVE FRONT DOOR SCUFF PLATE RH
67914
3.REMOVE FRONT DOOR SCUFF PLATE LH
- HINT:
-
Use the same procedure as for the RH side.
62111C
4.REMOVE COWL SIDE TRIM BOARD RH
62112
5.REMOVE COWL SIDE TRIM BOARD LH
- HINT:
-
Use the same procedure as for the RH side.
55405B
6.REMOVE INSTRUMENT CLUSTER FINISH CENTER PANEL SUB-ASSEMBLY
7.REMOVE RADIO RECEIVER ASSEMBLY WITH BRACKET (w/ Radio Receiver)
8.REMOVE NAVIGATION RECEIVER ASSEMBLY WITH BRACKET (w/ Navigation System)
55539C
9.REMOVE SPARE SWITCH HOLE COVER
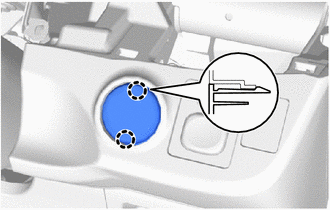
Disengage the 2 claws to remove the spare switch hole cover.
84870A
10.REMOVE OUTER MIRROR SWITCH ASSEMBLY
55539
11.REMOVE SPARE SWITCH HOLE COVER
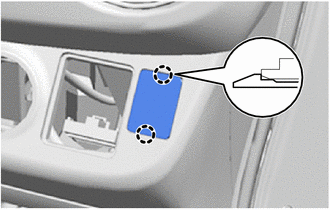
Disengage the 2 claws to remove the spare switch hole cover.
55606
12.REMOVE NO. 1 INSTRUMENT PANEL UNDER COVER SUB-ASSEMBLY
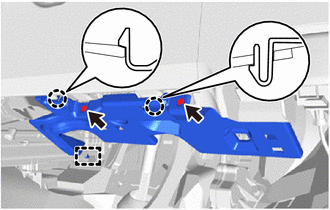
Remove the 2 <A> screws.
Disengage the 2 claw and the guide and remove the No. 1 instrument panel under cover sub-assembly.
73900
13.REMOVE LOWER NO. 1 INSTRUMENT PANEL AIRBAG ASSEMBLY
55900
14.REMOVE AIR CONDITIONING CONTROL ASSEMBLY (for Automatic Air Conditioning System)
15.REMOVE AIR CONDITIONING PANEL ASSEMBLY (for Manual Air Conditioning System)
55449D
16.REMOVE SWITCH BASE
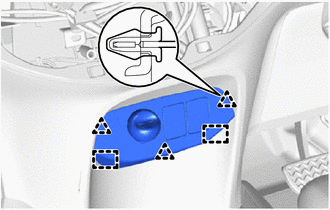
Disengage 3 clips and 2 guides.
Disconnect the connectors to remove the switch base.
55607
17.REMOVE NO. 2 INSTRUMENT PANEL UNDER COVER SUB-ASSEMBLY
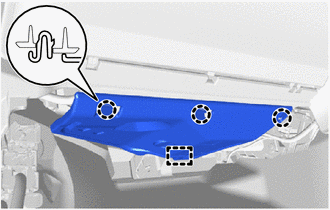
Disengage the 3 claws and guide to remove the No. 2 instrument panel under cover sub-assembly.
55550
18.REMOVE GLOVE COMPARTMENT DOOR ASSEMBLY
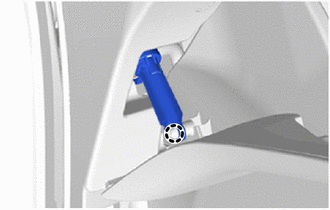
Disengage the claw to separate the glove compartment door stopper sub-assembly.
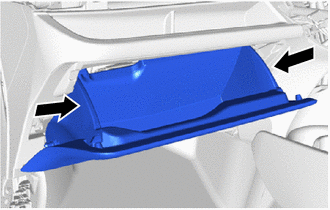
Slightly bend 2 stoppers in the directions indicated by the arrows in the illustration and pull the glove compartment door assembly until the stoppers are released.
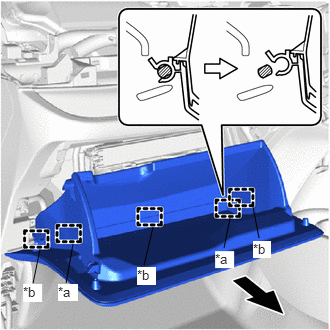
Pull the glove compartment door assembly out horizontally to disengage the 2 hinges and 3 guides to remove the glove compartment door assembly.
| *1 | Hinge |
| *2 | Guide |
- NOTICE:
-
Pull the glove compartment door assembly out horizontally. Otherwise, the hinge may be damaged, making re-installation impossible.
58910C
19.REMOVE REAR CONSOLE BOX ASSEMBLY
53601
20.SEPARATE HOOD LOCK CONTROL LEVER SUB-ASSEMBLY
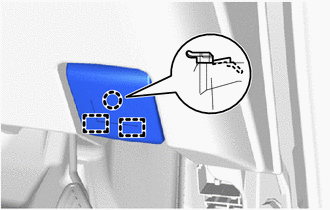
Disengage the claw and 2 guides to separate the hood lock control lever sub-assembly.
55303B
21.REMOVE LOWER INSTRUMENT PANEL SUB-ASSEMBLY
Disengage the clamps.
Disconnect the connectors.
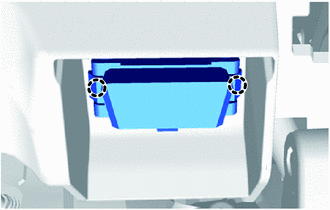
Disengage the 2 claws and disconnect the DLC3 connector.
Remove the 6 <B> or <C> bolts, <D> or <E> screw, 2 <F> or <G> or <H> bolts, and bolt from the lower instrument panel sub-assembly.
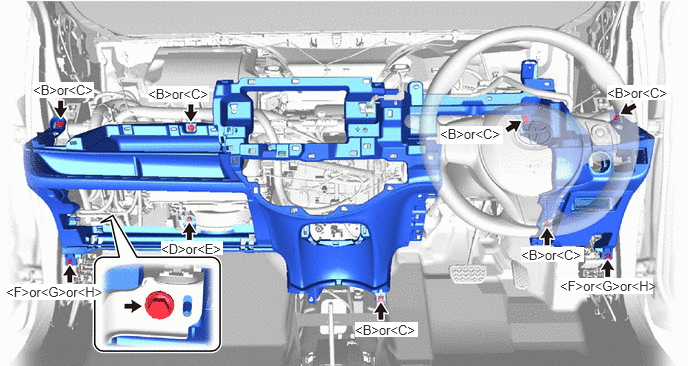
Disengage the 9 guides and remove the lower instrument panel sub-assembly.