FRONT SUSPENSION FRONT SUSPENSION MEMBER INSTALLATION
PROCEDURE

 12363A
1.TEMPORARILY INSTALL ENGINE MOVING CONTROL ROD (for Manual Transaxle)
Temporarily install the engine moving control rod to the front suspension crossmember sub-assembly with the bolt.
- HINT:
-
Temporarily install the transaxle side, and then tighten the bolt to the specified torque.
12363A
2.TEMPORARILY INSTALL ENGINE MOVING CONTROL ROD (for Automatic Transaxle and CVT)
Temporarily install the engine moving control rod to the front suspension crossmember sub-assembly with the bolt.
- HINT:
-
Temporarily install the transaxle side, and then tighten the bolt to the specified torque.
48069
3.TEMPORARILY INSTALL FRONT LOWER NO. 1 SUSPENSION ARM SUB-ASSEMBLY LH
Temporarily install the front lower No. 1 suspension arm sub-assembly LH to the front suspension crossmember sub-assembly with the bolt.
48068
4.TEMPORARILY INSTALL FRONT LOWER NO. 1 SUSPENSION ARM SUB-ASSEMBLY RH
- HINT:
-
Use the same procedure described for the LH side.
48811
5.INSTALL FRONT STABILIZER BAR
48829A
6.INSTALL FRONT NO. 1 STABILIZER BRACKET LH
48824A
7.INSTALL FRONT NO. 1 STABILIZER BRACKET RH
- HINT:
-
Use the same procedure described for the LH side.
8.INSTALL STEERING LINK ASSEMBLY
45025D
9.INSTALL NO. 1 STEERING COLUMN HOLE COVER SUB-ASSEMBLY
51201
10.INSTALL FRONT SUSPENSION CROSSMEMBER SUB-ASSEMBLY
Place wooden blocks or plate lift attachments on an engine lifter, and then set the front suspension crossmember sub-assembly so that the attachments are in the positions.
- NOTICE:
- ·
Place the wooden blocks or plate lift attachments so that the front suspension crossmember sub-assembly is level.
·As the front suspension crossmember sub-assembly is very heavy, be sure to support it securely.
Temporarily install the front suspension crossmember sub-assembly to the body with the 6 bolts.
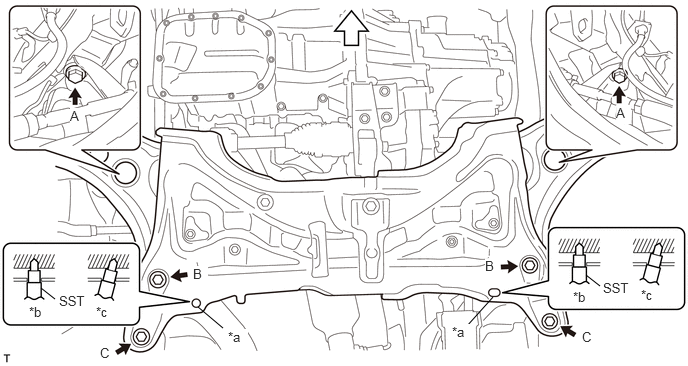
| *a | Datum Hole | *b | Correct |
| *c | Incorrect | - | - |

|
Front of the Vehicle | - | - |
By inserting SST into the datum holes in the front suspension crossmember sub-assembly RH and LH alternately, tighten bolts A, B and C on both sides to the specified torque, in several steps.
- SST
- 09670-00011
- Torque:
- Bolt A : 70 N*m (714 kgf*cm, 52 ft.*lbf)
- Bolt B : 165 N*m (1683 kgf*cm, 122 ft.*lbf)
- Bolt C : 95 N*m (969 kgf*cm, 70 ft.*lbf)
- NOTICE:
- ·
Insert SST into the datum hole in a vertical orientation.
·If SST cannot be inserted into the datum hole vertically, loosen all the bolts and then insert SST again.
Install the engine moving control rod to the engine moving control rod bracket with the bolt.
- Torque:
- 120 N*m (1224 kgf*cm, 89 ft.*lbf)
12363A
11.FULLY TIGHTEN ENGINE MOVING CONTROL ROD
Fully tighten the engine moving control rod to the front suspension crossmember sub-assembly with the bolt.
- Torque:
- 100 N*m (1020 kgf*cm, 74 ft.*lbf)
17410
12.INSTALL FRONT EXHAUST PIPE ASSEMBLY (for 1NR-FE)
17410
13.INSTALL FRONT EXHAUST PIPE ASSEMBLY (for 2NR-FE)
57533B
14.INSTALL FRONT FLOOR CENTER BRACE (for 1NR-FE)
57533B
15.INSTALL FRONT FLOOR CENTER BRACE (for 2NR-FE)
48069
16.INSTALL FRONT LOWER NO. 1 SUSPENSION ARM SUB-ASSEMBLY LH
48068
17.INSTALL FRONT LOWER NO. 1 SUSPENSION ARM SUB-ASSEMBLY RH
- HINT:
-
Use the same procedure described for the LH side.
45047
18.INSTALL TIE ROD END SUB-ASSEMBLY LH
45046
19.INSTALL TIE ROD END SUB-ASSEMBLY RH
- HINT:
-
Use the same procedure described for the LH side.
48819A
20.INSTALL FRONT STABILIZER BOLT LH
48819A
21.INSTALL FRONT STABILIZER BOLT RH
- HINT:
-
Use the same procedure described for the LH side.
45025D
22.INSTALL NO. 1 STEERING COLUMN HOLE COVER SUB-ASSEMBLY
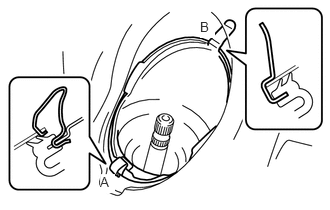
Engage clip B to the body portion and install the No. 1 steering column hole cover sub-assembly to the body portion with clip A.
- NOTICE:
-
Make sure that the lip portion of the No. 1 steering column hole cover sub-assembly is not damaged.
45209
23.INSTALL STEERING SLIDING YOKE SUB-ASSEMBLY
45259A
24.INSTALL COLUMN HOLE COVER SILENCER SHEET
25.INSTALL FRONT WHEELS
- Torque:
- 103 N*m (1050 kgf*cm, 76 ft.*lbf)
26.STABILIZE SUSPENSION
48069
27.FULLY TIGHTEN FRONT LOWER NO. 1 SUSPENSION ARM SUB-ASSEMBLY LH
48068
28.FULLY TIGHTEN FRONT LOWER NO. 1 SUSPENSION ARM SUB-ASSEMBLY RH
- HINT:
-
Use the same procedure described for the LH side.
29.INSPECT AND ADJUST FRONT WHEEL ALIGNMENT
51405A
30.INSTALL NO. 1 ENGINE UNDER COVER SUB-ASSEMBLY (w/ Metal Type Under Cover)
51451A
31.INSTALL CENTER ENGINE UNDER COVER (w/ Metal Type Under Cover)