BRAKE SYSTEM (OTHER) BRAKE BOOSTER(for LHD) REMOVAL
CAUTION / NOTICE / HINT
- NOTICE:
-
Make sure to release the vacuum from the brake booster assembly before removing the brake master cylinder sub-assembly from the brake booster assembly.
PROCEDURE

 47201
1.REMOVE BRAKE MASTER CYLINDER SUB-ASSEMBLY
55606
2.REMOVE NO. 1 INSTRUMENT PANEL UNDER COVER SUB-ASSEMBLY
for TMMIN Made:
Click hereVehicle Interior>INTERIOR PANELS / TRIM>INSTRUMENT PANEL SAFETY PAD>REMOVAL
for TMT Made without Knee Airbag:
Click hereVehicle Interior>INTERIOR PANELS / TRIM>UPPER INSTRUMENT PANEL>REMOVAL
55432B
3.REMOVE LOWER INSTRUMENT PANEL FINISH PANEL
for TMMIN Made:
Click hereVehicle Interior>INTERIOR PANELS / TRIM>INSTRUMENT PANEL SAFETY PAD>REMOVAL
for TMT Made without Knee Airbag:
Click hereVehicle Interior>INTERIOR PANELS / TRIM>UPPER INSTRUMENT PANEL>REMOVAL
73900
4.REMOVE LOWER NO. 1 INSTRUMENT PANEL AIRBAG ASSEMBLY (w/ Knee Airbag)
45259A
5.REMOVE COLUMN HOLE COVER SILENCER SHEET
for TMT Made:
Click hereSteering>STEERING COLUMN>STEERING COLUMN ASSEMBLY(for TMT Made)>REMOVAL
for TMMIN Made:
Click hereSteering>STEERING COLUMN>STEERING COLUMN ASSEMBLY(for TMMIN Made)>REMOVAL
45209
6.SEPARATE STEERING SLIDING YOKE SUB-ASSEMBLY
for TMT Made:
Click hereSteering>STEERING COLUMN>STEERING COLUMN ASSEMBLY(for TMT Made)>REMOVAL
for TMMIN Made:
Click hereSteering>STEERING COLUMN>STEERING COLUMN ASSEMBLY(for TMMIN Made)>REMOVAL
44510
7.REMOVE BRAKE ACTUATOR ASSEMBLY
for Manual Transaxle:
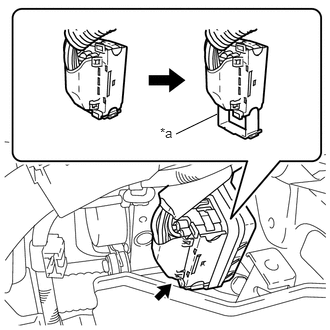
| *a | Lock Lever |
Release the lock lever and disconnect the brake actuator connector.
- NOTICE:
-
Be careful not to allow brake fluid to enter the removed connector.
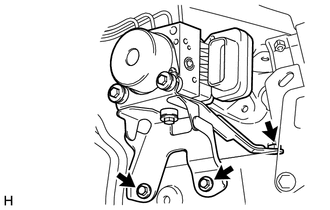
Remove the 3 bolts and brake actuator assembly with the brake actuator bracket assembly.
- NOTICE:
- ·
Do not damage the brake tubes or wire harness.
·Do not carry the brake actuator assembly with the brake actuator bracket assembly by the connector.
for CVT:
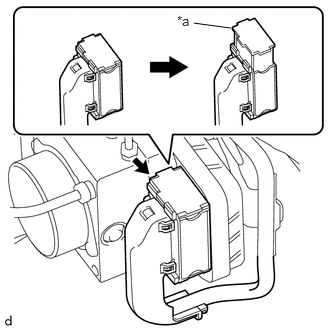
| *a | Lock Lever |
Release the lock lever and disconnect the brake actuator connector.
- NOTICE:
-
Be careful not to allow brake fluid to enter the removed connector.
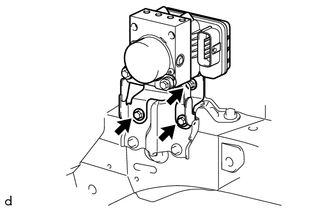
Remove the 3 bolts and brake actuator assembly with the brake actuator bracket assembly.
- NOTICE:
- ·
Do not damage the brake tubes or wire harness.
·Do not carry the brake actuator assembly with the brake actuator bracket assembly by the connector.
47315
8.REMOVE FRONT NO. 5 BRAKE TUBE
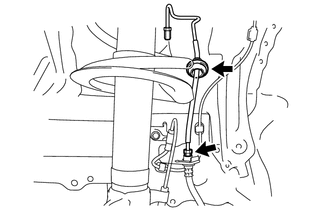
Using a 10 mm union nut wrench, disconnect the front No. 5 brake tube from the front flexible hose while holding the front flexible hose with a wrench.
- NOTICE:
- ·
Do not bend or damage the brake tube.
·Do not allow any foreign matter such as dirt or dust to enter the brake tube from the connecting parts.
Remove the grommet to remove the front No. 5 brake tube from the body.
44772
9.DISCONNECT CHECK VALVE TO CONNECTOR TUBE HOSE (for CVT)
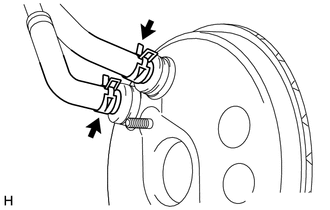
Loosen the 2 hose clips and disconnect the 2 check valve to connector tube hoses from the 2 brake vacuum check valve assemblies.
44772
10.DISCONNECT CHECK VALVE TO CONNECTOR TUBE HOSE (for Manual Transaxle)
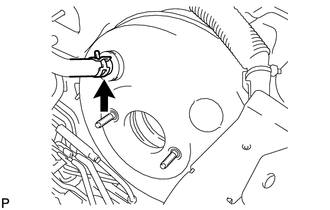
Loosen the hose clip and disconnect the check valve to connector tube hose from the brake vacuum check valve assembly.
84340
11.REMOVE STOP LIGHT SWITCH ASSEMBLY
12.SEPARATE WIRE HARNESS
47101A
13.REMOVE BRAKE PEDAL RETURN SPRING
47264D
14.REMOVE BRAKE MASTER CYLINDER PUSH ROD CLEVIS
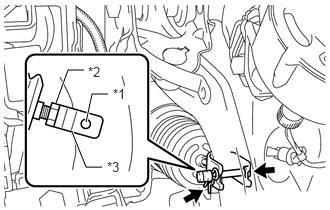
| *1 | Push Rod Pin |
| *2 | Clevis Lock Nut |
| *3 | Brake Master Cylinder Push Rod Clevis |
Loosen the clevis lock nut of the brake master cylinder push rod clevis.
Remove the clip and push rod pin to separate the brake master cylinder push rod clevis from the brake pedal sub-assembly.
Remove the brake master cylinder push rod clevis and clevis lock nut from the brake booster assembly.
44610
15.REMOVE BRAKE BOOSTER ASSEMBLY
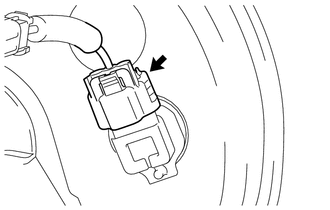
Disconnect the vacuum sensor assembly connector.
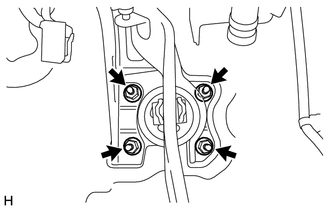
Remove the 4 nuts and brake booster assembly from the body.
Remove the brake booster gasket from the brake booster assembly.