M15A-FXE ENGINE CONTROL SFI SYSTEM P042000 Catalyst System Efficiency Below Threshold Bank 1
MONITOR DESCRIPTION
The ECM uses air fuel ratio sensors mounted in front of and behind the Three-Way Catalytic Converter (TWC) to monitor its efficiency.
The first sensor, the air fuel ratio sensor (sensor 1), sends pre-catalyst information to the ECM. The second sensor, the air fuel ratio sensor (sensor 2), sends post-catalyst information to the ECM.
In order to detect any deterioration in the three-way catalytic converter, the ECM calculates the oxygen storage capacity of the three-way catalytic converter. This calculation is based on the output current of the air fuel ratio sensor (sensor 2) while performing active air fuel ratio control.
The oxygen storage capacity value is an indication of the oxygen storage capacity of the three-way catalytic converter. When the vehicle is being driven with a warm engine, active air fuel ratio control is performed for approximately 30 seconds. When it is performed, the ECM deliberately sets the air fuel ratio to lean or rich levels. If the cycle of the waveform for the air fuel ratio sensor (sensor 2) is long, the oxygen storage capacity is great. There is a direct correlation between the air fuel ratio sensor (sensor 2) and the oxygen storage capacity of the three-way catalytic converter.
The ECM uses the oxygen storage capacity value to determine the state of the three-way catalytic converter. If any deterioration has occurred, the ECM will illuminate the MIL and store a DTC.
This system determines the deterioration of the entire catalyst system (including the front and rear catalysts), by using the oxygen storage capacity value of the front catalyst, that is more sensitive than the rear catalyst, as the representative value. Therefore, be sure to replace the front and rear catalysts together when catalyst replacement is necessary.
| DTC No. | Detection Item | DTC Detection Condition | Trouble Area | MIL | Memory | Note |
|---|---|---|---|---|---|---|
| P042000 | Catalyst System Efficiency Below Threshold Bank 1 | The oxygen storage capacity value is less than the standard value under active air fuel ratio control (2 trip detection logic). | ·
Gas leak from exhaust system ·
Air fuel ratio sensor (sensor 1) ·
Air fuel ratio sensor (sensor 2) ·
Exhaust manifold (TWC: Front catalyst) ·
Front exhaust pipe assembly (TWC: Rear catalyst) ·
EGR valve assembly |
Comes on | DTC stored | SAE Code: P0420 |
CATALYST LOCATION
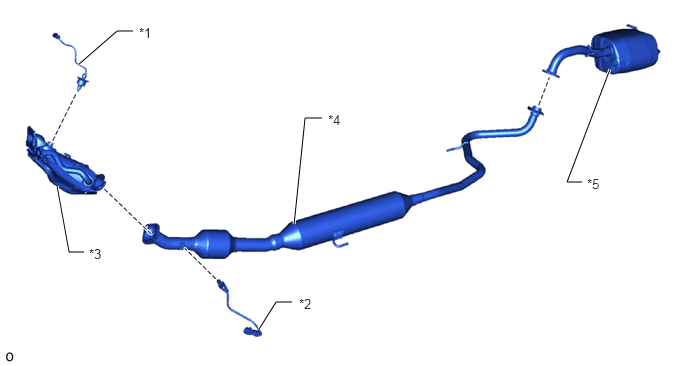
| *1 | Air Fuel Ratio Sensor (Sensor 1) | *2 | Air Fuel Ratio Sensor (Sensor 2) |
| *3 | Exhaust Manifold (TWC: Front Catalyst) | *4 | Front Exhaust Pipe Assembly (TWC: Rear Catalyst) |
| *5 | Tail Exhaust Pipe Assembly | - | - |
- NOTICE:
-
When replacing the exhaust manifold (*3) and the front exhaust pipe assembly (*4) in order to replace the three-way catalytic converter, it is not necessary to replace the air fuel ratio sensor (sensor 1) (*1) or the air fuel ratio sensor (sensor 2) (*2).
MONITOR STRATEGY
| Required Sensors/Components (Main) | Air fuel ratio sensor (sensor 1)
Air fuel ratio sensor (sensor 2) |
| Required Sensors/Components (Related) | Intake air temperature sensor
Mass air flow meter Crankshaft position sensor Engine coolant temperature sensor |
| Frequency of Operation | Once per driving cycle |
TYPICAL ENABLING CONDITIONS
| Auxiliary battery voltage | 11 V or higher |
| Intake air temperature | -10°C (14°F) or higher |
| Engine coolant temperature | 75°C (167°F) or higher |
| Atmospheric pressure | 76 kPa (abs) [11 psi (abs)] or higher |
| Idling | Off |
| Engine speed | Less than 4000 rpm |
| Air fuel ratio sensor (sensor 1) status | Activated |
| Fuel system status | Closed loop |
| Engine load | 10% or higher, and less than 80% |
| All of the following conditions are met | 1, 2 and 3 |
| 1. Mass air flow | 5 gm/sec or more, and less than 40 gm/sec |
| 2. Front catalyst temperature (estimated) | 510°C (950°F) or higher, and less than 800°C (1472°F) |
| 3. Rear catalyst temperature (estimated) | 400°C (752°F) or higher, and less than 880°C (1616°F) |
CONFIRMATION DRIVING PATTERN
- HINT:
- ·
It is necessary for the response of the air fuel ratio sensor (sensor 2) to be normal in order to confirm DTC P042000. Therefore, perform the confirmation driving pattern for the air fuel ratio sensor (sensor 2) monitor before performing the confirmation driving pattern for the catalyst efficiency monitor.
·Performing this confirmation driving pattern will activate the catalyst efficiency monitor. This is very useful for verifying the completion of a repair.
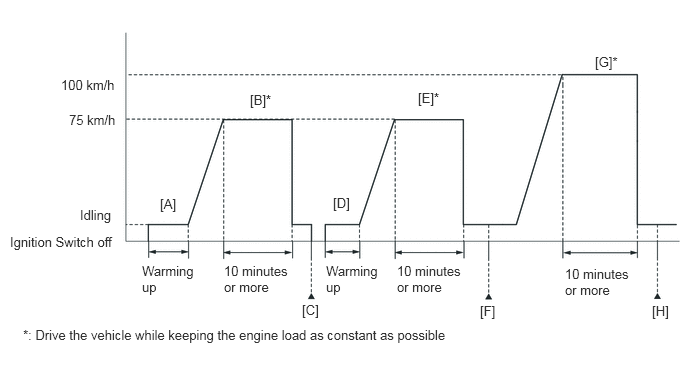
Connect the GTS to the DLC3.
Turn the ignition switch to ON.
Turn the GTS on.
Clear the DTCs (even if no DTCs are stored, perform the clear DTC procedure).
Turn the ignition switch off and wait for at least 30 seconds.
Turn the ignition switch to ON.
Turn the GTS on.
Put the engine in Inspection Mode (Maintenance Mode).
Click hereGeneral>INTRODUCTION>REPAIR INSTRUCTION>INSPECTION MODE PROCEDURE
Start the engine and warm it up until the engine coolant temperature is 75°C (167°F) or higher with the shift lever in P [A].
- HINT:
-
In order to keep the idle stable, turn the A/C and all other electric loads off and do not perform any shift operations.
With the engine running, drive the vehicle at approximately 75 km/h (47 mph) for 10 minutes or more [B].
- CAUTION:
-
When performing the confirmation driving pattern, obey all speed limits and traffic laws.
- HINT:
- ·
Drive the vehicle while keeping the engine load as constant as possible.
·If the engine stops, further depress the accelerator pedal to restart the engine.
Turn the ignition switch off and wait for at least 30 seconds [C].
Turn the ignition switch to ON.
Turn the GTS on.
Put the engine in Inspection Mode (Maintenance Mode).
Click hereGeneral>INTRODUCTION>REPAIR INSTRUCTION>INSPECTION MODE PROCEDURE
Start the engine and warm it up until the engine coolant temperature is 75°C (167°F) or higher [D].
With the engine running, drive the vehicle at approximately 75 km/h (47 mph) for 10 minutes or more [E].
- CAUTION:
-
When performing the confirmation driving pattern, obey all speed limits and traffic laws.
- HINT:
- ·
Drive the vehicle while keeping the engine load as constant as possible.
·If the engine stops, further depress the accelerator pedal to restart the engine.
Enter the following menus: Powertrain / Engine / Trouble Codes [F].
Read the pending DTCs.
- HINT:
- ·
If a pending DTC is output, the system is malfunctioning.
·If a pending DTC is not output, perform the following procedure.
Enter the following menus: Powertrain / Engine / Utility / All Readiness.
Input the DTC: P042000.
Check the DTC judgment result.
| GTS Display | Description |
|---|---|
| NORMAL | ·
DTC judgment completed ·
System normal |
| ABNORMAL | ·
DTC judgment completed ·
System abnormal |
| INCOMPLETE | ·
DTC judgment not completed ·
Perform driving pattern after confirming DTC enabling conditions |
- HINT:
- ·
If the judgment result is NORMAL, the system is normal.
·If the judgment result is ABNORMAL, the system is malfunctioning.
·If the judgment result is INCOMPLETE, perform the following procedure.
Drive the vehicle at 100 km/h (63 mph) for 10 minutes or more [G].
- CAUTION:
-
When performing the confirmation driving pattern, obey all speed limits and traffic laws.
- HINT:
- ·
Drive the vehicle while keeping the engine load as constant as possible.
·If the engine stops, further depress the accelerator pedal to restart the engine.
Enter the following menus: Powertrain / Engine / Trouble Codes [H].
Read the pending DTCs.
- HINT:
- ·
If a pending DTC is output, the system is malfunctioning.
·If a pending DTC is not output, perform the following procedure.
Enter the following menus: Powertrain / Engine / Utility / All Readiness.
Input the DTC: P042000.
Check the DTC judgment result.
| GTS Display | Description |
|---|---|
| NORMAL | ·
DTC judgment completed ·
System normal |
| ABNORMAL | ·
DTC judgment completed ·
System abnormal |
| INCOMPLETE | ·
DTC judgment not completed ·
Perform driving pattern after confirming DTC enabling conditions |
- HINT:
- ·
If the judgment result is NORMAL, the system is normal.
·If the judgment result is ABNORMAL, the system is malfunctioning.
CAUTION / NOTICE / HINT
- NOTICE:
- ·
Vehicle Control History may be stored in the hybrid vehicle control ECU assembly if the engine is malfunctioning. Certain vehicle condition information is recorded when Vehicle Control History is stored. Reading the vehicle conditions recorded in both the freeze frame data and Vehicle Control History can be useful for troubleshooting.
Click hereEngine / Hybrid System>HYBRID / BATTERY CONTROL>HYBRID CONTROL SYSTEM>VEHICLE CONTROL HISTORY
(Select Powertrain in Health Check and then check the time stamp data.)
Click hereEngine / Hybrid System>M15A-FXE (ENGINE CONTROL)>SFI SYSTEM>DTC CHECK / CLEAR
·If any "Engine Malfunction" Vehicle Control History item has been stored in the hybrid vehicle control ECU assembly, make sure to clear it. However, as all Vehicle Control History items are cleared simultaneously, if any Vehicle Control History items other than "Engine Malfunction" are stored, make sure to perform any troubleshooting for them before clearing Vehicle Control History.
Click hereEngine / Hybrid System>HYBRID / BATTERY CONTROL>HYBRID CONTROL SYSTEM>VEHICLE CONTROL HISTORY
- HINT:
- ·
If a malfunction cannot be found when troubleshooting DTC P042000, a lean or rich abnormality may be the cause. Perform troubleshooting by following the inspection procedure for P017100 (System Too Lean) and P017200 (System Too Rich).
·Sensor 1 refers to the sensor closest to the engine assembly.
·Sensor 2 refers to the sensor farthest away from the engine assembly.
·Read Freeze Frame Data using the GTS. The ECM records vehicle and driving condition information as Freeze Frame Data the moment a DTC is stored. When troubleshooting, Freeze Frame Data can help determine if the vehicle was moving or stationary, if the engine was warmed up or not, if the air fuel ratio was lean or rich, and other data from the time the malfunction occurred.
PROCEDURE
Read the DTCs.
- Powertrain > Engine > Trouble Codes
- 50001 372
- Result:
Result Proceed to P042000 and other DTCs are output A P042000 is output B
- HINT:
-
If any DTCs other than P042000 are output, troubleshoot those DTCs first.
A
B
Pre-procedure1
Put the engine in Inspection Mode (Maintenance Mode).
- Powertrain > Hybrid Control > Utility
-
Tester Display Inspection Mode - 50005 397 2103
Start the engine and warm it up until the engine coolant temperature is 75°C (167°F) or higher.
Idle the engine for 5 minutes or more with the shift lever in P.
Procedure1
Change the fuel injection volume using the GTS, and monitor the output current of the air fuel ratio sensor (sensor 1) (A/F (O2) Sensor Current B1S1) and air fuel ratio sensor (sensor 2) (A/F (O2) Sensor Current B1S2) displayed on the GTS.
- Powertrain > Engine > Active Test
-
Active Test Display Control the Injection Volume for A/F Sensor -
Data List Display Coolant Temperature Injection Volume A/F (O2) Sensor Current B1S1 A/F (O2) Sensor Current B1S2 - 50004 372 8 205,277,230,564
- HINT:
- ·
The Active Test "Control the Injection Volume for A/F Sensor" can be used to lower the fuel injection volume by 12.5% or increase the injection volume by 12.5%.
·The air fuel ratio sensor (sensor 1) is displayed as A/F (O2) Sensor Current B1S1, and the air fuel ratio sensor (sensor 2) is displayed as A/F (O2) Sensor Current B1S2 on the GTS.
·The air fuel ratio sensor (sensor 1) has an output delay of a few seconds and the air fuel ratio sensor (sensor 2) has a maximum output delay of approximately 20 seconds.
·If the sensor output current does not change (almost no reaction) while performing the Active Test, the sensor may be malfunctioning.
- Standard:
GTS Display
(Sensor)Injection Volume Status Current A/F (O2) Sensor Current B1S1
(Air fuel ratio (sensor 1))12.5% Rich Below -0.075 mA -12.5% Lean Higher than 0.037 mA A/F (O2) Sensor Current B1S2
(Air fuel ratio (sensor 2))12.5% Rich Below -0.86 mA -12.5% Lean Higher than 0.33 mA
Post-procedure1
None.
- Result:
Status A/F (O2) Sensor Current B1S1 Status A/F (O2) Sensor Current B1S2 Actual air fuel ratio, air fuel ratio sensor (sensor 1) and air fuel ratio sensor (sensor 2) condition Main Suspected Trouble Area Proceed to Lean/Rich Lean/Rich Normal ·Three-way catalytic converter
·Gas leak from exhaust system
·EGR valve assembly
A Lean Lean/Rich Air fuel ratio sensor (sensor 1) malfunction ·Air fuel ratio sensor (sensor 1)
B Rich Lean/Rich Air fuel ratio sensor (sensor 1) malfunction ·Air fuel ratio sensor (sensor 1)
B Lean/Rich Lean Air fuel ratio sensor (sensor 2) malfunction ·Air fuel ratio sensor (sensor 2)
·Gas leak from exhaust system
C Lean/Rich Rich Air fuel ratio sensor (sensor 2) malfunction ·Air fuel ratio sensor (sensor 2)
·Gas leak from exhaust system
C Lean Lean Actual air fuel ratio lean ·Extremely lean actual air fuel ratio
·Gas leak from exhaust system
·EGR valve assembly
D Rich Rich Actual air fuel ratio rich ·Extremely rich actual air fuel ratio
·Gas leak from exhaust system
·EGR valve assembly
D
Lean: During the Control the Injection Volume for A/F Sensor Active Test, the air fuel ratio sensor (sensor 1) output current (A/F (O2) Sensor Current B1S1) is consistently higher than 0.037 mA, and the air fuel ratio sensor (sensor 2) output current (A/F (O2) Sensor Current B1S2) is consistently higher than 0.33 mA.
Rich: During the Control the Injection Volume for A/F Sensor Active Test, the air fuel ratio sensor (sensor 1) output current (A/F (O2) Sensor Current B1S1) is consistently below -0.075 mA, and the air fuel ratio sensor (sensor 2) output current (A/F (O2) Sensor Current B1S2) is consistently below -0.86 mA.
Lean/Rich: During the Control the Injection Volume for A/F Sensor Active Test, the output current of the air fuel ratio sensor (sensor 1) or air fuel ratio sensor (sensor 2) alternate correctly.
- HINT:
-
Refer to "Data List / Active Test" [A/F (O2) Sensor Current B1S1, A/F (O2) Sensor Current B1S2].
-
Click hereEngine / Hybrid System>M15A-FXE (ENGINE CONTROL)>SFI SYSTEM>DATA LIST / ACTIVE TEST
A
B
C
D
Check for exhaust gas leaks.
- OK:
No gas leaks in exhaust system.
- Result:
Proceed to OK NG
OK
NG
Pre-procedure1
Put the engine in Inspection Mode (Maintenance Mode).
- Powertrain > Hybrid Control > Utility
-
Tester Display Inspection Mode - 50005 397 2103
Start the engine and warm it up until the engine coolant temperature is 75°C (167°F) or higher.
- HINT:
-
The A/C switch and all accessories should be off.
Procedure1
Confirm that the value of Data List item Engine Independent is "Operate" and then check the value of Intake Manifold Absolute Pressure while performing the Active Test.
- Powertrain > Engine > Active Test
-
Active Test Display Control the EGR Step Position -
Data List Display Intake Manifold Absolute Pressure Coolant Temperature EGR Step Position Engine Independent - 50004 372 25 385,205,386,428
- NOTICE:
- ·
Make sure that the value of Data List item Engine Independent is "Operate" while performing the Active Test.
·Do not leave the EGR valve open for 10 seconds or more during the Active Test.
·Be sure to return the EGR valve to step 0 when the Active Test is completed.
·Do not open the EGR valve 30 steps or more during the Active Test.
- OK:
The value of Intake Manifold Absolute Pressure changes in response to the EGR step position when the value of Engine Independent is "Operate".
- Standard:
- Control the EGR Step Position (Active Test) 0 Steps 0 to 30 Steps Intake Manifold Absolute Pressure
(Data List)(EGR valve is fully closed) Intake Manifold Absolute Pressure value is at least +10 kPa (1.45 psi) higher than when the EGR valve is fully closed
- HINT:
- ·
If the value of Data List item Engine Independent is "Not Opr" when the engine is idling, charge control is being performed. Perform the Active Test after charge control is complete ("Operate" is displayed).
·While performing the Active Test, if the increase in the value of Intake Manifold Absolute Pressure is small, the EGR valve assembly may be malfunctioning.
·Even if the EGR valve assembly is malfunctioning, rough idling or an increase in the value of Intake Manifold Absolute Pressure may occur while performing the Active Test. However, the amount that the value of Intake Manifold Absolute Pressure increases will be smaller than normal.
Post-procedure1
None.
- Result:
Proceed to OK NG
OK
NG
Pre-procedure1
Remove the EGR valve assembly.
Procedure1
Check if the EGR valve is stuck open.
- OK:
EGR valve is tightly closed.
Post-procedure1
None.
- Result:
Proceed to OK NG
OK
NG
Click hereEngine / Hybrid System>M15A-FXE (EMISSION CONTROL)>EGR VALVE>REMOVAL
- HINT:
-
Perform "Inspection After Repair" after replacing the EGR valve assembly.
-
Click hereEngine / Hybrid System>M15A-FXE (ENGINE CONTROL)>SFI SYSTEM>INITIALIZATION
- HINT:
- ··
Perform "Inspection After Repair" after replacing the air fuel ratio sensor (sensor 1).
Click hereEngine / Hybrid System>M15A-FXE (ENGINE CONTROL)>SFI SYSTEM>INITIALIZATION
- Result:
Proceed to NEXT
NEXT
Check for exhaust gas leaks.
- OK:
No gas leaks in exhaust system.
- Result:
Proceed to OK NG
OK
NG
- HINT:
- ··
Perform "Inspection After Repair" after replacing the air fuel ratio sensor (sensor 2).
Click hereEngine / Hybrid System>M15A-FXE (ENGINE CONTROL)>SFI SYSTEM>INITIALIZATION
- Result:
Proceed to NEXT
NEXT
Check for exhaust gas leaks.
- OK:
No gas leaks in exhaust system.
- Result:
Proceed to OK NG
OK
NG
Pre-procedure1
Put the engine in Inspection Mode (Maintenance Mode).
- Powertrain > Hybrid Control > Utility
-
Tester Display Inspection Mode - 50005 397 2103
Start the engine and warm it up until the engine coolant temperature is 75°C (167°F) or higher.
- HINT:
-
The A/C switch and all accessories should be off.
Procedure1
Confirm that the value of Data List item Engine Independent is "Operate" and then check the value of Intake Manifold Absolute Pressure while performing the Active Test.
- Powertrain > Engine > Active Test
-
Active Test Display Control the EGR Step Position -
Data List Display Intake Manifold Absolute Pressure Coolant Temperature EGR Step Position Engine Independent - 50004 372 25 385,205,386,428
- NOTICE:
- ·
Make sure that the value of Data List item Engine Independent is "Operate" while performing the Active Test.
·Do not leave the EGR valve open for 10 seconds or more during the Active Test.
·Be sure to return the EGR valve to step 0 when the Active Test is completed.
·Do not open the EGR valve 30 steps or more during the Active Test.
- OK:
The value of Intake Manifold Absolute Pressure changes in response to the EGR step position when the value of Engine Independent is "Operate".
- Standard:
- Control the EGR Step Position (Active Test) 0 Steps 0 to 30 Steps Intake Manifold Absolute Pressure
(Data List)(EGR valve is fully closed) Intake Manifold Absolute Pressure value is at least +10 kPa (1.45 psi) higher than when EGR valve is fully closed
- HINT:
- ·
If the value of Data List item Engine Independent is "Not Opr" when the engine is idling, charge control is being performed. Perform the Active Test after charge control is complete ("Operate" is displayed).
·While performing the Active Test, if the increase in the value of Intake Manifold Absolute Pressure is small, the EGR valve assembly may be malfunctioning.
·Even if the EGR valve assembly is malfunctioning, rough idling or an increase in the value of Intake Manifold Absolute Pressure may occur while performing the Active Test. However, the amount that the value of Intake Manifold Absolute Pressure increases will be smaller than normal.
Post-procedure1
None.
- Result:
Proceed to OK NG
OK
NG
Remove the EGR valve assembly.
Check if the EGR valve is stuck open.
- OK:
EGR valve is tightly closed.
- Result:
Proceed to OK NG
OK
NG
Click hereEngine / Hybrid System>M15A-FXE (EMISSION CONTROL)>EGR VALVE>REMOVAL
- HINT:
-
Perform "Inspection After Repair" after replacing the EGR valve assembly.
-
Click hereEngine / Hybrid System>M15A-FXE (ENGINE CONTROL)>SFI SYSTEM>INITIALIZATION
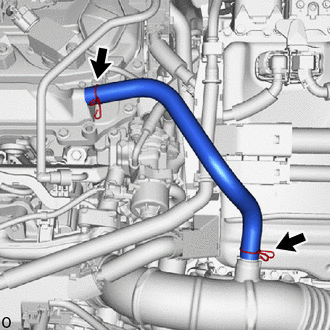
Check the PCV hose connections.
Check the PCV valve.
Click hereEngine / Hybrid System>M15A-FXE (EMISSION CONTROL)>PCV VALVE>INSPECTION
- OK:
The PCV hose and PCV valve are connected correctly and are not damaged.
- Result:
Proceed to OK NG
OK
NG
Check the intake system for vacuum leaks.
Click hereEngine / Hybrid System>M15A-FXE (INTAKE / EXHAUST)>INTAKE SYSTEM>ON-VEHICLE INSPECTION
- OK:
No leaks in intake system.
- Result:
Proceed to OK NG
OK
NG
- HINT:
-
Perform "Inspection After Repair" after repairing or replacing the intake system.
-
Click hereEngine / Hybrid System>M15A-FXE (ENGINE CONTROL)>SFI SYSTEM>INITIALIZATION
Read the Data List twice, when the engine is both cold and warmed up.
- Powertrain > Engine > Data List
-
Tester Display Coolant Temperature - 50003 372 205
- Standard:
GTS Display Condition Specified Condition Coolant Temperature Cold engine Same as ambient air temperature Warm engine Between 75 and 100°C (167 and 212°F)
- Result:
Proceed to OK NG
OK
NG
Click hereEngine / Hybrid System>M15A-FXE (ENGINE CONTROL)>ENGINE COOLANT TEMPERATURE SENSOR>REMOVAL
- HINT:
-
Perform "Inspection After Repair" after replacing the engine coolant temperature sensor.
-
Click hereEngine / Hybrid System>M15A-FXE (ENGINE CONTROL)>SFI SYSTEM>INITIALIZATION
Pre-procedure1
Put the engine in Inspection Mode (Maintenance Mode).
- Powertrain > Hybrid Control > Utility
-
Tester Display Inspection Mode - 50005 397 2103
Start the engine and warm it up until the engine coolant temperature is 75°C (167°F) or higher with all the accessories switched off and shift position N.
Procedure1
Read the Mass Air Flow Sensor while maintaining an engine speed of 2500 rpm.
- Powertrain > Engine > Data List
-
Tester Display Engine Speed Mass Air Flow Sensor Coolant Temperature - 50003 372 211,215,205
- HINT:
-
During charge control, the engine speed is set at idle. Therefore, the engine speed will not increase when the accelerator pedal is depressed. In this case, read the Data List after charge control has completed.
Post-procedure1
None.
- Result:
Result Proceed to The value of Mass Air Flow Sensor is between 4.0 gm/sec and 18.6 gm/sec A None of the above conditions are met B
A
B
Click hereEngine / Hybrid System>M15A-FXE (FUEL)>FUEL SYSTEM>ON-VEHICLE INSPECTION
- Result:
Proceed to OK NG
OK
NG
Click hereEngine / Hybrid System>M15A-FXE (ENGINE CONTROL)>IGNITION SYSTEM>ON-VEHICLE INSPECTION
- HINT:
-
If the spark plugs or ignition system malfunctions, engine misfire may occur. The misfire count can be read using the GTS. Enter the following menus: Powertrain / Engine / Data List / Misfire Count Cylinder #1 to Misfire Count Cylinder #3.
- Result:
Proceed to OK NG
OK
NG
- HINT:
-
Perform "Inspection After Repair" after repairing or replacing the ignition system.
-
Click hereEngine / Hybrid System>M15A-FXE (ENGINE CONTROL)>SFI SYSTEM>INITIALIZATION
Check the injection and volume.
- HINT:
- ·
Refer to the fuel injector assembly inspection procedure.
Click hereEngine / Hybrid System>M15A-FXE (FUEL)>FUEL INJECTOR>INSPECTION
·If the fuel injector assemblies malfunction, engine misfire may occur. The misfire count can be read using the GTS. Enter the following menus: Powertrain / Engine / Data List / Misfire Count Cylinder #1 to Misfire Count Cylinder #3.
- Result:
Proceed to OK NG
OK
NG
Click hereEngine / Hybrid System>M15A-FXE (FUEL)>FUEL INJECTOR>REMOVAL
- HINT:
-
Perform "Inspection After Repair" after replacing the fuel injector assembly.
-
Click hereEngine / Hybrid System>M15A-FXE (ENGINE CONTROL)>SFI SYSTEM>INITIALIZATION
Check the connection and terminal contact pressure of connectors and wire harnesses between the mass air flow meter and ECM.
- HINT:
-
Repair any problems.
- Result:
Proceed to NEXT
NEXT
Pre-procedure1
None.
Procedure1
Clear the DTCs.
- Powertrain > Engine > Clear DTCs
- 50002 372
Post-procedure1
Turn the ignition switch off and wait for at least 30 seconds.
- Result:
Proceed to NEXT
NEXT
Pre-procedure1
Drive the vehicle in accordance with the driving pattern described in Confirmation Driving Pattern.
Procedure1
Read the DTCs.
- Powertrain > Engine > Trouble Codes
- 50001 372
Post-procedure1
None.
- Result:
Result Proceed to DTCs are not output A P042000 is output B
A
B
Pre-procedure1
Disconnect the D23 mass air flow meter connector.
Disconnect the D52 ECM connector.
Procedure1
Measure the resistance according to the value(s) in the table below.
- Standard Resistance:
Tester Connection Condition Specified Condition D23-4 (VCC) - D52-107 (VCVG) Always Below 1 Ω D23-3 (FG) - D52-139 (VG) Always Below 1 Ω D23-2 (E2G) - D52-106 (E2G) Always Below 1 Ω D23-4 (VCC) or D52-107 (VCVG) - Body ground and other terminals Always 10 kΩ or higher D23-3 (FG) or D52-139 (VG) - Body ground and other terminals Always 10 kΩ or higher D23-2 (E2G) or D52-106 (E2G) - Body ground and other terminals Always 10 kΩ or higher
Post-procedure1
None.
- Result:
Proceed to OK NG
OK
NG
- HINT:
- ·
If the result of the inspection performed in steps 15 (READ VALUE USING GTS (MASS AIR FLOW SENSOR)) indicated no problem, proceed to the next step without replacing the mass air flow meter.
·Perform "Inspection After Repair" after replacing the mass air flow meter.
Click hereEngine / Hybrid System>M15A-FXE (ENGINE CONTROL)>SFI SYSTEM>INITIALIZATION
- Result:
Proceed to NEXT
NEXT
Pre-procedure1
None.
Procedure1
Clear the DTCs.
- Powertrain > Engine > Clear DTCs
- 50002 372
Post-procedure1
Turn the ignition switch off and wait for at least 30 seconds.
- Result:
Proceed to NEXT
NEXT
Pre-procedure1
Drive the vehicle in accordance with the driving pattern described in Confirmation Driving Pattern.
Procedure1
Read the DTCs.
- Powertrain > Engine > Trouble Codes
- 50001 372
Post-procedure1
None.
- Result:
Result Proceed to DTCs are not output A P042000 is output B
A
B
Check the fuel lines for leaks or blockage.
- Result:
Proceed to OK NG
OK
Click hereEngine / Hybrid System>M15A-FXE (ENGINE CONTROL)>SFI SYSTEM>Fuel Pump Control Circuit
- HINT:
-
Perform "Inspection After Repair" after replacing the fuel pump.
-
Click hereEngine / Hybrid System>M15A-FXE (ENGINE CONTROL)>SFI SYSTEM>INITIALIZATION
NG
Repair or replace exhaust system.
- HINT:
-
Perform "Inspection After Repair" after repairing or replacing the exhaust system.
-
Click hereEngine / Hybrid System>M15A-FXE (ENGINE CONTROL)>SFI SYSTEM>INITIALIZATION
- Result:
Proceed to NEXT
NEXT
Pre-procedure1
None.
Procedure1
Clear the DTCs.
- Powertrain > Engine > Clear DTCs
- 50002 372
Post-procedure1
Turn the ignition switch off and wait for at least 30 seconds.
- Result:
Proceed to NEXT
NEXT
Pre-procedure1
Drive the vehicle in accordance with the driving pattern described in Confirmation Driving Pattern.
Procedure1
Read the DTCs.
- Powertrain > Engine > Trouble Codes
- 50001 372
Post-procedure1
None.
- Result:
Result Proceed to DTCs are not output A P042000 is output B
A
B
- NOTICE:
-
When replacing the exhaust manifold and the front exhaust pipe assembly in order to replace the three-way catalytic converter, it is not necessary to replace the air fuel ratio sensor (sensor 1) and the air fuel ratio sensor (sensor 2).
- HINT:
-
Confirm the replacement parts by referring to the illustration in the Catalyst Location.
Replace the exhaust manifold (TWC: Front catalyst).
Click hereEngine / Hybrid System>M15A-FXE (INTAKE / EXHAUST)>EXHAUST MANIFOLD>REMOVAL
Replace the front exhaust pipe assembly (TWC: Rear catalyst).
Click hereEngine / Hybrid System>M15A-FXE (INTAKE / EXHAUST)>EXHAUST PIPE>REMOVAL
- HINT:
-
Clear the GPF deterioration record using the GTS after replacing the front exhaust pipe assembly (w/ Gasoline Particulate Filter).
-
Click hereEngine / Hybrid System>M15A-FXE (ENGINE CONTROL)>SFI SYSTEM>INITIALIZATION
- Result:
Proceed to NEXT
NEXT