METER / GAUGE / DISPLAY COMBINATION METER REMOVAL
CAUTION / NOTICE / HINT
The necessary procedures (adjustment, calibration, initialization or registration) that must be performed after parts are removed and installed, or replaced during combination meter assembly removal/installation are shown below.
| Replaced Part or Performed Procedure | Necessary Procedures | Effect/Inoperative Function When Necessary Procedures are not Performed | Link |
|---|---|---|---|
| Disconnect cable from negative (-) auxiliary battery terminal | Memorize steering angle neutral point | Parking assist monitor system | ( ) |
- HINT:
-
When the cable is disconnected/reconnected to the auxiliary battery terminal, systems temporarily stop operating. However, each system has a function that completes learning the first time the system is used.
- ·
Learning completes when vehicle is driven
Effect/Inoperative Function When Necessary Procedures are not Performed Necessary Procedures Link *1: for Gasoline Model
Lane tracing assist system Drive the vehicle straight ahead at 35 km/h (22 mph) or more for 5 second or more. ( )
Pre-collision system Stop and start system *1 Drive the vehicle until stop and start control is permitted (approximately 5 to 60 minutes) ( )
·Learning completes when vehicle is operated normally
Effect/Inoperative Function When Necessary Procedures are not Performed Necessary Procedures Link Power door lock control system
·Back door opener
Perform door unlock operation with door control switch or electrical key transmitter sub-assembly switch. ( )
Air conditioning system After the ignition switch is turned to ON, the servo motor standard position is recognized. -
PROCEDURE

 1. PRECAUTION
- NOTICE:
-
After the ignition switch is turned off, there may be a waiting time before disconnecting the negative (-) auxiliary battery terminal.
-
Click hereGeneral>SETUP>WHEN DISCONNECTING OR RECONNECTING BATTERY TERMINAL>BEFORE DISCONNECTING BATTERY
2.DISCONNECT CABLE FROM NEGATIVE AUXILIARY BATTERY TERMINAL
for M15A-FKS:
Click hereGeneral>MAINTENANCE>M15A-FKS AUXILIARY BATTERY>REMOVAL
for M15A-FXE:
Click hereGeneral>MAINTENANCE>M15A-FXE AUXILIARY BATTERY>REMOVAL
for G16E-GTS:
Click hereGeneral>MAINTENANCE>G16E-GTS AUXILIARY BATTERY>REMOVAL
for 1KR-FE:
Click hereGeneral>MAINTENANCE>1KR-FE AUXILIARY BATTERY>REMOVAL
55479D
3.REMOVE LOWER INSTRUMENT CLUSTER FINISH PANEL GARNISH
for 5 Door:
Click hereVehicle Interior>INTERIOR PANELS / TRIM>REAR CONSOLE BOX (for 5 Door)>REMOVAL
for 3 Door:
Click hereVehicle Interior>INTERIOR PANELS / TRIM>REAR CONSOLE BOX (for 3 Door)>REMOVAL
55432B
4.REMOVE LOWER INSTRUMENT PANEL FINISH PANEL
for 5 Door:
Click hereVehicle Interior>INTERIOR PANELS / TRIM>REAR CONSOLE BOX (for 5 Door)>REMOVAL
for 3 Door:
Click hereVehicle Interior>INTERIOR PANELS / TRIM>REAR CONSOLE BOX (for 3 Door)>REMOVAL
55407B
5.REMOVE SWITCH HOLE BASE SUB-ASSEMBLY
for 5 Door:
Click hereVehicle Interior>INTERIOR PANELS / TRIM>REAR CONSOLE BOX (for 5 Door)>REMOVAL
for 3 Door:
Click hereVehicle Interior>INTERIOR PANELS / TRIM>REAR CONSOLE BOX (for 3 Door)>REMOVAL
33504F
6.REMOVE SHIFT LEVER KNOB SUB-ASSEMBLY (for CVT)
for TMC Made:
Click hereDrivetrain>K320 (MULTIDRIVE / CVT)>SHIFT LEVER KNOB (for TMC Made)>REMOVAL
for TMMF Made:
Click hereDrivetrain>K320 (MULTIDRIVE / CVT)>SHIFT LEVER KNOB (for TMMF Made)>REMOVAL
33504F
7.REMOVE SHIFT LEVER KNOB SUB-ASSEMBLY (for Manual Transaxle)
for 5 Door:
Click hereVehicle Interior>INTERIOR PANELS / TRIM>REAR CONSOLE BOX (for 5 Door)>REMOVAL
for 3 Door:
Click hereVehicle Interior>INTERIOR PANELS / TRIM>REAR CONSOLE BOX (for 3 Door)>REMOVAL
33554
8.REMOVE SHIFT LEVER CAP (for CVT)
58802E
9.REMOVE FRONT CONSOLE BOX SUB-ASSEMBLY (for 5 Door)
58810J
10.REMOVE CONSOLE BOX ASSEMBLY (for 3 Door)
67914B
11.REMOVE FRONT DOOR SCUFF PLATE LH
for 5 Door:
Click hereVehicle Interior>INTERIOR PANELS / TRIM>ROOF HEADLINING (for 5 Door)>REMOVAL
for 3 Door:
Click hereVehicle Interior>INTERIOR PANELS / TRIM>ROOF HEADLINING (for 3 Door)>REMOVAL
62112
12.REMOVE COWL SIDE TRIM BOARD LH
for 5 Door:
Click hereVehicle Interior>INTERIOR PANELS / TRIM>ROOF HEADLINING (for 5 Door)>REMOVAL
for 3 Door:
Click hereVehicle Interior>INTERIOR PANELS / TRIM>ROOF HEADLINING (for 3 Door)>REMOVAL
62312B
13.DISCONNECT FRONT DOOR OPENING TRIM WEATHERSTRIP LH (for 5 Door)
14.DISCONNECT NO. 1 ROOF HEADLINING MOULDING LH (for 3 Door)
62312B
15.DISCONNECT FRONT DOOR OPENING TRIM WEATHERSTRIP LH (for 3 Door)
55317E
16.REMOVE NO. 1 INSTRUMENT SIDE PANEL
55606
17.REMOVE NO. 1 INSTRUMENT PANEL UNDER COVER SUB-ASSEMBLY
53601
18.DISCONNECT HOOD LOCK CONTROL LEVER SUB-ASSEMBLY
55480D
19.REMOVE LOWER INSTRUMENT PANEL FINISH PANEL ASSEMBLY
55410C
20.REMOVE INSTRUMENT CLUSTER FINISH PANEL ASSEMBLY (for Analog Meter)
55410C
21.REMOVE INSTRUMENT CLUSTER FINISH PANEL ASSEMBLY (for Digital Meter)
83100
22.REMOVE COMBINATION METER ASSEMBLY (for Analog Meter)
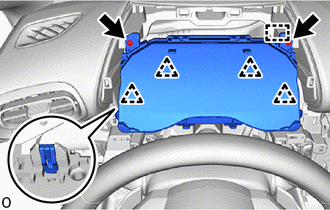
Remove the 2 screws.
Disengage the clips and guide.
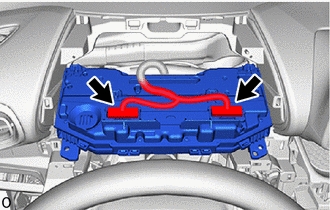
Disconnect the 2 connectors to remove the combination meter assembly.
83100
23.REMOVE COMBINATION METER ASSEMBLY (for Digital Meter)
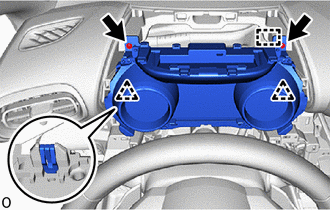
Remove the 2 screws.
Disengage the clips and guide.
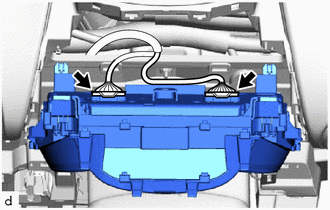
Disconnect the 2 connectors to remove the combination meter assembly.