BRAKE CONTROL / DYNAMIC CONTROL SYSTEMS BRAKE ACTUATOR(for Gasoline Model TMC Made RHD) INSTALLATION
CAUTION / NOTICE / HINT
- NOTICE:
-
After performing the update ECU security key procedure, make sure to perform the initialization procedure for when the cable has been disconnected and reconnected to the negative (-) auxiliary battery terminal.
PROCEDURE

 44547B
1.INSTALL BRAKE ACTUATOR BRACKET CUSHION
Install the 3 brake actuator bracket cushions to the brake actuator bracket assembly.
44521A
2.INSTALL NO. 1 BRAKE ACTUATOR CASE COLLAR
Install the 3 No. 1 brake actuator case collars to the brake actuator bracket cushion.
- NOTICE:
-
Make sure that the No. 1 brake actuator case collar is in full contact with the brake actuator bracket cushion.
44510
3.INSTALL BRAKE ACTUATOR ASSEMBLY
Temporarily install the brake actuator assembly with the 3 bolts.
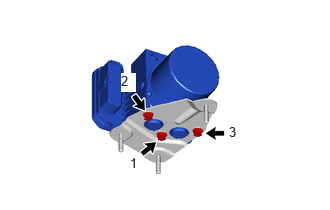
Fully tighten the 3 bolts in the order shown in the illustration.
- Torque:
- 5.4 N*m (55 kgf*cm, 48 in.*lbf)
- NOTICE:
- ·
Do not remove the hole plugs of a new brake actuator assembly before connecting the brake lines because the brake actuator assembly is filled with brake fluid.
·Do not hold the brake actuator assembly by the connector.
·Do not drop the brake actuator assembly when carrying it.
44591
4.INSTALL NO. 1 BRAKE ACTUATOR BRACKET
Temporarily install the No. 1 brake actuator bracket with the 3 nuts.
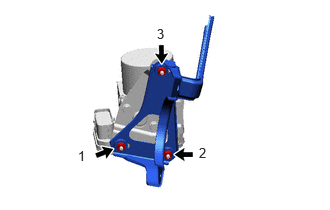
Fully tighten the 3 nuts in the order shown in the illustration.
- Torque:
- 5.4 N*m (55 kgf*cm, 48 in.*lbf)
- NOTICE:
- ·
Do not remove the hole plugs of a new brake actuator assembly before connecting the brake lines because the brake actuator assembly is filled with brake fluid.
·Do not hold the brake actuator assembly by the connector.
·Do not drop the brake actuator assembly when carrying it.
5.INSTALL BRAKE ACTUATOR WITH BRACKET
Temporarily install the brake actuator with bracket to the vehicle body with the bolt and 2 nuts.
- NOTICE:
- ·
Do not kink or damage the brake lines.
·Do not allow any foreign matter such as dirt or dust to enter the brake lines from the connecting parts.
·Be careful not to allow any brake fluid to enter the connector.
·Do not hold the brake actuator assembly by the connector.
·Do not drop the brake actuator with bracket when carrying it.
- HINT:
-
Install the brake actuator with bracket while avoiding the brake lines.
for M15A-FKS:
Using SST, fully tighten the bolt and 2 nuts in the order shown in the illustration.

| *a | Torque Wrench Fulcrum Length | - | - |
- SST
- 09729-00120
09925-40010 (09925-04120)
- Torque:
- Specified tightening torque : 19 N*m (194 kgf*cm, 14 ft.*lbf)
- NOTICE:
-
Do not damage the brake lines.
- HINT:
- ·
Calculate the torque wrench reading when changing the fulcrum length of the torque wrench.
Click hereGeneral>INTRODUCTION>REPAIR INSTRUCTION>PRECAUTION
·When using SST (fulcrum length of 200 mm (7.87 in.)) + torque wrench (fulcrum length of 162 mm (6.38 in.)): 8.5 N*m (87 kgf*cm, 75 in.*lbf)
for G16E-GTS:
Using SST, fully tighten the bolt and 2 nuts in the order shown in the illustration.

| *a | Torque Wrench Fulcrum Length | - | - |
- SST
- 09729-00120
09925-40010 (09925-04120)
- Torque:
- Specified tightening torque : 19 N*m (194 kgf*cm, 14 ft.*lbf)
- NOTICE:
-
Do not damage the brake lines.
- HINT:
- ·
Calculate the torque wrench reading when changing the fulcrum length of the torque wrench.
Click hereGeneral>INTRODUCTION>REPAIR INSTRUCTION>PRECAUTION
·When using SST (fulcrum length of 200 mm (7.87 in.)) + torque wrench (fulcrum length of 162 mm (6.38 in.)): 8.5 N*m (87 kgf*cm, 75 in.*lbf)
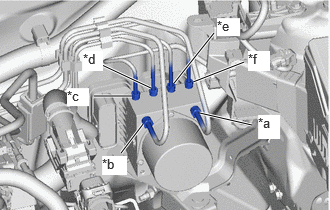
| *a | From 1st Chamber of Brake Booster with Master Cylinder Assembly |
| *b | From 2nd Chamber of Brake Booster with Master Cylinder Assembly |
| *c | To Front Wheel Cylinder Assembly LH |
| *d | To Rear Wheel Cylinder Assembly RH |
| *e | To Rear Wheel Cylinder Assembly LH |
| *f | To Front Wheel Cylinder Assembly RH |
Temporarily tighten each brake line to the correct position on the brake actuator assembly as shown in the illustration.
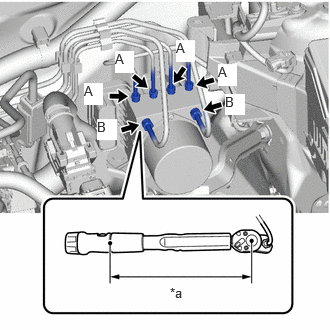
| *a | Torque Wrench Fulcrum Length |
Using a 10 mm and 12 mm union nut wrench, connect the 6 brake lines to the brake actuator assembly.
- Torque:
- Specified tightening torque (A) : 15.2 N*m (155 kgf*cm, 11 ft.*lbf)
- Specified tightening torque (B) : 19.5 N*m (199 kgf*cm, 14 ft.*lbf)
- NOTICE:
- ·
Do not kink or damage the brake lines.
·Do not allow the brake lines to twist or interfere with other parts or the vehicle body during tightening.
·Do not allow any foreign matter such as dirt or dust to enter the brake lines from the connecting parts.
- HINT:
- ·
Calculate the torque wrench reading when changing the fulcrum length of the torque wrench.
Click hereGeneral>INTRODUCTION>REPAIR INSTRUCTION>PRECAUTION
·When using a union nut wrench (fulcrum length of 22 mm (0.866 in.)) + torque wrench (fulcrum length of 162 mm (6.38 in.)) (A): 13.4 N*m (137 kgf*cm, 10 ft.*lbf)
·When using a union nut wrench (fulcrum length of 20 mm (0.787 in.)) + torque wrench (fulcrum length of 162 mm (6.38 in.)) (B): 17.4 N*m (177 kgf*cm, 13 ft.*lbf)
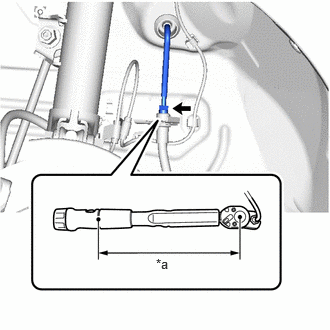
| *a | Torque Wrench Fulcrum Length |
Using a 10 mm union nut wrench, connect the brake line to the front flexible hose.
- Torque:
- Specified tightening torque : 15.2 N*m (155 kgf*cm, 11 ft.*lbf)
- NOTICE:
- ·
Do not kink or damage the brake lines.
·Do not allow the brake lines to twist or interfere with other parts or the vehicle body during tightening.
·Do not allow any foreign matter such as dirt or dust to enter the brake lines from the connecting parts.
- HINT:
- ·
Calculate the torque wrench reading when changing the fulcrum length of the torque wrench.
Click hereGeneral>INTRODUCTION>REPAIR INSTRUCTION>PRECAUTION
·When using a union nut wrench (fulcrum length of 22 mm (0.866 in.)) + torque wrench (fulcrum length of 162 mm (6.38 in.)): 13.4 N*m (137 kgf*cm, 10 ft.*lbf)
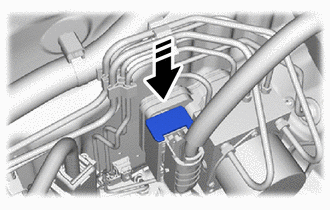

|
Lock the lock lever |
Connect the connector to the brake actuator assembly and lock the lock lever.
- NOTICE:
- ·
Make sure that the actuator connector can be connected smoothly. Do not allow water, oil or dirt to enter the connector.
·Make sure that the connector is locked securely.
74404A
6.INSTALL BATTERY CLAMP SUB-ASSEMBLY (for M15A-FKS)
17701
7.INSTALL AIR CLEANER CASE SUB-ASSEMBLY (for M15A-FKS)
8.INSTALL AIR CLEANER CAP WITH AIR CLEANER HOSE (for M15A-FKS)
89661
9.INSTALL ECM
for M15A-FKS:
Click hereEngine / Hybrid System>M15A-FKS (ENGINE CONTROL)>ECM>INSTALLATION
for G16E-GTS:
Click hereEngine / Hybrid System>G16E-GTS (ENGINE CONTROL)>ECM>INSTALLATION
55701J
10.INSTALL OUTER COWL TOP PANEL SUB-ASSEMBLY
55735A
11.INSTALL WATER GUARD PLATE LH
55815E
12.INSTALL FRONT NO. 1 VENTILATOR SEAL
13.INSTALL WINDSHIELD WIPER MOTOR AND LINK
14.CONNECT CABLE TO NEGATIVE AUXILIARY BATTERY TERMINAL
for M15A-FKS:
Click hereGeneral>MAINTENANCE>M15A-FKS AUXILIARY BATTERY>INSTALLATION
for G16E-GTS:
Click hereGeneral>MAINTENANCE>G16E-GTS AUXILIARY BATTERY>INSTALLATION
15. UPDATE ECU SECURITY KEY
16.BLEED BRAKE SYSTEM
17. PERFORM CALIBRATION
18.PERFORM TEST MODE INSPECTION
19.INSPECT BRAKE ACTUATOR USING GTS
20. INITIALIZATION AFTER RECONNECTING AUXILIARY BATTERY TERMINAL
Click hereGeneral>SETUP>WHEN DISCONNECTING OR RECONNECTING BATTERY TERMINAL>WORK PROCEDURE
- HINT:
-
When disconnecting and reconnecting the auxiliary battery, there is an automatic learning function that completes learning when the respective system is used.
-
Click hereGeneral>SETUP>WHEN DISCONNECTING OR RECONNECTING BATTERY TERMINAL>AUTOMATIC LEARNING CHART
21. CHECK FOR AND CLEAR DTCS