AXLE AND DIFFERENTIAL REAR DIFFERENTIAL CARRIER ASSEMBLY INSTALLATION
PROCEDURE

 52391B
1.INSTALL DIFFERENTIAL SUPPORT
Install the differential support to the rear differential carrier assembly with 3 new bolts.
- Torque:
- 120 N*m (1224 kgf*cm, 89 ft.*lbf)
41196
2.INSTALL REAR DIFFERENTIAL DYNAMIC DAMPER
Install the rear differential dynamic damper to the differential support with 2 bolts.
- Torque:
- 39 N*m (398 kgf*cm, 29 ft.*lbf)
41653
3.INSTALL REAR UPPER DIFFERENTIAL MOUNT STOPPER
Install the 2 rear upper differential mount stoppers to the rear No. 1 differential support.
- NOTICE:
-
Keep the rear upper differential mount stoppers free of oil and foreign matter.
4.TEMPORARILY INSTALL DIFFERENTIAL CARRIER ASSEMBLY
- NOTICE:
- ·
Do not damage the contact surface when installing the rear differential carrier assembly.
·The remaining oil may leak out when installing the rear differential carrier assembly.
·Securely support the rear differential carrier assembly while performing this step to avoid excessively tilting or dropping the rear differential carrier assembly.
·Install the bolts and nuts with the rear differential carrier assembly secured.
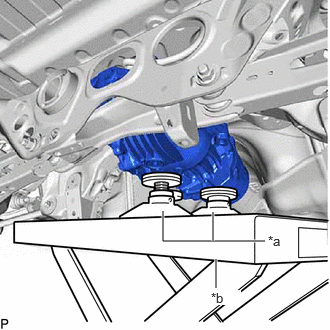
| *a | Attachment |
| *b | Engine Lifter |
Support the rear differential carrier assembly with an engine lifter using 2 attachments or equivalent tools as shown in the illustration.
- HINT:
-
Raise the rear differential carrier assembly until the vacuum hose can be installed.
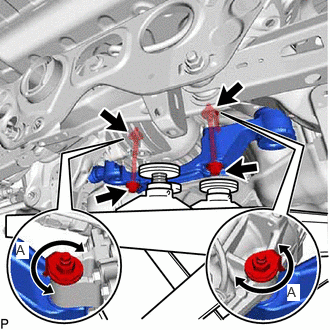
Temporarily install the rear No. 1 differential support to the rear differential carrier assembly with 2 new bolts and 2 new nuts.
- NOTICE:
- ·
Be sure to install the rear No. 1 differential support facing the direction shown in the illustration.
·Be sure to install the tab of each nut to the position (A) shown in the illustration.
- HINT:
-
The nuts have tabs to prevent them from rotating.
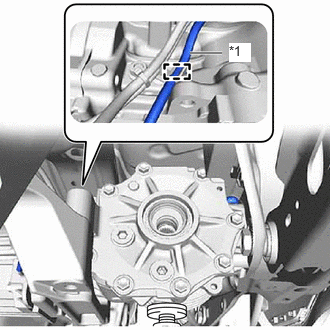
| *1 | Vacuum Hose |
Install the vacuum hose to the clamp.
- NOTICE:
-
Do not damage the vacuum hose and electro magnetic control coupling wire harness.
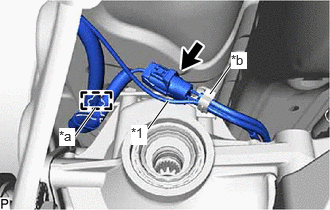
| *1 | Vacuum Hose |
| *a | Clamp (A) |
| *b | Clamp (B) |
Install the vacuum hose to the clamp (B).
Connect the connector and engage the clamp (A).
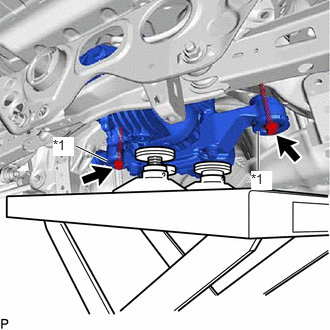
| *1 | Rear Lower Differential Mount Stopper |
Temporarily install the rear differential carrier assembly to the front side of the rear suspension member sub-assembly with the 2 rear lower differential mount stoppers, 2 new bolts.
- NOTICE:
-
Keep the bolt and rear lower differential mount stoppers free of oil and foreign matter.
- HINT:
- ·
Be sure to install the rear lower differential mount stoppers with the convex side facing upward.
·Make sure that the rear lower differential mount stoppers and the rear upper differential mount stoppers are not misaligned or tilted.
·The nuts have tabs to prevent them from rotating.
·Raise the engine lifter to the extent that the rear differential carrier assembly can be temporarily installed.
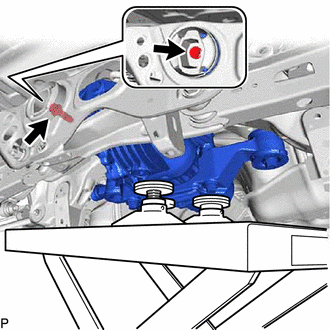
Temporarily install the rear differential carrier assembly to the rear differential support with the new bolts.
5.FULLY INSTALL DIFFERENTIAL CARRIER ASSEMBLY
Tighten the bolt.
- Torque:
- 130 N*m (1326 kgf*cm, 96 ft.*lbf)
- NOTICE:
-
Do not tighten the bolts with the inner cylinder or rear No. 1 differential mount cushion tilted.
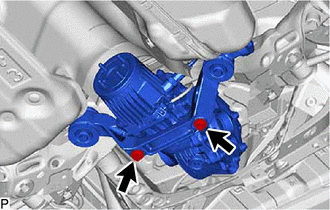
Tighten the 2 bolts.
- Torque:
- 82 N*m (836 kgf*cm, 60 ft.*lbf)
- HINT:
-
Lower the engine lifter to the extent that the bolts can still be tightened.
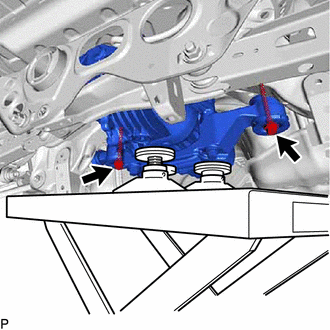
Tighten the 2 bolts.
- Torque:
- 86 N*m (877 kgf*cm, 63 ft.*lbf)
Lower the engine lifter.
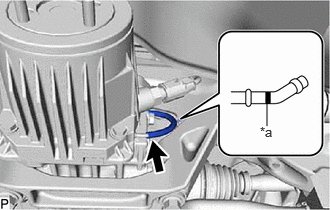
| *a | Paint Mark |
Connect the vacuum hose to the electro magnetic control coupling sub-assembly.
- NOTICE:
-
Connect the vacuum hose until it reaches the paint mark.
48812
6.INSTALL REAR STABILIZER BAR
7.INSTALL REAR DRIVE SHAFT ASSEMBLY
37100
8.INSTALL PROPELLER WITH CENTER BEARING SHAFT ASSEMBLY
9.ADD DIFFERENTIAL OIL
10. INSPECT FOR DIFFERENTIAL OIL LEAK
11. ACTIVE TORQUE SPLIT AWD SYSTEM CALIBRATION