DRIVE SHAFT / PROPELLER SHAFT REAR DRIVE SHAFT ASSEMBLY INSTALLATION
CAUTION / NOTICE / HINT
- HINT:
- ·
Use the same procedure for the RH side and LH side.
·The following procedure is for the LH side.
PROCEDURE

 42360M
1.INSTALL REAR DRIVE SHAFT INBOARD JOINT SHAFT SNAP RING
Install a new rear drive shaft inboard joint shaft snap ring to the rear drive shaft assembly.
42340B
2.INSTALL REAR DRIVE SHAFT ASSEMBLY
Coat the snap ring of the rear drive inboard joint assembly with MP grease.
Coat the splines of the rear drive inboard joint assembly with Toyota genuine differential gear oil LX.
Coat the lip of the rear drive shaft oil seal with MP grease.
- HINT:
-
Apply a light coat of MP grease to the entire circumference of the rear drive shaft oil seal.
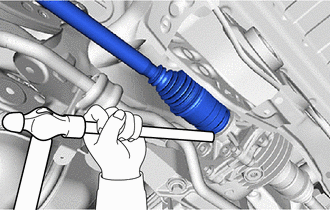
Align the inboard joint splines, and using a brass bar and a hammer, install the rear drive shaft assembly.
- NOTICE:
- ·
Face the end gap of the rear drive shaft inboard joint shaft snap ring downward.
·Do not damage the rear drive shaft oil seal.
·Do not damage the rear drive shaft inboard joint boot.
·Make sure to center the rear drive shaft assembly during installation to prevent damage to the rear drive shaft inboard joint shaft snap ring.
- HINT:
-
Confirm whether the drive shaft is securely driven in by checking the reaction force and sound.
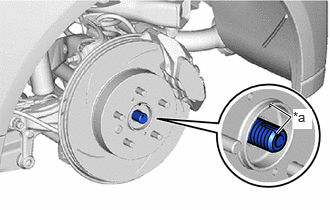
| *a | Matchmark |
Align the matchmarks and install the rear drive shaft assembly to the rear axle hub and bearing assembly.
- NOTICE:
- ·
Check that there is no foreign matter on the deflector or contact surfaces.
·Do not push the rear axle hub and bearing assembly towards the outside of the vehicle any further than necessary.
·Do not damage the rear drive shaft outboard joint boot.
·Do not deform the parking brake plate sub-assembly.
·Do not damage the deflector.
48790
3.TEMPORARILY INSTALL REAR UPPER CONTROL ARM ASSEMBLY
Temporarily install the rear upper control arm assembly to the rear axle carrier sub-assembly with the bolt and nut.
- NOTICE:
-
Tighten the bolt with the nut secured.
48720A
4.TEMPORARILY INSTALL REAR NO. 1 SUSPENSION ARM ASSEMBLY
48740F
5.TEMPORARILY INSTALL REAR NO. 2 SUSPENSION ARM ASSEMBLY
48258C
6.INSTALL REAR LOWER COIL SPRING INSULATOR
48231B
7.INSTALL REAR COIL SPRING
48840A
8.INSTALL REAR STABILIZER LINK ASSEMBLY
47319F
9.INSTALL REAR FLEXIBLE HOSE
Install the rear flexible hose to the flexible hose bracket with the bolt.
- Torque:
- 29 N*m (296 kgf*cm, 21 ft.*lbf)
89546
10.INSTALL REAR SPEED SENSOR
42312B
11.INSTALL REAR AXLE SHAFT NUT
Clean the threaded parts on the rear drive shaft assembly and a new rear axle shaft nut using non-residue solvent.
- NOTICE:
- ·
Be sure to perform this work even when using a new rear drive shaft assembly.
·Keep the threaded parts free of oil and foreign matter.
Using a 30 mm deep socket wrench, install the rear axle shaft nut while applying the brakes.
- Torque:
- 216 N*m (2203 kgf*cm, 159 ft.*lbf)
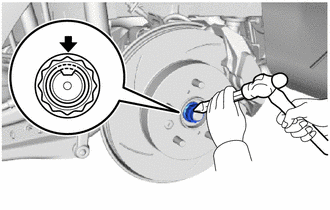
Using a chisel and a hammer, stake the rear axle shaft nut.
12.STABILIZE SUSPENSION
48720A
13.FULLY TIGHTEN REAR NO. 1 SUSPENSION ARM ASSEMBLY
48740F
14.FULLY TIGHTEN REAR NO. 2 SUSPENSION ARM ASSEMBLY
15.INSTALL REAR WHEEL
48740F
16.FULLY TIGHTEN REAR NO. 2 SUSPENSION ARM ASSEMBLY
17.ADD DIFFERENTIAL OIL
18.INSPECT FOR DIFFERENTIAL OIL LEAK
19.INSPECT AND ADJUST REAR WHEEL ALIGNMENT
20.CHECK FOR SPEED SENSOR SIGNAL