P0300 Random / Multiple Cylinder Misfire Detected
Diagnostic trouble codes · Vehicles built from Aug 2005
Also covers:
- P0301 Cylinder 1 Misfire Detected
- P0302 Cylinder 2 Misfire Detected
- P0303 Cylinder 3 Misfire Detected
DESCRIPTION
When a misfire occurs in the engine, hydrocarbons (HC) enter the exhaust gas in high concentrations. If this HC concentration is high enough, there could be an increase in exhaust emission levels. High concentrations of HC can also cause the temperature of the Three-Way Catalytic Converter (TWC) to increase, possibly damaging the TWC. To prevent this increase in emissions and limit the possibility of thermal damage, the ECM monitors the misfire rate. When the temperature of the TWC reaches the point of thermal degradation, the ECM blinks the MIL. To monitor misfires, the ECM uses both the camshaft position sensor and the crankshaft position sensor. The camshaft position sensor is used to identify misfiring cylinders and the crankshaft position sensor is used to measure variations in the crankshaft rotation speed. The misfire counter increments when the crankshaft rotation speed variations exceed the threshold values.If the misfiring rate exceeds the threshold and could cause emission deterioration, the ECM illuminates the MIL.
- HINT:
- The ECM monitors misfires, which could cause emission deterioration, every 1,000 engine revolutions. When these misfires are detected, the ECM illuminates the MIL and sets a DTC.
- The ECM monitors misfires, which could damage the TWC, every 200 engine revolutions. When these misfires are detected, the ECM flashes the MIL and sets a DTC.
- The ECM monitors misfires, which could cause emission deterioration, every 1,000 engine revolutions. When these misfires are detected, the ECM illuminates the MIL and sets a DTC.
| DTC No. |
DTC Detection Condition |
Trouble Area |
| P0300 |
Misfiring of random cylinders is detected (2 trip detection logic) |
|
| P0301 P0302 P0303 |
Misfiring of each cylinder is detected (2 trip trip detection detection logic) |
|
- HINT:
- These DTCs are detected when the engine idles for approximately 10 minutes after warm-up. (Misfire can be clearly checked by activating the air conditioning system.)
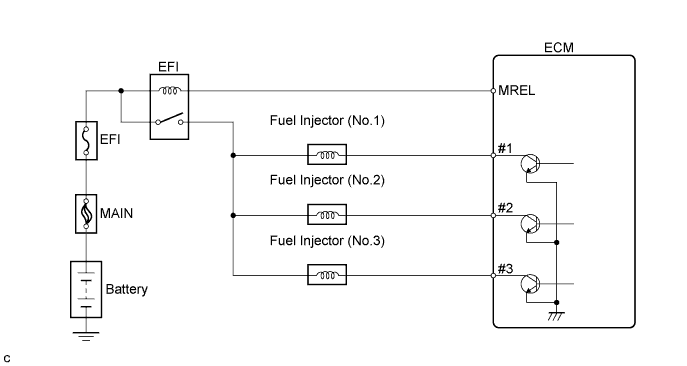
WIRING DIAGRAM

CONFIRMATION DRIVING PATTERN
Allow the engine to idle for 10 minutes or more.INSPECTION PROCEDURE
- HINT:
- If any DTCs other than the misfire DTCs are set simultaneously, troubleshoot them first.
- If a misfire does not occur when the vehicle is brought to the workshop, a misfire can be confirmed by reproducing the conditions of the freeze frame data. Also, after finishing repairs, confirm that misfires do not recur (see the confirmation driving pattern).
- Read freeze frame data using the intelligent tester. The ECM records vehicle and driving condition information as freeze frame data the moment a DTC is stored. When troubleshooting, freeze frame data can help determine if the vehicle was moving or stationary, if the engine was warmed up or not, if the air-fuel ratio was lean or rich, and other data from the time the malfunction occurred.
- When either of Short FT #1 and Long FT #1 in the freeze frame data is over the range of -20 %, there is a possibility that the air-fuel ratio is becoming rich (-20 % or less) or lean (+20 % or more).
- When Coolant Temp. in the freeze frame data is less than 75°C (167°F), there is a possibility that misfires occur only during engine warm-up.
- If a misfire cannot be reproduced, the following reasons may apply: 1) the vehicle lacks fuel, 2) improper fuel is being used, and 3) the ignition plug has been contaminated.
- If any DTCs other than the misfire DTCs are set simultaneously, troubleshoot them first.
| 1. CHECK ANY OTHER DTC OUTPUT (IN ADDITION TO P0300, P0301, P0302 OR P0303) |

Connect the intelligent tester to the DLC3.
Turn the ignition switch on (IG) and turn the tester ON.
Select the following menu items: Powertrain / Engine and ECT / DTC.
Read DTCs.
- Result:
Display (DTC Output)
Proceed To
P0300, P0301, P0302 and/or P0303
A
P0300, P0301, P0302 and/or P0303, and other DTCs
B
- HINT:
- If any DTCs other than P0300, P0301, P0302 and P0303 are output, troubleshoot those DTCs first.
|
|
||||

| A | |
 |
| 2. CHECK HARNESS AND CONNECTOR (CONNECTION CONDITION OF ENGINE WIRE HARNESS) |
Check the connection of the wire harnesses and connectors.
- OK:
- Connected correctly and no damage to the wire harnesses.
|
|
||||
| OK | |
|
| 3. CHECK OUTPUT DTCS |
Connect the intelligent tester to the DLC3.
Turn the ignition switch on (IG) and turn the tester ON.
Start the engine.
Select the following menu items: Powertrain / Engine and ECT / DTC.
Read DTCs and proceed to the appropriate step shown in the table below.
- Result:
Display (DTC Output)
Proceed To
1 misfire DTC (other than DTC P0300)
A
2 or more misfire DTCs (other than DTC P0300)
B
|
|
||||

| A | |
|
| 4. CHECK SPARK PLUG |
Remove the ignition coil assembly.
Remove the spark plug.
Check the spark plug type.
Supplier
Type
DENSO
K20HR-U11
Check the spark plug electrode gap.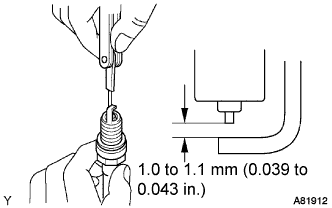
- Standard:
- 1.0 to 1.1 mm (0.039 to 0.043 in.)
- Maximum:
- 1.2 mm (0.047 in.)
- NOTICE:
- If adjusting the gap of a new spark plug, bend only the ground electrode. Do not touch the tip. Never attempt to adjust the gap of a used plug.
Check the electrode for carbon deposits.
Perform a spark test.
- CAUTION:
- Completely disconnect each injector connector.
- NOTICE:
- Do not crank the engine for more than 5 seconds.
Install the spark plug to the ignition coil, and connect the ignition coil connector.
Disconnect the injector connector.
Ground the spark plug.
Check if sparks occur while the engine is being cranked.
- OK:
- Sparks jump across the electrode gap.
Reinstall the spark plug.
Reinstall the ignition coil assembly.
|
|
||||
| NG | |
|
| 5. CHANGE NORMAL SPARK PLUG AND CHECK FOR SPARKS |
Replace the spark plug with the normally functioning spark plug.
Perform a spark test.
- CAUTION:
- Completely disconnect each injector connector.
- NOTICE:
- Do not crank the engine for more than 5 seconds.
Install the spark plug to the ignition coil, and connect the ignition coil connector.
Disconnect the injector connector.
Ground the spark plug.
Check if sparks occur while the engine is being cranked.
- OK:
- Spark jump across the electrode gap.
|
|
||||
| NG | |
|
| 6. CHECK HARNESS AND CONNECTOR (IGNITION COIL - ECM) |
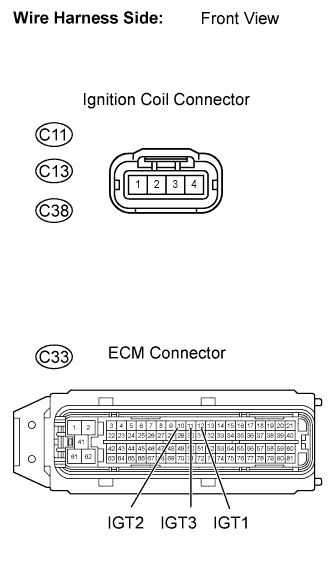 |
Disconnect the ignition coil connectors.
Disconnect the ECM connector.
Check the resistance.
- Standard resistance (Check for open):
Tester Connection
Specified Condition
Ignition coil (C11-3) - IGT1 (C33-12)
Below 1 Ω
Ignition coil (C38-3) - IGT2 (C33-10)
Below 1 Ω
Ignition coil (C13-3) - IGT3 (C33-11)
Below 1 Ω
- Standard resistance (Check for short):
Tester Connection
Specified Condition
Ignition coil (C11-3) or IGT1 (C33-12) - Body ground
10 kΩ or higher
Ignition coil (C38-3) or IGT2 (C33-10) - Body ground
10 kΩ or higher
Ignition coil (C13-3) or IGT3 (C33-11) - Body ground
10 kΩ or higher
Reconnect the ignition coil connectors.
Reconnect the ECM connector.
|
|
||||
| OK | ||
 |
||
| ||
| 7. INSPECT ECM TERMINAL VOLTAGE (#1, #2 OR #3) |
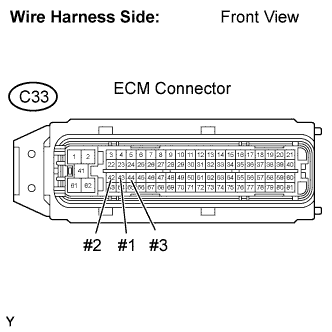 |
Disconnect the ECM connector.
Turn the ignition switch on (IG).
Measure the voltage between the terminal of the ECM connector and the body ground.
- Standard voltage:
Tester Connection
Specified Condition
#1 (C33-43) - Body ground
9 to 14 V
#2 (C33-42) - Body ground
9 to 14 V
#3 (C33-44) - Body ground
9 to 14 V
Reconnect the ECM connector.
|
|
||||
| NG | |
|
| 8. INSPECT FUEL INJECTOR (RESISTANCE) |
Disconnect the fuel injector connector.
Measure the resistance between the injector terminals.
- Standard resistance:
- 11.6 to 12.4 Ω at 20°C (68°F)
Reconnect the fuel injector connector.
|
|
||||
| OK | |
|
| 9. CHECK HARNESS AND CONNECTOR (FUEL INJECTOR - ECM, FUEL INJECTOR - EFI RELAY) |
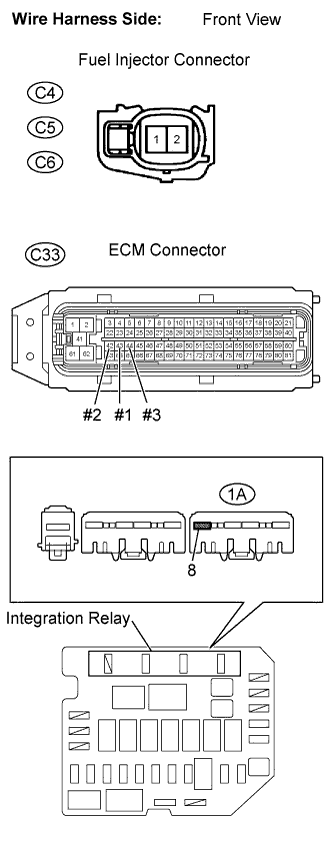 |
Remove the integration relay.
Disconnect the fuel injector connectors.
Disconnect the ECM connector.
Check the resistance.
- Standard resistance (Check for open):
Tester Connection
Specified Condition
Injector (C4-1) - #1 (C33-43)
Below 1 Ω
Injector (C5-1) - #2 (C33-42)
Below 1 Ω
Injector (C6-1) - #3 (C33-44)
Below 1 Ω
Injector (C4-2) - Engine room R/B (1A-8)
Below 1 Ω
Injector (C5-2) - Engine room R/B (1A-8)
Below 1 Ω
Injector (C6-2) - Engine room R/B (1A-8)
Below 1 Ω
- Standard resistance (Check for short):
Tester Connection
Specified Condition
Injector (C4-1) or #1 (C33-43) - Body ground
10 kΩ or higher
Injector (C5-1) or #2 (C33-42) - Body ground
10 kΩ or higher
Injector (C6-1) or #3 (C33-44) - Body ground
10 kΩ or higher
Injector (C4-2) or Engine room R/B (1A-8) - Body ground
10 kΩ or higher
Injector (C5-2) or Engine room R/B (1A-8) - Body ground
10 kΩ or higher
Injector (C6-2) or Engine room R/B (1A-8) - Body ground
10 kΩ or higher
Reconnect the ECM connector.
Reconnect the fuel injector connector.
Reinstall the integration relay.
|
|
||||
| OK | |
|
| 10. INSPECT FUEL INJECTOR |
Check the injector volume of the misfiring cylinder (Click here).
- Standard:
- 47 to 58 m3 (2.87 to 3.54 cu in.) in 15 seconds
|
|
||||
| OK | |
|
| 11. CHECK CYLINDER COMPRESSION PRESSURE |
Inspect the cylinder compression pressure of the misfiring cylinder (Click here).
- Standard:
- Minimum pressure:
- 1,079 kPa (11.0 kgf/cm2, 156 psi)
- Difference between each cylinder:
- 147 kPa (1.5 kgf/cm2, 21 psi)
|
|
||||
| OK | |
|
| 12. CHECK VALVE CLEARANCE |
Inspect the valve clearance of the misfiring cylinder (Click here).
- Standard (cold):
- Intake:
- 0.145 to 0.235 mm (0.00571 to 0.00925 in.)
- Exhaust:
- 0.275 to 0.365 mm (0.01053 to 0.01437 in.)
|
|
||||
| OK | |
|
| 13. CHECK OUTPUT DTC (REFER TO RESULT OF STEP 3) |
Read the output DTCs and proceed to the appropriate step shown in the table below.
- Result:
Display (DTC output)
Proceed To
1 misfire DTC (other than DTC P0300)
A
2 misfire DTCs or more (other than DTC P0300)
B
|
|
||||
| A | |
|
| 14. CHECK VALVE TIMING |
Check for looseness or a jumped tooth in the timing chain..
- OK:
- The match marks of the crankshaft pulley and camshaft pulley are aligning.
|
|
||||
| OK | |
|
| 15. CHECK FUEL PRESSURE |
Check fuel pressure (Click here).
- Standard:
- 304 to 343 kPa (3.1 to 3.5 kgf/cm2, 44.1 to 49.7 psi)
|
|
||||
| OK | |
|
| 16. READ VALUE OF ENGINE COOLANT TEMPERATURE SENSOR |
Connect the intelligent tester to the DLC3.
Turn the ignition switch on (IG) and turn the tester ON.
Select the following menu items: Powertrain / Engine and ECT / Data List / Coolant Temp.
Read the Coolant Temp value when the engine is cold and warmed up.
- Standard:
- When the engine is cold:
- Same as the ambient temperature
- When the engine is warmed up:
- 75° to 95°C (167° to 203°F)
|
|
||||
| OK | |
|
| 17. READ VALUE OF MANIFOLD ABSOLUTE PRESSURE SENSOR (INTAKE AIR TEMPERATURE AND MANIFOLD ABSOLUTE PRESSURE) |
Connect the intelligent tester to the DLC3.
Turn the ignition switch on (IG) and turn the tester ON.
Check the intake air temperature.
Select the following menu items: Powertrain / Engine and ECT / Data List / Intake Air.
Read the value.
- Standard:
- Equivalent to the ambient air temperature.
Check the manifold absolute pressure.
Select the following menu items: Powertrain / Engine and ECT / Data List / MAP and Coolant Temp.
Allow the engine to idle until the Coolant Temp reaches 75°C (167°F).
Read the MAP value at idling and 2,500 rpm.
- Standard:
Engine condition
Tester Display
Ignition switch on (IG)
(Engine not running)
50 to 115 kPa
Idling
(Shift position in N and A/C OFF)
17 to 39 kPa
2,500 rpm
(Shift position in N and A/C OFF)
22 to 50 kPa
|
|
||||
| OK | |
|
| 18. CHECK OUTPUT DTCS (REFER TO RESULT OF STEP 3) |
Read the output DTCs and proceed to the appropriate step shown in the table below.
- Result:
Display (DTC output)
Proceed To
1 misfire DTC (other than DTC P0300)
A
2 misfire DTCs or more (other than DTC P0300)
B
|
|
||||
| A | ||
|
||
| ||