INSTALLATION
Removal / installation · Vehicles built from Aug 2005
| 1. INSTALL CAMSHAFT |

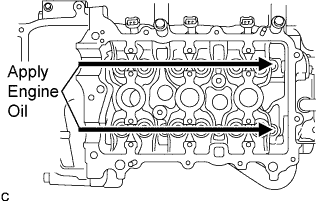  |
Apply engine oil to the cam of each camshaft, the journals of the cylinder head and the top of each valve lifter.
Align the matchmarks on the timing chain plates with the timing mark of the camshaft timing sprocket (VVT controller) and the paint mark of the timing chain respectively and install the timing chain.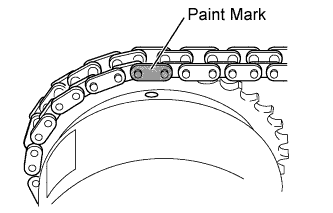
| 2. INSTALL NO.2 CAMSHAFT |
Apply engine oil to the cam of each camshaft No. 2.
Install the camshafts as shown in the illustration.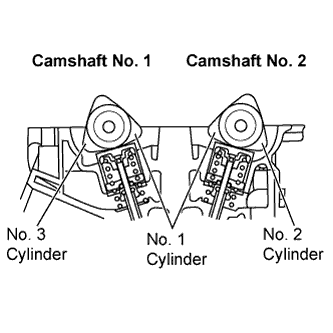
- HINT:
- Make sure that the timing marks of the camshaft timing sprocket and camshaft timing sprocket (VVT controller) face upward.
Place camshaft bearing caps No. 1 and No. 2 and tighten the bolts to the specified torque in the order shown in the illustration.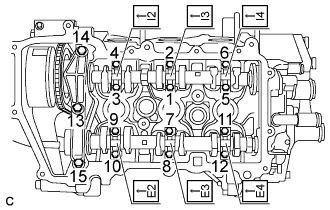
- Torque:
- Camshaft bearing cap No. 1:
- 15 N*m{ 153 kgf*cm , 11 ft.*lbf }
- Camshaft bearing cap No. 2:
- 12.5 N*m{ 128 kgf*cm , 9 ft.*lbf }
- NOTICE:
- Install camshaft bearing caps No. 1 and No. 2 with the front marks facing engine front.
| 3. INSTALL CAMSHAFT TIMING GEAR OR SPROCKET |
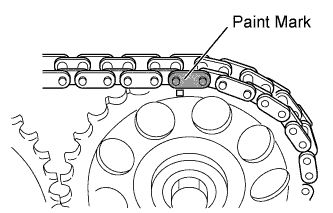 |
Align the matchmarks on the timing chain plates with the timing mark of the camshaft timing gear and the paint mark of the timing chain respectively and install the timing chain.
Install camshaft No. 2 with the knock pin aligned with the gear groove.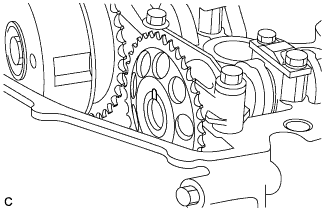
- HINT:
- Position the matchmark of the gear at the top.
Tighten the bolts onto the timing gear while holding the hexagonal portion of the camshaft No. 2.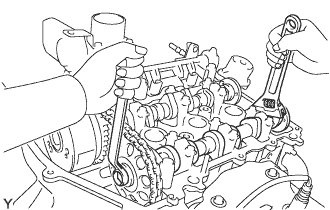
- Torque:
- 47 N*m{ 479 kgf*cm , 35 ft.*lbf }
| 4. INSTALL CAMSHAFT TIMING SPROCKET ASSEMBLY |
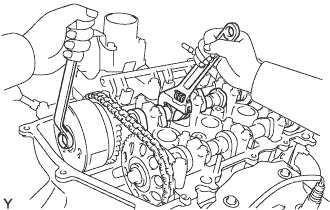 |
Tighten the bolts onto the sprocket while holding the hexagonal portion of the camshaft.
- Torque:
- 47 N*m{ 479 kgf*cm , 35 ft.*lbf }
| 5. INSTALL TIMING GEAR COVER TIGHT PLUG |
Remove the hexagon wrench from the timing chain tensioner sub-assembly.
- HINT:
- Before removing, slightly turn the hexagonal portion of the camshaft assembly counterclockwise to leave some slack on the chain of the timing chain tensioner sub-assembly side.
Clean the plug and the bolt holes of the timing chain cover and apply adhesive to the threads of the plug.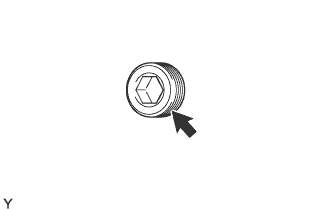
Using an 8mm socket hexagon wrench, install timing gear tight plug No. 1.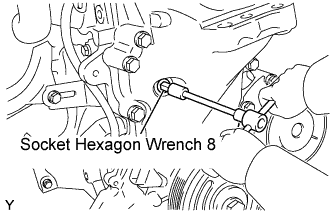
- Torque:
- 15 N*m{ 153 kgf*cm , 11 ft.*lbf }
| 6. INSPECT VALVE CLEARANCE |
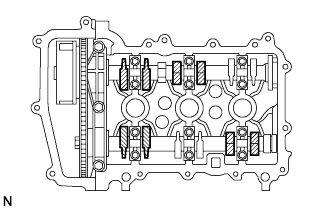 |
Check only the valves indicated.
Using a feeler gauge, measure the clearance between the valve lifter and camshaft.
- Valve clearance (Cold):
- Intake side:
- 0.145 to 0.235 mm (0.00571 to 0.00925 in.)
- Exhaust side:
- 0.275 to 0.365 mm (0.01083 to 0.01437 in.)
- HINT:
- Insert the feeler gauge from the spark plug side (center).
Record any out-of-specification valve clearance measurements. They will be used later to determine the required replacement valve lifters.
Turn the crankshaft 1 revolution (360°).
Check only the valves indicated.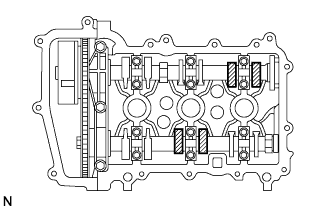
Using a feeler gauge, measure the clearance between the valve lifter and camshaft.
- Valve clearance (Cold):
- Intake side:
- 0.145 to 0.235 mm (0.00571 to 0.00925 in.)
- Exhaust side:
- 0.275 to 0.365 mm (0.01083 to 0.01437 in.)
- HINT:
- Insert the feeler gauge from the spark plug side (center).
Record any out-of-specification valve clearance measurements. They will be used later to determine the required replacement valve lifters.
| 7. ADJUST VALVE CLEARANCE |
Remove the No. 1 and No. 2 camshafts (Click here).
Remove the valve lifters (Click here).
Using a micrometer, measure the thickness of the removed valve lifters.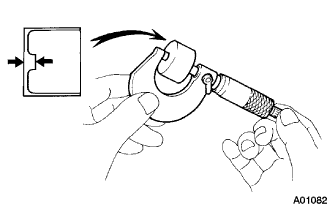
Calculate the thickness of a new lifter so that the valve clearance comes within the specified value.
A
Thickness of new lifter
B
Thickness of used lifter
C
Measured valve clearance
- Valve clearance:
- Intake A = B + (C - 0.18 mm (0.0071 in.))
- Exhaust A = B + (C - 0.31 mm (0.0122 in.))
- HINT:
- Select a new lifter with a thickness as close to the calculated values as possible.
- Lifters are available in 29 sizes in increments of 0.020 mm (0.0008 in.), from 5.12 mm (0.2016 in.) to 5.68 mm (0.2236 in.).
- Refer to the New Lifter Thickness Table on the next 2 pages.
- Select a new lifter with a thickness as close to the calculated values as possible.
Install the valve lifters (Click here).
Install the No. 1 and No. 2 camshafts (Click here).
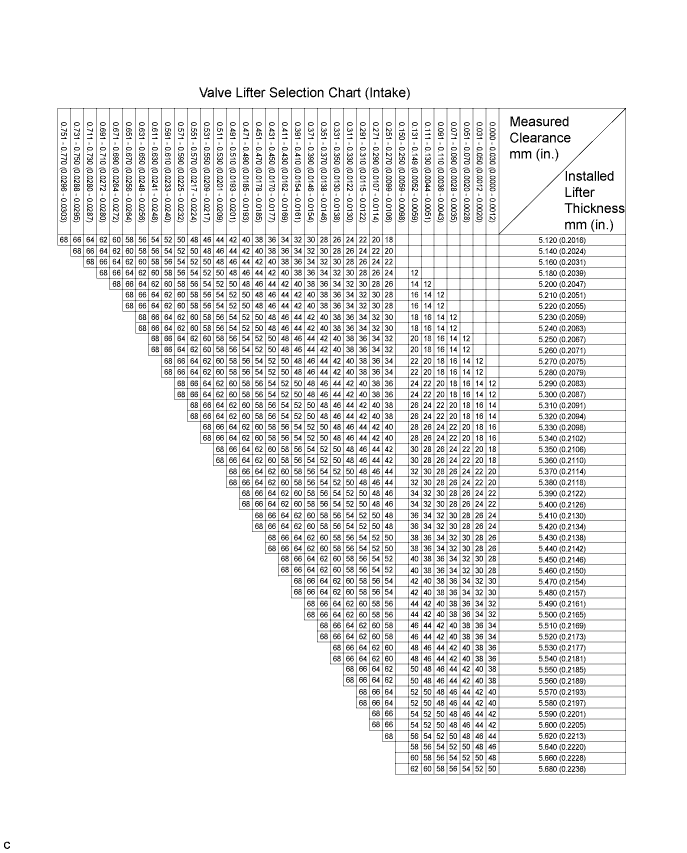
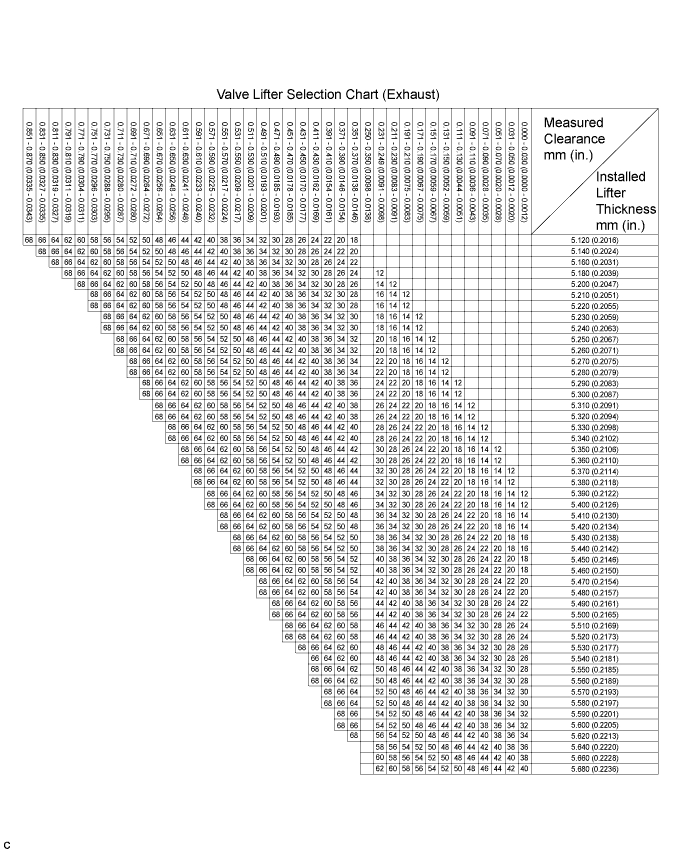
- HINT:
New lifter thickness mm (in.) Lifter No.
Thickness
Lifter No.
Thickness
Lifter No.
Thickness
12
5.12 (0.2016)
32
5.32 (0.2094)
52
5.52 (0.2173)
14
5.14 (0.2024)
34
5.34 (0.2102)
54
5.54 (0.2181)
16
5.16 (0.2031)
36
5.36 (0.2110)
56
5.56 (0.2189)
18
5.18 (0.2039)
38
5.38 (0.2118)
58
5.58 (0.2197)
20
5.20 (0.2047)
40
5.40 (0.2126)
60
5.60 (0.2205)
22
5.22 (0.2055)
42
5.42 (0.2134)
62
5.62 (0.2213)
24
5.24 (0.2063)
44
5.44 (0.2142)
64
5.64 (0.2220)
26
5.26 (0.2071)
46
5.46 (0.2150)
66
5.66 (0.2228)
28
5.28 (0.2079)
48
5.48 (0.2157)
68
5.68 (0.2236)
30
5.30 (0.2087)
50
5.50 (0.2165)
-
-
| 8. INSTALL CYLINDER HEAD COVER SUB-ASSEMBLY |
 |
Clean the cylinder head cover, cylinder head assembly and timing chain cover assembly.
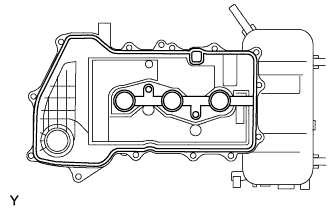
Fit the cylinder head cover gasket into the gasket groove on the cover and onto the center bosses.
Apply a continuous bead of seal packing (diameter: 3.5 to 4.5 mm (0.14 to 0.18 in.)) to the contact surface between the cylinder head assembly and timing chain cover assembly, as shown in the illustration.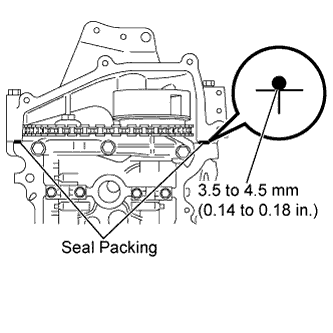
- Seal Packing:
- Part No. 08826-00080 or the equivalent
Install the bolts within 3 minutes of applying seal packing in the order shown in the illustration.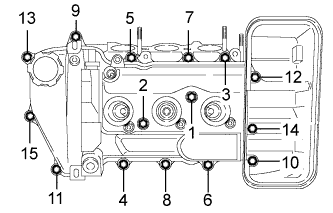
- Torque:
- 7.7 N*m{ 79 kgf*cm , 68 in.*lbf }
Tighten the bolts to the specified torque and make sure that bolts 1 and 2 are tightened to the specified torque shown in the illustration.
Install the wire harness.
Install the oxygen sensor wire harness with the bolt.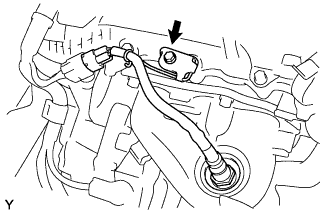
- Torque:
- 7.7 N*m{ 79 kgf*cm , 68 in.*lbf }
Connect the ventilation hose.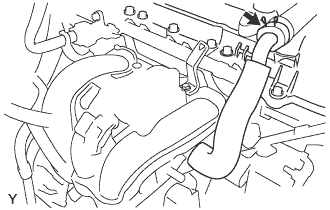
Connect vapor hoses No. 1 and No. 2.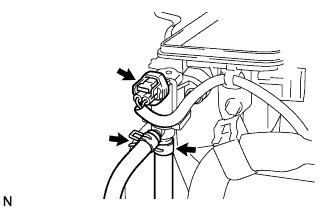
Connect the VSV connector.
| 9. INSTALL IGNITION COIL NO. 1 |
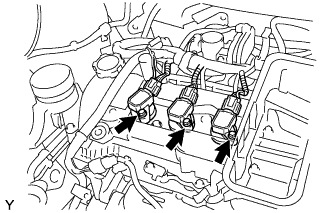 |
Install the 3 ignition coils with the 3 bolts.
- Torque:
- 9.2 N*m{ 94 kgf*cm , 81 in.*lbf }
Connect the ignition coil connectors.
| 10. INSTALL AIR CLEANER FILTER ELEMENT SUB-ASSEMBLY |
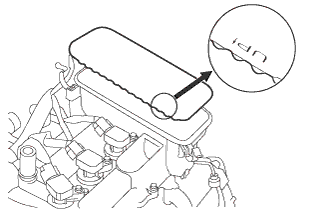 |
Install the air cleaner filter element as shown in the illustration.
| 11. INSTALL AIR CLEANER CAP SUB-ASSEMBLY |
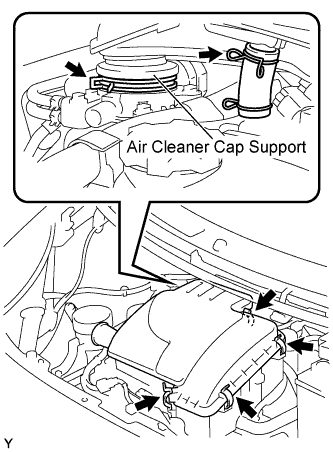 |
Install the air cleaner cap with the 2 clamps.
Tighten the 4 clamps.
| 12. CONNECT CABLE TO NEGATIVE BATTERY TERMINAL |
- Torque:
- 5.4 N*m{ 55 kgf*cm , 48 in.*lbf }
| 13. CHECK FOR ENGINE OIL LEAKAGE |