REASSEMBLY
Removal / installation · Vehicles built from Aug 2005
| 1. INSTALL PIN |

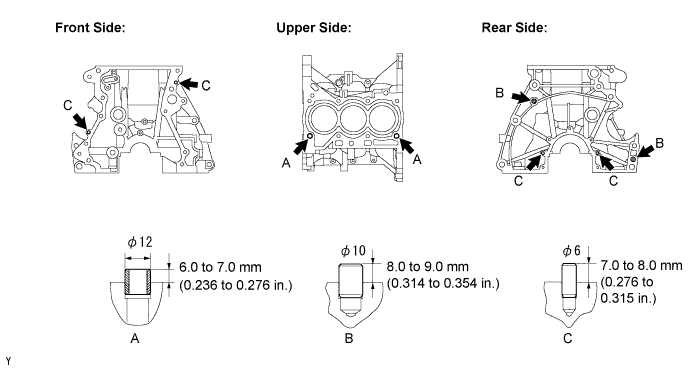

Using a plastic-hammer, tap in the 6 straight pins and 2 ring pins, as shown in the illustration.
- Standard protrusion:
- Pin A:
- 6.0 to 7.0 mm (0.23622 to 0.27559 in.)
- Pin B:
- 8.0 to 9.0 mm (0.31496 to 0.35433 in.)
- Pin C:
- 7.0 to 8.0 mm (0.27559 to 0.31496 in.)
| 2. INSTALL OIL LEVEL GAUGE GUIDE SUPPORT |
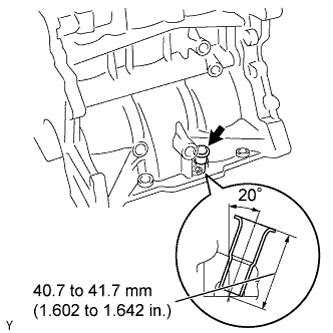 |
Install the oil level gauge guide support onto cylinder block.
| 3. INSTALL CRANKSHAFT BEARING |
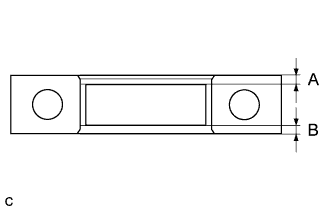 |
Align the crankshaft lower bearing with the bearing cap and install the crankshaft bearing cap.
- NOTICE:
- Install the bearing cap so that the gap between A and B is less than 0.8 mm (0.031in.)
- Do not apply engine oil to the bearing and its contact surface.
- Install the bearing cap so that the gap between A and B is less than 0.8 mm (0.031in.)
Align the crankshaft bearing (upper) with the oil hole in of the cylinder block and install the bearing.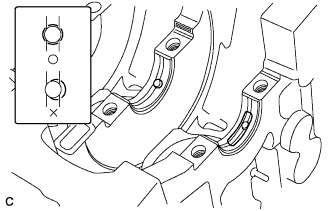
- NOTICE:
- Do not apply engine oil to the bearing or its contact surface.
| 4. INSTALL CRANKSHAFT THRUST WASHER UPPER |
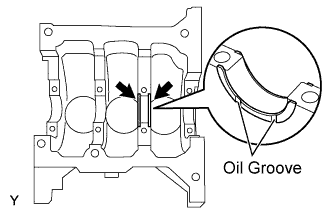 |
Apply engine oil to the oil groove.
Install the 2 crankshaft thrust washers onto the No. 3 journal position of the cylinder block with the oil grooves facing outward.
| 5. INSTALL CRANKSHAFT |
Apply engine oil to the sliding surface of the crankshaft bearing (upper) and install the crankshaft.
Apply engine oil to the sliding surface of the crankshaft bearing (lower) and install the crankshaft bearing cap with the front mark facing forward.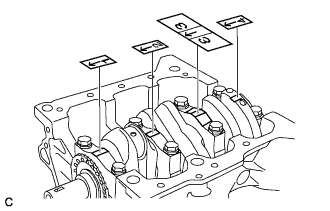
Apply engine oil to the crankshaft bolts and install them in 2 or 3 steps, in the order shown in the illustration.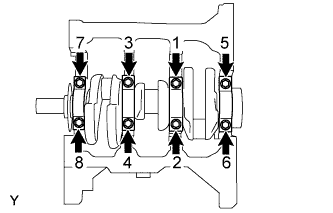
- Torque:
- 59 N*m{ 602 kgf*cm , 44 ft.*lbf }
Make sure that the crankshaft turns smoothly.
| 6. INSTALL WITH PIN PISTON SUB-ASSEMBLY |
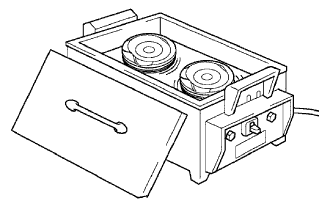 |
Gradually heat the piston up to 80 to 90°C (176 to 194°F).
Apply engine oil to the smaller end of a new connecting rod and a new piston pin.
Align the front marks on the piston with the connecting rod and assemble them.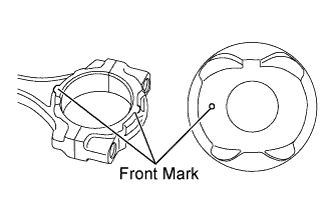
Using SST and a press, press in the piston pin.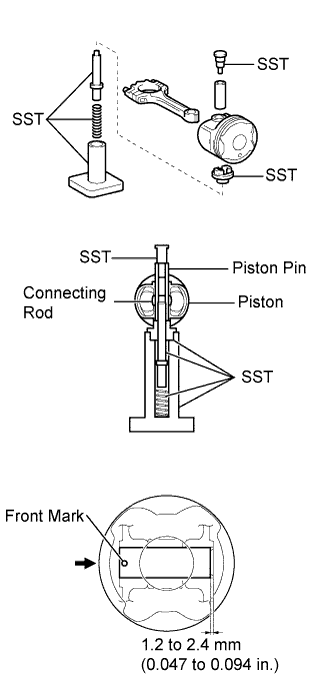
- SST
- 09221-25026
(09221-00021, 09221-00030, 09221-00130, 09221-00141, 09221-00150)
- NOTICE:
- Press the piston pin in from the front mark side of the piston.
- Do not press the piston pin in at an angle.
- Press the piston pin in from the front mark side of the piston.
Hold the connecting rod and check that the piston moves smoothly.
| 7. INSTALL PISTON RING SET |
 |
Install the oil ring.
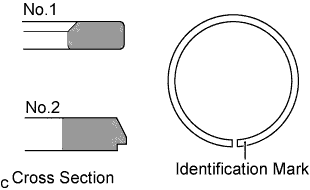
Using a piston ring expander, install compression ring No. 2 and compression ring No. 1 with identification marks (T) facing upward.
Install the rings so that each end faces as shown in the illustration.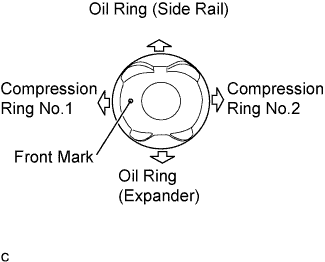
| 8. INSTALL CONNECTING ROD BEARING |
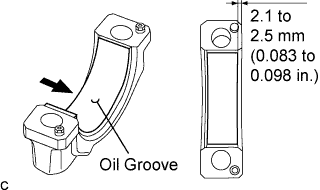 |
Align the connecting rod bearing oil groove of the connecting rod cap.
Install the connecting rod bearing onto the connecting rod bearing cap, as shown in the illustration.
- NOTICE:
- Do not apply engine oil to the bearing or its contact surface.
Align the connecting rod bearing oil groove of the connecting rod.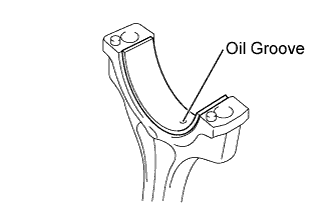
Install the connecting rod bearing onto the connecting rod.
- NOTICE:
- Do not apply engine oil to the bearing or its contact surface.
| 9. INSTALL CONNECTING ROD SUB-ASSEMBLY |
|
|
Make sure that the compression rings and oil ring are installed in the correct directions.
Apply engine oil to the sliding surfaces of the piston and connecting rod sub-assembly.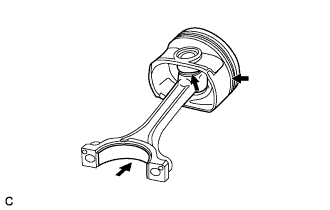
Using a piston ring compressor, push the numbered piston and connecting rod assemblies into each cylinder with the front mark of the piston facing forward.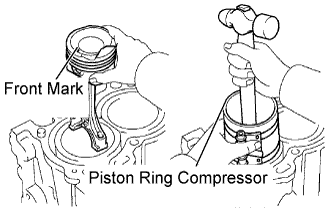
Apply engine oil to the sliding surface of the connecting rod bearing.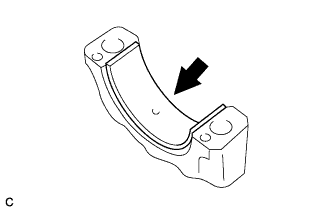
Install the connecting rod with the front mark of the connecting rod bearing cap facing forward.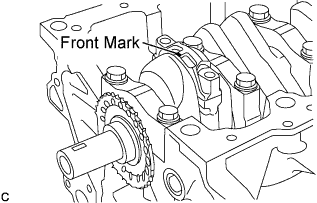
- NOTICE:
- Install the connecting rod bearing cap with the front mark facing forward. Make sure that the knock pin aligns with the knock pin hole.
- Do not change the connecting rod and connecting rod bearing cap combination.
- Install the connecting rod bearing cap with the front mark facing forward. Make sure that the knock pin aligns with the knock pin hole.
Apply a light coat of engine oil to the seating position and threads of the connecting rod bolt.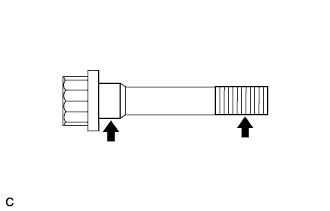
Alternately tighten the connecting rod bolts in 2 or 3 steps.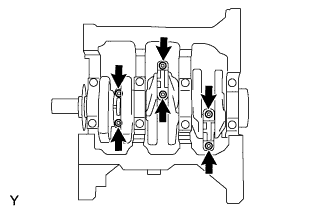
- Torque:
- 15 N*m{ 153 kgf*cm , 11 ft.*lbf }
Mark the front of the connecting cap bolts with paint.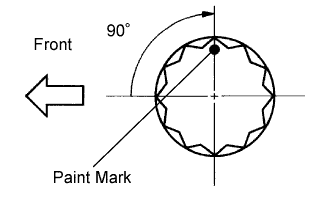
Retighten the cap bolts by an additional 90° as shown in the illustration.
Check that the crankshaft turns smoothly.
| 10. INSTALL CYLINDER HEAD OIL ORIFICE |
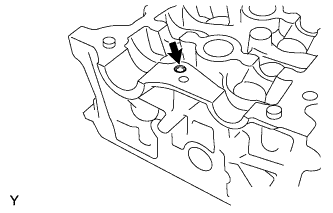 |
Tap the cylinder head oil orifice in, as shown in the illustration.
| 11. INSTALL TIGHT PLUG NO. 1 |
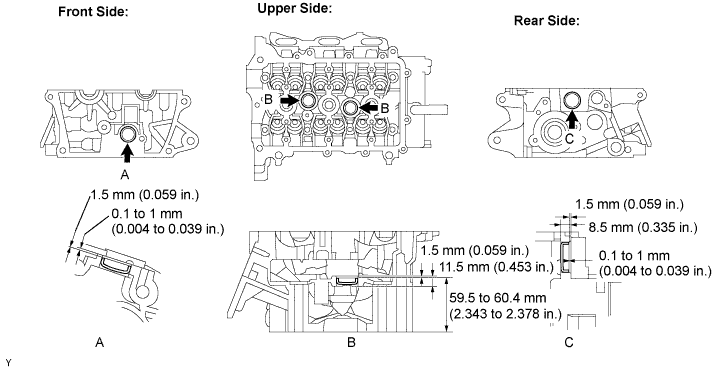
Tap the tight plug in, as shown in the illustration.
| 12. INSTALL VALVE |
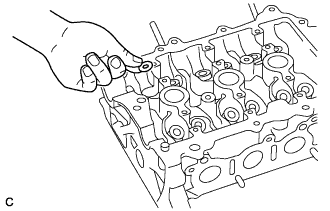 |
Install the 12 valve spring seats onto the cylinder head.
Apply a light coat of engine oil to 12 new valve stem oil seals.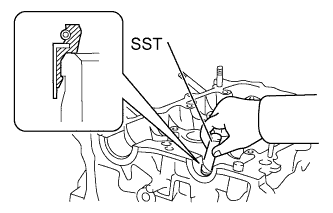
Using SST, push in the valve stem oil seals by hand.
- SST
- 09201-41020
Make sure that each valve stem oil seal is pushed in to the specified depth, as shown in the illustration.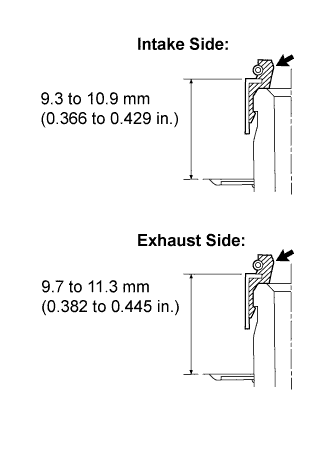
- Standard depth:
- Intake side:
- 9.7 to 11.3 mm (0.382 to 0.445 in.)
- Exhaust side:
- 9.3 to 10.9 mm (0.366 to 0.429 in.)
Apply engine oil to each valve area of 30 mm (1.18 in.) or more from its tip, as shown in the illustration.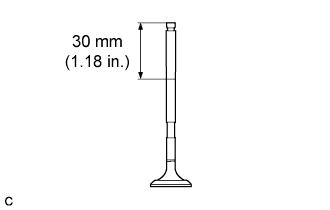
Install the valves, inner compression springs and valve seat retainers onto the cylinder head.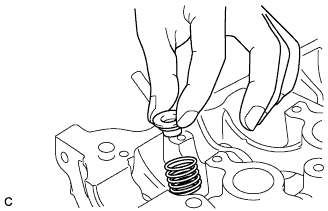
Using SST, compress the inner compression springs and place the 2 valve spring retainer locks around the valve stem.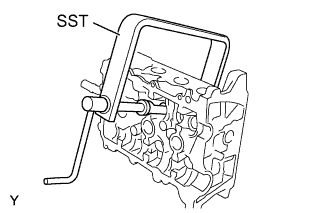
- SST
- 09202-70020
Using a pin punch, gently tap the valve stem tip to ensure that it is fitted properly.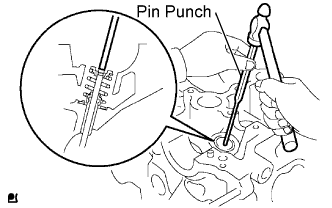
- NOTICE:
- Do not damage the valve stem tip.
Apply engine oil to the top surfaces of the valve as shown in the illustration.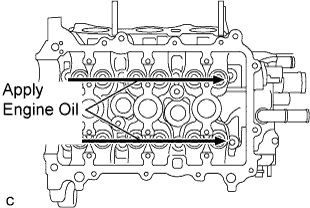
| 13. INSTALL CYLINDER HEAD GASKET |
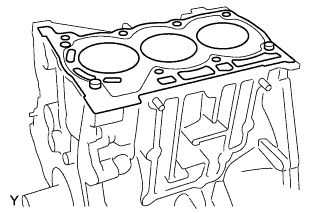 |
Place a new cylinder head gasket on the cylinder block sub-assembly.
| 14. INSTALL CYLINDER HEAD SUB-ASSEMBLY |
- NOTICE:
- Place the cylinder head gently in order not to damage the gasket.
Place the cylinder head on the cylinder block sub-assembly.
Apply engine oil to each bolt thread and seating surface.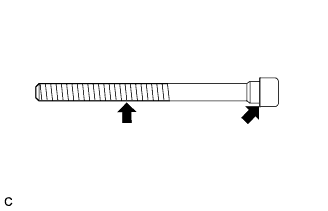
Tighten the bolts in 2 or 3 steps in the order shown in the illustration to install the cylinder head sub-assembly.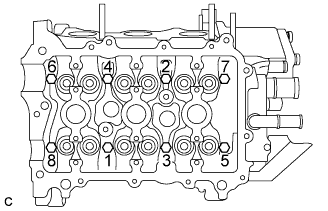
Tighten the bolts to the specified torque (*1).
- Torque:
- 32 N*m{ 326 kgf*cm , 24 ft.*lbf }
Mark the front of each cylinder head bolt with paint.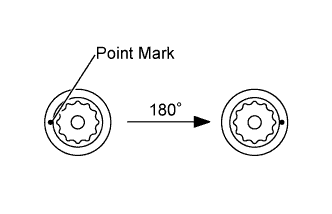
Retighten the bolts by 180° in the order indicated in step (*1).
Check that the painted marks are now 180° from the front.
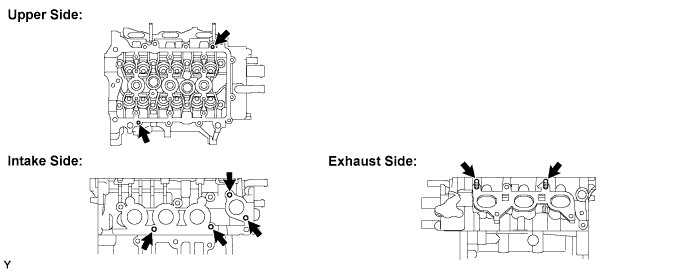
Install the 8 stud bolts.
| 15. INSTALL VALVE LIFTER |
Apply engine oil to the circumference of the valve lifters.
Install the valve lifters straight into the lifter holes.
- NOTICE:
- Check that the valve lifters turn smoothly after installing them.
| 16. INSTALL ENGINE REAR OIL SEAL |
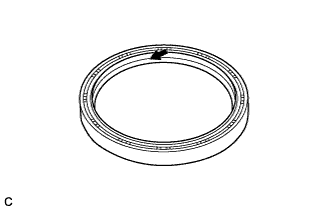 |
Apply engine oil to the lip of a new oil seal.
Using SST, tap the oil seal straight in.
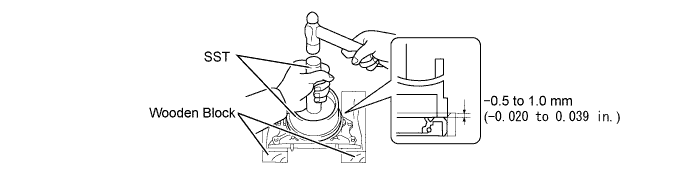
- SST
- 09950-60020
(09951-00890)
09950-70010 (09951-07200)
- Correct oil seal position:
- Protrusion from rear oil seal retainer edge:
- 0.5 mm (0.020 in.) or less
- Installation depth from rear oil seal retainer edge:
- 1.0 mm (0.039 in.) or less
| 17. INSTALL ENGINE REAR OIL SEAL RETAINER |
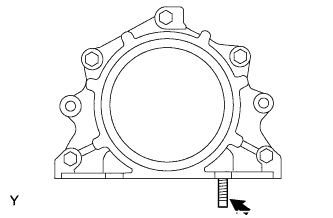 |
Install the stud bolt onto the rear oil seal retainer.
- Torque:
- 4.0 N*m{ 41 kgf*cm , 35 in.*lbf }
Apply a continuous bead of seal packing (Diameter 3 to 4 mm (0.12 to 0.16 in.)) as shown in the illustration.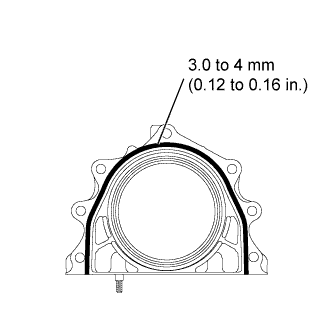
- Seal packing:
- Part No. 08826-00080 or the equivalent
Install the oil seal retainer with the 5 bolts.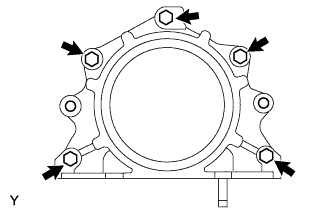
- Torque:
- 10 N*m{ 102 kgf*cm , 7.0 ft.*lbf }
| 18. INSTALL VENTILATION BAFFLE PLATE |
Clean the installation surface of the cylinder block sub-assembly and ventilation baffle plate.
Apply a continuous bead of seal packing (Diameter 3 to 4 mm (0.12 to 0.16 in.)) as shown in the illustration.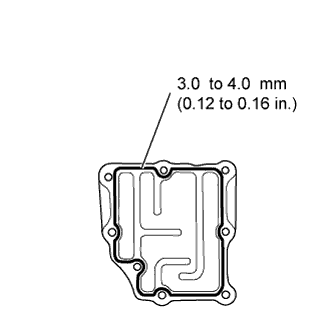
- Seal packing:
- Part No. 08826-00080 or the equivalent
Install the ventilation baffle plate in the order shown in the illustration with the 6 bolts and 2 nuts.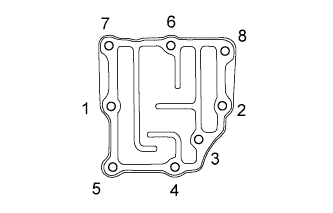
- Torque:
- 24 N*m{ 245 kgf*cm , 18 ft.*lbf }
- NOTICE:
- Install the ventilation baffle plate within 3 minutes of applying seal packing.
| 19. INSTALL CAMSHAFTS |
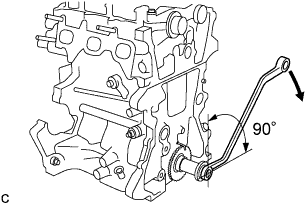 |
Before installing the camshaft, turn the crankshaft approximately 90°in the engine revolution direction from the point where the No. 1 piston is set at the TDC/ compression so that the lifted valve and piston do not touch each other.
Apply engine oil to the contact areas of the cam and journal of the camshafts No. 1 and No. 2.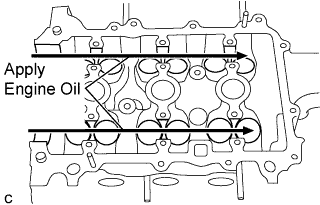
Set camshaft assembly No. 1 so that the cam noses for cylinders No. 1 and No. 3 press onto the valve lifters.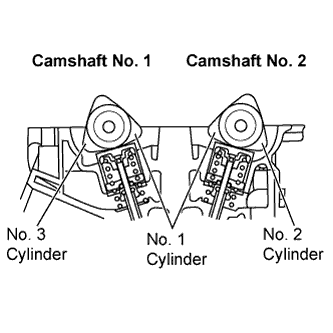
Set camshaft assembly No. 2 (on the exhaust side) so that the cam noses for cylinders No. 1 and No. 2 press onto the valve lifters.
Set the camshaft bearing caps No. 1 and No. 2 and tighten the bolts in the order shown in the illustration.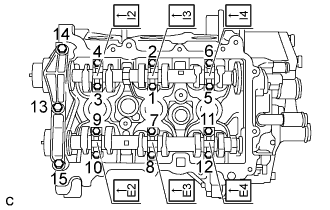
- Torque:
- Camshaft bearing cap No. 1:
- 15 N*m{ 153 kgf*cm , 11 ft.*lbf }
- Camshaft bearing cap No. 2:
- 12.5 N*m{ 128 kgf*cm , 9.0 ft.*lbf }
- NOTICE:
- Install the bearing caps with the front marks facing the engine front.
- Install the bolts in the correct positions by referring to the numbers inscribed on the bolts and the table below.
- Install the bearing caps with the front marks facing the engine front.
Installation position of the bearing cap No. 2 Installation position
Inscribed No.
Intake No. 1 cylinder
I2
Intake No. 2 cylinder
I3
Intake No. 3 cylinder
I4
Exhaust No. 1 cylinder
E2
Exhaust No. 2 cylinder
E3
Exhaust No. 3 cylinder
E4
| 20. INSTALL CAMSHAFT TIMING SPROCKET ASSEMBLY |
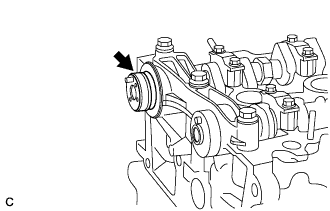 |
Apply engine oil to the camshaft timing sprocket installation portion of the camshaft.
Insert the knock pin on the camshaft end into the knock hole in the camshaft timing sprocket.
- NOTICE:
- Slightly turn the sprocket to make sure that the knock pin is securely installed after inserting the knock pin.
- The end surface of the sprocket may be damaged if the sprocket is turned with excessive force when the knock pin is not inserted.
- Slightly turn the sprocket to make sure that the knock pin is securely installed after inserting the knock pin.
While holding the hexagonal portion of the camshaft, tighten the bolts to install the camshaft timing sprocket.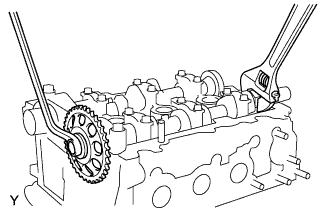
- Torque:
- 47 N*m{ 479 kgf*cm , 35 ft.*lbf }
| 21. INSTALL CAMSHAFT TIMING GEAR OR SPROCKET |
Insert the camshaft timing gear so that the knock pin on the camshaft end fits into the groove.
While holding the hexagonal portion of the camshaft, tighten the bolts to install the camshaft timing gear.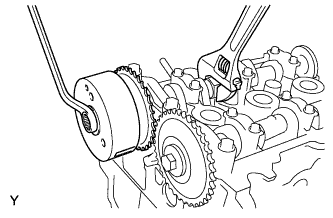
- Torque:
- 47 N*m{ 479 kgf*cm , 35 ft.*lbf }
| 22. INSPECT VALVE CLEARANCE |
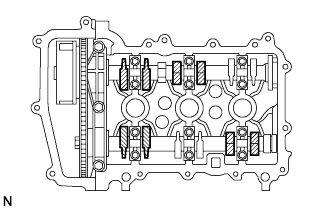 |
Check only the valves indicated.
Using a feeler gauge, measure the clearance between the valve lifter and camshaft.
- Valve clearance (Cold):
- Intake side:
- 0.145 to 0.235 mm (0.00571 to 0.00925 in.)
- Exhaust side:
- 0.275 to 0.365 mm (0.01083 to 0.01437 in.)
- HINT:
- Insert the feeler gauge from the spark plug side (center).
Record any out-of-specification valve clearance measurements. They will be used later to determine the required replacement valve lifters.
Turn the crankshaft 1 revolution (360°).
Check only the valves indicated.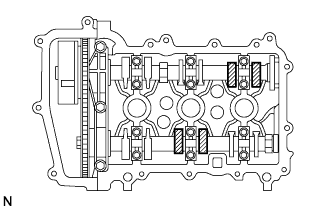
Using a feeler gauge, measure the clearance between the valve lifter and camshaft.
- Valve clearance (Cold):
- Intake side:
- 0.145 to 0.235 mm (0.00571 to 0.00925 in.)
- Exhaust side:
- 0.275 to 0.365 mm (0.01083 to 0.01437 in.)
- HINT:
- Insert the feeler gauge from the spark plug side (center).
Record any out-of-specification valve clearance measurements. They will be used later to determine the required replacement valve lifters.
| 23. ADJUST VALVE CLEARANCE |
Remove the No. 1 and No. 2 camshafts (Click here).
Remove the valve lifters (Click here).
Using a micrometer, measure the thickness of the removed valve lifters.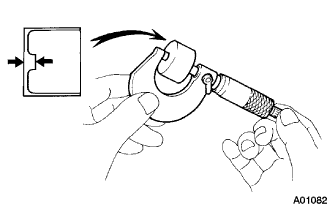
Calculate the thickness of a new lifter so that the valve clearance comes within the specified value.
A
Thickness of new lifter
B
Thickness of used lifter
C
Measured valve clearance
- Valve clearance:
- Intake A = B + (C - 0.18 mm (0.0071 in.))
- Exhaust A = B + (C - 0.31 mm (0.0122 in.))
- HINT:
- Select a new lifter with a thickness as close to the calculated values as possible.
- Lifters are available in 29 sizes in increments of 0.020 mm (0.0008 in.), from 5.12 mm (0.2016 in.) to 5.68 mm (0.2236 in.).
- Refer to the New Lifter Thickness Table on the next 2 pages.
- Select a new lifter with a thickness as close to the calculated values as possible.
Install the valve lifters (Click here).
Install the No. 1 and No. 2 camshafts (Click here).
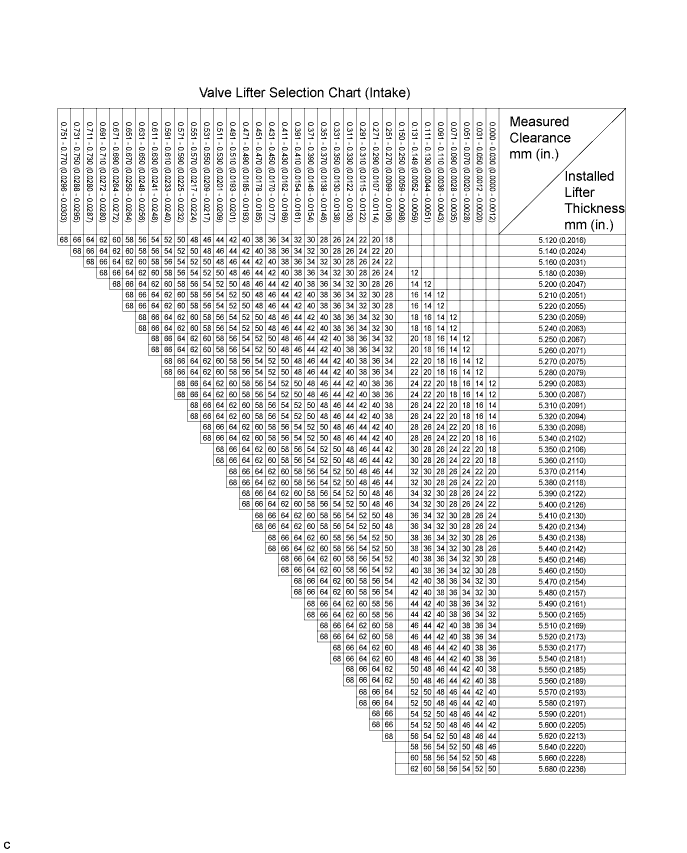
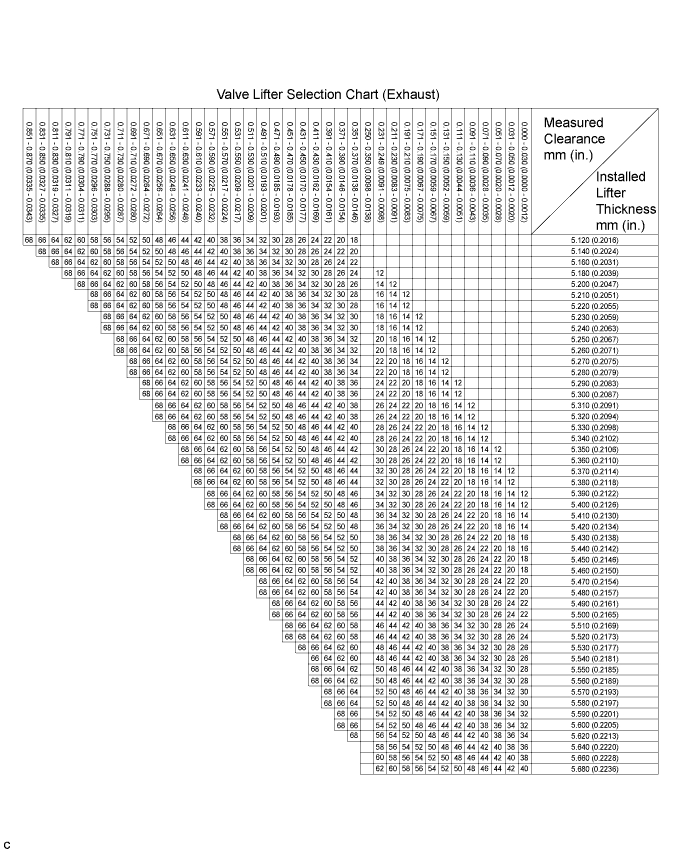
- HINT:
New lifter thickness mm (in.) Lifter No.
Thickness
Lifter No.
Thickness
Lifter No.
Thickness
12
5.12 (0.2016)
32
5.32 (0.2094)
52
5.52 (0.2173)
14
5.14 (0.2024)
34
5.34 (0.2102)
54
5.54 (0.2181)
16
5.16 (0.2031)
36
5.36 (0.2110)
56
5.56 (0.2189)
18
5.18 (0.2039)
38
5.38 (0.2118)
58
5.58 (0.2197)
20
5.20 (0.2047)
40
5.40 (0.2126)
60
5.60 (0.2205)
22
5.22 (0.2055)
42
5.42 (0.2134)
62
5.62 (0.2213)
24
5.24 (0.2063)
44
5.44 (0.2142)
64
5.64 (0.2220)
26
5.26 (0.2071)
46
5.46 (0.2150)
66
5.66 (0.2228)
28
5.28 (0.2079)
48
5.48 (0.2157)
68
5.68 (0.2236)
30
5.30 (0.2087)
50
5.50 (0.2165)
-
-
| 24. INSTALL OIL JET |
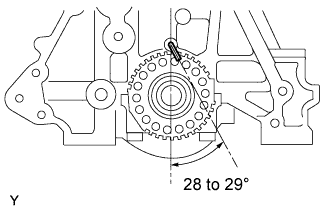 |
Install the oil jet as shown in the illustration.
- NOTICE:
- Insert the oil jet until the spool is attached.
| 25. INSTALL CRANKSHAFT STRAIGHT PIN |
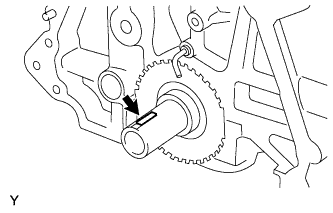 |
Install the crankshaft straight pin into the crankshaft groove.
| 26. INSTALL CRANKSHAFT TIMING GEAR OR SPROCKET |
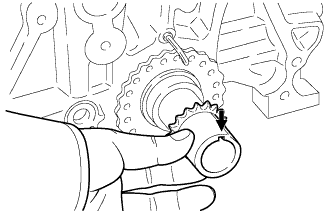 |
Align the groove of the crankshaft timing sprocket with the key of the crankshaft and install the crankshaft timing sprocket.
| 27. INSTALL TIMING CHAIN GUIDE |
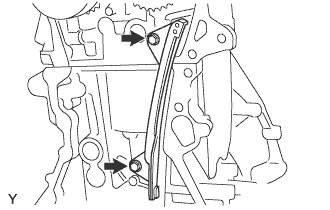 |
Install the timing chain guide with the 2 bolts.
- Torque:
- 9.0 N*m{ 92 kgf*cm , 80 in.*lbf }
| 28. INSTALL CHAIN SUB-ASSEMBLY |
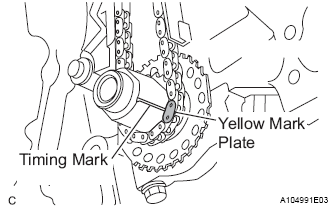 |
Align the yellow mark plate with the timing mark of the crankshaft timing sprocket and install the timing chain, as shown in the illustration.
Align the 2 orange mark plates with the timing marks of the camshaft timing sprockets and install the timing chain, as shown in the illustration.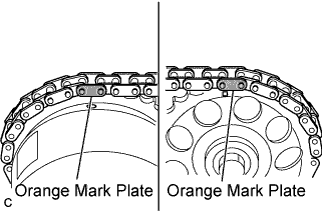
| 29. INSTALL TIMING CHAIN TENSION ARM |
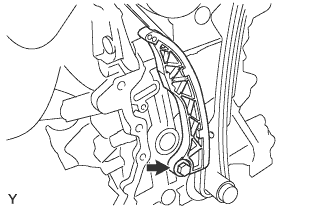 |
Install the timing chain tension arm with the bolt.
- Torque:
- 19 N*m{ 194 kgf*cm , 14 ft.*lbf }
| 30. INSTALL CHAIN TENSIONER ASSEMBLY NO. 1 |
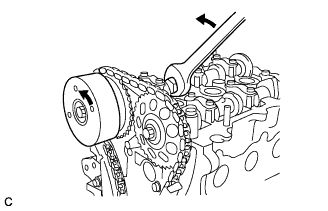 |
Slightly turn the hexagonal portion of the camshaft assembly (intake side) counterclockwise to leave some slack on the chain of the timing chain tensioner side.
Install the chain tensioner with the 2 bolts.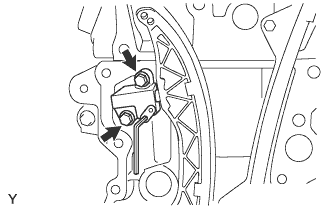
- Torque:
- 10.5 N*m{ 107 kgf*cm , 8.0 ft.*lbf }
Remove the hexagon wrench, turn the crankshaft 2 complete revolutions and operate the chain tension assembly.
Make sure that the timing mark of the sprocket camshaft timing is at the top with the timing chain tensed (set No. 1 piston to the TDC/ compression).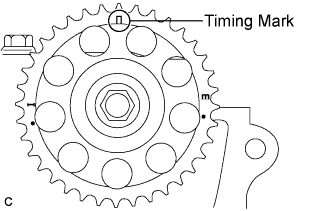
| 31. INSTALL OIL PUMP GASKET |
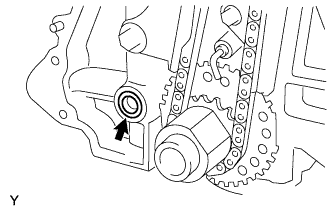 |
Install a new oil pump gasket onto the cylinder block.
| 32. INSTALL TIMING CHAIN OR BELT COVER OIL SEAL |
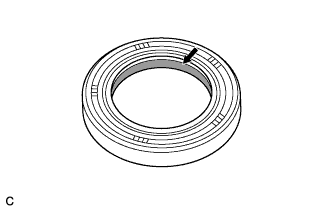 |
Apply engine oil to the lip of a new oil seal.
Using SST, tap the oil seal straight in.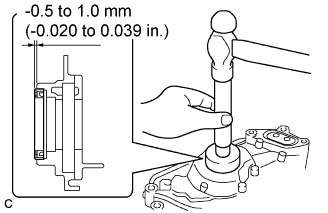
- SST
- 09950-60010
(09951-00500, 09952-06010)
09950-70010 (09951-07200)
- Correct oil seal position:
- Protrusion from chain cover edge:
- 0.5 mm (0.020 in.) or less
- Installation depth from chain cover edge:
- 1.0 mm (0.039 in.) or less
| 33. INSTALL TIMING CHAIN OR BELT COVER SUB-ASSEMBLY |
Remove any grease from the installation surfaces of the cylinder block sub-assembly and timing chain cover assembly.
Apply seal packing to the cylinder block and timing chain cover, as shown in the illustration, and install the timing chain cover sub-assembly.
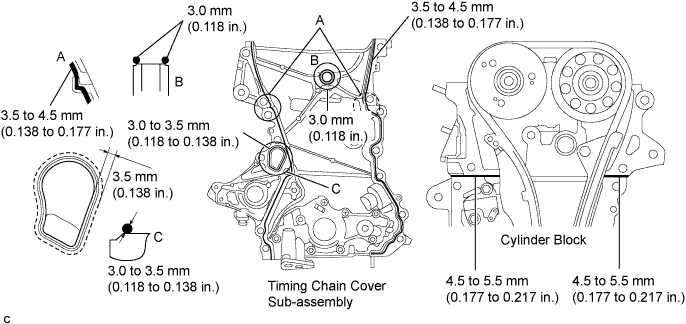
- Seal packing:
- Water pump part:
- Part No. 08826-00100 or the equivalent
- Other part:
- Part No. 08826-00080 or the equivalent
- NOTICE:
- Install the timing chain cover within 3 minutes of applying seal packing.
Tighten the 11 bolts in the order shown in the illustration.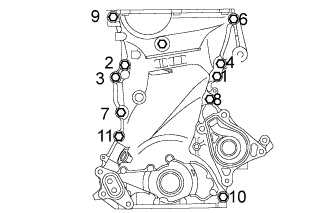
- Torque:
- M8 head bolt:
- 24 N*m{ 245 kgf*cm , 18 ft.*lbf }
- M10 head bolt:
- 40 N*m{ 408 kgf*cm , 30 ft.*lbf }
Remove excess seal packing.
Install the stud bolt.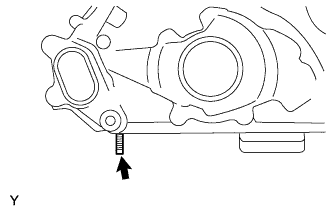
Install the water drain plug with a new gasket.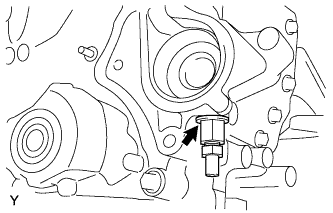
- Torque:
- 54 N*m{ 551 kgf*cm , 40 ft.*lbf }
| 34. INSTALL TIMING GEAR COVER TIGHT PLUG |
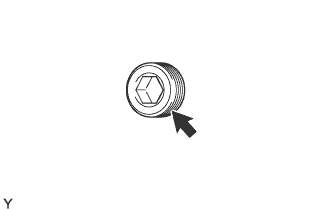 |
Clean the timing gear cover tight plug and installation surface of the timing chain cover.
Apply a light coat of the seal packing black to the timing gear cover tight plug.
Using an 8 mm socket hexagon wrench, install the timing gear cover tight plug onto the timing chain cover.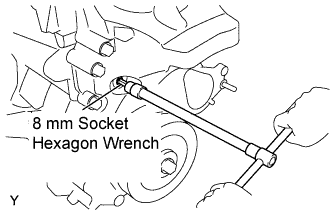
- Torque:
- 15 N*m{ 153 kgf*cm , 11 ft.*lbf }
| 35. INSTALL CRANKSHAFT PULLEY |
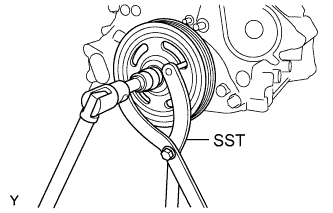 |
Hold the crankshaft pulley with SST and tighten the bolt.
- SST
- 09960-10010
(09962-01000, 09963-01000)
- Torque:
- 170 N*m{ 1,734 kgf*cm , 125 ft.*lbf }
| 36. INSTALL OIL FILTER BRACKET |
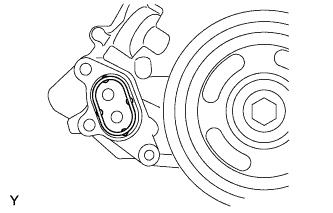 |
Install the gasket onto the timing chain cover.
Install the oil filter bracket with the 3 bolts.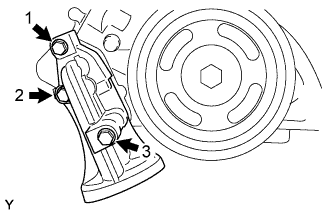
Tighten the 3 bolts in the order shown in the illustration.
- Torque:
- 24 N*m{ 245 kgf*cm , 18 ft.*lbf }
| 37. INSTALL OIL FILTER SUB-ASSEMBLY |
 |
Check and clean the oil filter installation surface.
Apply clean engine oil to the gasket of a new oil filter.
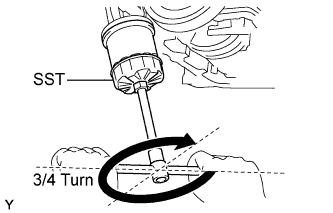
Gently screw the oil filter into place, then tighten it until the gasket comes into contact with the seat.
Using SST, tighten it an additional 3/4 turn.
- SST
- 09228-06501
| 38. INSTALL WATER PUMP ASSEMBLY |
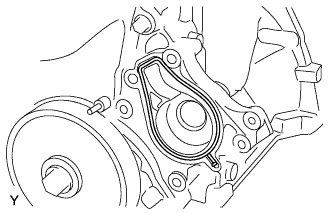 |
Install the gasket onto the chain cover.
Provisionally tighten the water pump with the 5 bolts.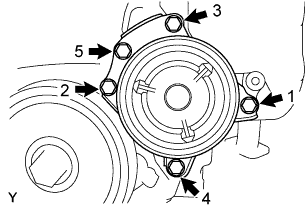
Tighten the water pump with the 5 bolts.
- Torque:
- 28 N*m{ 286 kgf*cm , 21 ft.*lbf }
- NOTICE:
- Tighten the bolts and nuts in the sequence shown in the illustration.
| 39. CONNECT WATER BY-PASS HOSE |
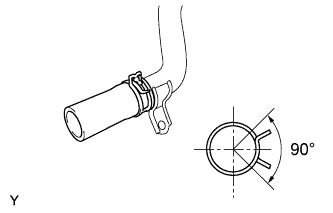 |
| 40. INSTALL WATER BY-PASS PIPE NO. 1 |
Install the water by-pass hose onto the water by-pass pipe with the clamp.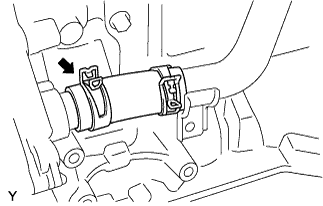
- NOTICE:
- Install the clip as shown in the illustration.
- Insert the water by-pass hose into the stay edge of the water by-pass hose.
- Install the clip as shown in the illustration.
Install a new water by-pass pipe gasket and water by-pass pipe No. 1 with the 2 nuts.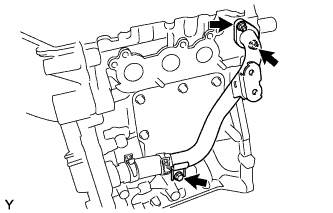
- Torque:
- 24 N*m{ 245 kgf*cm , 18 ft.*lbf }
- NOTICE:
- Install the gasket in the direction shown in the illustration.
Install the water by-pass pipe with the bolt.
- Torque:
- 24 N*m{ 245 kgf*cm , 18 ft.*lbf }
| 41. INSTALL THERMOSTAT |
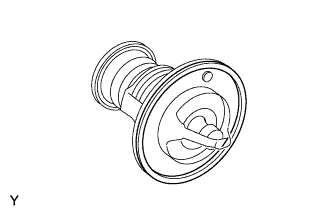 |
Install a new gasket onto the thermostat.
Install the thermostat into the water inlet with the jiggle pin facing straight upward.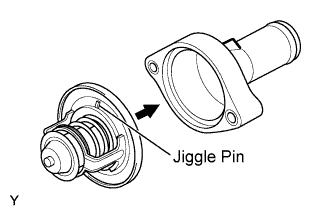
| 42. INSTALL WATER INLET |
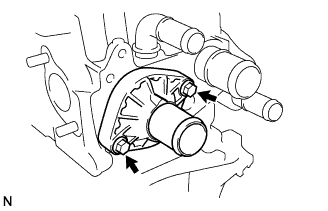 |
Install the water inlet with the 2 bolts.
- Torque:
- 7.0 N*m{ 71 kgf*cm , 62 in.*lbf }
- NOTICE:
- Avoid catching the rubber gasket of thermostat under the water inlet.
- Do not use a water inlet that has been dropped.
- Ensure that gasket is secured between the water inlet and block.
- Avoid catching the rubber gasket of thermostat under the water inlet.
| 43. INSTALL OIL STRAINER SUB-ASSEMBLY |
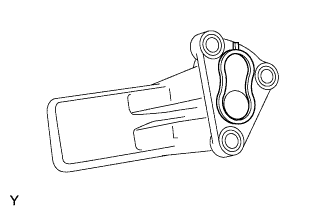 |
Install a new oil strainer gasket onto the oil strainer.
Install the oil strainer with the 3 bolts.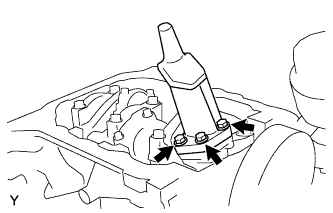
- Torque:
- 8.5 N*m{ 87 kgf*cm , 75 in.*lbf }
| 44. INSTALL OIL PAN SUB-ASSEMBLY |
Remove any grease from the installation surfaces of the cylinder block sub-assembly and oil pan sub-assembly.
Using a plastic hammer, tap into the straight pin, as shown in the illustration.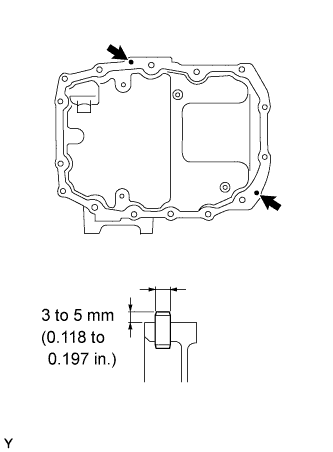
- Standard protrusion:
- 3 to 5 mm (0.11811 to 0.19685 in.)
Apply seal packing to the oil pan sub-assembly and install it onto the cylinder block assembly.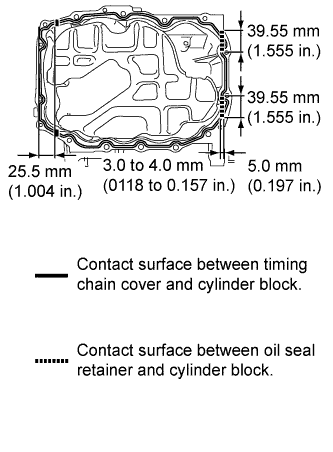
- Seal packing:
- Part No. 08826-00080 or the equivalent
- NOTICE:
- During sealant application, apply the quantity of sealant specified in the directions and overlap the starting and finished points.
- Apply seal packing to the contact surfaces between the timing chain cover and cylinder block, and between the oil seal retainer and cylinder block.
- Install the oil pan sub-assembly within 3 minutes and tighten the bolts within 15 minutes of applying seal packing.
- During sealant application, apply the quantity of sealant specified in the directions and overlap the starting and finished points.
Tighten the specified 6 bolts in the order shown in the illustration.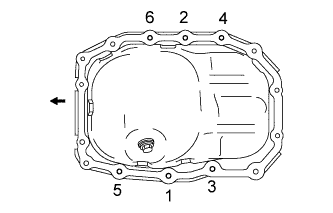
- Torque:
- 24 N*m{ 245 kgf*cm , 18 ft.*lbf }
The remaining 7 bolts and 2 nuts can be tightened in any order.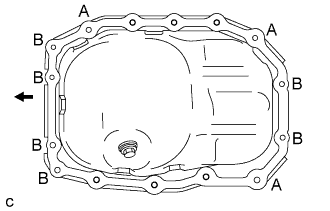
- Torque:
- A:
- 24 N*m{ 245 kgf*cm , 18 ft.*lbf }
- B:
- 10 N*m{ 102 kgf*cm , 7.0 ft.*lbf }
| 45. INSTALL OIL PAN DRAIN PLUG |
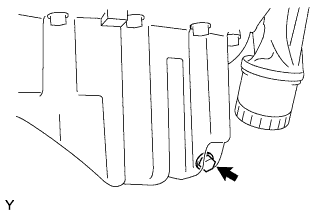 |
Install the engine oil drain plug with a new gasket.
- Torque:
- 30 N*m{ 306 kgf*cm , 22 ft.*lbf }
| 46. INSTALL VENTILATION VALVE SUB-ASSEMBLY |
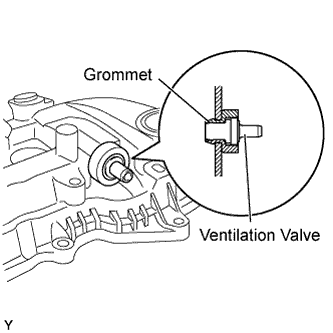 |
Install the grommet, as shown in the illustration.
Install the ventilation valve.
| 47. INSTALL CYLINDER HEAD COVER SUB-ASSEMBLY |
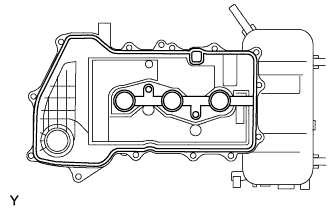 |
Fit the cylinder head cover gasket into the groove on the cylinder head cover and onto the center bosses.
- NOTICE:
- Insert the gasket securely until it completely fits into the roots of the bosses.
Apply seal packing to the upper section of the contact surfaces of the cylinder head sub-assembly and timing chain cover.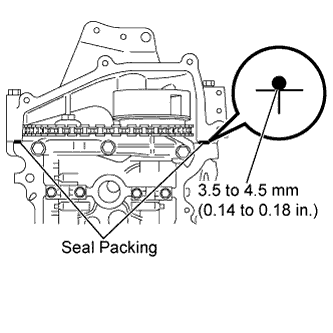
- Seal packing:
- Part No. 08826-00080 or the equivalent
- NOTICE:
- Install the cylinder head cover within 3 minutes and tighten the bolts and nuts within 15 minutes of applying seal packing.
Tighten the 13 bolts and 2 nuts to the specified torque in the order shown in the illustration.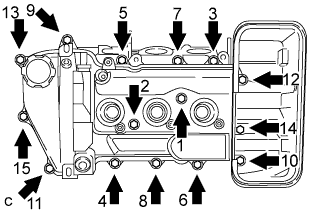
- Torque:
- 7.7 N*m{ 77 kgf*cm , 68 in.*lbf }
After tightening all of them, make sure that 1 and 2 are tightened to the specified torque shown in the illustraiton.
| 48. INSTALL OIL FILLER CAP SUB-ASSEMBLY |
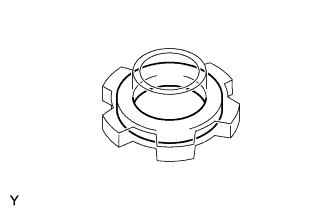 |
Install a new gasket onto the oil filler cap.
Install the oil filler cap.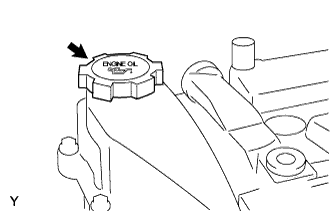
| 49. INSTALL OIL CONTROL VALVE FILTER |
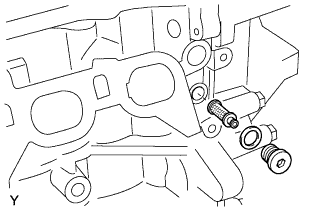 |
Install the oil control valve filter onto the tight plug.
Install a new gasket and install the oil control valve filter using a hexagon wrench.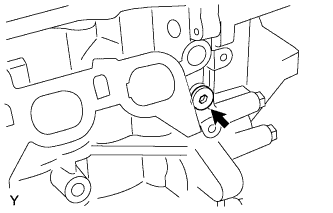
- Torque:
- 25 N*m{ 250 kgf*cm , 18 ft.*lbf }
| 50. INSTALL ENGINE OIL PRESSURE SWITCH ASSEMBLY |
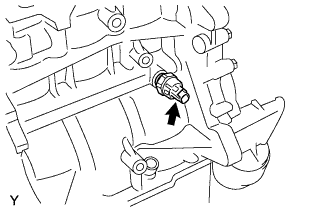 |
Using a 24 mm deep socket wrench, install the oil pressure switch.
- Torque:
- 10 N*m{ 102 kgf*cm , 7.0 ft.*lbf }
| 51. INSTALL OIL LEVEL GAUGE GUIDE |
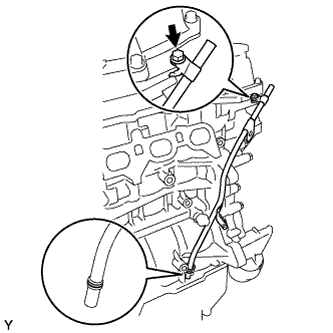 |
Install a new O-ring onto the oil level gauge guide.
Apply a light coat of engine oil to the O-ring.
Install the oil level gauge guide with the bolt.
- Torque:
- 10 N*m{ 102 kgf*cm , 7.0 ft.*lbf }
| 52. INSTALL OIL LEVEL GAUGE SUB-ASSEMBLY |
| 53. INSTALL CRANKSHAFT POSITION SENSOR |
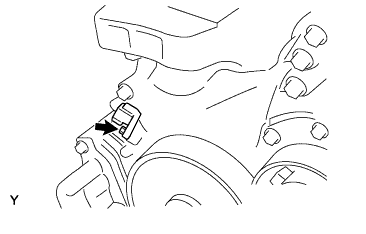 |
- NOTICE:
- Do not use dropped or hit parts.
- Make sure that the O-ring is not damaged before installing it.
- Do not use dropped or hit parts.
Apply light coat of engine oil to the O-ring.
Install the crankshaft position sensor with the bolt.
- Torque:
- 7.5 N*m{ 77 kgf*cm , 66 in.*lbf }
| 54. INSTALL CAMSHAFT TIMING OIL CONTROL VALVE ASSEMBLY |
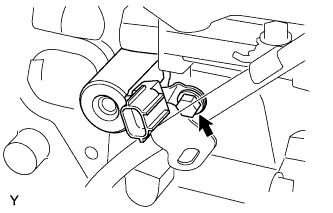 |
- NOTICE:
- Make sure that the O-ring is not damaged before installing it.
Apply light coat of engine oil to the O-ring.
Install the camshaft timing oil control valve with the bolt.
- Torque:
- 10 N*m{ 102 kgf*cm , 7.0 ft.*lbf }
| 55. INSTALL ENGINE COOLANT TEMPERATURE SENSOR |
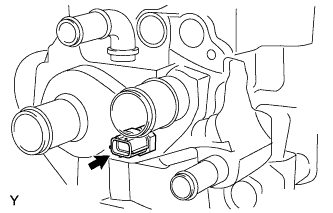 |
- NOTICE:
- Do not use parts that have been dropped or hit.
Install a gasket and the water temperature sensor.
- Torque:
- 20 N*m{ 200 kgf*cm , 14 ft.*lbf }
| 56. INSTALL CAMSHAFT POSITION SENSOR |
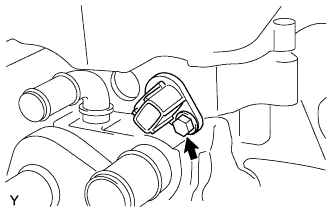 |
- NOTICE:
- Do not use dropped or hit parts.
- Make sure that the O-ring is not damaged before installing it.
- Do not use dropped or hit parts.
Apply a light coat of engine oil to the O-ring.
Install the camshaft position sensor with the bolt.
- Torque:
- 7.5 N*m{ 77 kgf*cm , 66 in.*lbf }
| 57. INSTALL SPARK PLUG |
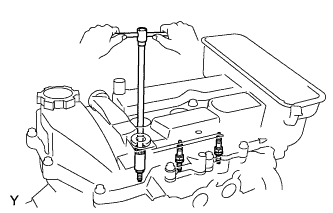 |
- NOTICE:
- Do not use parts that have been dropped or hit.
Install the 3 spark plugs.
- Torque:
- 25 N*m{ 255 kgf*cm , 18 ft.*lbf }
| 58. INSTALL ENGINE HANGERS |
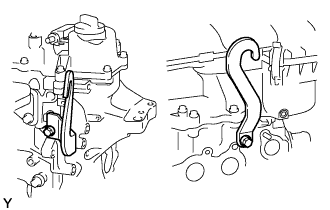 |
Install the 2 engine hangers with the 2 bolts.
- Torque:
- 28 N*m{ 285 kgf*cm , 21 ft.*lbf }