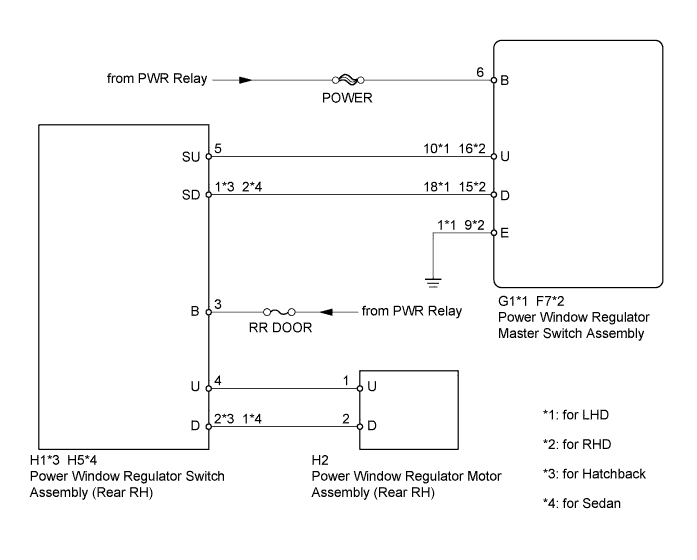
POWER WINDOW CONTROL SYSTEM > Rear Power Window RH does not Operate with Rear Power Window Switch RH |
| 1.CHECK POWER WINDOW REGULATOR SWITCH ASSEMBLY (POWER SOURCE) |
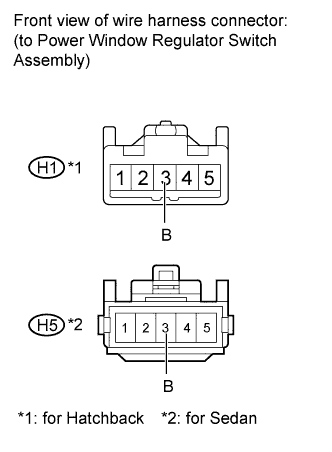 |
Disconnect the H1 or H5 power window regulator switch assembly connector.
Measure the voltage according to the value(s) in the table below.
| Tester Connection | Switch Condition | Specified Condition |
| H1-3 (B) - Body ground | Ignition switch ON | 11 to 14 V |
| Tester Connection | Switch Condition | Specified Condition |
| H5-3 (B) - Body ground | Ignition switch ON | 11 to 14 V |
Reconnect the power window regulator switch assembly connector.
|
| ||||
| OK | |
 |
| 2.INSPECT POWER WINDOW REGULATOR SWITCH ASSEMBLY |
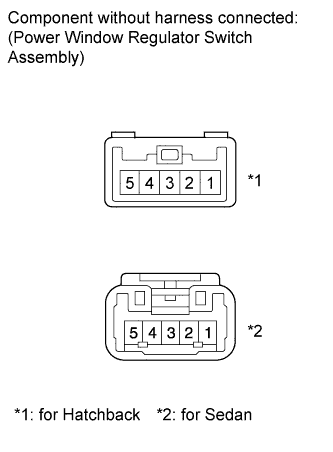 |
Remove the power window regulator switch assembly.
Measure the resistance according to the value(s) in the table below.
| Tester Connection | Switch Condition | Specified Condition |
| 1 - 2 3 - 4 | UP | Below 1 Ω |
| 4 - 5 1 - 2 | OFF | Below 1 Ω |
| 2 - 3 4 - 5 | DOWN | Below 1 Ω |
| Tester Connection | Switch Condition | Specified Condition |
| 1 - 2 3 - 4 | UP | Below 1 Ω |
| 4 - 5 1 - 2 | OFF | Below 1 Ω |
| 1 - 3 4 - 5 | DOWN | Below 1 Ω |
| Result | Proceed to |
| OK | A |
| NG (Hatchback) | B |
| NG (Sedan) | C |
Reinstall the power window regulator switch assembly.
|
| ||||
|
| ||||
| A | |
|
| 3.CHECK HARNESS AND CONNECTOR (POWER WINDOW REGULATOR SWITCH - POWER WINDOW REGULATOR MOTOR) |
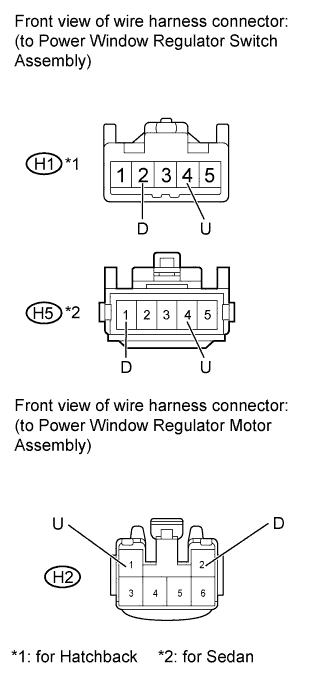 |
Disconnect the H1 or H5 power window regulator switch assembly connector.
Disconnect the H2 power window regulator motor assembly connector.
Measure the resistance according to the value(s) in the table below.
| Tester Connection | Condition | Specified Condition |
| H1-4 (U) - H2-1 (U) | Always | Below 1 Ω |
| H1-4 (U) or H2-1 (U) - Body ground | Always | 10 kΩ or higher |
| H1-2 (D) - H2-2 (D) | Always | Below 1 Ω |
| H1-2 (D) or H2-2 (D) - Body ground | Always | 10 kΩ or higher |
| Tester Connection | Condition | Specified Condition |
| H5-4 (U) - H2-1 (U) | Always | Below 1 Ω |
| H5-4 (U) or H2-1 (U) - Body ground | Always | 10 kΩ or higher |
| H5-1 (D) - H2-2 (D) | Always | Below 1 Ω |
| H5-1 (D) or H2-2 (D) - Body ground | Always | 10 kΩ or higher |
Reconnect the power window regulator switch assembly connector.
Reconnect the power window regulator motor assembly connector.
|
| ||||
| OK | |
|
| 4.INSPECT POWER WINDOW REGULATOR MOTOR ASSEMBLY |
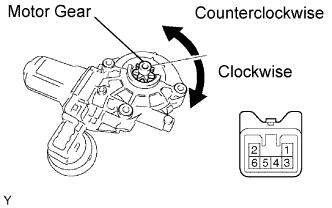 |
Remove the power window regulator motor assembly.
Apply battery voltage to connector terminals 1 and 2.
Check that the motor gear rotates smoothly as follows.
| Measurement Condition | Specified Condition |
| Battery positive (+) → 1 Battery negative (-) → 2 | Motor gear rotates counterclockwise |
| Battery positive (+) → 2 Battery negative (-) → 1 | Motor gear rotates clockwise |
| Result | Proceed to |
| OK | A |
| NG (Hatchback) | B |
| NG (Sedan) | C |
Reinstall the power window regulator motor assembly.
|
| ||||
|
| ||||
| A | |
|
| 5.CHECK HARNESS AND CONNECTOR (REGULATOR MASTER SWITCH - REGULATOR SWITCH) |
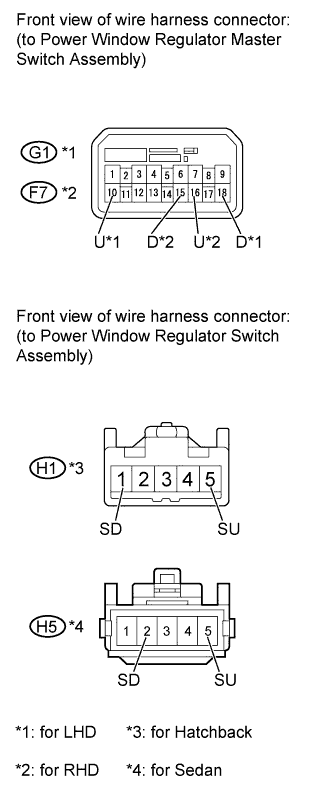 |
Disconnect the G1 or F7 power window regulator master switch assembly connector.
Disconnect the H1 or H5 power window regulator switch assembly connector.
Measure the resistance according to the value(s) in the table below.
| Tester Connection | Condition | Specified Condition |
| G1-10 (U) - H1-5 (SU) | Always | Below 1 Ω |
| G1-10 (U) or H1-5 (SU) - Body ground | Always | 10 kΩ or higher |
| G1-18 (D) - H1-1 (SD) | Always | Below 1 Ω |
| G1-18 (D) or H1-1 (SD) - Body ground | Always | 10 kΩ or higher |
| Tester Connection | Condition | Specified Condition |
| F7-16 (U) - H1-5 (SU) | Always | Below 1 Ω |
| F7-16 (U) or H1-5 (SU) - Body ground | Always | 10 kΩ or higher |
| F7-15 (D) - H1-1 (SD) | Always | Below 1 Ω |
| F7-15 (D) or H1-1 (SD) - Body ground | Always | 10 kΩ or higher |
| Tester Connection | Condition | Specified Condition |
| G1-10 (U) - H5-5 (SU) | Always | Below 1 Ω |
| G1-10 (U) or H5-5 (SU) - Body ground | Always | 10 kΩ or higher |
| G1-18 (D) - H5-2 (SD) | Always | Below 1 Ω |
| G1-18 (D) or H5-2 (SD) - Body ground | Always | 10 kΩ or higher |
| Tester Connection | Condition | Specified Condition |
| F7-16 (U) - H5-5 (SU) | Always | Below 1 Ω |
| F7-16 (U) or H5-5 (SU) - Body ground | Always | 10 kΩ or higher |
| F7-15 (D) - H5-2 (SD) | Always | Below 1 Ω |
| F7-15 (D) or H5-2 (SD) - Body ground | Always | 10 kΩ or higher |
Reconnect the power window regulator master switch assembly connector.
Reconnect the power window regulator switch assembly connector.
|
| ||||
| OK | |
|
| 6.INSPECT POWER WINDOW REGULATOR MASTER SWITCH ASSEMBLY (REAR RH SWITCH) |
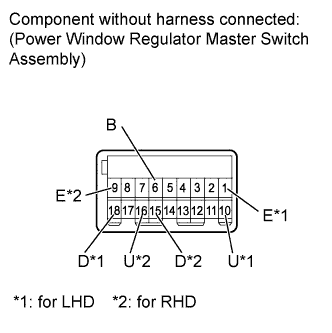 |
Remove the power window regulator master switch assembly.
Measure the resistance according to the value(s) in the table below.
| Tester Connection | Window Lock Switch Condition | Power Window Switch Condition | Specified Condition |
| 1 (E) - 18 (D) 6 (B) - 10 (U) | OFF | UP | Below 1 Ω |
| 1 (E) - 10 (U) 1 (E) - 18 (D) | OFF | OFF | Below 1 Ω |
| 1 (E) - 10 (U) 6 (B) - 18 (D) | OFF | DOWN | Below 1 Ω |
| 1 (E) - 18 (D) | ON | UP | 10 kΩ or higher |
| 6 (B) - 10 (U) | Below 1 Ω | ||
| 10 (U) - 18 (D) | ON | OFF | Below 1 Ω |
| 1 (E) - 10 (U) | ON | DOWN | 10 kΩ or higher |
| 6 (B) - 18 (D) | Below 1 Ω |
| Tester Connection | Window Lock Switch Condition | Power Window Switch Condition | Specified Condition |
| 9 (E) - 15 (D) 6 (B) - 16 (U) | OFF | UP | Below 1 Ω |
| 9 (E) - 16 (U) 9 (E) - 15 (D) | OFF | OFF | Below 1 Ω |
| 9 (E) - 16 (U) 6 (B) - 15 (D) | OFF | DOWN | Below 1 Ω |
| 9 (E) - 15 (D) | ON | UP | 10 kΩ or higher |
| 6 (B) - 16 (U) | Below 1 Ω | ||
| 16 (U) - 15 (D) | ON | OFF | Below 1 Ω |
| 9 (E) - 16 (U) | ON | DOWN | 10 kΩ or higher |
| 6 (B) - 15 (D) | Below 1 Ω |
| Result | Proceed to |
| OK | A |
| NG (Hatchback) | B |
| NG (Sedan) | C |
Reinstall the power window regulator master switch assembly.
|
| ||||
|
| ||||
| A | ||
 | ||
| ||
