DOOR
REMOVAL
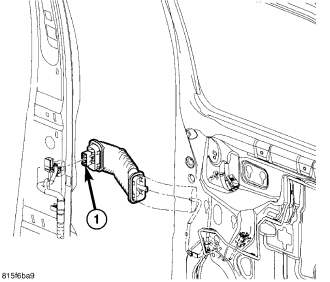
1. Disconnect the door wire harness electrical connector (1) at the B-pillar.
2. Disconnect the check strap from the B-pillar. (Refer to 23 - BODY/DOORS - REAR/CHECK STRAP - REMOVAL)
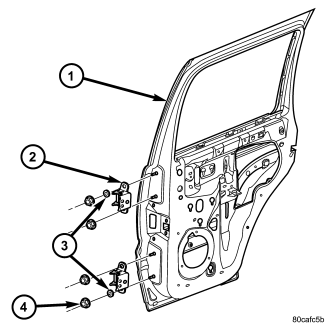
3. Support the door with a suitable lifting device.
NOTE: The epoxy washers (3) should not be removed from the hinge. If the washers are removed the door may have to be re-adjusted.
4. Remove the nuts (4) attaching the door hinges to the door (1).
INSTALLATION
1. Support the door with a suitable lifting device and install the door onto the B-pillar.
2. Install the nuts (4), washers (3) and tighten to 23 N·m (17 ft. lbs.).
3. Connect the door wire harness electrical connector (1).
4. Connect the check strap to the B-pillar. (Refer to 23 - BODY/DOORS - REAR/CHECK STRAP - INSTALLATION)
5. Adjust the door as necessary. (Refer to 23 - BODY/BODY STRUCTURE/GAP AND FLUSH - SPECIFICATIONS)
ADJUSTMENTS
NOTE:
For vehicles equipped with four doors, it is recommended that you adjust the rear door before adjusting the front door.
FORE/AFT
NOTE: Fore/aft (lateral) door adjustment is done by loosening the hinge to the hinge pillar fasteners one hinge at a time and moving the door to the correct position.
1. Support the door with a suitable lifting device.
2. Loosen the hinge to hinge pillar fasteners. (Refer to 23 - BODY/DOORS - REAR/HINGE - REMOVAL)
3. Adjust the door to the correct position. (Refer to 23 - BODY/BODY STRUCTURE/GAP AND FLUSH - SPECIFICATIONS)
4. Tighten the hinge pillar fasteners to 28 N·m (21 ft. lbs.). (Refer to 23 - BODY/DOORS - REAR/HINGE - INSTALLATION)
NOTE: Use a suitable body sealer on the hinge to body mating surfaces.
UP/DOWN
NOTE: Up/down door adjustment is done by loosening either the hinge to the hinge pillar fasteners or the hinge to door fasteners and moving the door to the correct position.
NOTE: When adjustment of the door requires the loosening of the door to hinge fasteners, it will be necessary to separate the epoxy bonded washers with a chisel or other suitable tool.
NOTE: When the up/down adjustments are done correctly, the top of the door is positioned over flush to the roof. (Refer to 23 - BODY/BODY STRUCTURE/GAP AND FLUSH - SPECIFICATIONS)
1. Support the door with a suitable lifting device.
2. Remove the latch striker. (Refer to 23 - BODY/DOORS - REAR/LATCH STRIKER - REMOVAL)
3. Loosen the hinge to hinge pillar fasteners (Refer to 23 - BODY/DOORS - REAR/HINGE - REMOVAL) or loosen the hinge to door fasteners (Refer to 23 - BODY/DOORS - REAR/DOOR - REMOVAL).
4. Adjust the door to the correct position. (Refer to 23 - BODY/BODY STRUCTURE/GAP AND FLUSH - SPECIFICATIONS)
5. Tighten the hinge pillar fasteners or the door to hinges fasteners and fasteners to 28 N·m (21 ft. lbs.). (Refer to 23 - BODY/DOORS - REAR/HINGE - INSTALLATION)
6. Install the latch striker. (Refer to 23 - BODY/DOORS - REAR/LATCH STRIKER - INSTALLATION)
IN/OUT
NOTE: In/out door adjustment is done by loosening the hinge to door fasteners one hinge at a time and moving the door to the correct position.
NOTE: When adjustment of the door requires the loosening of the door to hinge fasteners, it will be necessary to separate the epoxy bonded washers with a chisel or other suitable tool.
1. Support the door with a suitable lifting device.
2. Remove the latch striker. (Refer to 23 - BODY/DOORS - REAR/LATCH STRIKER - REMOVAL)
3. Loosen the hinge to door fasteners. (Refer to 23 - BODY/DOORS - REAR/DOOR - REMOVAL)
4. Adjust the front of the door to the correct position. (Refer to 23 - BODY/BODY STRUCTURE/GAP AND FLUSH - SPECIFICATIONS)
5. Tighten the door to hinges fasteners to 28 N·m (21 ft. lbs.).
6. Install the latch striker. (Refer to 23 - BODY/DOORS - REAR/LATCH STRIKER - INSTALLATION)