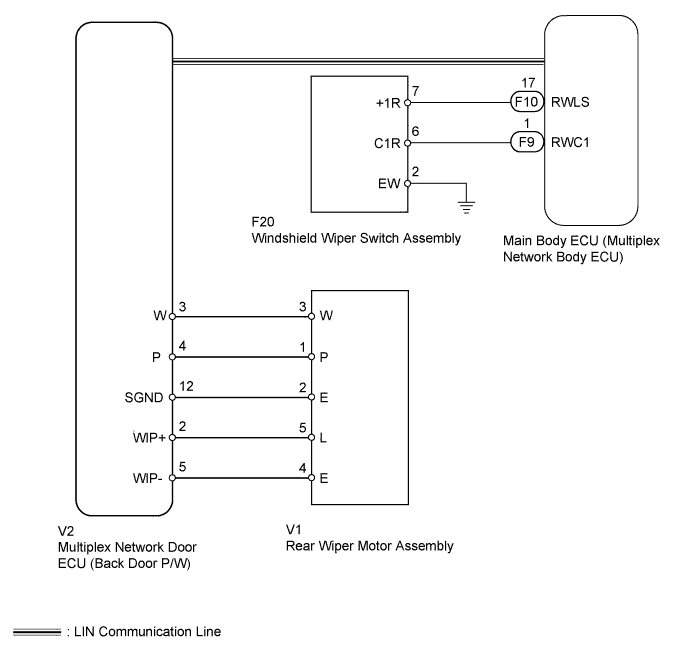
WIPER AND WASHER SYSTEM > Rear Wiper does not Operate |
| 1.READ VALUE USING TECHSTREAM (WIPER AND BACK DOOR POWER WINDOW POSITION) |
Use the Data List to check if the rear wiper and back power window are functioning properly (Click here).
| Tester Display | Measurement Item/Range | Normal Condition | Diagnostic Note |
| Wiper Retracted Position | Rear wiper retracting switch signal / ON or OFF | ON: Rear wiper in retracting position OFF: Rear wiper in other position | - |
| Wiper Reverse Position | Rear wiper reverse position switch signal / ON or OFF | ON: Rear wiper in reverse position OFF: Rear wiper in other position | - |
| Back Door P/W Status | Back door power window position / Open or Close | Open: Back door window open Close: Back door window closed | - |
| Result | Proceed to |
| OK | A |
| NG (Rear wiper position) | B |
| NG (Back door power window position) | C |
|
| ||||
|
| ||||
| A | |
 |
| 2.READ VALUE USING TECHSTREAM (WINDSHIELD WIPER SWITCH) |
Use the Data List to check if the rear wiper is functioning properly (Click here).
| Tester Display | Measurement Item/Range | Normal Condition | Diagnostic Note |
| Rear Wiper HI SW Signal | Rear wiper HI switch / ON or OFF | ON: Rear wiper switch in HI position OFF: Rear wiper switch not in HI position | - |
| Rear Wiper LO SW Signal | Rear wiper LO switch / ON or OFF | ON: Rear wiper switch in LO position OFF: Rear wiper switch not in LO position | - |
|
| ||||
| OK | |
|
| 3.PERFORM ACTIVE TEST USING TECHSTREAM (REAR WIPER) |
Using the Techstream, perform the Active Test (Click here).
| Tester Display | Test Part | Control Range | Diagnostic Note |
| Rear Wiper Active | Rear wiper motor operation | STOP/ACTIVE | - |
|
| ||||
| OK | ||
 | ||
| ||
| 4.CHECK MULTIPLEX NETWORK DOOR ECU (BACK DOOR P/W) |
Measure the voltage according to the value(s) in the table below.
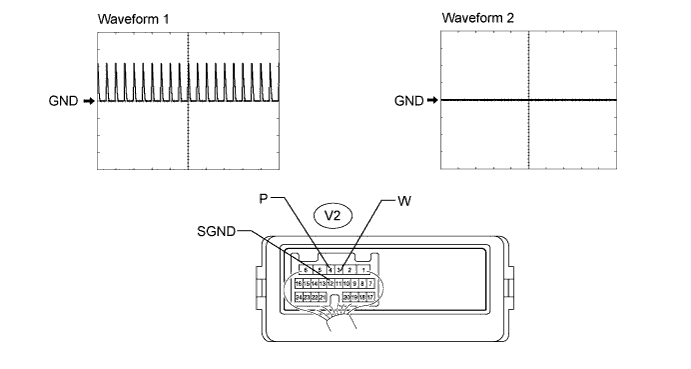
| Tester Connection | Tool Setting | Switch Condition | Specified Condition |
| V2-3 (W) - V2-12 (SGND) | 5 V/DIV., 10 ms/DIV. | Ignition switch ON and rear wiper switch on (rear wiper reverse position switch off) | Pulse generation (See waveform 1) |
| V2-3 (W) - V2-12 (SGND) | 5 V/DIV., 10 ms/DIV. | Ignition switch ON and rear wiper switch on (rear wiper reverse position switch on) | Pulse generation (See waveform 2) |
| V2-4 (P) - V2-12 (SGND) | 5 V/DIV., 10 ms/DIV. | Ignition switch ON and rear wiper switch on (rear wiper retractable position switch off) | Pulse generation (See waveform 1) |
| V2-4 (P) - V2-12 (SGND) | 5 V/DIV., 10 ms/DIV. | Ignition switch ON and rear wiper switch on (rear wiper retractable position switch on) | Pulse generation (See waveform 2) |
|
| ||||
| OK | |
|
| 5.CHECK HARNESS AND CONNECTOR (REAR WIPER MOTOR ASSEMBLY - MULTIPLEX NETWORK DOOR ECU) |
Disconnect the V1 rear wiper motor connector.
Disconnect the V2 multiplex network door ECU connector.
Measure the resistance according to the value(s) in the table below.
| Tester Connection | Condition | Specified Condition |
| V1-3 (W) - V2-3 (W) | Always | Below 1 Ω |
| V1-1 (P) - V2-4 (P) | Always | Below 1 Ω |
| V1-2 (E) - V2-12 (SGND) | Always | Below 1 Ω |
| V1-3 (W) - Body ground | Always | 10 kΩ or higher |
| V1-1 (P) - Body ground | Always | 10 kΩ or higher |
| V1-2 (E) - Body ground | Always | 10 kΩ or higher |
|
| ||||
| OK | ||
| ||
| ||
| 6.INSPECT WINDSHIELD WIPER SWITCH ASSEMBLY |
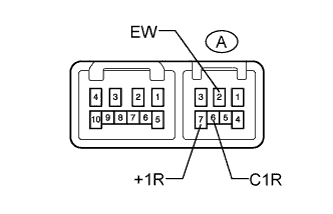 |
Remove the windshield wiper switch (Click here).
Measure the resistance according to the value(s) in the table below.
| Tester Connection | Switch Condition | Specified Condition |
| A-6 (C1R) - A-2 (EW) | Rear wiper switch LO | Below 1 Ω |
| A-7 (+1R) - A-2 (EW) | Rear wiper switch HI | Below 1 Ω |
| A-6 (C1R) - A-2 (EW) | Rear wiper switch off | 10 kΩ or higher |
| A-7 (+1R) - A-2 (EW) | Rear wiper switch off | 10 kΩ or higher |
| A-6 (C1R) - A-7 (+1R) | Rear wiper switch off | 10 kΩ or higher |
|
| ||||
| OK | |
|
| 7.CHECK HARNESS AND CONNECTOR (WINDSHIELD WIPER SWITCH ASSEMBLY - MAIN BODY ECU AND BODY GROUND) |
Disconnect the F20 windshield wiper switch connector.
Disconnect the F9 and F10 main body ECU connectors.
Measure the resistance according to the value(s) in the table below.
| Tester Connection | Condition | Specified Condition |
| F20-7 (+1R) - F10-17 (RWLS) | Always | Below 1 Ω |
| F20-6 (C1R) - F9-1 (RWC1) | Always | Below 1 Ω |
| F20-2 (EW) - Body ground | Always | Below 1 Ω |
| F20-7 (+1R) - Body ground | Always | 10 kΩ or higher |
| F20-6 (C1R) - Body ground | Always | 10 kΩ or higher |
|
| ||||
| OK | ||
| ||
| ||
| 8.INSPECT REAR WIPER MOTOR ASSEMBLY |
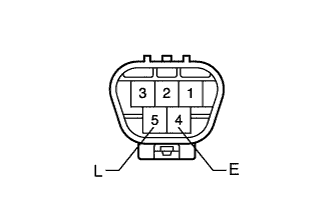 |
Remove the rear wiper motor (Click here).
Apply battery voltage to the rear wiper motor and check the operation of the rear wiper motor.
| Measurement Condition | Specified Condition |
| Battery positive (+) → 5 (L) Battery negative (-) → 4 (E) | Rear wiper motor operation is normal |
|
| ||||
| OK | |
|
| 9.CHECK HARNESS AND CONNECTOR (REAR WIPER MOTOR ASSEMBLY - MULTIPLEX NETWORK DOOR ECU) |
Disconnect the V1 rear wiper motor connector.
Disconnect the V2 multiplex network door ECU connector.
Measure the resistance according to the value(s) in the table below.
| Tester Connection | Condition | Specified Condition |
| V1-5 (L) - V2-2 (WIP+) | Always | Below 1 Ω |
| V1-4 (E) - V2-5 (WIP-) | Always | Below 1 Ω |
| V1-5 (L) - Body ground | Always | 10 kΩ or higher |
| V1-4 (E) - Body ground | Always | 10 kΩ or higher |
|
| ||||
| OK | ||
| ||
| ||

