 |
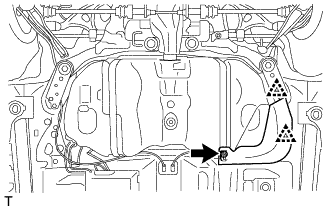
Remove the nut, 2 clips and No. 3 fuel tank protector.
REAR SUSPENSION MEMBER > REMOVAL |
| 1. REMOVE REAR WHEELS |
| 2. REMOVE REAR HEIGHT CONTROL SENSOR SUB-ASSEMBLY LH (w/ HID Headlight System) |
| 3. REMOVE PROPELLER WITH CENTER BEARING SHAFT ASSEMBLY |
| 4. REMOVE EXHAUST TAIL PIPE ASSEMBLY |
| 5. REMOVE REAR DIFFERENTIAL CARRIER ASSEMBLY |
| 6. REMOVE REAR DRIVE SHAFT ASSEMBLY LH |
| 7. REMOVE REAR DRIVE SHAFT ASSEMBLY RH |
| 8. REMOVE REAR AXLE CARRIER SUB-ASSEMBLY LH |
| 9. REMOVE REAR AXLE CARRIER SUB-ASSEMBLY RH |
| 10. REMOVE NO. 3 FUEL TANK PROTECTOR (for Metal Type) |
|
Remove the nut, 2 clips and No. 3 fuel tank protector.
| 11. REMOVE NO. 1 FUEL TANK PROTECTOR (for Clamp Type) |
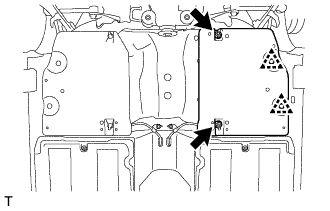 |
Remove the 2 nuts, 2 clip and No. 1 fuel tank protector.
| 12. REMOVE NO. 2 FUEL TANK PROTECTOR (for Clamp Type) |
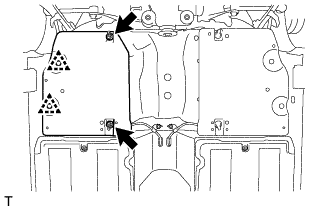 |
Remove the 2 nuts, 2 clips and No. 2 fuel tank protector.
| 13. SEPARATE NO. 3 PARKING BRAKE CABLE ASSEMBLY |
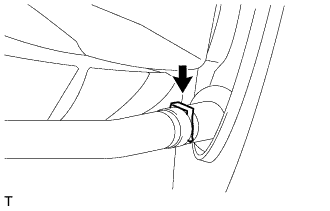 |
Remove the clamp and separate the No. 3 parking brake cable assembly.
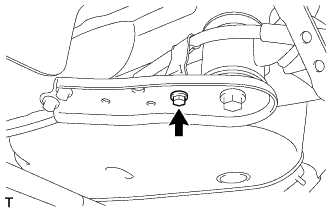 |
Remove the bolt and separate the No. 3 parking brake cable assembly from rear suspension member lower stopper LH.
| 14. SEPARATE NO. 2 PARKING BRAKE CABLE ASSEMBLY |
| 15. REMOVE PARKING BRAKE CABLE SUPPORT BRACKET (for LH Side) |
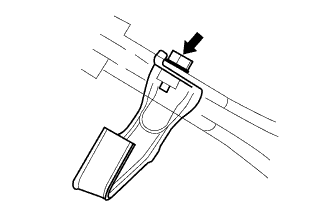 |
Remove the bolt and No.1 parking brake cable support bracket.
| 16. REMOVE PARKING BRAKE CABLE SUPPORT BRACKET (for RH Side) |
| 17. REMOVE REAR STABILIZER BAR |
| 18. REMOVE REAR NO. 1 SUSPENSION ARM ASSEMBLY LH |
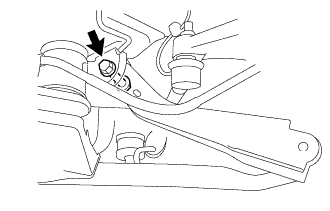 |
Remove the bolt, nut and rear No. 1 suspension arm assembly LH.
| 19. REMOVE REAR NO. 1 SUSPENSION ARM ASSEMBLY RH |
| 20. SEPARATE REAR SHOCK ABSORBER WITH COIL SPRING LH |
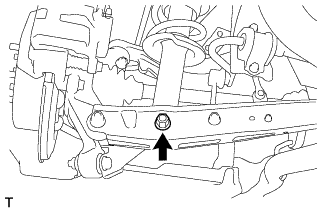 |
Remove the bolt, nut and separate the rear shock absorber with coil spring from the rear No. 2 suspension arm assembly.
| 21. SEPARATE REAR SHOCK ABSORBER WITH COIL SPRING RH |
| 22. SEPARATE REAR NO. 2 SUSPENSION ARM ASSEMBLY LH |
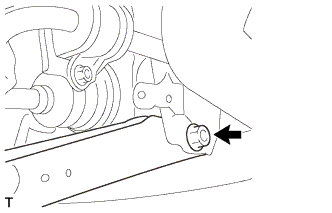 |
Remove the bolt, nut and rear No. 2 suspension arm assembly LH from the rear suspension member sub-assembly.
| 23. SEPARATE REAR NO. 2 SUSPENSION ARM ASSEMBLY RH |
| 24. REMOVE TOE CONTROL LINK SUB-ASSEMBLY LH |
Put matchmarks on the rear No. 2 suspension toe adjust plate and rear suspension member.
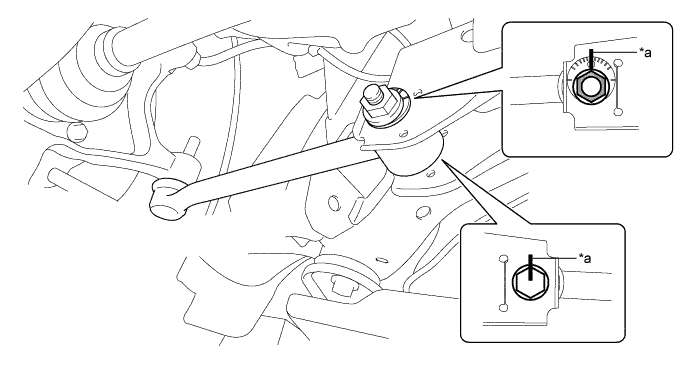
| *a | Matchmark | - | - |
Remove the nut, rear suspension toe adjust cam, rear No. 2 suspension toe adjust plate and toe control link sub-assembly LH.
| 25. REMOVE TOE CONTROL LINK SUB-ASSEMBLY RH |
| 26. REMOVE REAR SUSPENSION MEMBER SUB-ASSEMBLY |
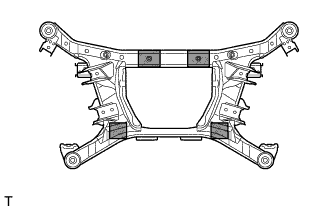 |
Support the rear suspension member sub-assembly with an engine lifter using 4 attachments or equivalent tools as shown in the illustration.
 | Attachment Placement Location |
Remove the 8 bolts, 2 rear lower suspension member stoppers, 2 differential support member stoppers and 2 rear suspension member lower stoppers from the rear suspension member.
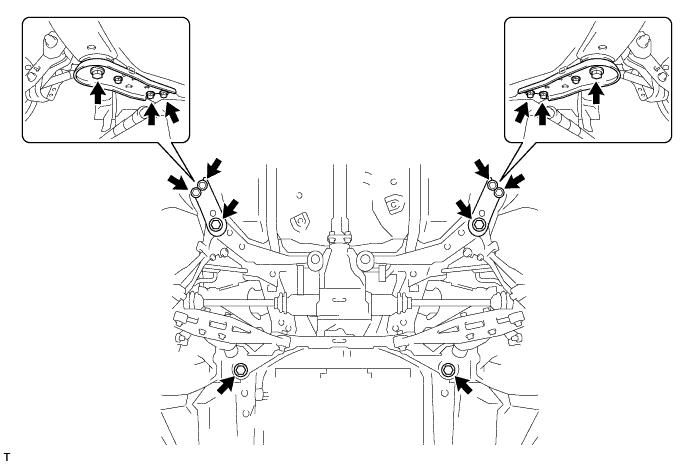
Slowly lower the rear suspension member sub-assembly.
| 27. REMOVE REAR UPPER CONTROL ARM ASSEMBLY LH |
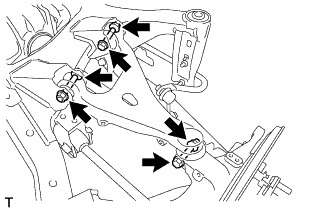 |
Remove the 3 bolts, 3 nuts, and then remove the rear upper control arm assembly LH from the rear suspension member sub-assembly.
| 28. REMOVE REAR UPPER CONTROL ARM ASSEMBLY RH |
| 29. REMOVE REAR NO. 1 DIFFERENTIAL MOUNT CUSHION |
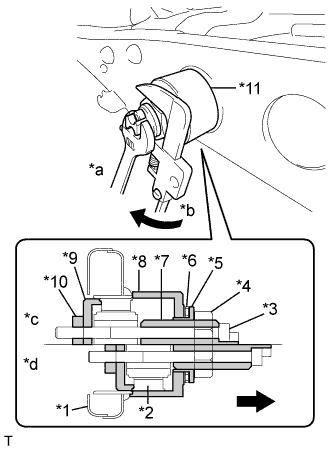 |
Using SST, remove the rear No. 1 differential mount cushion.
| *1 | Rear Suspension Member |
| *2 | Rear No. 1 Differential Mount Cushion |
| *3 | SST(09571-01180) |
| *4 | SST(09571-01160) |
| *5 | SST(09571-01140) |
| *6 | SST(09571-01170) |
| *7 | SST(09571-01190) |
| *8 | SST(09571-01110) |
| *9 | SST(09571-01100) |
| *10 | SST(09571-01150) |
| *11 | SST(09922-10010) |
| *a | Hold |
| *b | Turn |
| *c | Start |
| *d | End |
 | Front side |
| 30. REMOVE REAR NO. 2 DIFFERENTIAL MOUNT CUSHION |
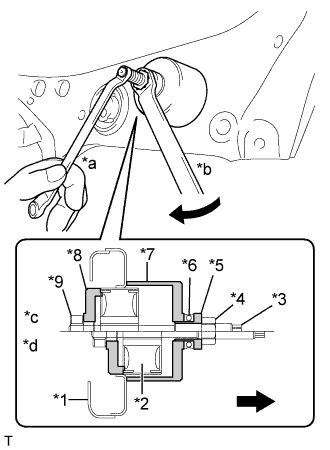 |
Using SST, remove the rear No. 2 differential mount cushion.
| *1 | Rear Suspension Member |
| *2 | Rear No. 2 Differential Mount Cushion |
| *3 | SST(09571-01090) |
| *4 | SST(09571-01070) |
| *5 | SST(09571-01050) |
| *6 | SST(09571-01080) |
| *7 | SST(09571-01020) |
| *8 | SST(09571-01010) |
| *9 | SST(09571-01060) |
| *a | Hold |
| *b | Turn |
| *c | Start |
| *d | End |
| Front side |