FA20 ENGINE MECHANICAL ENGINE UNIT INSTALLATION
PROCEDURE

 19500
1.INSTALL IGNITION COIL ASSEMBLY
Install the 4 ignition coils with the 4 bolts.
- Torque:
- 8.5 N*m (87 kgf*cm, 75 in.*lbf)
16268
2.INSTALL NO. 1 WATER BY-PASS PIPE (for Manual Transmission)
Install the No. 1 water by-pass pipe with the 2 bolts.
- Torque:
- 6.4 N*m (65 kgf*cm, 57 in.*lbf)
Connect the water by-pass hose with the hose clamp.
16268
3.INSTALL NO. 1 WATER BY-PASS PIPE (for Automatic Transmission)
Install the No. 1 water by-pass pipe with the 2 bolts.
- Torque:
- 6.4 N*m (65 kgf*cm, 57 in.*lbf)
Connect the 2 water by-pass hoses with the 2 hose clamps.
32943C
4.CONNECT NO. 3 TRANSMISSION OIL COOLER HOSE (for Automatic Transmission)
Connect the No. 3 transmission oil cooler hose with the hose clamp.
16264
5.INSTALL NO. 2 WATER BY-PASS HOSE
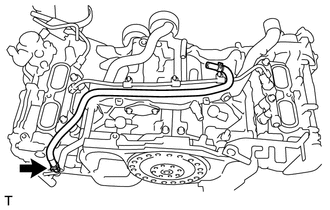
Connect the No. 2 water by-pass hose with the clamp.
12262
6.CONNECT NO. 2 VENTILATION HOSE
Connect the No. 2 ventilation hose.
82121
7.INSTALL ENGINE WIRE
Connect the ground wire with the 2 bolts.
- Torque:
- 19 N*m (194 kgf*cm, 14 ft.*lbf)
Connect each connector and each clamp to fix the engine wire as shown in the illustration, and check that the engine wire is correctly installed.
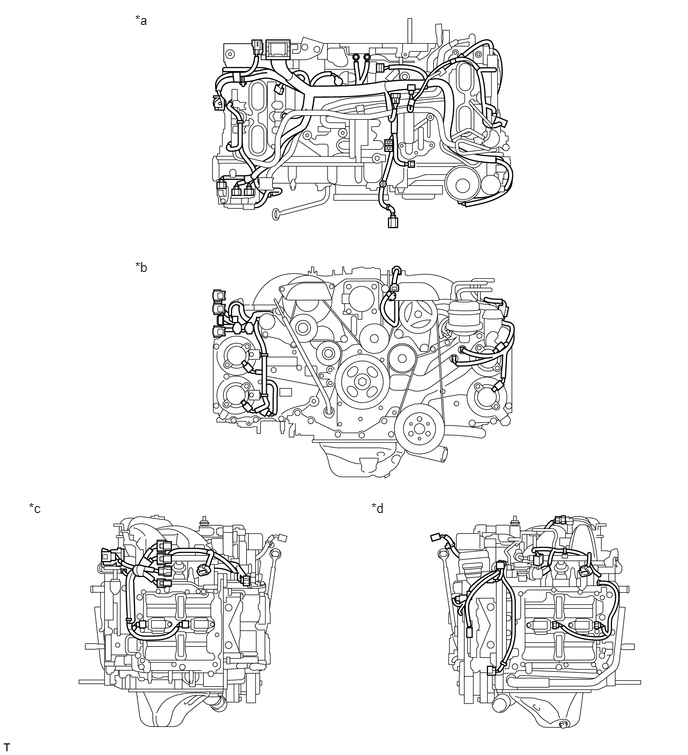
| *a | Upper side | *b | Front side |
| *c | Right side | *d | Left side |
11104E
8.INSTALL PUMP DRIVE CASE ASSEMBLY
13751A
9.INSTALL VALVE LIFTER
23100X
10.INSTALL FUEL PUMP ASSEMBLY
23250B
11.INSTALL FUEL INJECTOR O-RING
23250
12.INSTALL FUEL INJECTOR ASSEMBLY
23815E
13.INSTALL FUEL DELIVERY PIPE LH
23814E
14.INSTALL FUEL DELIVERY PIPE RH
23814B
15.INSTALL FUEL DELIVERY PIPE
23815
16.INSTALL NO. 2 FUEL DELIVERY PIPE
17111
17.INSTALL INTAKE MANIFOLD
Install 2 new gaskets to the intake manifold.
Install the intake manifold with the 6 bolts.
- Torque:
- 25 N*m (255 kgf*cm, 18 ft.*lbf)
Engage the 2 clamps and connect the 4 connectors.
Connect the fuel pump connector.
Connect the No. 1 vacuum switching valve assembly connector.
Connect the vacuum sensor connector.
Connect the 2 water by-pass hoses to the throttle body assembly.
Connect the throttle body assembly connector.
12261
18.CONNECT VENTILATION HOSE
23807
19.INSTALL FUEL DELIVERY PIPE SUB-ASSEMBLY
Install the fuel delivery pipe sub-assembly to the fuel pump assembly with a new gasket and the union bolt.
- Torque:
- 31 N*m (316 kgf*cm, 23 ft.*lbf)
Connect the No. 2 fuel vapor feed hose.
Install the bolt and connect the fuel delivery pipe sub-assembly.
- Torque:
- 6.4 N*m (65 kgf*cm, 57 in.*lbf)
23261A
20.INSTALL INJECTOR COVER (for Bank 2)
Install the injector cover to the intake manifold with the 2 bolts.
- Torque:
- 19 N*m (194 kgf*cm, 14 ft.*lbf)
23261A
21.INSTALL INJECTOR COVER (for Bank 1)
Install the injector cover to the intake manifold with the 2 bolts.
- Torque:
- 19 N*m (194 kgf*cm, 14 ft.*lbf)
16631
22.INSTALL IDLER PULLEY BRACKET (w/o Air Conditioning System)
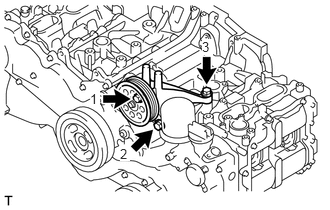
Temporarily tighten the idler pulley bracket with the 3 bolts.
Fully tighten the 3 bolts shown in the illustration.
- Torque:
- 36 N*m (367 kgf*cm, 27 ft.*lbf)
88310E
23.INSTALL COMPRESSOR WITH MAGNET CLUTCH (w/ Air Conditioning System)
24.INSTALL GENERATOR BRACKET
Temporarily install the generator bracket with the 4 bolts.
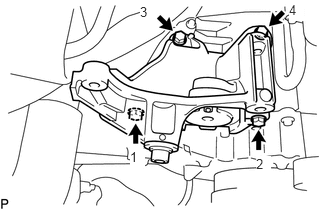
Tighten the 4 bolts in the order shown in the illustration.
- Torque:
- 36 N*m (367 kgf*cm, 27 ft.*lbf)
16620
25.INSTALL V-RIBBED BELT TENSIONER ASSEMBLY
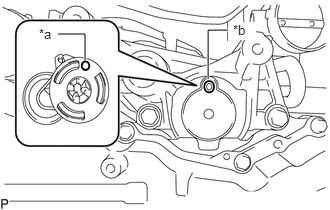
| *a | Stopper pin |
| *b | Positioning hole |
Align the stopper pin and the positioning hole, and then install the V-ribbed belt tensioner assembly using an 8 mm hexagon socket wrench.
- Torque:
- 25 N*m (255 kgf*cm, 18 ft.*lbf)
Install the cap.
16604
26.INSTALL NO. 2 IDLER PULLEY SUB-ASSEMBLY
11452
27.INSTALL OIL LEVEL DIPSTICK GUIDE
27020
28.INSTALL GENERATOR ASSEMBLY
Install the generator assembly with the 2 bolts.
- Torque:
- 25 N*m (255 kgf*cm, 18 ft.*lbf)
16361A
29.INSTALL FAN AND GENERATOR V BELT
27029A
30.INSTALL BELT GENERATOR COVER
27029
31.INSTALL GENERATOR COVER