FA20 LUBRICATION OIL PUMP INSTALLATION
PROCEDURE

 11302
1.INSTALL TIMING CHAIN OR BELT COVER SUB-ASSEMBLY
Apply a light coat of engine oil to the 4 O-rings.
Remove any old packing material remaining on the sealing surfaces before applying seal packing.
If there are gaps at positions shown in the illustration, fill up with seal packing by using a sealer gun.
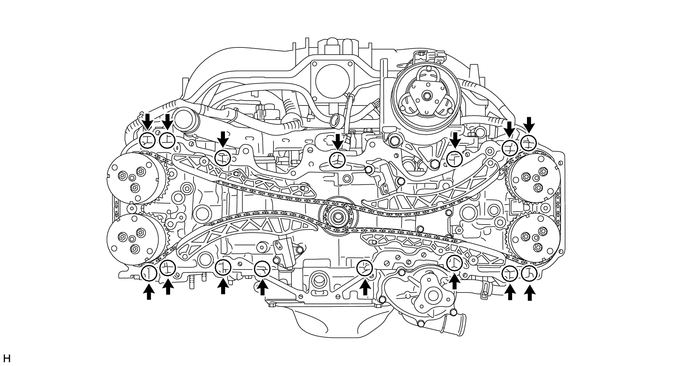
- Seal packing:
Three Bond 1217G, 1217H or equivalent
Using a sealer gun, apply seal packing in a continuous line to the timing chain cover as shown in the following illustration.
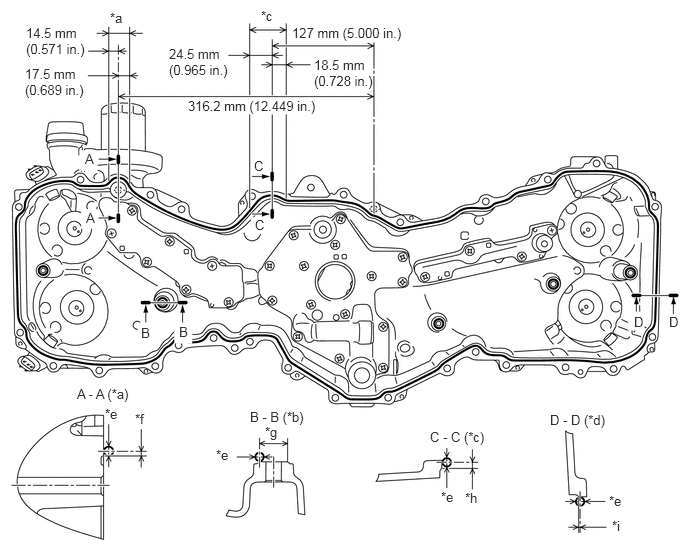
| *a | Range A | *b | Boss (5 locations) |
| *c | Range B | *d | Other than ranges A and B |
| *e | φ3.5 to 4.5 mm (0.138 to 0.177 in.) | *f | 2 mm (0.079 in.) |
| *g | φ12 mm (0.472 in.) | *h | 2.5 mm (0.098 in.) |
| *i | 0.5 mm (0.020 in.) | - | - |
- Seal packing:
Three Bond 1217G, 1217H or equivalent
- NOTICE:
- ·
If the contact surfaces are wet, wipe them with an oil-free cloth before applying seal packing.
·Install the chain cover within 3 minutes and tighten the bolts within 10 minutes after applying seal packing.
·Do not add engine oil for at least 2 hours after installing.
·Do not start the engine for at least 2 hours after installing.
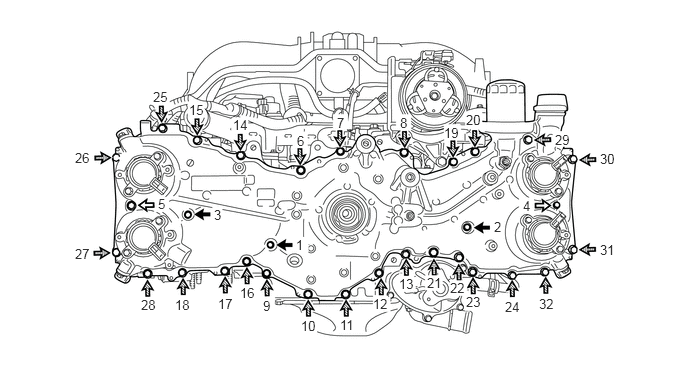
Temporarily tighten the timing chain cover with the 32 bolts.
Fully tighten the 32 bolts shown in the illustration.

|
Bolt A | 
|
Bolt B |

|
Bolt C | 
|
Bolt D |
- Torque:
- for bolt A and B : 10 N*m (102 kgf*cm, 7 ft.*lbf)
- for bolt C and D : 25 N*m (255 kgf*cm, 18 ft.*lbf)
- Bolt Length:
Item Length Item Length Bolt A 20 mm (0.787 in.) Bolt B 50 mm (1.969 in.) Bolt C 25 mm (0.984 in.) Bolt D 60 mm (2.362 in.)
11302A
2.INSTALL TIMING CHAIN OR BELT COVER OIL SEAL
16603
3.INSTALL NO. 1 IDLER PULLEY SUB-ASSEMBLY
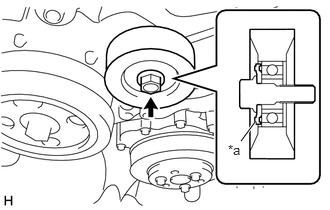
Install the washer plate to the No. 1 idler pulley sub-assembly as shown in the illustration.
| *a | Protrusion |
Install the washer plate and No. 1 idler pulley sub-assembly with the bolt.
- Torque:
- 36 N*m (367 kgf*cm, 27 ft.*lbf)
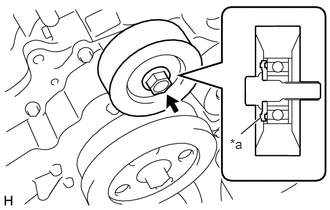
Install the washer plate to the No. 1 idler pulley sub-assembly as shown in the illustration.
| *a | Protrusion |
Install the washer plate and No. 1 idler pulley sub-assembly with the bolt.
- Torque:
- 36 N*m (367 kgf*cm, 27 ft.*lbf)
16620
4.INSTALL V-RIBBED BELT TENSIONER ASSEMBLY
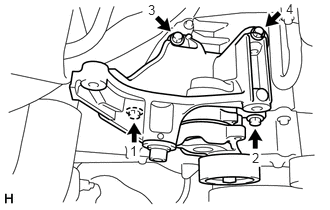
Temporarily install the V-ribbed belt tensioner with the 5 bolts.
Tighten the 4 bolts in the order shown in the illustration.
- Torque:
- 36 N*m (367 kgf*cm, 27 ft.*lbf)
16604
5.INSTALL NO. 2 IDLER PULLEY SUB-ASSEMBLY
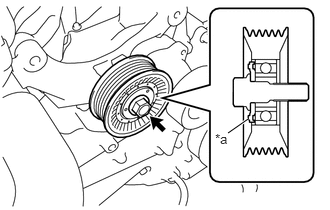
Install the washer plate to the No. 2 idler pulley sub-assembly as shown in the illustration.
| *a | Protrusion |
Install the washer plate and No. 2 idler pulley sub-assembly with the bolt.
- Torque:
- 36 N*m (367 kgf*cm, 27 ft.*lbf)
11452
6.INSTALL OIL LEVEL DIPSTICK GUIDE
Install a new O-ring to the oil level dipstick guide.
Apply a light coat of engine oil to the O-ring.
Install the oil level dipstick guide with the bolt.
- Torque:
- 6.4 N*m (65 kgf*cm, 57 in.*lbf)
Install the oil level dipstick sub-assembly.
7.CONNECT ENGINE WIRE
Connect the camshaft position sensor connector and camshaft timing oil control valve connector.
Engage the wire harness clamp.
Connect the engine oil pressure switch connector and engine oil temperature sensor connector.
Connect the camshaft position sensor connector and camshaft timing oil control valve connector.
Connect the 2 camshaft position sensor connectors and camshaft timing oil control valve connector.
Connect the camshaft position sensor connector.
Install the wire harness bracket with the bolt.
- Torque:
- 6.4 N*m (65 kgf*cm, 57 in.*lbf)
Engage the wire harness clamp.
Install the 2 wire harness brackets with the 2 bolts.
- Torque:
- 6.4 N*m (65 kgf*cm, 57 in.*lbf)
23261A
8.INSTALL INJECTOR COVER (for Bank 1)
13471
9.INSTALL CRANKSHAFT PULLEY
16173
10.INSTALL WATER PUMP PULLEY
16572
11.CONNECT RADIATOR OUTLET HOSE
17141
12.INSTALL EXHAUST MANIFOLD
16502
13.INSTALL WATER FILLER SUB-ASSEMBLY
16470
14.INSTALL RADIATOR RESERVE TANK ASSEMBLY
89871
15.INSTALL INJECTOR DRIVER
27020
16.INSTALL GENERATOR ASSEMBLY
17.ADD ENGINE COOLANT
18.ADD ENGINE OIL
19.INSPECT FOR ENGINE OIL LEAK
20. CHECK ENGINE OIL LEVEL