HEATING / AIR CONDITIONING AIR CONDITIONING UNIT REMOVAL
CAUTION / NOTICE / HINT
The necessary procedures (adjustment, calibration, initialization or registration) that must be performed after parts are removed and installed, or replaced during air conditioning unit removal/installation are shown below.
| Replaced Part or Performed Procedure | Necessary Procedure | Effect/Inoperative Function when Necessary Procedure not Performed | Link |
|---|---|---|---|
|
*1: When performing learning using the GTS. Click here( |
|||
| Disconnect cable from negative auxiliary battery terminal | Perform steering sensor zero point calibration | Lane departure alert system (w/ Steering Control) | ( ) |
| Toyota parking assist-sensor system*1 | |||
| Parking support brake system*1 | |||
| Simple intelligent parking assist system*1 | |||
| Pre-collision system | |||
| Memorize steering angle neutral point | Panoramic view monitor system | ()
|
|
| Initialize back door lock | Power door lock control system | ()
|
|
·
No. 1 air conditioning radiator damper servo sub-assembly ·
No. 1 blower damper servo sub-assembly ·
Air conditioning amplifier assembly |
Initialize servo motor (Air conditioning system) | DTCs are stored | ()
|
- NOTICE:
- ·
After the power switch is turned off, the radio and display receiver assembly records various types of memory and settings. As a result, after turning the power switch off, make sure to wait at least 120 seconds before disconnecting the cable from the negative (-) auxiliary battery terminal (for Audio and Visual System).
·After the power switch is turned off, the radio and display receiver assembly records various types of memory and settings. As a result, after turning the power switch off, make sure to wait at least 120 seconds before disconnecting the cable from the negative (-) auxiliary battery terminal (for Navigation System (for Radio and Display Type)).
- HINT:
- ·
Use the same procedure for RHD and LHD vehicles.
·The following procedure is for the LHD vehicles.
PROCEDURE

 1. RECOVER REFRIGERANT FROM REFRIGERATION SYSTEM
for HFC-134a(R134a):
Click hereVehicle Interior>HEATING / AIR CONDITIONING>REFRIGERANT (for HFC-134a(R134a))>REPLACEMENT
for HFO-1234yf(R1234yf):
Click hereVehicle Interior>HEATING / AIR CONDITIONING>REFRIGERANT(for HFO-1234yf(R1234yf))>REPLACEMENT
2. DRAIN ENGINE COOLANT
for M20A-FXS:
Click hereGeneral>MAINTENANCE>M20A-FXS COOLANT (for Engine)>REPLACEMENT
for 2ZR-FXE:
Click hereGeneral>MAINTENANCE>2ZR-FXE COOLANT (for Engine Coolant)>REPLACEMENT
3.REMOVE WINDSHIELD WIPER MOTOR AND LINK ASSEMBLY
55737B
4.REMOVE NO. 1 HEATER AIR DUCT SPLASH SHIELD SEAL
55734D
5.REMOVE WATER GUARD PLATE LH (for TMC Made)
55736D
6.REMOVE COWL BODY MOUNTING REINFORCEMENT LH
55735C
7.REMOVE COWL BODY MOUNTING REINFORCEMENT RH
55701J
8.REMOVE OUTER COWL TOP PANEL SUB-ASSEMBLY (for LHD)
55701J
9.REMOVE OUTER COWL TOP PANEL SUB-ASSEMBLY (for RHD)
87246
10.DISCONNECT OUTLET HEATER WATER HOSE
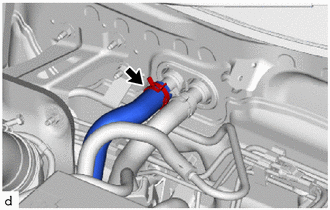
Slide the hose clip to disconnect the outlet heater water hose.
- NOTICE:
- ·
To prevent contamination by foreign matter or water droplets, protect the connecting portions of the outlet heater water hose and air conditioner radiator assembly with plastic bags.
·Do not apply excessive force to the outlet heater water hose.
·Prepare a drain pan or cloth in case the coolant leaks.
87245
11.DISCONNECT INLET HEATER WATER HOSE
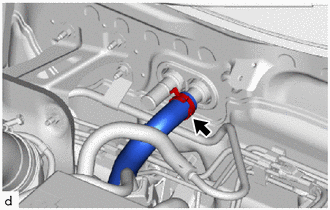
Slide the hose clip to disconnect the inlet heater water hose.
- NOTICE:
- ·
To prevent contamination by foreign matter or water droplets, protect the connecting portions of the inlet heater water hose and air conditioner radiator assembly with plastic bags.
·Do not apply excessive force to the inlet heater water hose.
·Prepare a drain pan or cloth in case the coolant leaks.
88707
12.DISCONNECT SUCTION PIPE SUB-ASSEMBLY
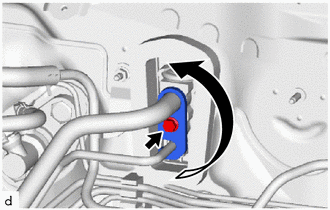
Remove the bolt and rotate the hook connector as shown in the illustration.
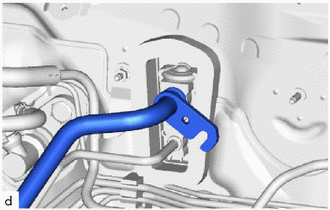
Disconnect the suction pipe sub-assembly.
Remove the O-ring from the suction pipe subassembly.
- NOTICE:
-
Seal the openings of the disconnected parts using vinyl tape to prevent entry of moisture and foreign matter.
88716A
13.DISCONNECT COOLER REFRIGERANT LIQUID PIPE A
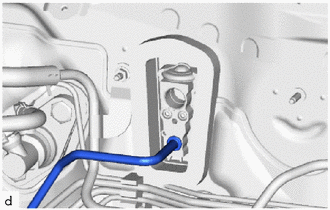
Disconnect the cooler refrigerant liquid pipe A.
Remove the O-ring from the cooler refrigerant liquid pipe A.
- NOTICE:
-
Seal the openings of the disconnected parts using vinyl tape to prevent entry of moisture and foreign matter.
14.REMOVE FRONT SEAT ASSEMBLY LH (for Manual Seat)
15.INSTALL FRONT SEAT ASSEMBLY RH (for Manual Seat)
- HINT:
-
Use the same procedure as for the LH side.
16.REMOVE FRONT SEAT ASSEMBLY LH (for Power Seat)
17.REMOVE FRONT SEAT ASSEMBLY RH (for Power Seat)
- HINT:
-
Use the same procedure as for the LH side.
55401E
18.REMOVE INSTRUMENT PANEL SAFETY PAD SUB-ASSEMBLY
19.REMOVE STEERING COLUMN ASSEMBLY
85940
20.REMOVE WINDSHIELD WIPER RELAY ASSEMBLY
89340A
21.REMOVE CLEARANCE WARNING ECU ASSEMBLY (w/ Clearance Sonar System)
82877
22.REMOVE ECU INTEGRATION BOX RH (for LHD)
82878
23.REMOVE ECU INTEGRATION BOX LH (for RHD)
88625Q
24.REMOVE COOLER THERMISTOR (ROOM TEMPERATURE SENSOR)
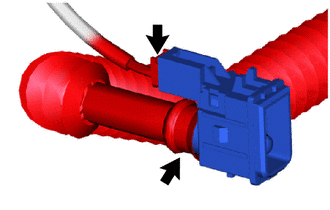
Disconnect the connector and aspirator to remove the cooler thermistor (room temperature sensor).
55215D
25.REMOVE NO. 3 DASH PANEL INSULATOR PAD
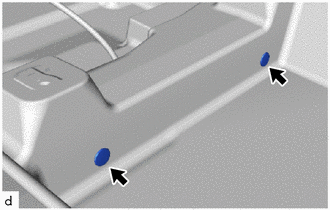
Remove the 2 front floor carpet clips.
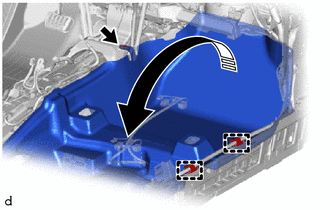

|
Remove in this Direction |
Remove the clip.
Disengage the clamps to turn back the front floor carpet assembly as shown in the illustration.
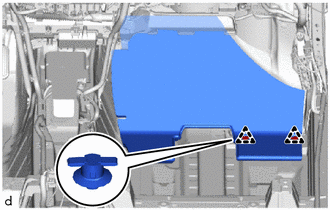
Disengage the clips to remove the No. 3 dash panel insulator pad.
87212K
26.REMOVE REAR NO. 6 AIR DUCT (w/ Rear Air Duct)
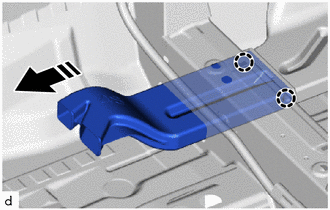
|
|
Remove in this Direction |
Disengage the claws to remove the rear No. 6 air duct as shown in the illustration.
87212J
27.REMOVE REAR NO. 5 AIR DUCT (w/ Rear Air Duct)
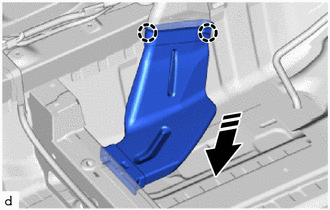
|
|
Remove in this Direction |
Disengage the claws to remove the rear No. 5 air duct as shown in the illustration.
87212H
28.REMOVE REAR NO. 4 AIR DUCT (w/ Rear Air Duct)
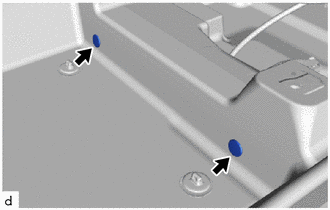
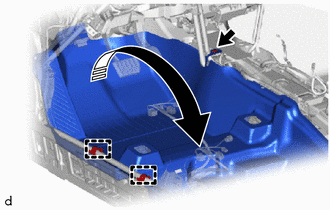
Remove the 2 front floor carpet clips.
|
|
Remove in this Direction |
Remove the clip.
Disengage the clamps to turn back the front floor carpet assembly as shown in the illustration.
|
|
Remove in this Direction |
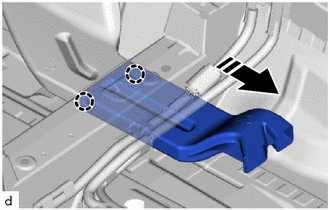
Disengage the claws to remove the rear No. 4 air duct as shown in the illustration.
87212G
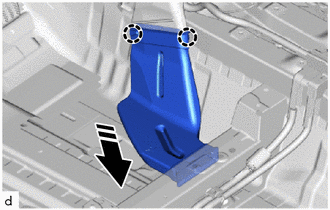
29.REMOVE REAR NO. 3 AIR DUCT (w/ Rear Air Duct)
|
|
Remove in this Direction |
Disengage the claws to remove the rear No. 3 air duct as shown in the illustration.
87212F
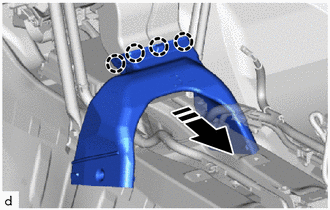
30.REMOVE REAR NO. 2 AIR DUCT (w/ Rear Air Duct)
|
|
Remove in this Direction |
Disengage the claws to remove the rear No. 2 air duct.
87212
31.REMOVE REAR NO. 1 AIR DUCT (w/ Rear Air Duct)
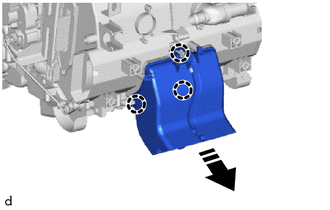
Disengage the claws to remove the rear No. 1 air duct.
55306A
32.REMOVE NO. 1 INSTRUMENT PANEL BRACE SUB-ASSEMBLY
w/ PTC Heater:
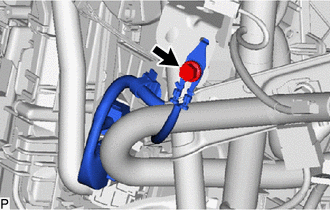
Remove the bolt to disconnect the ground wire
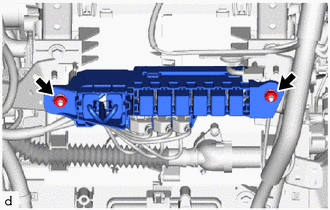
Remove the 2 nuts and separate the relay block assembly.
for LHD:
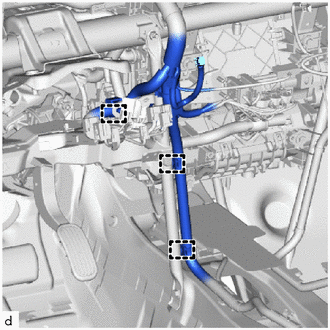
Disengage the clamps to disconnect the wire harness.
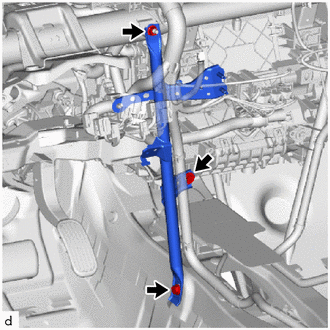
Remove the bolt, screw, nut and No. 1 instrument panel brace sub-assembly.
for RHD:
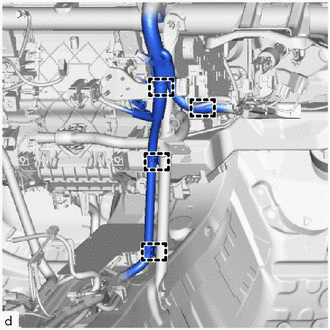
Disengage the clamps to disconnect the wire harness.
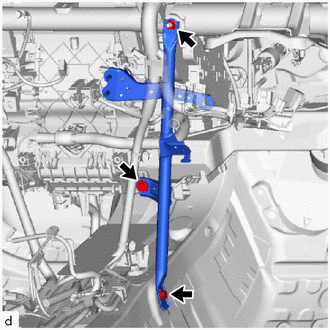
Remove the bolt, screw, nut and No. 1 instrument panel brace sub-assembly.
55307C
33.REMOVE NO. 2 INSTRUMENT PANEL BRACE SUB-ASSEMBLY
for LHD:
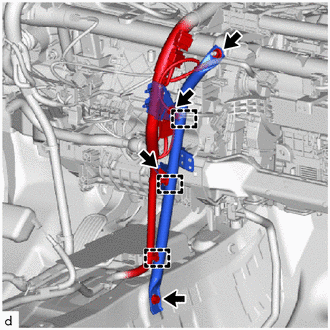
Remove the bolt to disconnect the ground wire.
Disengage the clamps to disconnect the wire harness.
Remove the bolt, screw, nut and No. 2 instrument panel brace sub-assembly.
for RHD:
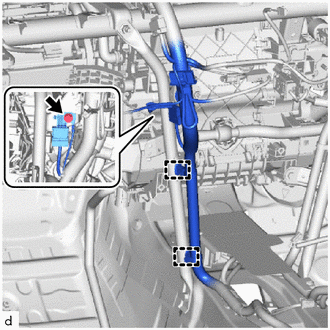
Remove the bolt to disconnect the ground wire.
Disengage the clamps to disconnect the wire harness.
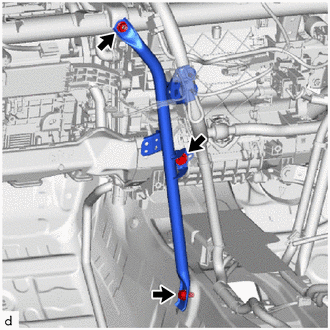
Remove the bolt, screw, nut and No. 2 instrument panel brace sub-assembly.
55308B
34.REMOVE NO. 3 INSTRUMENT PANEL TO COWL BRACE SUB-ASSEMBLY
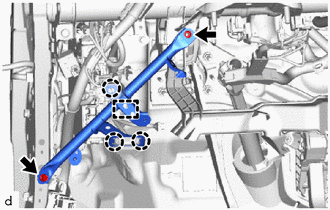
Disengage the clamp and claws.
Remove the bolt, nut and No. 3 instrument panel to cowl brace sub-assembly.
82141
35.DISCONNECT INSTRUMENT PANEL WIRE
for LHD:
Disconnect each connector.
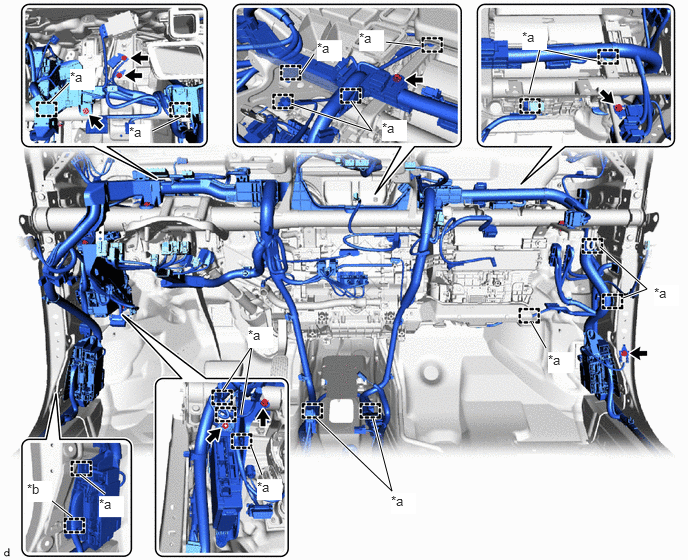
| *a | Clamp | *b | Hook |
Remove the bolt and screw.
Remove the 4 bolts to disconnect the 4 ground wires.
Remove the bolt and nut to separate the instrument panel junction block assembly with main body ECU.
Disengage clamps and hook to disconnect the instrument panel wire.
for RHD:
Disconnect each connector.
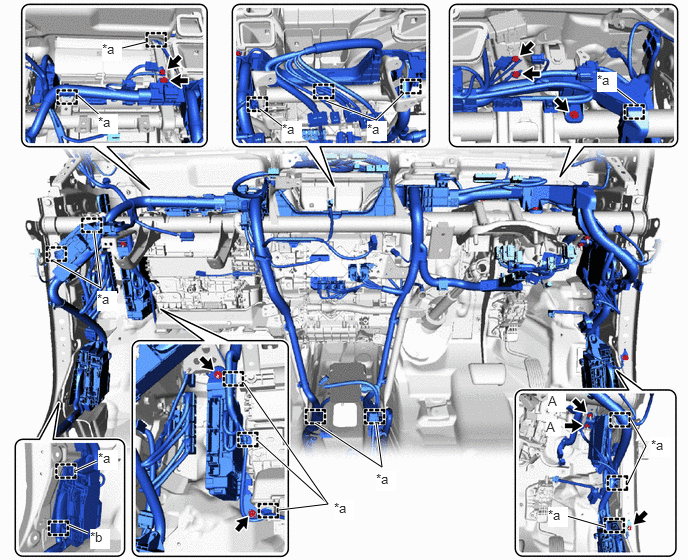
| *a | Clamp | *b | Hook |
Remove the bolt and screw.
Remove the 4 bolts to disconnect the 4 ground wires.
Remove the 2 nuts A.
Remove the bolt and nut to separate the instrument panel junction block assembly with main body ECU.
Disengage clamps and hook to disconnect the instrument panel wire.
88539J
36.DISCONNECT DRAIN COOLER HOSE
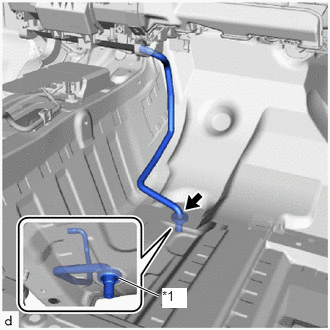
| *1 | Cooler Unit Drain Hose Grommet |
Disconnect the drain cooler hose.
- NOTICE:
-
If the cooler unit drain hose grommet is disconnected from the vehicle body while disconnecting the drain cooler hose, make sure to replace it with a new one. Failure to do so may cause water ingress.
37.REMOVE INSTRUMENT PANEL REINFORCEMENT ASSEMBLY WITH AIR CONDITIONER UNIT ASSEMBLY
- NOTICE:
- ·
Be sure to support the air conditioner unit assembly when removing it. Failure to do so may cause the bracket of the air conditioner unit assembly to break.
·When disassembling the air conditioner unit assembly, eliminate static electricity by touching the vehicle body to prevent the components from being damaged.
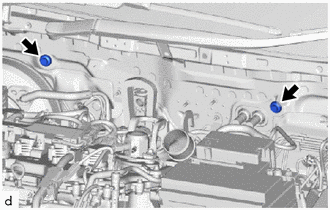
Remove the 2 bolts.
Remove the 5 bolts.
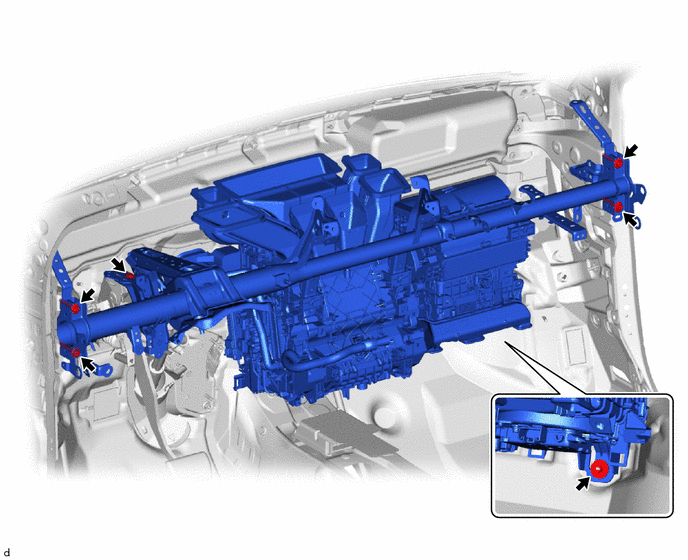
Remove the nut.
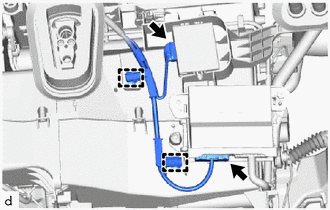
Disengage the clamps.
Disconnect 2 connectors.
Disengage the guides to remove the instrument panel reinforcement assembly with air conditioner unit assembly as shown in the illustration.
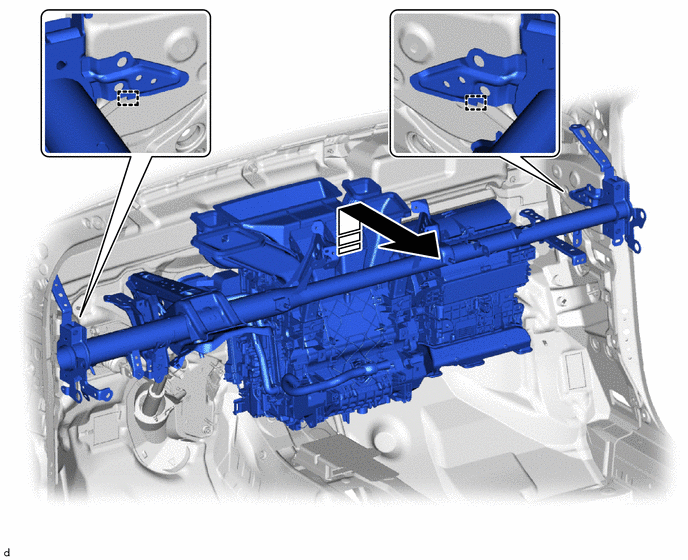
|
|
Remove in this Direction | - | - |
38.REMOVE AIR CONDITIONER UNIT ASSEMBLY
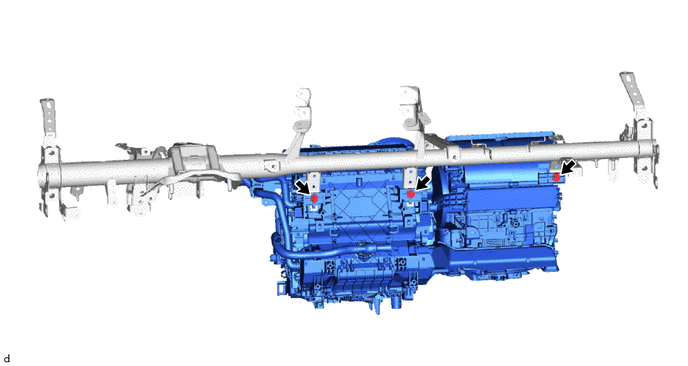
Remove the 3 bolts and air conditioner unit assembly from the instrument panel reinforcement assembly.
55990B
39.REMOVE LOWER DEFROSTER NOZZLE ASSEMBLY
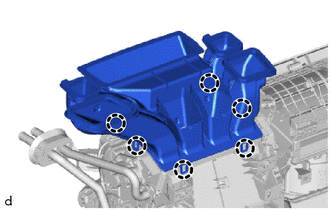
Disengage the 6 claws to remove the lower defroster nozzle assembly.