8NR-FTS ENGINE MECHANICAL CAMSHAFT REMOVAL
CAUTION / NOTICE / HINT
The necessary procedures (adjustment, calibration, initialization, or registration) that must be performed after parts are removed, installed, or replaced during the camshaft removal/installation are shown below.
| Replacement Part or Procedure | Necessary Procedure | Effect/Inoperative when not Performed | Link |
|---|---|---|---|
| Disconnect cable from negative battery terminal | Perform steering sensor zero point calibration | Lane departure alert system (w/ Steering Control) | ( ) |
| Toyota parking assist-sensor system*1 | |||
| Parking support brake system*1 | |||
| Simple intelligent parking assist system*1 | |||
| Pre-collision syatem | |||
| Memorize steering angle neutral point | Panoramic view monitor system | ()
|
|
| Initialize back door lock | Power door lock control system | ()
|
|
·
Replacement of camshaft timing gear assembly ·
Replacement of camshaft timing exhaust gear assembly ·
Replacement of camshaft ·
Replacement of No. 2 camshaft |
Inspection After Repair | ·
Poor idle, etc. ·
Engine start function, etc. |
()
|
| Replacement of CVT fluid | ATF thermal degradation estimate reset | The value of the Data List item "ATF thermal Degradation Estimate" is not estimated correctly | for K313
( )
for 313F ( )
|
| Front wheel alignment adjustment | Perform the following procedures in the order shown:
1.
Clear zero point calibration data and store system information 2.
Perform yaw rate and acceleration sensor zero point calibration and store system information |
·
VSC disabled or malfunctions ·
DTCs are stored ·
Slip indicator light illuminates ·
ABS warning light illuminates |
()
|
*1: When performing learning using the GTS
Click hereAudio / Visual / Telematics>PARK ASSIST / MONITORING>TOYOTA PARKING ASSIST-SENSOR SYSTEM>CALIBRATION
PROCEDURE

 1.INSTALL ENGINE ASSEMBLY TO ENGINE STAND
2.REMOVE ENGINE HANGERS
17201
3.REMOVE TURBOCHARGER SUB-ASSEMBLY
23250
4.REMOVE FUEL INJECTOR ASSEMBLY
23100X
5.REMOVE FUEL PUMP ASSEMBLY
19500D
6.REMOVE NO. 1 IGNITION COIL
23818
7.REMOVE FUEL VAPOR FEED PIPE
16206
8.REMOVE WATER BY-PASS PIPE SUB-ASSEMBLY
11452
9.REMOVE ENGINE OIL LEVEL DIPSTICK GUIDE
29300
10.REMOVE VACUUM PUMP ASSEMBLY
15370
11.REMOVE CAMSHAFT TIMING OIL CONTROL SOLENOID ASSEMBLY (for Intake Side)
15370
12.REMOVE CAMSHAFT TIMING OIL CONTROL SOLENOID ASSEMBLY (for Exhaust Side)
11201
13.REMOVE CYLINDER HEAD COVER SUB-ASSEMBLY
11213
14.REMOVE CYLINDER HEAD COVER GASKET
11191A
15.REMOVE SPARK PLUG TUBE GASKET
16.SET NO. 1 CYLINDER TO TDC/COMPRESSION
13470
17.REMOVE CRANKSHAFT PULLEY ASSEMBLY
12315A
18.REMOVE ENGINE MOUNTING BRACKET RH
11310
19.REMOVE TIMING CHAIN COVER ASSEMBLY
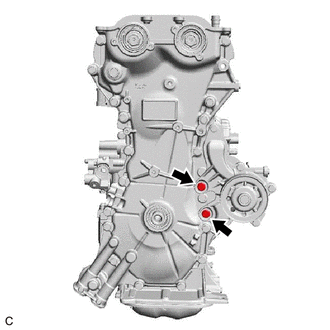
Remove the 2 bolts from the engine water pump assembly.
Remove the timing chain cover assembly.
Click hereEngine / Hybrid System>8NR-FTS (ENGINE MECHANICAL)>ENGINE UNIT>DISASSEMBLY
11302A
20.REMOVE TIMING CHAIN COVER OIL SEAL
16322
21.REMOVE WATER INLET PIPE
13540
22.REMOVE NO. 1 CHAIN TENSIONER ASSEMBLY
13559
23.REMOVE CHAIN TENSIONER SLIPPER
13566B
24.REMOVE TIMING CHAIN GUIDE
13506
25.REMOVE CHAIN SUB-ASSEMBLY
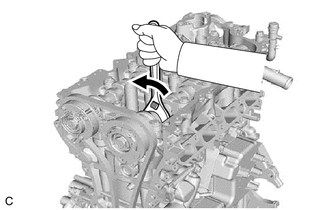
Hold the hexagonal portion of the camshaft with a wrench and turn the camshaft timing gear assembly counterclockwise to loosen the chain sub-assembly between the camshaft timing exhaust gear assembly and camshaft timing gear assembly.
With the chain sub-assembly loosened, release the chain sub-assembly from the camshaft timing gear assembly and place it on the camshaft timing gear assembly.
- NOTICE:
-
Be sure to release the chain sub-assembly from the sprocket completely.
Turn the camshaft clockwise to return it to its original position and remove the chain sub-assembly.
13050
26.REMOVE CAMSHAFT TIMING GEAR ASSEMBLY
13070A
27.REMOVE CAMSHAFT TIMING EXHAUST GEAR ASSEMBLY
28.REMOVE CAMSHAFT BEARING CAP
13511
29.REMOVE CAMSHAFT
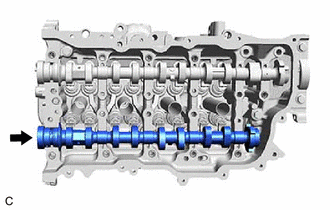
Remove the camshaft from the camshaft housing sub-assembly.
13512
30.REMOVE NO. 2 CAMSHAFT
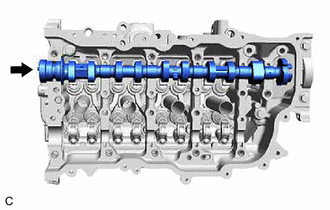
Remove the No. 2 camshaft from the camshaft housing sub-assembly.
15678A
31.REMOVE OIL CONTROL VALVE FILTER
16671
32.REMOVE WATER VALVE
11103
33.REMOVE CAMSHAFT HOUSING SUB-ASSEMBLY
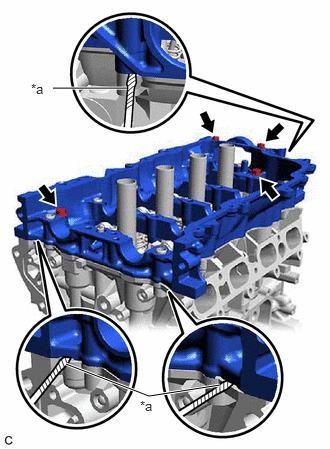
| *a | Protective Tape |
Remove the 4 bolts from the camshaft housing sub-assembly.
Remove the camshaft housing sub-assembly by prying between the cylinder head sub-assembly and camshaft housing sub-assembly with a screwdriver with its tip wrapped with protective tape.
- NOTICE:
-
Be careful not to damage the contact surfaces of the cylinder head sub-assembly and camshaft housing sub-assembly.