INTERIOR PANELS / TRIM INSTRUMENT PANEL SAFETY PAD INSTALLATION
PROCEDURE

 1.INSTALL INSTRUMENT PANEL SAFETY PAD ASSEMBLY
Engage the 5 guides and temporarily install the instrument panel safety pad assembly as shown in the illustration.
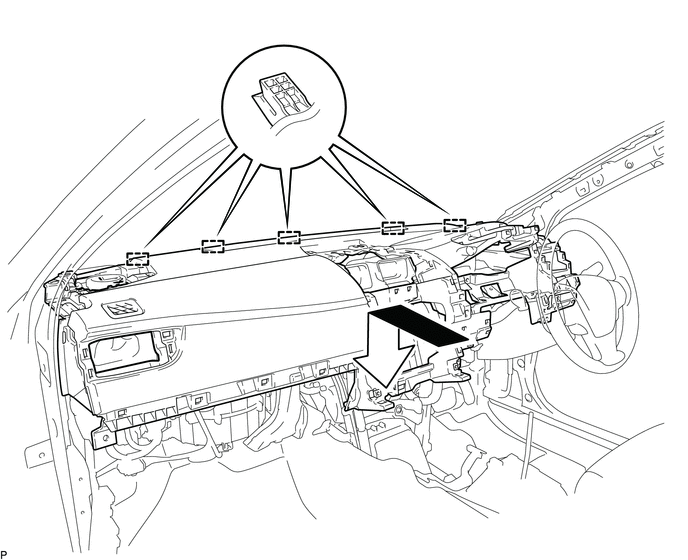
- NOTICE:
- ·
Do not damage the instrument panel safety pad assembly.
·Do not allow the wire harnesses to interfere with the surrounding parts.
Install the 2 clips.
Install the 3 bolts <B> and nut <E>.
Install the 2 passenger airbag bolts <A>.
- Torque:
- 20 N*m (204 kgf*cm, 15 ft.*lbf)
Engage each clamp.
Connect each connector.
82142A
2.CONNECT NO. 2 INSTRUMENT PANEL WIRE
55011A
3.INSTALL NO. 1 INSTRUMENT PANEL GARNISH SUB-ASSEMBLY
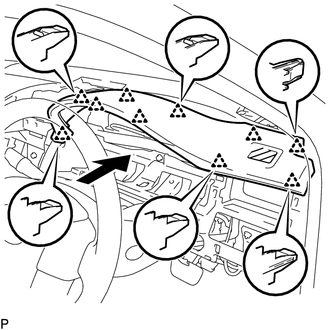
Engage the 10 clips to install the No. 1 instrument panel garnish sub-assembly.
58816B
4.INSTALL CONSOLE BOX INSERT
Engage the 2 claws to connect the room temperature sensor.
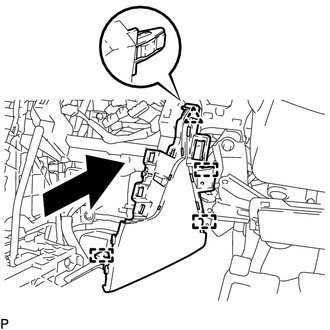
Engage the clip and 3 guides.
Install the console box insert with the 2 screws <C> or <D>.
58817A
5.INSTALL FRONT NO. 2 CONSOLE BOX INSERT
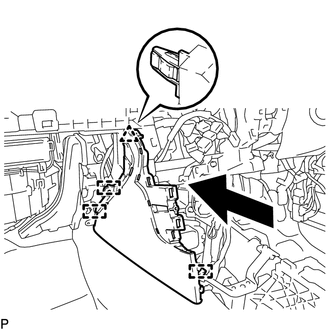
Engage the clip and 3 guides.
Install the front No. 2 console box insert with the 2 screws <C> or <D>.
55480D
6.INSTALL LOWER INSTRUMENT PANEL FINISH PANEL ASSEMBLY
Connect the connector.
Engage the 4 clips and guide to install the lower instrument panel finish panel assembly.
86160P
7.INSTALL FRONT NO. 2 SPEAKER ASSEMBLY (for RH Side)
55409F
8.INSTALL NO. 2 INSTRUMENT PANEL SPEAKER PANEL SUB-ASSEMBLY
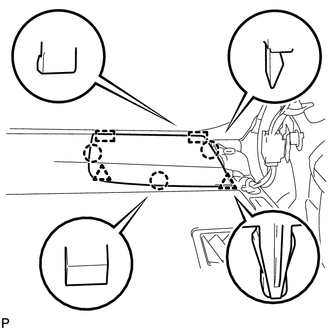
Engage the 2 guides.
Engage the 3 claws and 2 clips to install the No. 2 instrument panel speaker panel sub-assembly.
62211
9.INSTALL FRONT PILLAR GARNISH RH
86160P
10.INSTALL FRONT NO. 2 SPEAKER ASSEMBLY (for LH Side)
- HINT:
-
Use the same procedure as for the RH side.
-
Click hereAudio / Visual / Telematics>AUDIO / VIDEO>INSTRUMENT PANEL SPEAKER>INSTALLATION
55408F
11.INSTALL NO. 1 INSTRUMENT PANEL SPEAKER PANEL SUB-ASSEMBLY
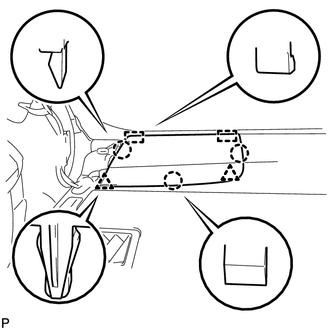
Engage the 2 guides.
Engage the 3 claws and 2 clips to install the No. 1 instrument panel speaker panel sub-assembly.
62212
12.INSTALL FRONT PILLAR GARNISH LH
- HINT:
-
Use the same procedure as for the RH side.
-
Click hereVehicle Interior>INTERIOR PANELS / TRIM>ROOF HEADLINING>INSTALLATION
55650
13.INSTALL NO. 1 INSTRUMENT PANEL REGISTER ASSEMBLY
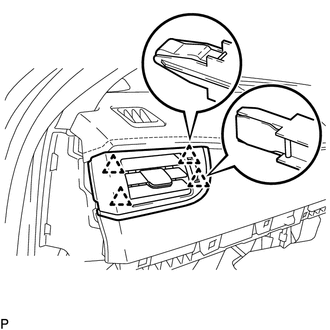
Engage the 4 clips to install the No. 1 instrument panel register assembly.
55475A
14.INSTALL NO. 2 INSTRUMENT CLUSTER FINISH PANEL GARNISH
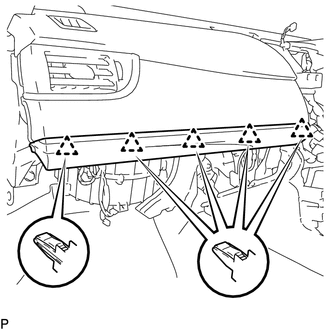
Engage the 5 clips to install the No. 2 instrument cluster finish panel garnish.
55303B
15.INSTALL LOWER INSTRUMENT PANEL SUB-ASSEMBLY
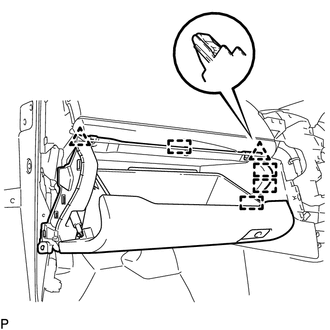
Engage the 4 guides and 2 clips.
Install the lower instrument panel sub-assembly with the bolt <B> and 4 screws <C> or <D>.
55607
16.INSTALL NO. 2 INSTRUMENT PANEL UNDER COVER SUB-ASSEMBLY
Connect the connector.
Engage the 2 guides and 4 claws to install the No. 2 instrument panel under cover sub-assembly.
55318C
17.INSTALL INSTRUMENT SIDE PANEL LH
Engage the 3 guides.
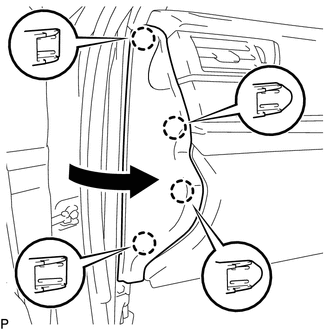
Engage the 4 claws to install the instrument side panel LH as shown in the illustration.
62312B
18.INSTALL FRONT DOOR OPENING TRIM WEATHERSTRIP LH
62112A
19.INSTALL COWL SIDE TRIM SUB-ASSEMBLY LH
- HINT:
-
Use the same procedure as for the RH side.
-
Click hereVehicle Interior>INTERIOR PANELS / TRIM>ROOF HEADLINING>INSTALLATION
67914
20.INSTALL FRONT DOOR SCUFF PLATE LH
- HINT:
-
Use the same procedure as for the RH side.
-
Click hereVehicle Interior>INTERIOR PANELS / TRIM>ROOF HEADLINING>INSTALLATION
86160J
21.INSTALL FRONT NO. 3 SPEAKER ASSEMBLY (for 10 Speakers)
55510F
22.INSTALL NO. 1 SPEAKER OPENING COVER ASSEMBLY
Connect the connector.
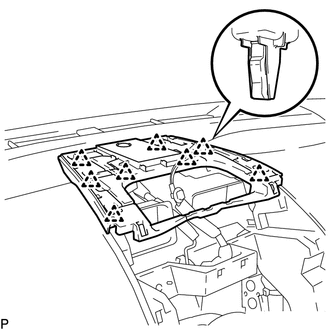
Engage the 8 clips to install the No. 1 speaker opening cover assembly.
23.INSTALL RADIO RECEIVER ASSEMBLY WITH AIR CONDITIONING CONTROL ASSEMBLY (w/o Navigation System)
24.INSTALL NAVIGATION RECEIVER ASSEMBLY WITH AIR CONDITIONING CONTROL ASSEMBLY (w/ Navigation System)
58804A
25.INSTALL UPPER CONSOLE PANEL SUB-ASSEMBLY
Connect each connector.
Engage the 4 clips and guide.
Install the upper console panel sub-assembly with the 2 screws <C> or <D>.
58916
26.INSTALL BOX BOTTOM MAT
Install the box bottom mat.
55660
27.INSTALL NO. 2 INSTRUMENT PANEL REGISTER ASSEMBLY
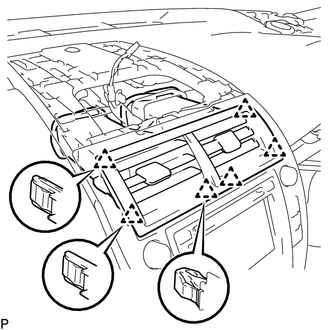
Engage the 6 clips to install the No. 2 instrument panel register assembly.
- NOTICE:
-
When installing the No. 2 instrument panel register assembly, check that the wire harness is not caught between the No. 2 instrument panel register assembly and duct.
28.INSTALL CENTER INSTRUMENT CLUSTER FINISH PANEL ASSEMBLY
Connect the connector.
Engage the clamp.
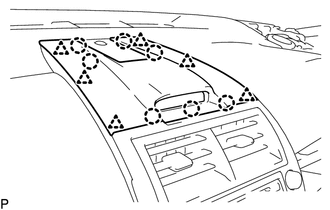
Engage the 6 clips and 7 claws to install the center instrument cluster finish panel assembly.
29.INSTALL REAR CONSOLE BOX ASSEMBLY
58815A
30.INSTALL CONSOLE BOX CARPET
58864B
31.INSTALL NO. 4 CONSOLE BOX DUCT
58801E
32.INSTALL UPPER CONSOLE BOX SUB-ASSEMBLY
58805C
33.INSTALL REAR CONSOLE UPPER PANEL SUB-ASSEMBLY
Connect each connector.
Engage the 4 clips and install the rear console upper panel sub-assembly.
Move the shift lever to P.
33504F
34.INSTALL SHIFT LEVER KNOB SUB-ASSEMBLY
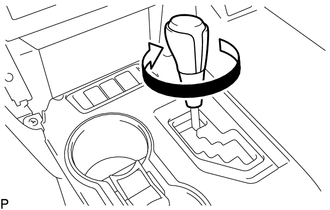
Turn the shift lever knob sub-assembly clockwise to install the shift lever knob sub-assembly.
53922B
35.INSTALL FRONT PANEL GARNISH LH
Engage the 3 claws, 2 clips and 8 guides to install the front panel garnish LH.
36.INSTALL LOWER NO. 1 INSTRUMENT PANEL FINISH PANEL ASSEMBLY
Engage the 4 claws, 9 clips and 3 guides.
Install the lower No. 1 instrument panel finish panel assembly with the 2 bolts <B>.
53601
37.CONNECT HOOD LOCK CONTROL LEVER SUB-ASSEMBLY
Engage the claw and 2 guides to connect the hood lock control lever sub-assembly.
53921B
38.INSTALL FRONT PANEL GARNISH RH
Engage the 3 claws, 2 clips and 8 guides to install the front panel garnish RH.
83100
39.INSTALL COMBINATION METER ASSEMBLY
55410C
40.INSTALL INSTRUMENT CLUSTER FINISH PANEL ASSEMBLY
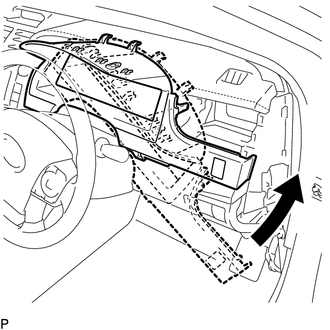
Temporarily install the instrument cluster finish panel assembly as shown in the illustration.
Connect each connector.
Engage the 5 claws, 5 clips and 2 guides, and install the instrument cluster finish panel assembly.
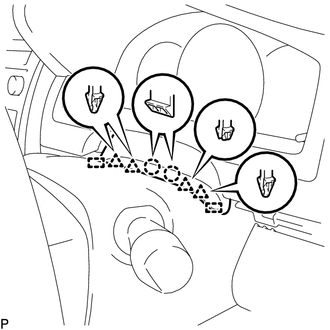
Engage the 2 claws, 4 clips and 2 guides.
55670
41.INSTALL NO. 3 INSTRUMENT PANEL REGISTER ASSEMBLY
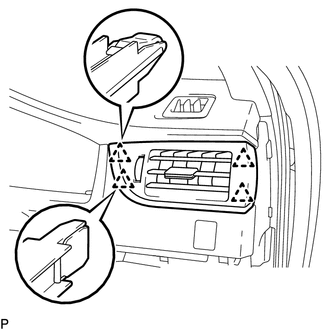
Engage the 4 clips to install the No. 3 instrument panel register assembly.
55431B
42.INSTALL UPPER INSTRUMENT PANEL FINISH PANEL
Connect the connector.
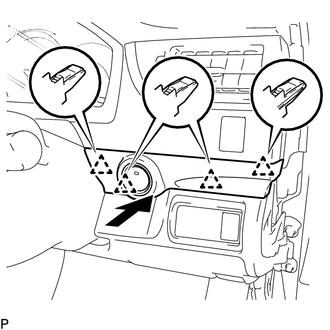
Engage the 4 clips to install the upper instrument panel finish panel.
55317A
43.INSTALL INSTRUMENT SIDE PANEL RH
Engage the 3 guides.
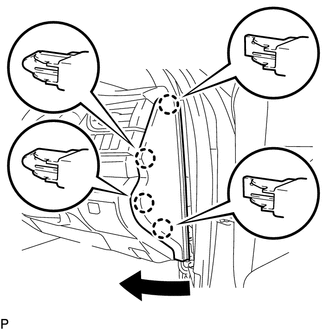
Engage the 4 claws to install the instrument side panel RH as shown in the illustration.
62311B
44.INSTALL FRONT DOOR OPENING TRIM WEATHERSTRIP RH
62111A
45.INSTALL COWL SIDE TRIM SUB-ASSEMBLY RH
67913
46.INSTALL FRONT DOOR SCUFF PLATE RH
47.CONNECT CABLE TO NEGATIVE AUXILIARY BATTERY TERMINAL
- NOTICE:
-
When disconnecting the cable, some systems need to be initialized after the cable is reconnected.
-
Click hereGeneral>INTRODUCTION>REPAIR INSTRUCTION>INITIALIZATION
64718C
48.INSTALL LUGGAGE TRIM SERVICE HOLE COVER
49.INSPECT SRS WARNING LIGHT