2AZ-FE ENGINE CONTROL SFI SYSTEM Cranking Holding Function Circuit
DESCRIPTION
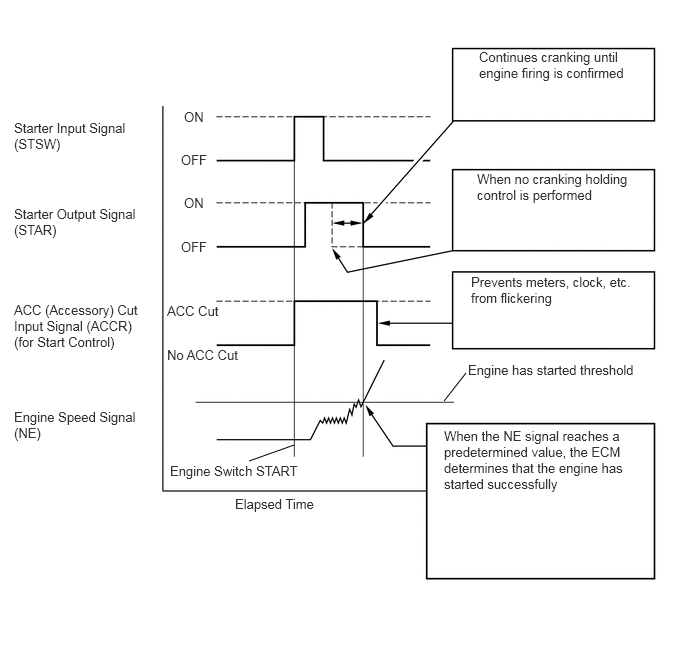
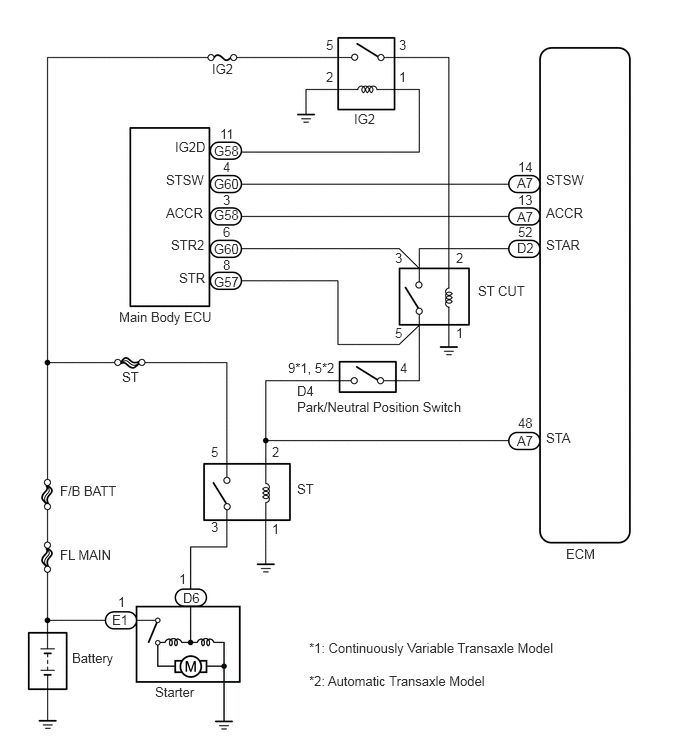
The cranking holding control system provides current to the starter when the ECM detects the engine switch start signal (STSW). When the ECM judges that the engine has started , the system cuts current to the starter. When the ECM receives the STSW signal, the ACC (Accessory) relay is turned off to, prevents flickering of the combination meter, clock and audio system. Also, the STAR output signal travels through the ST cut relay and the park/neutral position switch to the ST relay, causing the starter to activate.
When the engine is cranking, the starter operation signal is received by the STA terminal of the ECM.
WIRING DIAGRAM
CAUTION / NOTICE / HINT
- NOTICE:
-
Inspect the fuses for circuits related to this system before performing the following inspection procedure.
PROCEDURE
Connect the GTS to the DLC3.
Turn the engine switch on (IG) and turn the GTS on.
Enter the following menus: Powertrain / Engine and ECT / Data List / Starter Signal.
Check the result when the engine switch is turned on (IG) and the engine is started.
- Standard:
Engine Switch Position Starter Signal On (IG) ON Engine start OFF
OK
NG
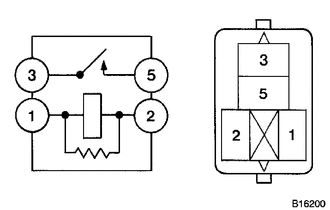
Remove the ST relay from the engine room relay block.
Measure the resistance according to the value(s) in the table below.
- Standard Resistance:
Tester Connection Condition Specified Condition 3 - 5 No battery voltage applied across terminals 1 and 2 10 kΩ or higher 3 - 5 Battery voltage applied across terminals 1 and 2 Below 1 Ω
OK
NG
Remove the ST relay from the engine room No. 1 relay block.
Measure the resistance according to the value(s) in the table below.
- Standard Resistance (Check for Open):
Tester Connection Condition Specified Condition ST relay terminal 1 - Body ground Always Below 1 Ω
OK
NG
Disconnect the park/neutral position switch connector.
Remove the ST relay from the engine room No. 1 relay block.
Measure the resistance according to the value(s) in the table below.
- Standard Resistance (Check for Open):
Tester Connection Condition Specified Condition D4-9*1, 5*2 - ST relay terminal 2 Always Below 1 Ω
- Standard Resistance (Check for Short):
Tester Connection Condition Specified Condition D4-9*1, 5*2 or ST relay terminal 2 - Body ground Always 10 kΩ or higher
*1: for CVT models.
*2: for A/T models.
OK
NG
Remove the ST relay from the engine room No. 1 relay block.
Measure the voltage according to the value(s) in the table below.
- Standard Voltage:
Tester Connection Condition Specified Condition ST relay terminal 5 - Body ground Always 11 to 14 V
OK
NG
Inspect the starter assembly for 1.6 kW type (See page Engine / Hybrid System>2AZ-FE STARTING>STARTER(for 1.6 kW Type)>INSPECTION) or 1.7 kW type (See page Engine / Hybrid System>2AZ-FE STARTING>STARTER(for 1.7 kW Type)>INSPECTION).
OK
NG
Remove the ST relay from the engine room No. 1 relay block.
Disconnect the starter connector.
Measure the resistance according to the value(s) in the table below.
- Standard Resistance (Check for Open):
Tester Connection Condition Specified Condition ST relay terminal 3 - D6-1 Always Below 1 Ω
- Standard Resistance (Check for Short):
Tester Connection Condition Specified Condition ST relay terminal 3 or D6-1 - Body ground Always 10 kΩ or higher
OK
NG
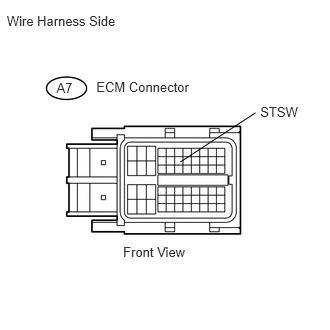
Disconnect the ECM connector.
Move the shift lever to P.
Measure the voltage according to the value(s) in the table below.
- Standard Voltage:
Tester Connection Condition Specified Condition A7-14 (STSW) - Body ground Engine switch cranking position 11 to 14 V
OK
NG
Remove the ST CUT relay from the fusible link block.
Measure the resistance according to the value(s) in the table below.
- Standard Resistance:
Tester Connection Condition Specified Condition 3 - 5 No battery voltage applied across terminals 1 and 2 10 kΩ or higher 3 - 5 Battery voltage applied across terminals 1 and 2 Below 1 Ω
OK
NG
Inspect the park/neutral position switch (See page Drivetrain>U241E (AUTOMATIC TRANSMISSION / TRANSAXLE)>PARK / NEUTRAL POSITION SWITCH>INSPECTION for Automatic transaxle, Drivetrain>K112 (CVT)>PARK / NEUTRAL POSITION SWITCH>INSPECTION for Continuously variable transaxle).
- Result:
Result Proceed to OK A NG (for A/T models) B NG (for CVT models) C
A
B
(See pageDrivetrain>U241E (AUTOMATIC TRANSMISSION / TRANSAXLE)>PARK / NEUTRAL POSITION SWITCH>REMOVAL)
C
Remove the ST CUT relay from the fusible link block.
Turn the engine switch on (IG).
Measure the voltage according to the value(s) in the table below.
- Standard Voltage:
Tester Connection Condition Specified Condition ST CUT relay terminal 2 - Body ground Engine switch on (IG) 11 to 14 V
OK
NG
Remove the ST CUT relay from the fusible link block.
Measure the resistance according to the value(s) in the table below.
- Standard Resistance (Check for Open):
Tester Connection Condition Specified Condition ST CUT relay terminal 1 - Body ground Always Below 1 Ω
OK
NG
Disconnect the ECM connector.
Remove the ST CUT relay from the fusible link block.
Disconnect the main body ECU connector.
Measure the resistance according to the value(s) in the table below.
- Standard Resistance (Check for Open):
Tester Connection Condition Specified Condition D2-52 (STAR) - ST CUT relay terminal 3 Always Below 1 Ω D2-52 (STAR) - G60-6 (STR2) Always Below 1 Ω
- Standard Resistance (Check for Short):
Tester Connection Condition Specified Condition D2-52 (STAR) or ST CUT relay terminal 3 or G60-6 (STR2) - Body ground Always 10 kΩ or higher
OK
NG
Disconnect the park/neutral position switch connector.
Remove the ST CUT relay from the fusible link block.
Disconnect the main body ECU connector.
Measure the resistance according to the value(s) in the table below.
- Standard Resistance (Check for Open):
Tester Connection Condition Specified Condition D4-4 - ST CUT relay terminal 5 Always Below 1 Ω D4-4 - G57-8 (STR) Always Below 1 Ω
- Standard Resistance (Check for Short):
Tester Connection Condition Specified Condition D4-4 or ST CUT relay terminal 5 or G57-8 (STR) - Body ground Always 10 kΩ or higher
- Result:
Result Proceed to OK (w/ Engine switch) A OK (w/o Engine switch) B NG C
A
B
(See pageEngine / Hybrid System>2AZ-FE STARTING>PUSH-BUTTON START>HOW TO PROCEED WITH TROUBLESHOOTING)
C
Disconnect the main body ECU connector.
Disconnect the ECM connector.
Measure the resistance according to the value(s) in the table below.
- Standard Resistance (Check for Open):
Tester Connection Condition Specified Condition A7-14 (STSW) - G60-4 (STSW) Always Below 1 Ω
- Standard Resistance (Check for Short):
Tester Connection Condition Specified Condition A7-14 (STSW) or G60-4 (STSW) - Body ground Always 10 kΩ or higher
- Result:
Result Proceed to OK (w/ Engine switch) A OK (w/o Engine switch) B NG C
A
B
(See pageEngine / Hybrid System>2AZ-FE STARTING>PUSH-BUTTON START>HOW TO PROCEED WITH TROUBLESHOOTING)
C