2GR-FE FUEL FUEL TANK REMOVAL
CAUTION / NOTICE / HINT
- NOTICE:
-
These procedures should be performed with the fuel tank less than 1/5 full.
PROCEDURE

 1.DISCHARGE FUEL SYSTEM PRESSURE
28800
2.DISCONNECT CABLE FROM NEGATIVE BATTERY TERMINAL
- NOTICE:
-
When disconnecting the cable, some systems need to be initialized after the cable is reconnected (See page General>INTRODUCTION>REPAIR INSTRUCTION>INITIALIZATION).
71940A
3.REMOVE REAR SEAT HEADREST ASSEMBLY (for Captain Seat Type)
4.REMOVE REAR NO. 1 SEAT ASSEMBLY LH (for Captain Seat Type)
71940A
5.REMOVE REAR SEAT HEADREST ASSEMBLY (for Tumble Seat Type LH Side)
6.REMOVE REAR NO. 1 SEAT ASSEMBLY (for Tumble Seat Type LH Side)
58595
7.REMOVE NO. 3 FLOOR CARPET MOULDING
72129
8.REMOVE NO. 1 SEAT TRACK LOWER RAIL PROTECTOR
77310A
9.REMOVE FUEL TANK CAP
58325E
10.REMOVE REAR FLOOR SERVICE HOLE COVER
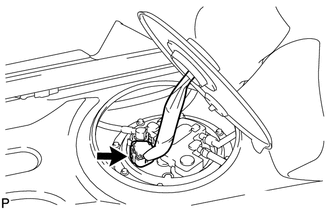
Remove the service hole cover and disconnect the fuel pump connector.
77707
11.DISCONNECT CHARCOAL CANISTER OUTLET TUBE SUB-ASSEMBLY
77026A
12.DISCONNECT NO. 1 FUEL EVAPORATION TUBE SUB-ASSEMBLY
77027
13.DISCONNECT NO. 2 FUEL EVAPORATION TUBE SUB-ASSEMBLY
77209D
14.DISCONNECT FUEL TANK MAIN TUBE SUB-ASSEMBLY
77168A
15.REMOVE FUEL TANK VENT TUBE SET PLATE
16.DRAIN FUEL
77020A
17.REMOVE FUEL SUCTION WITH PUMP AND GAUGE TUBE ASSEMBLY
58166A
18.REMOVE FRONT FLOOR COVER LH
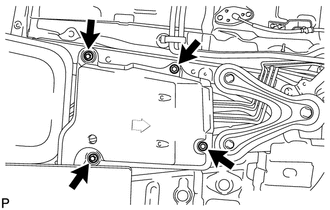
Remove the 4 bolts and floor cover.
77209D
19.DISCONNECT FUEL TANK MAIN TUBE SUB-ASSEMBLY
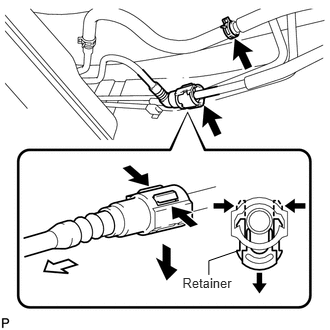
Pinch and pull the main tube connector to disconnect the connector from the pipe.
- NOTICE:
- ·
Remove any dirt and foreign matter on the fuel tube joint before performing this work.
- ·
Do not allow any scratches or foreign matter on the parts when disconnecting them, as the fuel tube joint contains the O-rings that seal the plug.
- ·
Perform this work by hand. Do not use any tools.
- ·
Do not forcibly bend, twist or turn the nylon tube.
- ·
Protect the disconnected part by covering it with a plastic bag and tape after disconnecting the fuel tubes.
77026A
20.DISCONNECT NO. 1 FUEL EVAPORATION TUBE SUB-ASSEMBLY
Disconnect the purge line hose from the pipe.
77213B
21.DISCONNECT FUEL TANK TO FILLER PIPE HOSE
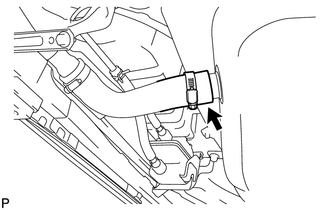
Disconnect the filler pipe hose from the fuel tank.
77221
22.DISCONNECT NO. 1 FUEL TANK BREATHER TUBE
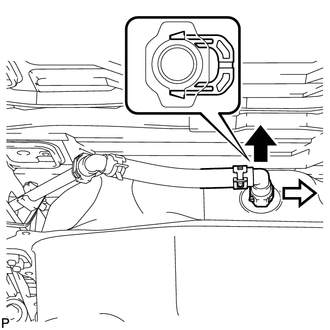
Disconnect the breather tube from the fuel tank.
- NOTICE:
- ·
Remove any dirt and foreign matter on the tube joint before performing this work.
- ·
Do not allow any scratches or foreign matter on the parts when disconnecting them, as the fuel tube joint contains the O-rings that seal the plug.
- ·
Perform this work by hand. Do not use any tools.
- ·
Do not forcibly bend, twist or turn the nylon tube.
- ·
Protect the disconnected part by covering it with a plastic bag and tape after disconnecting the fuel tubes.
77707
23.DISCONNECT CHARCOAL CANISTER OUTLET TUBE SUB-ASSEMBLY
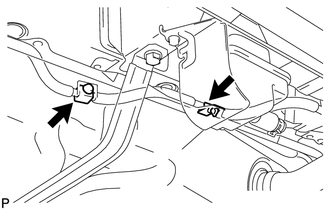
Disconnect the outlet tube from the fuel tank.
77100
24.REMOVE FUEL TANK ASSEMBLY
Set a transmission jack underneath the fuel tank.
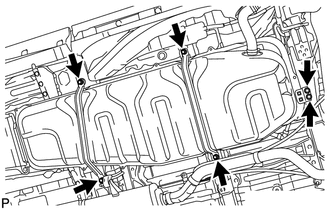
Remove the 6 bolts and 2 fuel tank bands.
Slightly lower the transmission jack.
77209D
25.REMOVE FUEL TANK MAIN TUBE SUB-ASSEMBLY
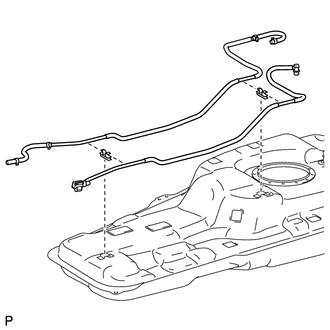
Remove the fuel tank main tube from the fuel tube clamps.
77026A
26.REMOVE NO. 1 FUEL EVAPORATION TUBE SUB-ASSEMBLY
Remove the tube from the fuel tube clamps.
77285B
27.REMOVE NO. 1 FUEL TUBE CLAMP
Remove the 2 tube clamps from the fuel tank.
77027
28.REMOVE NO. 2 FUEL EVAPORATION TUBE SUB-ASSEMBLY
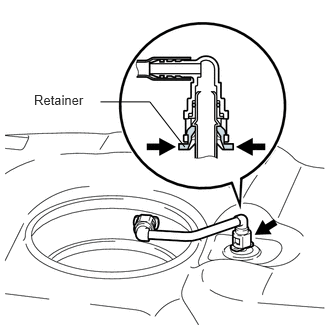
Remove the tube from the tank.
- NOTICE:
- ·
Remove any dirt and foreign matter on the tube joint before performing this work.
- ·
Do not allow any scratches or foreign matter on the parts when disconnecting them, as the fuel tube joint contains the O-rings that seal the plug.
- ·
Perform this work by hand. Do not use any tools.
- ·
Do not forcibly bend, twist or turn the nylon tube.
- ·
Protect the disconnected part by covering it with a plastic bag and tape after disconnecting the fuel tubes.
77641A
29.REMOVE NO. 1 FUEL TANK PROTECTOR
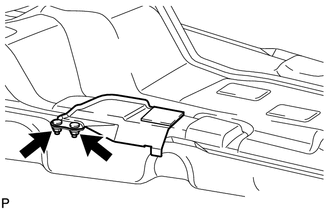
Remove the 2 nuts and protector.
77512
30.REMOVE REAR FUEL TANK BRACKET
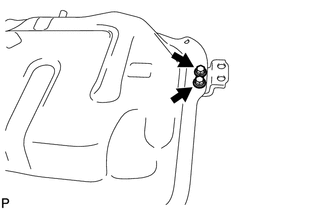
Remove the 2 bolts, spacer and bracket.
77651A
31.REMOVE FUEL TANK CUSHION
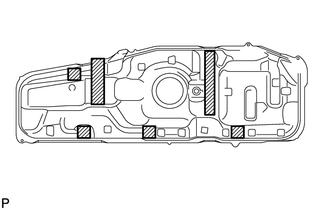
Remove the 6 fuel tank cushions from the fuel tank.