Door Courtesy Switch Circuit
Circuit diagnosis · Vehicles built from Aug 2014
Versions by build date: Jul 2007 – Jul 2008 Aug 2008 – Oct 2010 Nov 2010 – Jul 2011 Aug 2011 – Jul 2012 Aug 2012 – Jul 2014 from Aug 2014
DESCRIPTION
The main body ECU detects the condition of each door courtesy switch.WIRING DIAGRAM
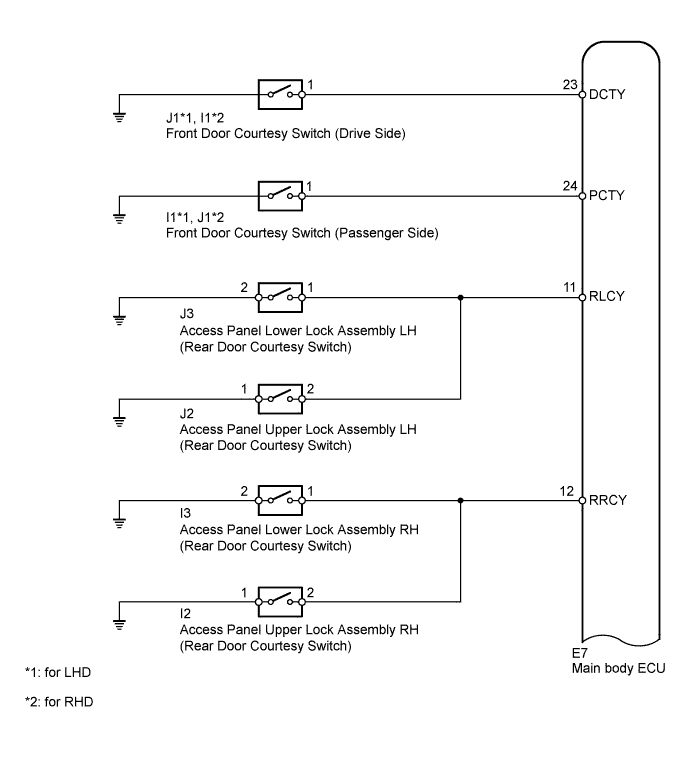

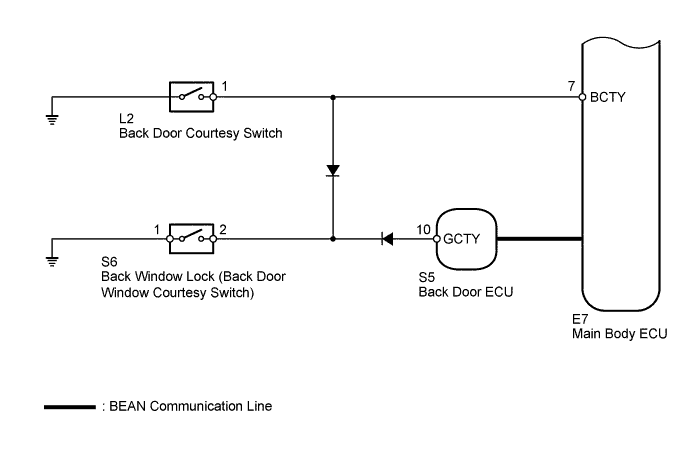
INSPECTION PROCEDURE
| 1. READ VALUE USING INTELLIGENT TESTER (DOOR COURTESY SWITCH) |

Connect the intelligent tester to the DLC3.
Turn the ignition switch to ON.
Turn the tester on.
Enter the following menus: Body / Main Body / Data List /
According to the display on the tester, read the Data List.
Main Body Tester Display
Measurement Item/Range
Normal Condition
Diagnostic Note
Luggage Courtesy SW
Back door and back window courtesy switch signal/ OFF or ON
OFF: Both back door and back window are closed
ON: Either back door or back window is open
-
D Door Courtesy SW
Driver side door courtesy light switch signal/ OFF or ON
OFF: Driver side door is closed
ON: Driver side door is open
-
P Door Courtesy SW
Passenger side door courtesy light switch signal/ OFF or ON
OFF: Passenger side door is closed
ON: Passenger side door is open
-
Rear Door Courtesy SW
Rear door courtesy light switch signal/ OFF or ON
OFF: Rear door is closed
ON: Rear door is open
-
- OK:
- Condition sign can be displayed.
Result Result
Proceed to
OK
A
Front door courtesy switch (driver side) does not operate
B
Front door courtesy switch (passenger side) does not operate
C
Both rear door courtesy switches do not operate
D
Back door courtesy switch or back window courtesy switch does not operate
E
|
|
||||
|
|
||||
|
|
||||
|
|
||||

| A | ||
 |
||
| ||
| 2. INSPECT FRONT DOOR COURTESY SWITCH (DRIVER SIDE) |
Inspect the front door courtesy switch (driver side) (Click here).
|
|
||||

| OK | |
 |
| 3. CHECK HARNESS AND CONNECTOR (FRONT DOOR COURTESY SWITCH (DRIVER SIDE) - MAIN BODY ECU) |
for LHD
Disconnect the J1 front door courtesy switch (driver side) connector.
for RHD
Disconnect the I1 front door courtesy switch (driver side) connector.
Disconnect the E7 main body ECU connector.
Measure the resistance according to the value(s) in the table below.
- Standard Resistance:
for LHD Tester Connection
Condition
Specified Condition
J1-1 - E7-23 (DCTY)
Always
Below 1 Ω
J1-1 - Body ground
Always
10 kΩ or higher
for RHD Tester Connection
Condition
Specified Condition
I1-1 - E7-23 (DCTY)
Always
Below 1 Ω
I1-1 - Body ground
Always
10 kΩ or higher
Reconnect the main body ECU connector.
Reconnect the front door courtesy switch (driver side) connector.
|
|
||||
| OK | ||
|
||
| ||
| 4. INSPECT FRONT DOOR COURTESY SWITCH (PASSENGER SIDE) |
Inspect the front door courtesy switch (passenger side) (Click here).
|
|
||||
| OK | |
|
| Go to step 7 |
| 5. CHECK HARNESS AND CONNECTOR (FRONT DOOR COURTESY SWITCH (PASSENGER SIDE) - MAIN BODY ECU) |
for LHD
Disconnect the I1 front door courtesy switch (passenger side) connector.
for RHD
Disconnect the J1 front door courtesy switch (passenger side) connector.
Disconnect the E7 main body ECU connector.
Measure the resistance according to the value(s) in the table below.
- Standard Resistance:
for LHD Tester Connection
Condition
Specified Condition
I1-1 - E7-24 (PCTY)
Always
Below 1 Ω
I1-1 - Body ground
Always
10 kΩ or higher
for RHD Tester Connection
Condition
Specified Condition
J1-1 - E7-24 (PCTY)
Always
Below 1 Ω
J1-1 - Body ground
Always
10 kΩ or higher
Reconnect the main body ECU connector.
Reconnect the front door courtesy switch (passenger side) connector.
|
|
||||
| OK | ||
|
||
| ||
| 6. INSPECT ACCESS PANEL LOCK ASSEMBLY (REAR DOOR COURTESY SWITCH) |
Inspect the access panel lower lock assembly LH and RH (Click here).
Inspect the access panel upper lock assembly LH and RH (Click here).
| Result |
Proceed to |
| OK |
A |
| NG (Access panel lower lock assembly) |
B |
| NG (Access panel upper lock assembly) |
C |
|
|
||||
|
|
||||
| A | |
|
| Go to step 10 |
| 7. CHECK HARNESS AND CONNECTOR (ACCESS PANEL LOCK ASSEMBLY - MAIN BODY ECU AND BODY GROUND) |
Disconnect the J2, J3, I2 and I3 access panel lock assembly connectors.
Disconnect the E7 main body ECU connector.
Measure the resistance according to the value(s) in the table below.
- Standard Resistance:
LH Side Tester Connection
Condition
Specified Condition
J2-2 - E7-11 (RLCY)
Always
Below 1 Ω
J2-2 - Body ground
Always
10 kΩ or higher
J2-1 - Body ground
Always
Below 1 Ω
J3-1 - E7-11 (RLCY)
Always
Below 1 Ω
J3-1 - Body ground
Always
10 kΩ or higher
J3-2 - Body ground
Always
Below 1 Ω
RH Side Tester Connection
Condition
Specified Condition
I2-2 - E7-12 (RRCY)
Always
Below 1 Ω
I2-2 - Body ground
Always
10 kΩ or higher
I2-1 - Body ground
Always
Below 1 Ω
I3-1 - E7-12 (RRCY)
Always
Below 1 Ω
I3-1 - Body ground
Always
10 kΩ or higher
I3-2 - Body ground
Always
Below 1 Ω
Reconnect the main body ECU connector.
Reconnect the access panel lock assembly connectors.
|
|
||||
| OK | ||
|
||
| ||
| 8. CHECK MULTIPLEX COMMUNICATION SYSTEM |
Check if a BEAN communication DTC is output (Click here).
Result Result
Proceed to
BEAN communication DTC is not output
A
BEAN communication DTC is output
B
|
|
||||
| A | |
|
| 9. INSPECT BACK DOOR COURTESY SWITCH |
Inspect the back door courtesy switch (Click here).
|
|
||||
| OK | |
|
| 10. INSPECT BACK WINDOW LOCK (BACK DOOR WINDOW COURTESY SWITCH) |
Inspect the back window lock (Click here).
|
|
||||
| OK | |
|
| 11. CHECK HARNESS AND CONNECTOR (BACK DOOR COURTESY SWITCH - MAIN BODY ECU) |
Disconnect the L2 back door courtesy switch connector.
Disconnect the E7 main body ECU connector.
Measure the resistance according to the value(s) in the table below.
- Standard Resistance:
Tester Connection
Condition
Specified Condition
L2-1 - E7-7 (BCTY)
Always
Below 1 Ω
L2-1 - Body ground
Always
10 kΩ or higher
Reconnect the main body ECU connector.
Reconnect the back door courtesy switch connector.
|
|
||||
| OK | |
|
| 12. CHECK HARNESS AND CONNECTOR (BACK WINDOW LOCK - BACK DOOR ECU AND BODY GROUND) |
Disconnect the S6 back window lock connector.
Disconnect the E7 main body ECU connector.
Disconnect the S5 back door ECU connector.
Measure the resistance according to the value(s) in the table below.
- Standard Resistance:
Tester Connection
Condition
Specified Condition
S6-2 - S5-10 (GCTY)
Always
Below 1 Ω
S6-2 - E7-7 (BCTY)
Always
Below 1 Ω
S6-2 - Body ground
Always
10 kΩ or higher
S6-1 - Body ground
Always
Below 1 Ω
Reconnect the back door ECU connector.
Reconnect the main body ECU connector.
Reconnect the back window lock connector.
|
|
||||
| OK | |
|
| 13. REPLACE MAIN BODY ECU |
Temporarily replace the main body ECU with a new or normally functioning one.
| NEXT | |
|
| 14. READ VALUE USING INTELLIGENT TESTER (LUGGAGE COURTESY SW) |
Connect the intelligent tester to the DLC3.
Turn the ignition switch to ON.
Turn the tester on.
Enter the following menus: Body / Main Body / Data List /
According to the display on the tester, read the Data List.
Main Body Tester Display
Measurement Item/Range
Normal Condition
Diagnostic Note
Luggage Courtesy SW
Back door and back window courtesy switch signal/ OFF or ON
OFF: Both back door and back window are closed
ON: Either back door or back window is open
-
- OK:
- The display is as specified in the normal condition column.
|
|
||||
| OK | ||
|
||
| ||