VSC OFF Indicator Light Remains ON
Circuit diagnosis · Vehicles built Jul 2007 – Jul 2008
Versions by build date: Jul 2007 – Jul 2008 Aug 2008 – Jul 2009 Aug 2009 – Oct 2010 Nov 2010 – Jul 2011 Aug 2011 – Jul 2012 Aug 2012 – Oct 2012 from Nov 2012
DESCRIPTION
When the rear differential is locked or during the 4WD mode, VSC control turns off and the VSC OFF indicator illuminates. Also, the VSC OFF indicator light is ON when the VSC system is in fail-safe control.WIRING DIAGRAM
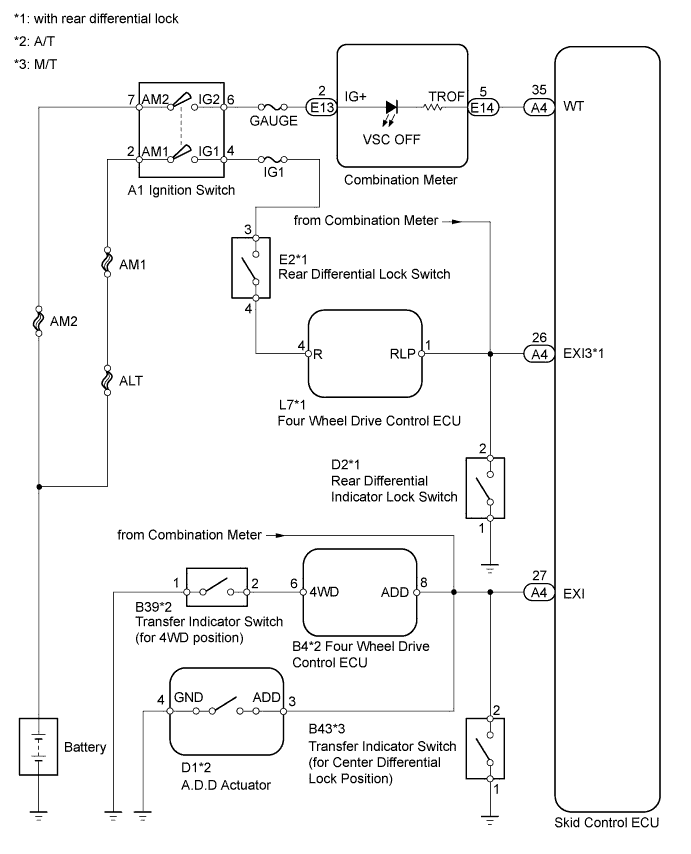

INSPECTION PROCEDURE
- NOTICE:
- When replacing the master cylinder solenoid, perform zero point calibration (Click here).
| 1. CHECK DTC |

Check if DTCs for VSC are recorded (Click here).
- Result:
Result
Proceed to
DTC not output
A
DTC output
B
|
|
||||

| A | |
 |
| 2. CHECK VSC OFF INDICATOR LIGHT |
Disconnect the skid control ECU connector.
Turn the ignition switch to ON.
Check that the VSC OFF indicator light.
- Result:
VSC OFF Indicator Light
Proceed to
Illuminates
A
Turns off
B
|
|
||||

| A | |
|
| 3. CHECK HARNESS AND CONNECTOR (SKID CONTROL ECU - COMBINATION METER) |
Disconnect the skid control ECU connector.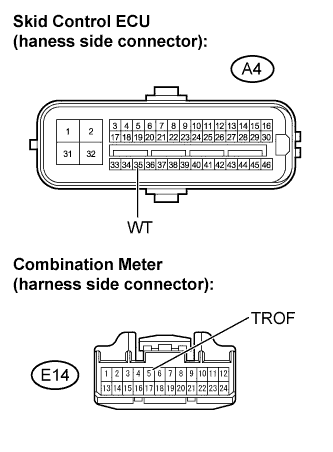
Disconnect the combination meter connector.
Measure the resistance.
- Standard resistance:
Tester Connection
Specified Condition
A4-35 (WT) - E14-5 (TROF)
Below 1 Ω
A4-35 (WT) - Body ground
10 kΩ or higher
|
|
||||
| OK | ||
 |
||
| ||
| 4. INSPECT SKID CONTROL ECU TERMINAL VOLTAGE (EXI and EXI3 TERMINALS) |
Disconnect the skid control ECU connector.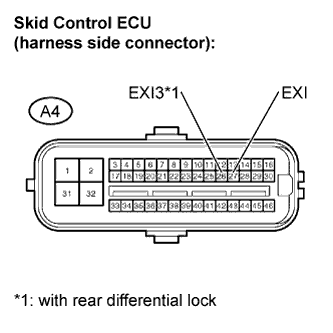
Turn the ignition switch to ON.
Measure the voltage.
- Standard voltage:
Tester Connection
Switch Condition
Specified Condition
A4-26 (EXI3)*1 - Body ground
Rear differential lock switch ON
Below 1.5 V
A4-26 (EXI3)*1 - Body ground
Rear differential lock switch OFF
8 to 14 V
A4-27 (EXI) - Body ground
A/T: Transfer range H4 or L4
M/T: Transfer range HL or LL
Below 1.5 V
A4-27 (EXI) - Body ground
A/T: Transfer range H2
M/T: Transfer range H
8 to 14 V
- HINT:
- *1: with rear differential lock
- Result:
Result
Proceed to
OK
A
NG (EXI3 terminal voltage)
B
NG (EXI terminal voltage for A/T)
C
NG (EXI terminal voltage for M/T)
D
|
|
||||
|
|
||||
|
|
||||
| A | ||
|
||
| ||
| 5. INSPECT REAR DIFFERENTIAL LOCK SWITCH |
Remove the rear differential lock switch.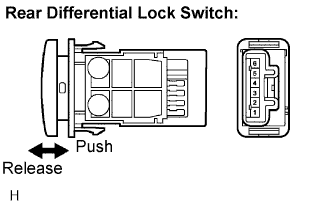
Disconnect the rear differential lock switch connector.
Measure the resistance.
- Standard resistance:
Tester Connection
Switch Condition
Specified Condition
3 - 4
Released
10 kΩ or higher
3 - 4
Pushed in
Below 1 Ω
|
|
||||
| OK | |
|
| 6. CHECK HARNESS AND CONNECTOR (DIFFERENTIAL LOCK SWITCH - BATTERY) |
Disconnect the differential lock switch connector.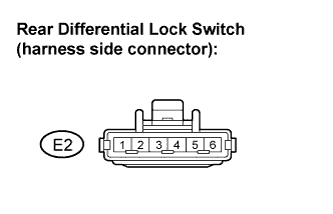
Turn the ignition switch to ON.
Measure the voltage.
- Standard voltage:
Tester Connection
Specified Condition
E2-3 - Body ground
11 to 14 V
|
|
||||
| OK | |
|
| 7. CHECK HARNESS AND CONNECTOR (DIFFERENTIAL LOCK SWITCH - FOUR WHEEL DRIVE CONTROL ECU) |
Disconnect the four wheel drive control ECU connector.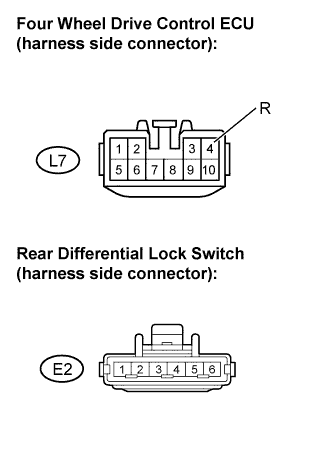
Disconnect the rear differential lock switch connector.
Measure the resistance.
- Standard resistance:
Tester Connection
Specified Condition
L7-4 (R) - E2-4
Below 1 Ω
L7-4 (R) - Body ground
10 kΩ or higher
|
|
||||
| OK | |
|
| 8. INSPECT REAR DIFFERENTIAL LOCK INDICATOR SWITCH |
Disconnect the rear differential lock indicator switch connector.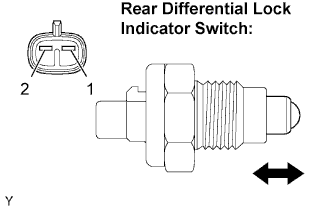
Remove the rear differential lock indicator switch.
Measure the resistance.
- Standard resistance:
Tester Connection
Condition
Specified Condition
D2-1 - D2-2
Pushed
Below 1 Ω
D2-1 - D2-2
Free
10 kΩ or higher
|
|
||||
| OK | |
|
| 9. CHECK HARNESS AND CONNECTOR (SKID CONTROL ECU - RR DIFF LOCK IND SW - 4WD ECU - METER) |
Disconnect the skid control ECU connector.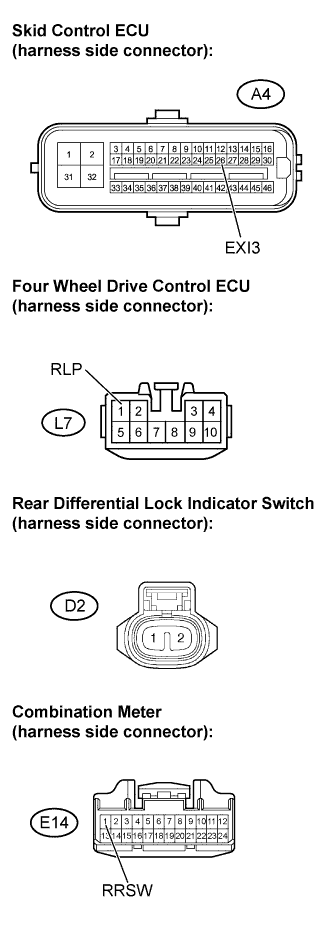
Disconnect the four wheel drive control ECU connector.
Disconnect the rear differential lock indicator switch connector.
Disconnect the combination meter connector.
Measure the resistance.
- Standard resistance:
Tester Connection
Specified Condition
A4-26 (EXI3) - L7-1 (RLP)
Below 1 Ω
A4-26 (EXI3) - D2-2
Below 1 Ω
A4-26 (EXI3) - E14-1 (RRSW)
Below 1 Ω
A4-26 (EXI3) - Body ground
10 kΩ or higher
|
|
||||
| OK | |
|
| 10. INSPECT COMBINATION METER ASSEMBLY |
Disconnect the four wheel drive control ECU connector.
Connect the skid control ECU connector.
Connect the rear differential lock indicator switch connector.
Connect the combination meter connector.
Turn the ignition switch to ON.
Check that the rear differential lock warning light.
- Result:
Rear Differential Lock Warning Light
Proceed to
Illuminates
A
Turns off
B
|
|
||||
| A | ||
|
||
| ||
| 11. INSPECT TRANSFER INDICATOR SWITCH (for 4WD POSITION) |
Disconnect the transfer indicator switch (4WD position) connector.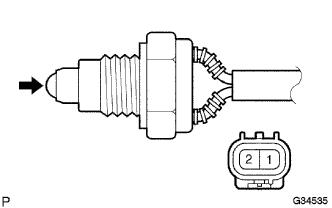
Remove the transfer indicator switch (4WD position).
Measure the resistance.
- Standard resistance:
Tester Connection
Switch Position
Specified Condition
1 - 2
Pushed
Below 1 Ω
1 - 2
Released
10 kΩ or higher
|
|
||||
| OK | |
|
| 12. CHECK HARNESS AND CONNECTOR (TRANSFER INDICATOR SWITCH - FOUR WHEEL DRIVE CONTROL ECU) |
Disconnect the four wheel drive control ECU connector.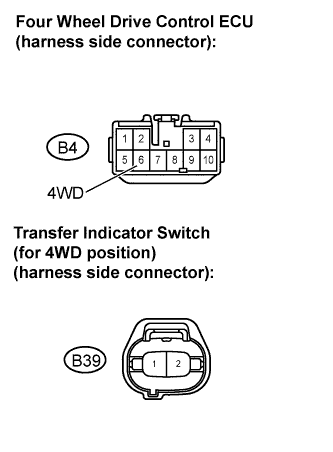
Disconnect the transfer indicator switch (for 4WD position) connector.
Measure the resistance.
- Standard resistance:
Tester Connection
Specified Condition
B4-6 (4WD) - B39-2
Below 1 Ω
B4-6 (4WD) - Body ground
10 kΩ or higher
|
|
||||
| OK | |
|
| 13. CHECK HARNESS AND CONNECTOR (SKID CONTROL ECU - 4WD ECU - A.D.D ACTUATOR - METER) |
Disconnect the skid control ECU connector.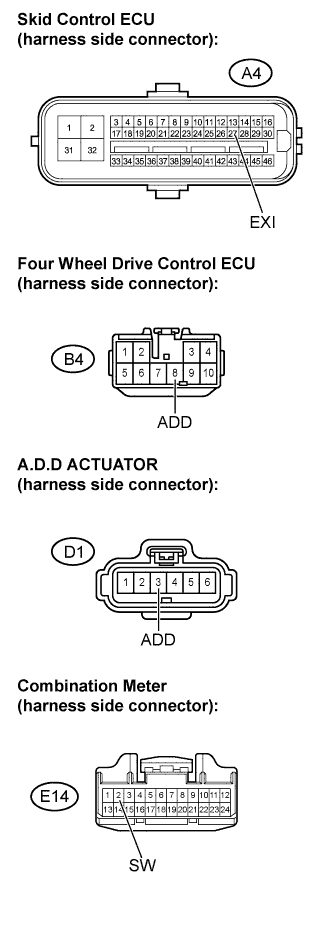
Disconnect the four wheel drive control ECU connector.
Disconnect the A.D.D actuator connector.
Disconnect the combination meter connector.
Measure the resistance.
- Standard resistance:
Tester Connection
Specified Condition
A4-27 (EXI) - B4-8 (ADD)
Below 1 Ω
A4-27 (EXI) - D1-3 (ADD)
Below 1 Ω
A4-27 (EXI) - E14-2 (SW)
Below 1 Ω
A4-27 (EXI) - Body ground
10 kΩ or higher
|
|
||||
| OK | |
|
| 14. INSPECT A.D.D ACTUATOR |
Disconnect the A.D.D actuator connector.
Measure the resistance.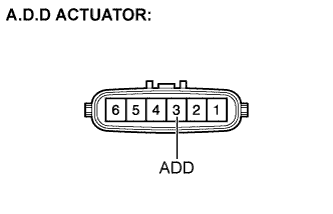
- Standard resistance:
Tester Connection
Specified Condition
3 (ADD) - Body ground
10 kΩ or higher
|
|
||||
| OK | |
|
| 15. INSPECT COMBINATION METER ASSEMBLY |
Disconnect the four wheel drive control ECU connector.
Connect the skid control ECU connector.
Connect the A.D.D actuator connector.
Connect the combination meter connector.
Turn the ignition switch to ON.
Check that the 4WD indicator light.
- Result:
4WD indicator light
Proceed to
Illuminates
A
Turns off
B
|
|
||||
| A | ||
|
||
| ||
| 16. INSPECT TRANSFER INDICATOR SWITCH (for CENTER DIFFERENTIAL LOCK POSITION) |
Disconnect the transfer indicator switch (center differential lock position) connector.
Remove the transfer indicator switch (center differential lock position).
Measure the resistance.
- Standard resistance:
Tester Connection
Switch Position
Specified Condition
1 - 2
Pushed
Below 1 Ω
1 - 2
Released
10 kΩ or higher
|
|
||||
| OK | |
|
| 17. CHECK HARNESS AND CONNECTOR (SKID CONTROL ECU - TRANSFER INDICATOR SWITCH) |
Disconnect the skid control ECU connector.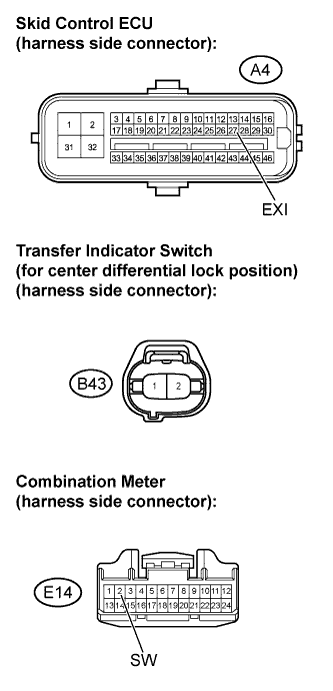
Disconnect the transfer indicator switch (center differential lock position) connector.
Disconnect the combination meter connector.
Measure the resistance.
- Standard resistance:
Tester Connection
Specified Condition
A4-27 (EXI) - B43-2
Below 1 Ω
A4-27 (EXI) - E14-2 (SW)
Below 1 Ω
A4-27 (EXI) - Body ground
10 kΩ or higher
|
|
||||
| OK | ||
|
||
| ||