Speaker Circuit
Circuit diagnosis · Vehicles built Jul 2007 – Oct 2010
Versions by build date: Jul 2007 – Oct 2010 Nov 2010 – Jul 2012 from Aug 2012
DESCRIPTION
Sound signals that have been amplified by the stereo component amplifier are sent to the speakers from the radio receiver through this circuit. If there is a short in this circuit, the sound cannot be heard from the speakers even though there is no malfunction in the speakers.WIRING DIAGRAM
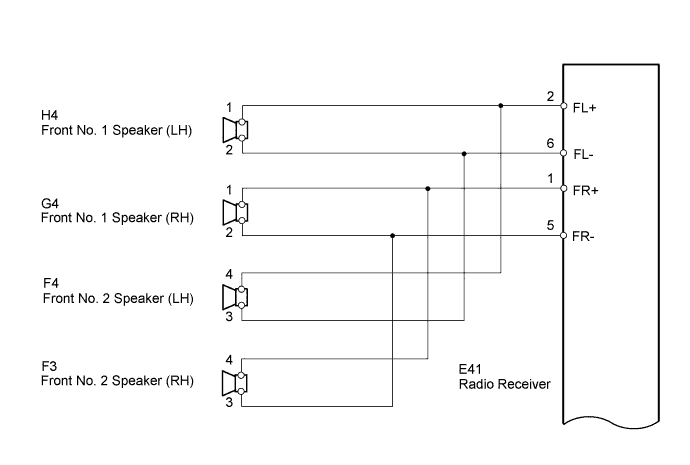

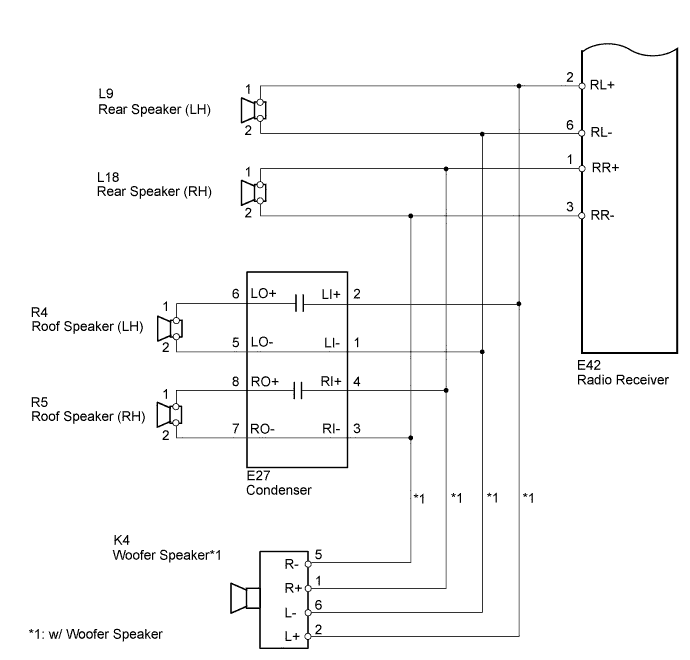
INSPECTION PROCEDURE
| 1. CHECK SPEAKER |

Check whether sound is emitted from each speaker.
- Result:
Result
Proceed to
Front No. 1 speakers have problems
A
Front No. 2 speakers have problems
B
Rear speakers have problems
C
Woofer speaker has problems (w/ woofer speaker)
D
Roof speakers have problems
E
|
|
||||
|
|
||||
|
|
||||
|
|
||||

| A | |
 |
| 2. INSPECT FRONT NO. 1 SPEAKERS |
Check the left and right front No. 1 speakers (Click here).
- OK:
- Front No. 1 speakers are normal.
|
|
||||

| OK | |
|
| 3. CHECK HARNESS AND CONNECTOR (RADIO RECEIVER - FRONT NO. 1 SPEAKER) |
Disconnect the E41 receiver connector.
Disconnect the G4 and H4 front No. 1 speaker connectors.
Measure the resistance.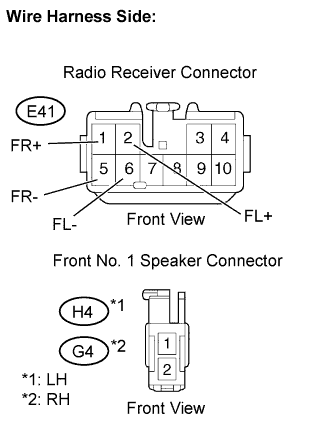
- Standard resistance:
Tester Connection
Specified Condition
E41-2 (FL+) - H4-1
Below 1 Ω
E41-6 (FL-) - H4-2
Below 1 Ω
E41-2 (FL+) or H4-1 - Body ground
10 kΩ or higher
E41-6 (FL-) or H4-2 - Body ground
10 kΩ or higher
E41-1 (FR+) - G4-1
Below 1 Ω
E41-5 (FR-) - G4-2
Below 1 Ω
E41-1 (FR+) or G4-1 - Body ground
10 kΩ or higher
E41-5 (FR-) or G4-2 - Body ground
10 kΩ or higher
Reconnect the receiver connector.
Reconnect the front No. 1 speaker connectors.
|
|
||||
| OK | ||
 |
||
| ||
| 4. INSPECT FRONT NO. 2 SPEAKERS |
Check the left and right front No. 2 speakers (Click here).
- OK:
- Front No. 2 speakers are normal.
|
|
||||
| OK | |
|
| 5. CHECK HARNESS AND CONNECTOR (RADIO RECEIVER - FRONT NO. 2 SPEAKER) |
Disconnect the E41 receiver connector.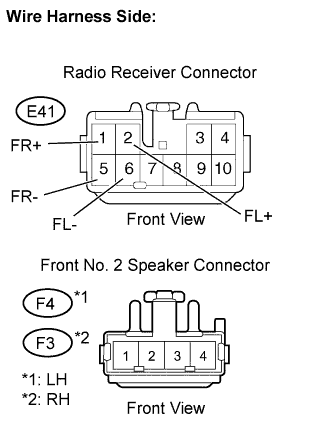
Disconnect the F3 and F4 front No. 2 speaker connectors.
Measure the resistance.
- Standard resistance:
Tester Connection
Specified Condition
E41-2 (FL+) - F4-4
Below 1 Ω
E41-6 (FL-) - F4-3
Below 1 Ω
E41-2 (FL+) or F4-4 - Body ground
10 kΩ or higher
E41-6 (FL-) or F4-3 - Body ground
10 kΩ or higher
E41-1 (FR+) - F3-4
Below 1 Ω
E41-5 (FR-) - F3-3
Below 1 Ω
E41-1 (FR+) or F3-4 - Body ground
10 kΩ or higher
E41-5 (FR-) or F3-3 - Body ground
10 kΩ or higher
Reconnect the receiver connector.
Reconnect the front No. 2 speaker connectors.
|
|
||||
| OK | ||
|
||
| ||
| 6. INSPECT REAR SPEAKERS |
Check the left and right rear speakers (Click here).
- OK:
- Rear speakers are normal.
|
|
||||
| OK | |
|
| 7. CHECK HARNESS AND CONNECTOR (RADIO RECEIVER - REAR SPEAKER) |
Disconnect the E42 receiver connector.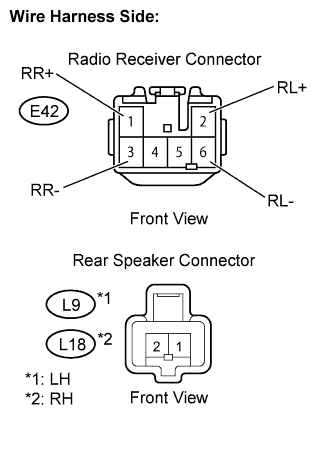
Disconnect the L9 and L18 rear speaker connectors.
Measure the resistance.
- Standard resistance:
Tester Connection
Specified Condition
E42-2 (RL+) - L9-1
Below 1 Ω
E42-6 (RL-) - L9-2
Below 1 Ω
E42-2 (RL+) or L9-1 - Body ground
10 kΩ or higher
E42-6 (RL-) or L9-2 - Body ground
10 kΩ or higher
E42-1 (RR+) - L18-1
Below 1 Ω
E42-3 (RR-) - L18-2
Below 1 Ω
E42-1 (RR+) or L18-1 - Body ground
10 kΩ or higher
E42-3 (RR-) or L18-2 - Body ground
10 kΩ or higher
Reconnect the receiver connector.
Reconnect the rear speaker connectors.
|
|
||||
| OK | ||
|
||
| ||
| 8. INSPECT WOOFER SPEAKER |
Check the woofer speaker.
- OK:
- Woofer speaker is normal.
|
|
||||
| OK | |
|
| 9. CHECK HARNESS AND CONNECTOR (RADIO RECEIVER - WOOFER SPEAKER) |
Disconnect the E42 receiver connector.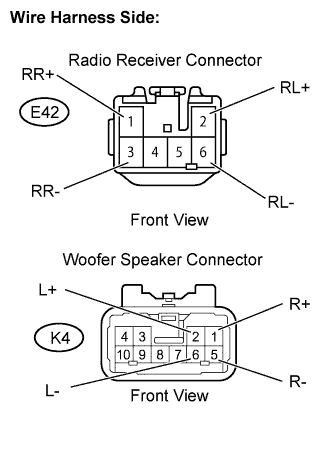
Disconnect the K4 woofer speaker connector.
Measure the resistance.
- Standard resistance:
Tester Connection
Specified Condition
E42-2 (RL+) - K4-2 (L+)
Below 1 Ω
E42-6 (RL-) - K4-6 (L-)
Below 1 Ω
E42-2 (RL+) orK4-2 (L+) - Body ground
10 kΩ or higher
E42-6 (RL-) or K4-6 (L-) - Body ground
10 kΩ or higher
E42-1 (RR+) - K4-1 (R+)
Below 1 Ω
E42-3 (RR-) - K4-5 (R-)
Below 1 Ω
E42-1 (RR+) or K4-1 (R+) - Body ground
10 kΩ or higher
E42-3 (RR-) or K4-5 (R-) - Body ground
10 kΩ or higher
Reconnect the receiver connector.
Reconnect the woofer speaker connector.
|
|
||||
| OK | ||
|
||
| ||
| 10. INSPECT ROOF SPEAKERS |
Check the left and right roof speakers (Click here).
- OK:
- Roof speakers are normal.
|
|
||||
| OK | |
|
| 11. CHECK HARNESS AND CONNECTOR (RADIO RECEIVER - CONDENSER) |
Disconnect the E42 receiver connector.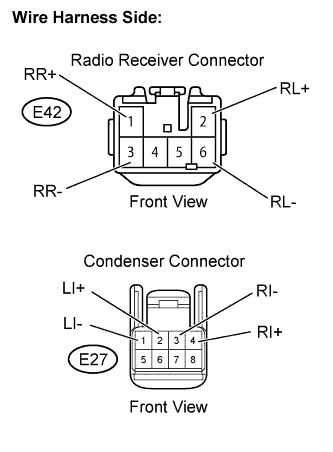
Disconnect the E27 condenser connector.
Measure the resistance.
- Standard resistance:
Tester Connection
Specified Condition
E42-2 (RL+) - E27-2 (LI+)
Below 1 Ω
E42-6 (RL-) - E27-1 (LI-)
Below 1 Ω
E42-2 (RL+) or E27-2 (LI+) - Body ground
10 kΩ or higher
E42-6 (RL-) or E27-1 (LI-) - Body ground
10 kΩ or higher
E42-1 (RR+) - E27-4 (RI+)
Below 1 Ω
E42-3 (RR-) - E27-3 (RI-)
Below 1 Ω
E42-1 (RR+) or E27-4 (RI+) - Body ground
10 kΩ or higher
E42-3 (RR-) or E27-3 (RI-) - Body ground
10 kΩ or higher
Reconnect the receiver connector.
Reconnect the condenser connector.
|
|
||||
| OK | |
|
| 12. CHECK HARNESS AND CONNECTOR (CONDENSER - ROOF SPEAKER) |
Disconnect the E42 receiver connector.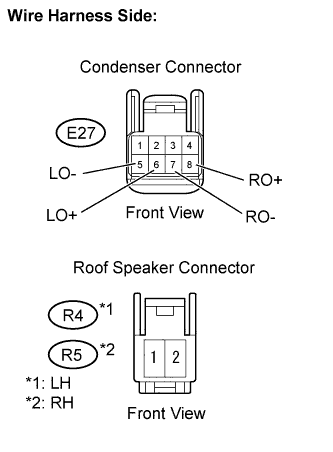
Disconnect the E27 condenser connector.
Measure the resistance.
- Standard resistance:
Tester Connection
Specified Condition
E27-2 (LO+) - R4-1
Below 1 Ω
E27-5 (LO-) - R4-2
Below 1 Ω
E27-2 (LO+) or R4-1 - Body ground
10 kΩ or higher
E27-5 (LO-) or R4-2 - Body ground
10 kΩ or higher
E27-8 (RO+) - R5-1
Below 1 Ω
E27-7 (RO-) - R5-2
Below 1 Ω
E27-8 (RO+) or R5-1 - Body ground
10 kΩ or higher
E27-7 (RO-) or R5-2 - Body ground
10 kΩ or higher
Reconnect the receiver connector.
Reconnect the condenser connector.
|
|
||||
| OK | |
|
| 13. REPLACE CONDENSER |
Temporarily replace the condenser with a new or normally functioning one.
Check that the sound is normal.
- OK:
- Sound is normal.
|
|
||||
| OK | ||
|
||
| ||