Crawl Indicator Light Remains ON
Circuit diagnosis · Vehicles built from Nov 2012
Versions by build date: Aug 2012 – Oct 2012 from Nov 2012
DESCRIPTION
When crawl control starts after operating the crawl switch, the crawl indicator light turns on.WIRING DIAGRAM
Refer to Crawl Indicator Light does not Come ON (Click here).INSPECTION PROCEDURE
- NOTICE:
- When replacing the master cylinder solenoid, perform calibration (Click here).
- Inspect the fuses for circuits related to this system before performing the following inspection procedure.
- When replacing the master cylinder solenoid, perform calibration (Click here).
| 1. CHECK CAN COMMUNICATION LINE |

Turn the ignition switch off.
Connect the intelligent tester to the DLC3.
Turn the ignition switch to ON.
Turn the intelligent tester on.
Select CAN Bus Check from the System Selection Menu screen and follow the prompts on the screen to inspect the CAN bus (Click here).
- OK:
- CAN Bus Check indicates no malfunctions in CAN communication.
|
|
||||

| OK | |
 |
| 2. READ VALUE USING INTELLIGENT TESTER (CRAWL CONTROL SWITCH ASSEMBLY) |
Turn the ignition switch off.
Connect the intelligent tester to the DLC3.
Turn the ignition switch to ON.
Turn the intelligent tester on.
Enter the following menus: Body / D-SEAT SW / Data List.
According to the display on the intelligent tester, read the Data List.
D-SEAT SW Tester Display
Measurement Item/Range
Normal Condition
Diagnostic Note
Crawl Control Main Switch
Crawl control switch (ON/OFF switch)/ ON or OFF
ON: Crawl switch on
OFF: Crawl switch off
-
- OK:
- The intelligent tester displays ON or OFF according to crawl control switch operation.
|
|
||||

| OK | |
|
| 3. READ VALUE USING INTELLIGENT TESTER (CRAWL CONTROL SWITCH ASSEMBLY) |
Turn the ignition switch off.
Connect the intelligent tester to the DLC3.
Turn the ignition switch to ON.
Turn the intelligent tester on.
Enter the following menus: Chassis / ABS/VSC/ TRC / Data List.
According to the display on the intelligent tester, read the Data List.
ABS/VSC/TRC Tester Display
Measurement Item/Range
Normal Condition
Diagnostic Note
Crawl Control Light
Crawl indicator light/ ON or OFF
ON: Indicator light on
OFF: Indicator light off
-
Crawl Control Switch
Crawl speed selector switch status/ LOW, MIDLOW, MID, MIDHIGH or HIGH
Actual crawl speed selector switch position
-
- OK:
- The intelligent tester displays ON or OFF according to switch operation.
|
|
||||
| OK | |
|
| 4. PERFORM ACTIVE TEST USING INTELLIGENT TESTER |
Turn the ignition switch off.
Connect the intelligent tester to the DLC3.
Turn the ignition switch to ON.
Turn the intelligent tester on.
Perform Active Test of the combination meter using the intelligent tester (Click here).
Check that the CRAWL indicator light turns on and off on the combination meter when using the intelligent tester.
- OK:
- The CRAWL indicator light turns ON or OFF according to the intelligent tester operations.
|
|
||||
| OK | ||
 |
||
| ||
| 5. CHECK HARNESS AND CONNECTOR (POWER SOURCE TERMINAL) |
Turn the ignition switch off.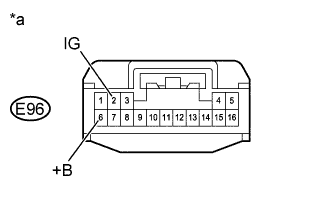

Make sure that there is no looseness at the locking part and the connecting part of the connector.
Disconnect the driving support switch control ECU connector.
Check the connector case and terminals for deformation and corrosion.
- Standard condition:
- No deformation or corrosion.
Measure the voltage according to the value(s) in the table below.
- Standard Voltage:
Tester Connection
Switch Condition
Specified Condition
E96-2 (IG) - Body ground
Ignition switch ON
11 to 14 V
E96-6 (+B) - Body ground
Always
11 to 14 V
Text in Illustration *a
Front view of wire harness connector
(to Driving Support Switch Control ECU)
|
|
||||
| OK | |
|
| 6. CHECK HARNESS AND CONNECTOR (GND TERMINAL) |
Turn the ignition switch off.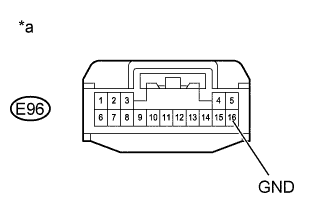
Measure the resistance according to the value(s) in the table below.
- Standard Resistance:
Tester Connection
Condition
Specified Condition
E96-16 (GND) - Body ground
Always
Below 1 Ω
Text in Illustration *a
Front view of wire harness connector
(to Driving Support Switch Control ECU)
|
|
||||
| OK | |
|
| 7. CHECK HARNESS AND CONNECTOR (CRAWL CONTROL SWITCH ASSEMBLY - DRIVING SUPPORT SWITCH CONTROL ECU) |
Disconnect the Q3 crawl control switch assembly connector.
Disconnect the E96 driving support switch control ECU connector.
Measure the resistance according to the value(s) in the table below.
- Standard Resistance:
Tester Connection
Condition
Specified Condition
Q3-5 (SWI1) - E96-10 (SWO1)
Always
Below 1 Ω
Q3-5 (SWI1) - Body ground
Always
10 kΩ or higher
E96-10 (SWO1) - Body ground
Always
10 kΩ or higher
Q3-6 (SWO2) - E96-12 (SWI2)
Always
Below 1 Ω
Q3-6 (SWO2) - Body ground
Always
10 kΩ or higher
E96-12 (SWI2) - Body ground
Always
10 kΩ or higher
Q3-2 (SWI3) - E96-14 (SWO3)
Always
Below 1 Ω
Q3-2 (SWI3) - Body ground
Always
10 kΩ or higher
E96-14 (SWO3) - Body ground
Always
10 kΩ or higher
Q3-8 (SWO4) - E96-4 (SWI4)
Always
Below 1 Ω
Q3-8 (SWO4) - Body ground
Always
10 kΩ or higher
E96-4 (SWI4) - Body ground
Always
10 kΩ or higher
|
|
||||
| OK | |
|
| 8. INSPECT CRAWL CONTROL SWITCH ASSEMBLY |
Remove the crawl control switch assembly (Click here).
Inspect the crawl control switch assembly (Click here).
|
|
||||
| OK | ||
|
||
| ||
| 9. CHECK HARNESS AND CONNECTOR (CRAWL CONTROL SWITCH ASSEMBLY - DRIVING SUPPORT SWITCH CONTROL ECU) |
Disconnect the Q3 crawl control switch assembly connector.
Disconnect the E96 driving support switch control ECU connector.
Measure the resistance according to the value(s) in the table below.
- Standard Resistance:
Tester Connection
Condition
Specified Condition
Q3-5 (SWI1) - E96-10 (SWO1)
Always
Below 1 Ω
Q3-5 (SWI1) - Body ground
Always
10 kΩ or higher
E96-10 (SWO1) - Body ground
Always
10 kΩ or higher
Q3-6 (SWO2) - E96-12 (SWI2)
Always
Below 1 Ω
Q3-6 (SWO2) - Body ground
Always
10 kΩ or higher
E96-12 (SWI2) - Body ground
Always
10 kΩ or higher
Q3-2 (SWI3) - E96-14 (SWO3)
Always
Below 1 Ω
Q3-2 (SWI3) - Body ground
Always
10 kΩ or higher
E96-14 (SWO3) - Body ground
Always
10 kΩ or higher
Q3-8 (SWO4) - E96-4 (SWI4)
Always
Below 1 Ω
Q3-8 (SWO4) - Body ground
Always
10 kΩ or higher
E96-4 (SWI4) - Body ground
Always
10 kΩ or higher
|
|
||||
| OK | |
|
| 10. INSPECT CRAWL CONTROL SWITCH ASSEMBLY |
Remove the crawl control switch assembly (Click here).
Inspect the crawl control switch assembly (Click here).
|
|
||||
| OK | |
|
| 11. REPLACE DRIVING SUPPORT SWITCH CONTROL ECU |
Replace the driving support switch control ECU (Click here).
| NEXT | |
|
| 12. READ VALUE USING INTELLIGENT TESTER (CRAWL CONTROL SWITCH ASSEMBLY) |
Turn the ignition switch off.
Connect the intelligent tester to the DLC3.
Turn the ignition switch to ON.
Turn the intelligent tester on.
Enter the following menus: Chassis / ABS/VSC/ TRC / Data List.
According to the display on the intelligent tester, read the Data List.
ABS/VSC/TRC Tester Display
Measurement Item/Range
Normal Condition
Diagnostic Note
Crawl Control Light
Crawl indicator light/ ON or OFF
ON: Indicator light on
OFF: Indicator light off
-
Crawl Control Switch
Crawl speed selector switch status/ LOW, MIDLOW, MID, MIDHIGH or HIGH
Actual crawl speed selector switch position
-
- OK:
- The intelligent tester displays ON or OFF according to switch operation.
|
|
||||
| OK | ||
|
||
| ||