 |
Install the mounting bracket with the 4 bolts.
- Torque:
- 51 N*m{ 520 kgf*cm , 38 ft.*lbf }
ENGINE ASSEMBLY > INSTALLATION |
| 1. INSTALL ENGINE OIL LEVEL SENSOR |
Install the engine oil level sensor with the 4 bolts.
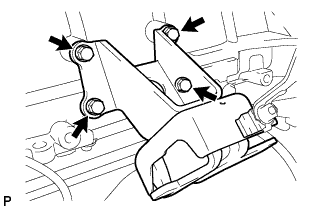
| 2. INSTALL ENGINE MOUNTING BRACKET FRONT NO.1 LH |
|
Install the mounting bracket with the 4 bolts.
| 3. INSTALL ENGINE MOUNTING BRACKET FRONT NO.1 RH |
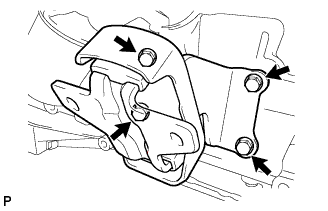 |
Install the mounting bracket with the 4 bolts.
| 4. INSTALL WATER TEMPERATURE SENSOR |
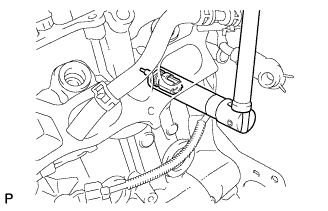 |
Using a 19 mm deep socket wrench, install a new gasket and the water temperature sensor.
| 5. INSTALL KNOCK CONTROL SENSOR |
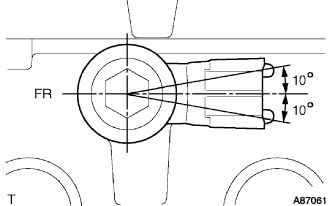 |
Install the bolt and knock control sensor as shown in the illustration.
Connect the knock control sensor connector.
| 6. INSTALL ENGINE OIL PRESSURE SWITCH ASSEMBLY |
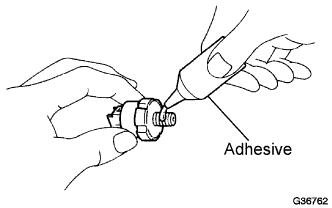 |
Apply adhesive to 2 or 3 threads of the oil pressure switch.
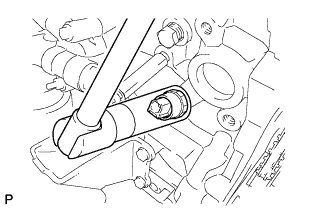 |
Install the oil pressure switch.
| 7. INSTALL V-RIBBED BELT TENSIONER ASSEMBLY |
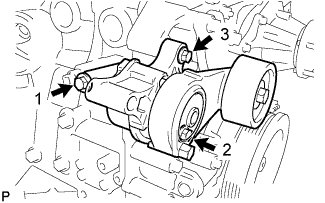 |
Temporarily install the belt tensioner with the 3 bolts.
Install the tensioner by tightening the 3 bolts in the order shown in the illustration.
| 8. INSTALL IDLER PULLEY SUB-ASSEMBLY NO.1 |
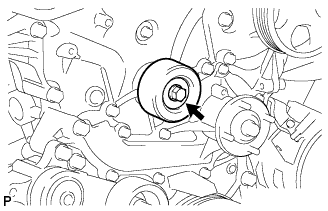 |
Install the idler pulley sub-assembly No.1, collar and pulley plate with the bolt.
| 9. INSTALL COMPRESSOR MOUNTING BRACKET NO.1 (w/ Air Conditioning) |
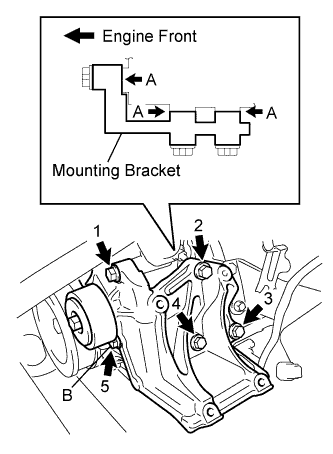 |
Temporarily install the mounting bracket with the 5 bolts.
Install the mounting bracket by tightening the 5 bolts in the order shown in the illustration.
| 10. INSTALL GENERATOR ASSEMBLY |
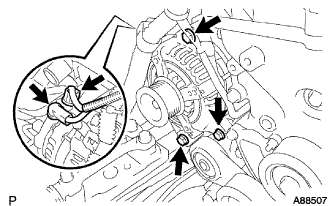 |
Install the generator assembly with the 3 bolts.
Install the generator wire with the nut to terminal B.
Install the terminal cap.
Connect the generator connector.
| 11. INSTALL THERMOSTAT |
Install a new gasket to the thermostat.
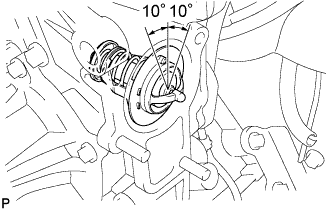 |
Install the thermostat with the jiggle valve upward.
| 12. INSTALL WATER INLET |
Install a new gasket and the water inlet with the bolt and 2 nuts.
| 13. INSTALL WATER BY-PASS PIPE NO.1 |
Install a new gasket and the water by-pass pipe with the 2 nuts and bolt.
| 14. INSTALL FAN PULLEY |
Install the fan spacer and fan pulley with the 4 nuts.
| 15. INSTALL EXHAUST MANIFOLD |
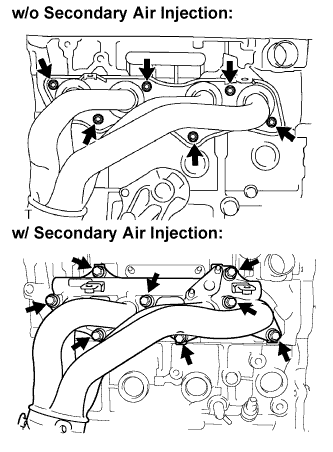 |
w/o Secondary air injection system:
Install a new gasket and the exhaust manifold with the new 6 nuts.
w/ Secondary air injection system:
Install a new gasket and the exhaust manifold with the new 8 nuts.
| 16. INSTALL AIR SWITCHING VALVE ASSEMBLY (w/ Secondary Air Injection System) |
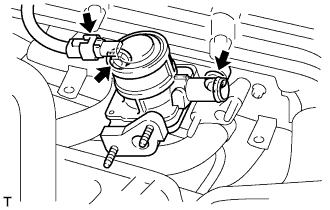 |
Install the air switching valve with the 2 nuts.
Connect the air switching valve connector.
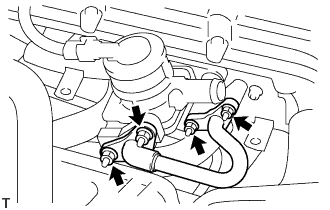 |
Install the intake pipe No.4 with 4 new nuts and new gaskets.
| 17. INSTALL EXHAUST MANIFOLD HEAT INSULATOR NO.1 |
Install the heat insulator with the 4 bolts.
| 18. INSTALL INJECTOR ASSEMBLY |
Apply a light coat of grease or gasoline to new O-rings and install them to the injector spacers.
Install the injection spacers.
Apply a light coat of grease or gasoline to the place where the delivery pipe touches the O-ring.
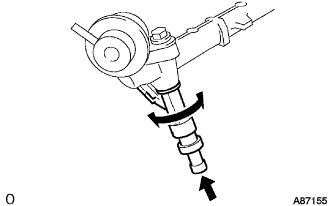 |
To install the fuel injector into the fuel delivery pipe, push the fuel injector while twisting it right and left.
| 19. INSTALL FUEL DELIVERY PIPE SUB-ASSEMBLY |
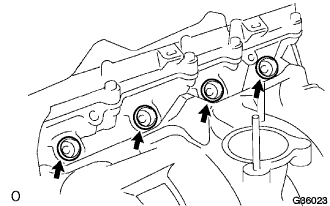 |
Install the 4 spacers to the cylinder head.
Install the delivery pipe spacers.
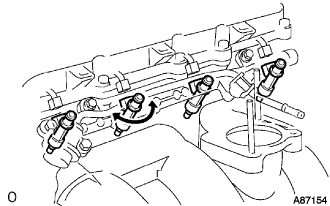 |
Temporarily install the 2 bolts and fuel delivery pipe together with the 4 injectors.
Fully tighten the 2 bolts.
Apply a light coat of grease or gasoline to the place where the delivery pipe touches the O-ring.
Install the 2 bolts and pressure pulsation damper assembly.
Connect the 2 fuel hoses.
| 20. INSTALL SPARK PLUG |
| 21. INSTALL IGNITION COIL ASSEMBLY |
Install the ignition coils with the bolts.
| 22. INSTALL INTAKE MANIFOLD |
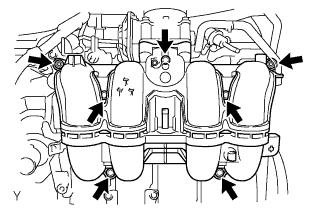 |
Install a new gasket and the intake manifold with the 5 bolts and 2 nuts.
Connect the ventilation hose No.3.
| 23. INSTALL THROTTLE WITH MOTOR BODY ASSEMBLY |
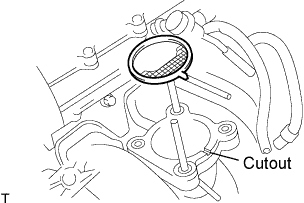 |
Install a new gasket onto the intake manifold.
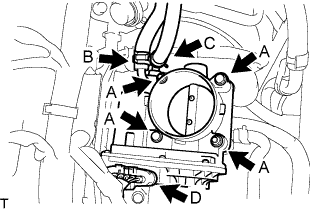 |
Install the throttle body assembly with the 2 bolts and 2 nuts. (A)
Connect the water by-pass hose. (B)
Connect the water by-pass hose No.2. (C)
Connect the throttle motor connector. (D)
| 24. INSTALL VENTILATION PIPE |
Install the ventilation pipe with the bolt.
| 25. INSTALL ENGINE WIRE |
Install the engine wire to the engine assembly.
| 26. REMOVE ENGINE STAND |
| 27. INSTALL FRONT SUSPENSION CROSS MEMBER SUB-ASSEMBLY |
Install the engine assembly to the cross member.
Connect the engine mounting insulator with the 4 bolts.
| 28. INSTALL REAR END PLATE |
Install the rear end plate with the 2 bolts.
| 29. INSTALL FLYWHEEL SUB-ASSEMBLY (for Manual Transmission) |
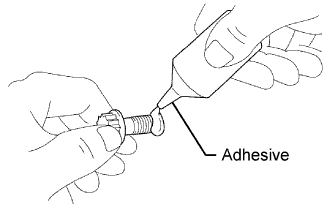 |
Apply adhesive to 2 or 3 threads of the mounting bolt end.
Install the flywheel.
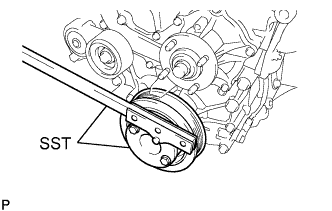 |
Fix the crankshaft with SST.
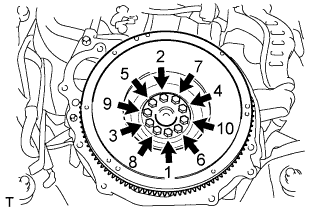 |
Install and uniformly tighten the 10 mounting bolts in several steps in the sequence shown in the illustration.(*1)
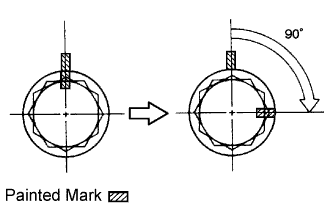 |
Mark the mounting bolt with paint.(*2)
Retighten the mounting bolt by 90° in the order shown in step (*1).
Check that the painted mark is now at a 90° angle to that in step (*2).
| 30. INSTALL CLUTCH DISC ASSEMBLY (for Manual Transmission) |
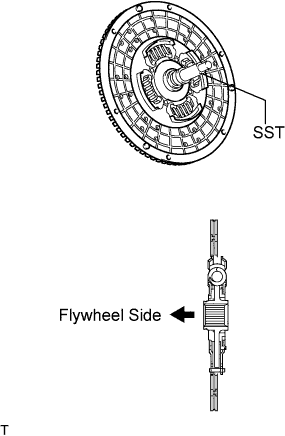 |
Insert SST into the clutch disc assembly, then insert them into the flywheel sub-assembly.
| 31. INSTALL CLUTCH COVER ASSEMBLY (for Manual Transmission) |
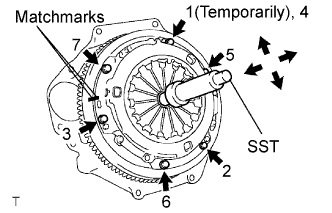 |
Align the matchmark on the clutch cover assembly with the one on the flywheel sub-assembly.
Following the procedures shown in the illustration, tighten the 6 bolts starting from the bolt located near the knock pin on the top.
| 32. INSPECT AND ADJUST CLUTCH COVER ASSEMBLY (for Manual Transmission) |
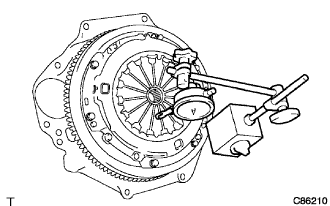 |
Using a dial indicator with a roller instrument, check the diaphragm spring tip alignment.
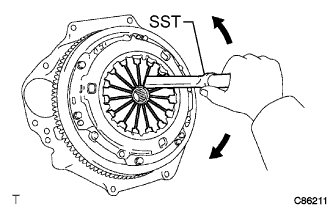 |
If alignment is not as specified, adjust the diaphragm spring tip alignment using SST.
| 33. INSTALL DRIVE PLATE AND RING GEAR SUB-ASSEMBLY (for Automatic Transmission) |
|
Apply adhesive to 2 or 3 threads of the mounting bolt end.
Install the spacer FR, drive plate and spacer RR on the crankshaft.
|
Fix the crankshaft with SST.
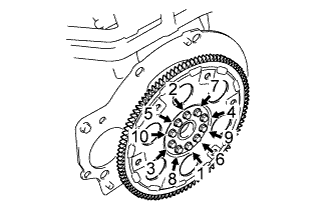 |
Install and uniformly tighten the 10 mounting bolts in several steps in the sequence shown in the illustration.
| 34. INSTALL MANUAL TRANSMISSION UNIT ASSEMBLY (for Manual Transmission) |
| 35. INSTALL AUTOMATIC TRANSMISSION ASSEMBLY (for Automatic Transmission) |
| 36. INSTALL STARTER ASSEMBLY |
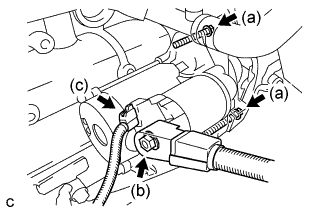 |
Install the starter with the 2 bolts.
Connect the wire harness to terminal 30 and install the nut.
Connect the terminal 50 connector to the starter assembly.
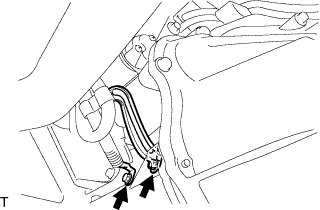 |
Install the ground cable and wire bracket with the 2 bolts.
| 37. INSTALL ENGINE ASSEMBLY WITH TRANSMISSION |
Using the engine lifter, hold the engine assembly and install the engine assembly w/ transmission.
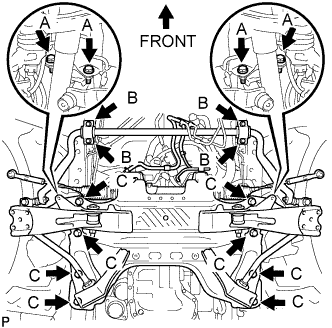 |
Install the stabilizer bracket and 16 bolts of the front suspension cross member.
Connect the rear engine mount.
Remove the engine lifter slowly.
| 38. CONNECT STEERING TORQUE SHAFT ASSEMBLY |
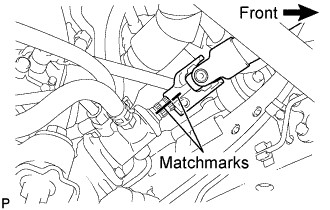 |
Align the matchmarks on the steering torque shaft assembly and the power steering link assembly.
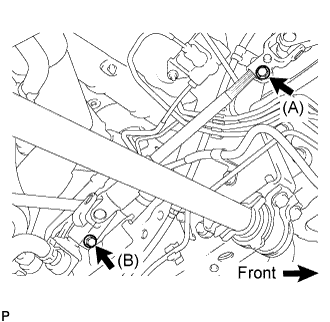 |
Install bolt (B) and tighten the 2 bolts.
| 39. CONNECT OIL COOLER HOSE (for Automatic Transmission) |
Connect the oil cooler inlet hose and outlet hose with the clamp to the oil cooler tube.
| 40. CONNECT TRANSMISSION CONTROL CABLE ASSEMBLY (for Automatic Transmission) |
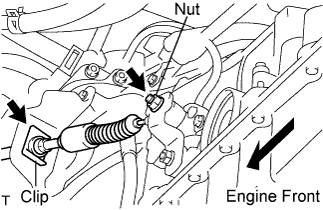 |
Install the transmission control cable assembly to the control shaft lever and transmission control bracket No.1 with the nut and a new clip.
| 41. INSTALL TRANSMISSION OIL FILLER TUBE SUB-ASSEMBLY (for Automatic Transmission) |
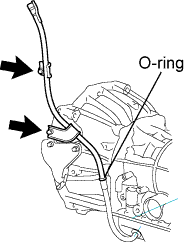 |
Coat a new O-ring with ATF and install the oil filler tube.
Install the oil filler tube with 2 bolts.
| 42. INSTALL TRANSMISSION CONTROL CABLE ASSEMBLY (for Manual Transmission) |
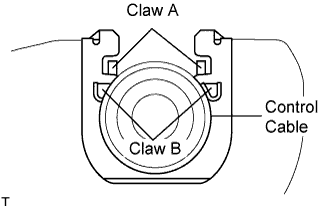 |
Install 2 new clips to the transmission control cable bracket No.1.
Install the transmission control cable assembly to the transmission control cable bracket No.1.
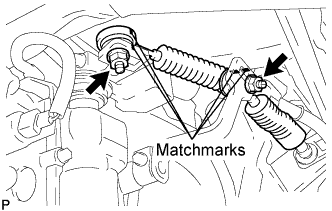 |
Align the matchmarks on the control cable assembly and the outer lever.
Install the transmission control cable assembly to the outer levers with the 2 nuts.
| 43. INSTALL CLUTCH RELEASE CYLINDER ASSEMBLY (for Manual Transmission) |
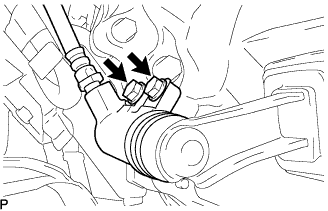 |
Install the clutch release cylinder with the 2 bolts.
| 44. CONNECT SHOCK ABSORBER ASSEMBLY FRONT LH |
| 45. CONNECT SHOCK ABSORBER ASSEMBLY FRONT RH |
| 46. CONNECT FRONT SUSPENSION SUB-ASSEMBLY UPPER LH |
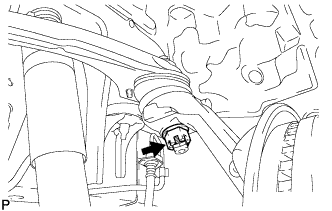 |
Connect the front suspension upper arm to the steering knuckle with the nut.
Install a new cotter pin.
| 47. CONNECT FRONT SUSPENSION SUB-ASSEMBLY UPPER RH |
| 48. INSTALL FRONT DISC BRAKE CALIPER ASSEMBLY LH |
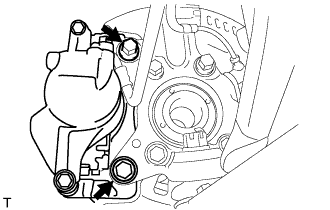 |
Install the brake caliper assembly to the steering knuckle with the 2 bolts.
| 49. INSTALL FRONT DISC BRAKE CALIPER ASSEMBLY RH |
| 50. INSTALL SPEED SENSOR FRONT LH (w/ ABS) |
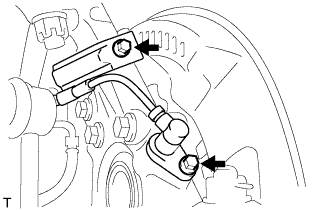 |
Install the speed sensor to the steering knuckle with the 2 bolts.
| 51. INSTALL SPEED SENSOR FRONT RH (w/ ABS) |
| 52. INSTALL PROPELLER WITH CENTER BEARING SHAFT ASSEMBLY (for Super Long Wheelbase) |
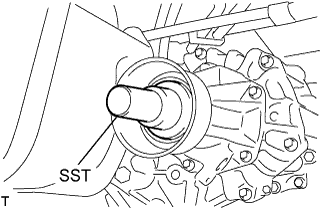 |
Remove the SST from the extension housing.
Install the propeller with center bearing shaft assembly in the extension housing.
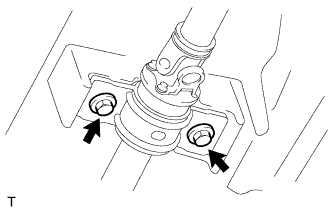 |
Install the center support bearing assembly No.1, and temporarily tighten the 2 bolts.
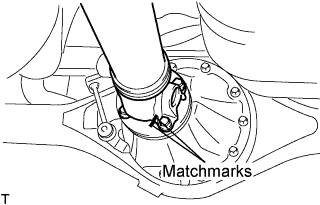 |
Align the matchmarks on the propeller shaft flange and differential flange.
Install the propeller shaft assy with the 4 nuts, 4 bolts and 4 washers.
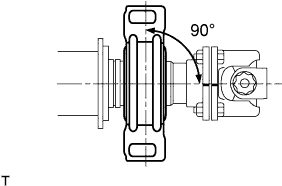 |
Check that the center line of the bracket is at right angles to the shaft axial direction.
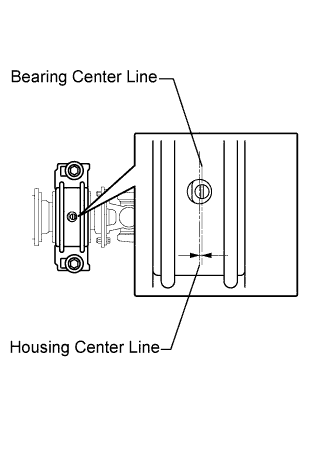 |
Adjust the center support bearing assembly No.1.
Tighten the 2 bolts.
| 53. INSTALL PROPELLER SHAFT ASSEMBLY (for Long Wheelbase) |
|
Remove the SST from the extension housing.
Install the propeller shaft assembly in the extension housing.
Align the matchmarks on the propeller shaft flange and differential flange.
|
Install the propeller shaft assembly with the 4 nuts, 4 bolts and 4 washers.
| 54. INSTALL EXHAUST PIPE ASSY CENTER (for Super Long Wheelbase) |
Install a new gasket to the exhaust pipe assembly center.
Connect the exhaust pipe assembly center to the exhaust pipe supports.
Install the exhaust pipe assembly center and exhaust pipe assembly tail with the 2 bolts.
| 55. INSTALL EXHAUST PIPE ASSEMBLY FRONT (for Super Long Wheelbase) |
w/ Secondary air infection system:
Install the air fuel ratio sensor. (Click here)
For Unleaded gasoline engine:
Install the oxygen sensor. (Click here)
Inspect the compression spring.
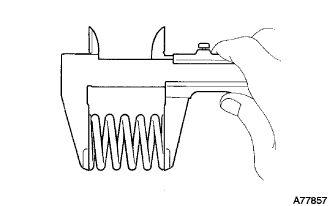 |
Using vernier calipers, measure the free length of the compression springs.
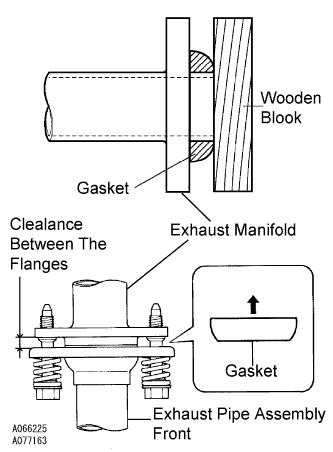 |
Install the gasket.
Fully insert a new gasket to the exhaust manifold by hand.
Using a wooden block, uniformly strike the gasket so that the gasket and exhaust manifold are properly fit.
Install a new gasket to the exhaust pipe assembly front.
Connect the exhaust pipe assembly front to the exhaust pipe support.
Install the exhaust pipe assembly front with the 4 bolts, 2 nuts, and 2 compression springs.
For Unleaded gasoline engine:
Connect the sensor connector(s).
| 56. INSTALL EXHAUST PIPE ASSY FRONT (for Long Wheelbase) |
w/ Secondary air injection system:
Install the fuel ratio sensor. (Click here)
For unleaded gasoline engine:
Install the oxygen sensor. (Click here)
Inspect the compression spring.
|
Using vernier calipers, measure the free length of the compression springs.
|
Install the gasket.
Fully insert a new gasket to the exhaust manifold by hand.
Using a wooden block, uniformly strike the gasket so that the gasket and exhaust manifold are properly fit.
Install a new gasket to the exhaust pipe assembly front.
Connect the exhaust pipe assembly front to the exhaust pipe support.
Install the exhaust pipe assembly front with the 4 bolts, 2 nuts, and 2 compression springs.
For unleaded gasoline engine:
Connect the sensor connector(s).
| 57. CONNECT ENGINE WIRE |
Connect the +B terminal and connector of the starter.
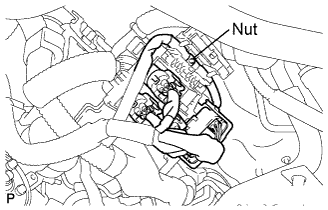 |
Install the connectors and nut as shown in the illustration.
Connect the clamps of the engine wire and earth cable.
Connect the connectors of the ECM.
Install the wire harness support of the engine ECM.
| 58. INSTALL COMPRESSOR AND MAGNETIC CLUTCH (w/ Air Conditioning) |
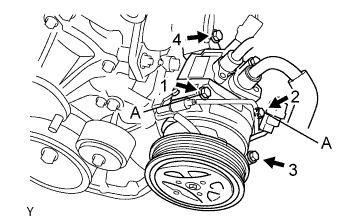 |
Temporarily install the bolt A to install the compressor.
Install the compressor completely by tightening the 4 bolts in the order shown in the illustration.
Connect the suction tube clamp with the bolt.
Connect the compressor connector.
| 59. INSTALL OIL LEVEL GAUGE GUIDE |
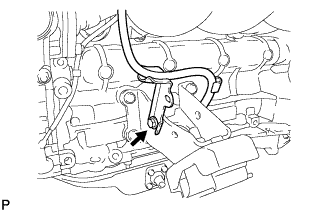 |
Install the gauge guide with the bolt.
| 60. INSTALL OIL LEVEL GAUGE SUB-ASSEMBLY |
| 61. INSTALL VANE PUMP ASSEMBLY |
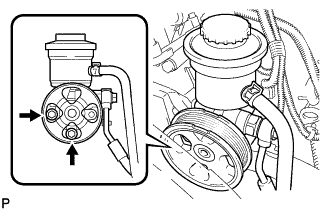 |
Install the vane pump with the 2 bolts.
Connect the PS fluid pressure switch connector.
| 62. CONNECT FUEL HOSE NO.2 |
Connect the fuel hose No.2 to the delivery pipe.
| 63. CONNECT FUEL HOSE |
Align the connector and pipe. Push on the connector until the retainer locks with a click sound. (Click here)
Pull the connector to check that the connector is securely connected. (Click here)
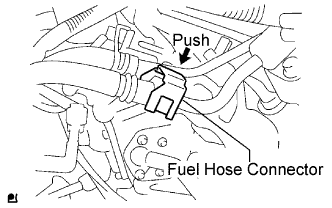 |
Install the connector and lock it with the fuel hose connector cover. (Click here)
| 64. CONNECT AIR HOSE NO.5 (w/ Secondary Air Injection System) |
Connect the air hose No.5 to the air switching valve.
| 65. INSTALL INTAKE AIR CONNECTOR |
Temporarily install the intake air connector to the throttle body assembly.
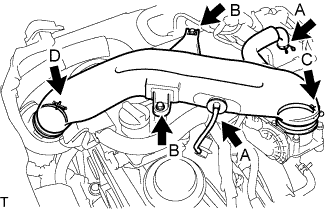 |
Connect the ventilation hose No.2 and the vacuum hose. (A)
Install the intake air connector with the 2 bolts. (B)
Tighten the 2 hose clamp bolts. (C)
Tighten the 2 hose clamp bolts. (D)
| 66. CONNECT UNION TO CONNECTOR TUBE HOSE |
Connect the union to connector tube hose to the intake manifold.
| 67. CONNECT FUEL VAPOR FEED HOSE ASSEMBLY |
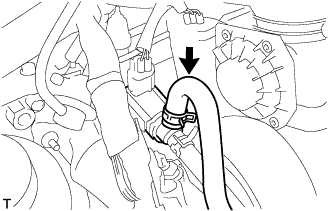 |
Connect the fuel vapor feed hose to the VSV.
| 68. CONNECT HEATER WATER OUTLET HOSE B |
Connect the heater water outlet hose B to the heater unit.
| 69. CONNECT HEATER WATER INLET HOSE A |
Connect the heater water inlet hose A to the heater unit.
| 70. CONNECT RADIATOR HOSE OUTLET |
Connect the radiator outlet hose to the clamp.
| 71. CONNECT RADIATOR HOSE INLET |
Connect the radiator inlet hose to the clamp.
| 72. INSTALL FAN AND GENERATOR V BELT |
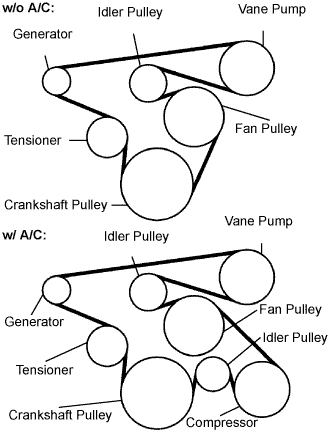 |
Install the drive belt to the pulleys except the drive belt tensioner pulley.
Use the hexagon-shaped part indicated by the arrow in the illustration to move the tensioner pulley downward and then install the drive belt to the tensioner pulley.
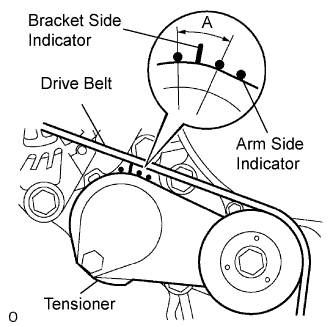 |
After a new belt has been installed, check that the tensioner indicator mark is within range A shown in the illustration.
| 73. INSTALL ENGINE SERVICE HOLE SUB COVER SUB-ASSEMBLY |
Install the engine service hole sub cover with the 5 bolts.
| 74. INSTALL FRONT DOOR SCUFF PLATE |
| 75. INSTALL FRONT SEAT ASSEMBLY RH (for Hi-back Seat Type) |
Perform the same procedure as above on the opposite side.
| 76. INSTALL FRONT SEAT ASSEMBLY RH (for Low-back Seat Type) |
Perform the same procedure as above on the opposite side.
| 77. INSTALL FRONT WHEELS |
| 78. PLACE FRONT WHEELS FACING STRAIGHT AHEAD |
| 79. CONNECT BATTERY NEGATIVE CABLE |
| 80. ADD ENGINE OIL |
| 81. ADD ENGINE COOLANT |
Firmly tighten the drain plugs and fill the reservoir tank with coolant to the top of the inlet.
Remove the 2-way that is located near the throttle body.
When air is bled and the coolant drains out, firmly install the 2-way.
Add coolant up to the B line mark in the reservoir tank and install the radiator cap.
| Condition | Capacity |
| w/ rear heater | 15.0 liters (15.8 US qts, 13.2 lmp. qts) |
| w/o rear heater | 13.0 liters (13.7 US qts, 11.4 lmp. qts) |
Warm up the engine.
After the engine cools down, check that the coolant level is between the LOW and FULL level marks.
| 82. INSPECT FUEL LEAKS |
When using the intelligent tester
Connect the intelligent tester to the DLC3.
Turn the ignition switch to the on position and intelligent tester main switch ON.
Select the Active Test mode on the intelligent tester.
When not using the intelligent tester.
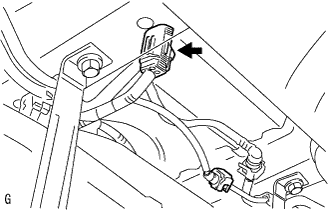 |
Disconnect the fuel pump connector.
Using a service wire, connect terminals FP and +B of the relay block.
Turn the ignition switch to the ON position, and check that the fuel pump operates.
Check that there are no fuel leaks anywhere on the fuel system after doing maintenance.
Check that the pulsation damper screw rises up when the fuel pump operates.
If operation is not as specified, check the following parts:
Turn the ignition switch off.
Disconnect the intelligent tester from the DLC3.
| 83. INSPECT ENGINE OIL LEAKS |
| 84. INSPECT MANUAL TRANSMISSION OIL (for Manual Transmission) |
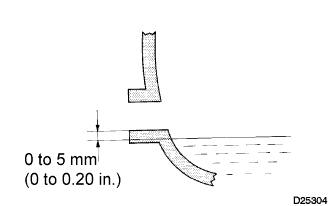 |
Park the vehicle in a level place.
Remove the transmission filler plug and gasket.
Check that the oil surface is within 5 mm (0.20 in.) below the lowest point of the transmission filler plug opening.
Check for oil leakage if the oil level is low.
Install the transmission filler plug and a new gasket.
| 85. INSPECT AUTOMATIC TRANSMISSION FLUID (for Automatic Transmission) |
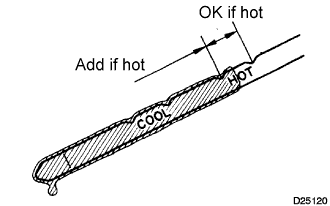 |
Park the vehicle on a level surface and set the parking brake.
With the engine idling and the brake pedal depressed, move shift the lever into all positions from P to L and return to the P position.
Take out the dipstick and wipe it clean.
Put it back all the way.
Take it out again and check that the fluid level is within the HOT range.
If the fluid level is below the HOT range, add new fluid and recheck the fluid level. If the fluid level exceeds the HOT range, drain the fluid once, add the proper amount of new fluid and recheck the fluid level.
| 86. INSPECT ENGINE COOLANT LEAKS |
Fill the radiator with coolant and attach a radiator cap tester to the radiator.
Warm up the engine.
Using a radiator cap tester, increase the pressure inside the radiator to 137 kPa (1.4 kgf/cm2, 19.9 psi), and check that the pressure does not drop.
| 87. INSPECT SHIFT LEVER POSITION (for Automatic Transmission) |
When shifting from P position only with ignition switch ON and depress the break pedal.
Make sure that the shifting lever moves smoothly and can be moderately operated.
When starting engine, make sure that the vehicle moves forward when shifting from N to D position and moves reward when shifting R position.
| 88. ADJUST SHIFT LEVER POSITION (for Automatic Transmission) |
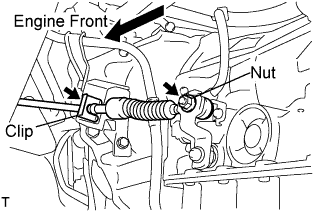 |
Remove a clip, nut, and disconnect between the control shaft lever to transmission control cable assembly from the control shaft lever and transmission control cable bracket No.1.
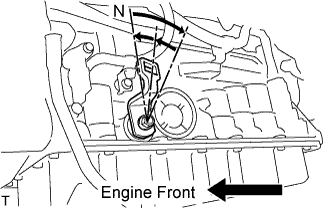 |
Turn the control shaft lever until stop to a clockwise direction, return the control shaft lever 2 notches to N position.
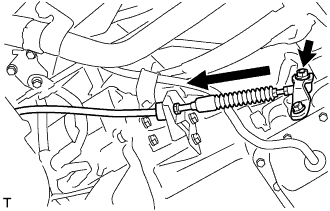 |
Set the shift lever to N position while holding the shift lever lightly toward the R position side and install it.
Inspect the operation condition and work.
| 89. INSPECT EXHAUST GAS LEAKS |
| 90. ADJUST FRONT WHEEL ALIGNMENT |
| 91. INSTALL ENGINE SIDE UNDER COVER RH (w/ Engine Side Under Cover RH) |
| 92. INSTALL ENGINE SIDE UNDER COVER LH (w/ Engine Side Under Cover LH) |
| 93. INSTALL ENGINE UNDER COVER NO.2 (w/ Engine Under Cover No.2) |
| 94. INSTALL ENGINE UNDER COVER NO.1 (w/ Engine Under Cover No.1) |
| 95. INSPECT IGNITION TIMING |
Warm up and stop the engine.
When using the intelligent tester:
Connect the intelligent tester to the DLC3.
Start the engine and idle it.
Turn the intelligent tester main switch on.
Enter the following items:
Powertrain / Engine and ECT / Data list / IGN Advance
When not using the intelligent tester:
Connect the tester probe of a timing light to the wire of the ignition coil connector for the No.4 cylinder.
Turn the ignition switch to the ON position.
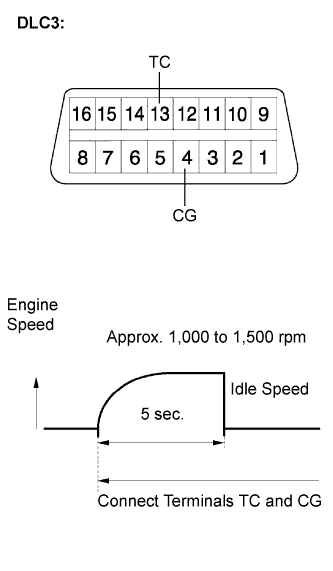 |
Using SST, connect terminals 13 (TC) and 4 (CG) of the DLC3.
Inspect the ignition timing
Disconnect terminals 13 (TC) and 4 (CG) of the DLC3.
Inspect the ignition timing
Check that the ignition timing advances immediately when the engine speed is increased.
Turn the ignition switch off.
Remove the timing light.
| 96. INSPECT IDLE SPEED |
Warm up and stop the engine.
When using the intelligent tester:
Connect the intelligent tester to the DLC3.
Start the engine and idle it.
Turn the intelligent tester main switch on.
Enter the following items:
Powertrain / Engine and ECT / Data list / Engine SPD
Turn the ignition switch off.
Disconnect the intelligent tester from the DLC3.
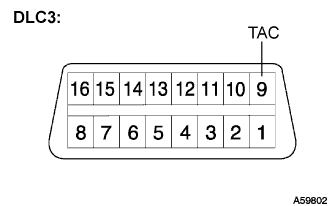 |
When not using the intelligent tester:
Install SST to terminal 9 (TAC) of DLC3, then connect a tachometer.
Turn the ignition switch to the ON position.
Inspect the engine idling speed.
Turn the ignition switch off.
Disconnect the tachometer.
Remove the SST from terminal 9 (TAC).
| 97. INSPECT CO (for Leaded Gasoline Specification Vehicle) |
Initial condition:
Engine at normal operating temperature
Air cleaner installed
All pipes and hoses of the air induction system connected
All accessories switched off
All vacuum lines properly connected
EFI system wiring connectors fully seated
Ignition timing set correctly
Transmission in the neutral position
Tachometer and CO meter calibration at idle
Warm up the engine by driving at constant speed (approximately 50 km/h (31 mph)). Close the throttle valve for 5 minutes after the engine coolant temperature becomes stable (80 to 90°C (176 to 194°F)) and idle the engine for 5 minutes.
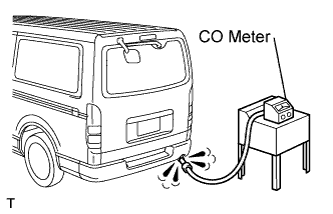 |
Insert a tester probe at least 40 cm (1.3 ft) into the tail pipe.
Wait at least 1 minute before measurement to allow the concentration to stabilize. Complete the measurement within 3 minutes.
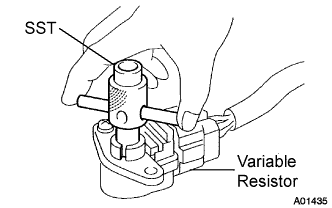 |
If the CO concentration does not conform to regulations, adjust it by turning the idle mixture adjusting screw in the variable resistor with SST.
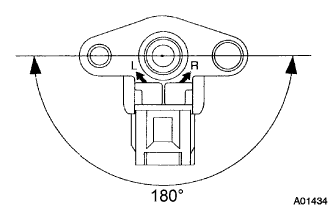 |
The idle mixture adjusting screw can be adjusted within an 180° angle range.
Remove the SST.
| CO | Problems | Causes |
| High | Rough idle (black smoke from exhaust) |
|
| 98. INSPECT CO,HC (for Unleaded Gasoline Specification Vehicle) |
Start the engine.
Run the engine at 2,500 rpm for approximately 180 seconds.
Insert the CO/HC meter testing probe at least 40 cm (1.3 ft) into the tail pipe while idling.
Check the CO/HC concentration with the engine idling and/or running at 2,500 rpm.
| CO | HC | Problems | Causes |
| Normal | High | Rough idle |
|
| Low | High | Rough idle (Fluctuating HC reading) |
|
| High | High | Rough idle (Black smoke from exhaust) |
|
| 99. INSPECT FUNCTION OF THROTTLE BODY |
Check the throttle control motor operating sounds.
Turn the ignition switch to the ON position.
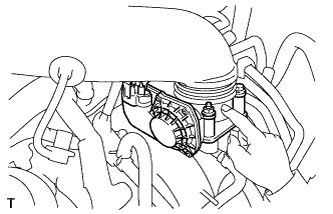 |
When pressing the accelerator pedal, listen to the running sounds of the motor. Make sure no friction noise comes from the motor.
If friction noise exists, replace the throttle body.
 |
Check the throttle position sensor.
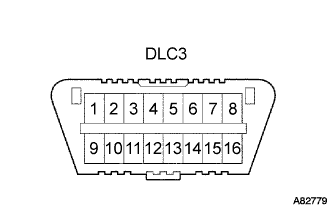
Connect the intelligent tester to the DLC3.
Turn the ignition switch to the ON position.
Turn the intelligent tester main switch on.
Enter the following menus: Power train / Engine / Data List / Throttle Sensor Position and Throttle Position Sensor Position #2.
Depress the accelerator pedal. When the throttle valve is fully opened, check that the value of the "Throttle Sensor Position" is within the specification.
| 100. INSPECT ABS SENSOR SIGNAL (w/ ABS) |
| 101. PERFORM INITIALIZATION |