Open in CAN Main Bus Line
Circuit diagnosis · Vehicles built Jan 2015 – Mar 2016
Versions by build date: Oct 2014 – Dec 2014 Jan 2015 – Mar 2016 Apr 2016 – Dec 2016 from Jan 2017
DESCRIPTION
There may be an open circuit in the CAN main wire and/or DLC3 CAN branch wire when the resistance between terminals 6 (CANH) and 14 (CANL) of the DLC3 is 70 Ω or higher.| Symptom |
Trouble Area |
| The resistance between terminals 6 (CANH) and 14 (CANL) of the DLC3 is 70 Ω or higher. |
|
WIRING DIAGRAM
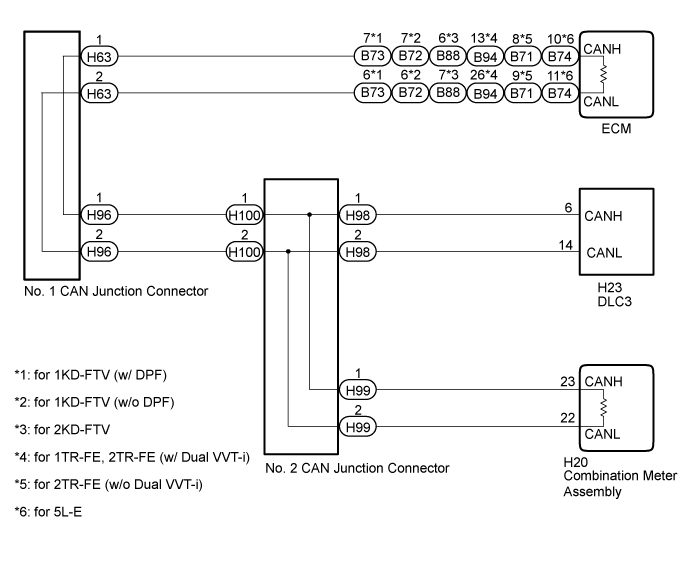

INSPECTION PROCEDURE
- HINT:
- Operating the ignition switch, any switches or any doors triggers related ECU and sensor communication with the CAN, which causes resistance variation.
| 1. DISCONNECT CABLE FROM NEGATIVE BATTERY TERMINAL |

Disconnect the cable from the negative (-) battery terminal before measuring the resistances of the CAN main wire and the CAN branch wire.
- CAUTION:
- For vehicles with an airbag system:
- Wait at least 90 seconds after disconnecting the cable from the negative (-) battery terminal to disable the SRS system.
- NOTICE:
- When disconnecting the cable, some systems need to be initialized after the cable is reconnected (Click here).
| NEXT | |
 |
| 2. CHECK FOR OPEN IN CAN BUS WIRE (DLC3 CAN BRANCH WIRE) |
Measure the resistance according to the value(s) in the table below.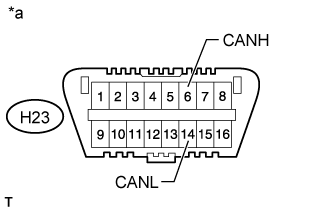
- Standard Resistance:
Tester Connection
Switch Condition
Specified Condition
H23-6 (CANH) - H23-14 (CANL)
Ignition switch off
108 to 132 Ω
Text in Illustration *a
Front view of DLC3
- NOTICE:
- When the measured value is 133 Ω or higher and a CAN communication system DTC is output, there may be a fault besides disconnection of the DLC3 branch line. For that reason, troubleshooting should be performed again from How to Proceed with Troubleshooting after repairing the trouble area (Click here).
|
|
||||

| OK | |
|
| 3. CHECK FOR OPEN IN CAN BUS WIRE (NO. 2 CAN JUNCTION CONNECTOR - ECM) |
Disconnect the No. 2 CAN junction connector.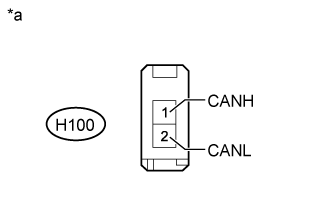
Measure the resistance according to the value(s) in the table below.
- Standard Resistance:
Tester Connection
Switch Condition
Specified Condition
H100-1 (CANH) - H100-2 (CANL)
Ignition switch off
108 to 132 Ω
Text in Illustration *a
Front view of wire harness connector
(to No. 2 CAN Junction Connector)
|
|
||||

| OK | |
|
| 4. CHECK FOR OPEN IN CAN BUS WIRE (NO. 2 CAN JUNCTION CONNECTOR - COMBINATION METER ASSEMBLY) |
Disconnect the No. 2 CAN junction connector.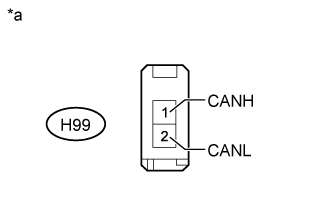
Measure the resistance according to the value(s) in the table below.
- Standard Resistance:
Tester Connection
Switch Condition
Specified Condition
H99-1 (CANH) - H99-2 (CANL)
Ignition switch off
108 to 132 Ω
Text in Illustration *a
Front view of wire harness connector
(to No. 2 CAN Junction Connector)
|
|
||||
| OK | ||
 |
||
| ||
| 5. CONNECT CONNECTOR |
Reconnect all wire harness No. 2 CAN junction connectors.
| NEXT | |
|
| 6. CHECK FOR OPEN IN CAN BUS WIRE (NO. 2 CAN JUNCTION CONNECTOR - NO. 1 CAN JUNCTION CONNECTOR) |
Disconnect the No. 1 CAN junction connector.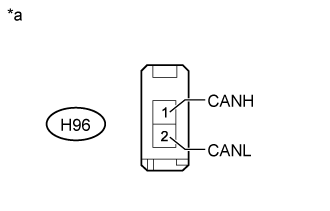
Measure the resistance according to the value(s) in the table below.
- Standard Resistance:
Tester Connection
Switch Condition
Specified Condition
H96-1 (CANH) - H96-2 (CANL)
Ignition switch off
108 to 132 Ω
Text in Illustration *a
Front view of wire harness connector
(to No. 1 CAN Junction Connector)
|
|
||||
| OK | |
|
| 7. CHECK FOR OPEN IN CAN BUS WIRE (NO. 1 CAN JUNCTION CONNECTOR - ECM) |
Disconnect the No. 1 CAN junction connector.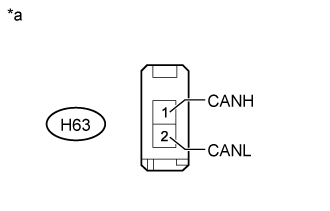
Measure the resistance according to the value(s) in the table below.
- Standard Resistance:
Tester Connection
Switch Condition
Specified Condition
H63-1 (CANH) - H63-2 (CANL)
Ignition switch off
108 to 132 Ω
Text in Illustration *a
Front view of wire harness connector
(to No. 1 CAN Junction Connector)
|
|
||||
| OK | ||
|
||
| ||
| 8. CONNECT CONNECTOR |
Reconnect all wire harness No. 1 CAN junction connectors.
| NEXT | |
|
| 9. CHECK FOR OPEN IN CAN BUS WIRE (ECM - NO. 1 CAN JUNCTION CONNECTOR) |
Disconnect the ECM connector.
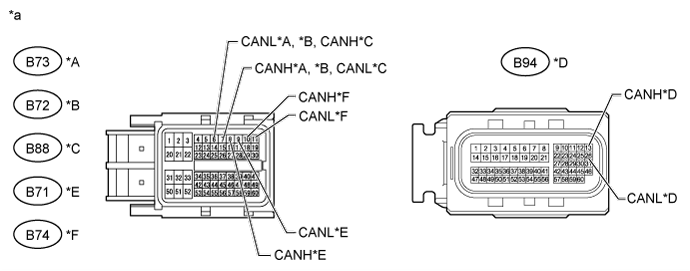
Text in Illustration *A
for 1KD-FTV (w/ DPF)
*B
for 1KD-FTV (w/o DPF)
*C
for 2KD-FTV
*D
for 1TR-FE, 2TR-FE (w/ Dual VVT-i)
*E
for 2TR-FE (w/o Dual VVT-i)
*F
for 5L-E
*a
Front view of wire harness connector
(to ECM)
-
-
Measure the resistance according to the value(s) in the table below.
- Standard Resistance:
for 1KD-FTV (w/ DPF) Tester Connection
Switch Condition
Specified Condition
B73-7 (CANH) - B73-6 (CANL)
Ignition switch off
108 to 132 Ω
for 1KD-FTV (w/o DPF) Tester Connection
Switch Condition
Specified Condition
B72-7 (CANH) - B72-6 (CANL)
Ignition switch off
108 to 132 Ω
for 2KD-FTV Tester Connection
Switch Condition
Specified Condition
B88-6 (CANH) - B88-7 (CANL)
Ignition switch off
108 to 132 Ω
for 1TR-FE, 2TR-FE (w/ Dual VVT-i) Tester Connection
Switch Condition
Specified Condition
B94-13 (CANH) - B94-26 (CANL)
Ignition switch off
108 to 132 Ω
for 2TR-FE (w/o Dual VVT-i) Tester Connection
Switch Condition
Specified Condition
B71-8 (CANH) - B71-9 (CANL)
Ignition switch off
108 to 132 Ω
for 5L-E Tester Connection
Switch Condition
Specified Condition
B74-10 (CANH) - B74-11 (CANL)
Ignition switch off
108 to 132 Ω
- HINT:
- *: Replacement procedure:
- for 1KD-FTV (Click here).
- for 2KD-FTV (Click here).
- for 1TR-FE (Click here).
- for 2TR-FE (w/o Dual VVT-i) (Click here).
- for 2TR-FE (w/ Dual VVT-i) (Click here).
- for 5L-E (Click here).
|
|
||||
| OK | ||
|
||
| ||
| 10. CONNECT CONNECTOR |
Reconnect all wire harness No. 2 CAN junction connectors.
| NEXT | |
|
| 11. CHECK FOR OPEN IN CAN BUS WIRE (COMBINATION METER ASSEMBLY - NO. 2 CAN JUNCTION CONNECTOR) |
Disconnect the combination meter assembly connector.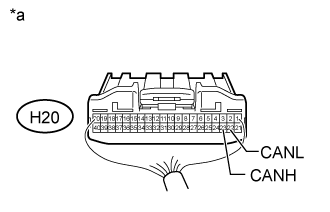
Measure the resistance according to the value(s) in the table below.
- Standard Resistance:
Tester Connection
Switch Condition
Specified Condition
H20-23 (CANH) - H20-22 (CANL)
Ignition switch off
108 to 132 Ω
Text in Illustration *a
Rear view of wire harness connector
(to Combination Meter Assembly)
|
|
||||
| OK | ||
|
||
| ||