Fuel Receiver Gauge Malfunction
Circuit diagnosis · Vehicles built Jan 2015 – Dec 2016
Versions by build date: Oct 2014 – Dec 2014 Jan 2015 – Dec 2016 from Jan 2017
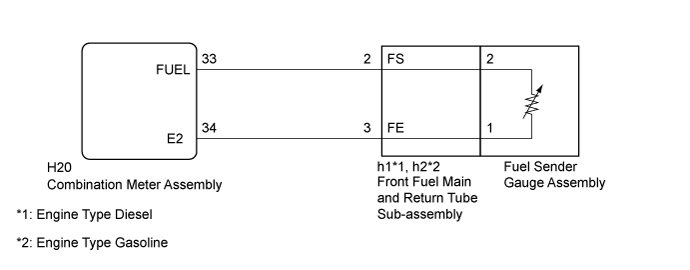
WIRING DIAGRAM

INSPECTION PROCEDURE
- NOTICE:
- Be careful of flames.
| 1. PERFORM ACTIVE TEST USING GTS (FUEL METER OPERATION) |

Use the Active Test to check the operation of the fuel receiver gauge (Click here).
Combination Meter Tester Display
Test Part
Control Range
Diagnostic Note
Fuel Meter Operation
Fuel receiver gauge
OFF, Sender E, Empty, Warning, 1/4, 1/2, 3/4, Full or Sender F
-
- OK:
- Fuel receiver gauge is normal.
|
|
||||

| OK | |
 |
| 2. READ VALUE USING GTS (FUEL INPUT) |
Use the Data List to check if the fuel receiver gauge is operating properly (Click here).
Combination Meter Tester Display
Measurement Item/Range
Normal Condition
Diagnostic Note
Fuel Input
Fuel input signal/Min.: 0, Max. 127.5
Current fuel level displayed
Unit: Liters
- OK:
- Fuel amount value displayed on the GTS is almost the same as needle indication.
|
|
||||
| OK | |
|
| 3. CHECK HARNESS AND CONNECTOR (COMBINATION METER ASSEMBLY - FRONT FUEL MAIN AND RETURN TUBE SUB-ASSEMBLY) |
Disconnect the H20 combination meter assembly connector.
Disconnect the h1*1 or h2*2 front fuel main and return tube sub-assembly connector.
- *1: Engine Type Diesel
- *2: Engine Type Gasoline
- *1: Engine Type Diesel
Measure the resistance according to the value(s) in the table below.
- Standard Resistance:
Engine Type Diesel Tester Connection
Condition
Specified Condition
H20-33 (FUEL) - h1-2
Always
Below 1 Ω
H20-34 (E2) - h1-3
H20-33 (FUEL) or h1-2 - Body ground
Always
10 kΩ or higher
H20-34 (E2) or h1-3 - Body ground
Engine Type Gasoline Tester Connection
Condition
Specified Condition
H20-33 (FUEL) - h2-2
Always
Below 1 Ω
H20-34 (E2) - h2-3
H20-33 (FUEL) or h2-2 - Body ground
Always
10 kΩ or higher
H20-34 (E2) or h2-3 - Body ground
|
|
||||
| OK | |
|
| 4. INSPECT FRONT FUEL MAIN AND RETURN TUBE SUB-ASSEMBLY |
Remove the front fuel main and return tube sub-assembly.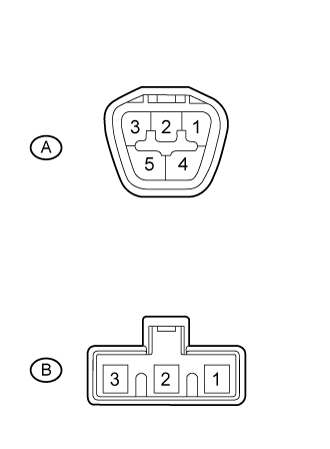
- for 1KD-FTV: Click here
- for 2KD-FTV: Click here
- for 5L-E: Click here
- for 1TR-FE: Click here
- for 2TR-FE: Click here
- for 1KD-FTV: Click here
Measure the resistance according to the value(s) in the table below.
- Standard Resistance:
Tester Connection
Condition
Specified Condition
A-2 - B-2
Always
Below 1 Ω
A-3 - B-1
- *: Replacement procedure;
- for 1KD-FTV: Click here
- for 2KD-FTV: Click here
- for 5L-E: Click here
- for 1TR-FE: Click here
- for 2TR-FE: Click here
|
|
||||
| OK | |
|
| 5. INSPECT FUEL SENDER GAUGE ASSEMBLY |
Remove the fuel sender gauge assembly.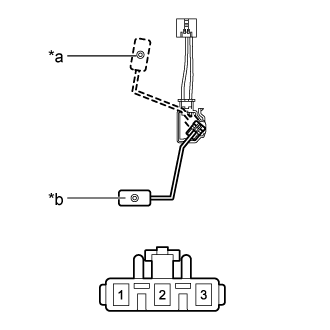
- for 1KD-FTV: Click here
- for 2KD-FTV: Click here
- for 5L-E: Click here
- for 1TR-FE: Click here
- for 2TR-FE: Click here
- for 1KD-FTV: Click here
Measure the resistance according to the value(s) in the table below.
- Standard Resistance:
Tester Connection
Condition
Specified Condition
1 - 2
Float level is F (upper)
13.5 to 16.5 Ω
Float level is E (lower)
405.5 to 414.5 Ω
Text in Illustration *a
F (Upper)
*b
E (Lower)
- HINT:
- *: Replacement procedure;
- for 1KD-FTV: Click here
- for 2KD-FTV: Click here
- for 5L-E: Click here
- for 1TR-FE: Click here
- for 2TR-FE: Click here
- for 1KD-FTV: Click here
|
|
||||
| OK | ||
 |
||
| ||