SUPPLEMENTAL RESTRAINT SYSTEMS CENTER AIRBAG SENSOR ASSEMBLY INSTALLATION
CAUTION / NOTICE / HINT
- HINT:
- ·
Use the same procedure for RHD and LHD vehicles.
·The procedure listed below is for LHD vehicles.
PROCEDURE

 89170
1.INSTALL AIRBAG SENSOR ASSEMBLY
Check that the ignition switch is off.
Check that the cable is disconnected from the negative (-) battery terminal.
- CAUTION:
- ·
Wait at least 90 seconds after disconnecting the cable from the negative (-) battery terminal to disable the SRS system.
·If the airbag deploys for any reason, it may cause a serious accident.
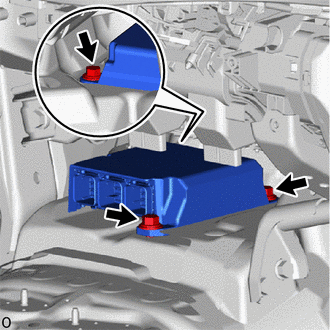
Install the airbag sensor assembly with the 3 bolts.
- Torque:
- 17.5 N*m (178 kgf*cm, 13 ft.*lbf)
- NOTICE:
- ·
If the airbag sensor assembly has been dropped, or there are any cracks, dents or other defects in the case or connector, replace the airbag sensor assembly with a new one.
·When installing the airbag sensor assembly, be careful that the SRS wiring does not interfere with or is not pinched between other parts.
·When the ignition switch is first turned to ON after the airbag sensor assembly has been replaced, make sure that no one is in the vehicle.
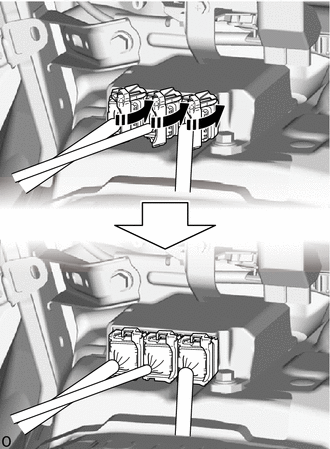

|
Push in |
Connect the 3 connectors and push in the lock lever to lock the connector.
- NOTICE:
-
When connecting any airbag connector, take care not to damage the airbag wire harness.
Check that there is no looseness in the installation parts of the airbag sensor assembly.
55646
2.INSTALL NO. 3 INSTRUMENT PANEL UNDER COVER
58534E
3.INSTALL CENTER FLOOR CARPET COVER LH
58533C
4.INSTALL CENTER FLOOR CARPET COVER RH
58810J
5.INSTALL CONSOLE BOX ASSEMBLY (w/ Console Tray)
58904B
6.INSTALL PARKING BRAKE HOLE COVER SUB-ASSEMBLY (w/ Console Tray, for Separate Seat Type)
58839A
7.INSTALL CONSOLE BOX HOLE COVER (w/ Console Tray, w/o Console Box, w/o Fire Extinguisher)
58199D
8.INSTALL NO. 2 EXTINGUISHER BRACKET (w/ Console Tray, w/o Console Box, w/ Fire Extinguisher)
58919B
9.INSTALL CONSOLE BOX PLATE (w/ Console Tray, w/o Console BOX)
58820A
10.INSTALL CONSOLE COMPARTMENT BOX ASSEMBLY (w/ Console Tray, w/ Console Box)
58815A
11.INSTALL CONSOLE BOX CARPET (w/ Console Tray, w/ Console Box)
58825A
12.INSTALL CONSOLE BOX POCKET (w/ Console Tray, w/ Console Box)
58903A
13.INSTALL CONSOLE REAR END PANEL SUB-ASSEMBLY (w/ Console Tray)
55438A
14.INSTALL NO. 2 INSTRUMENT PANEL FINISH PANEL RETAINER
55317A
15.INSTALL INSTRUMENT SIDE PANEL RH
55012A
16.INSTALL NO. 2 INSTRUMENT PANEL GARNISH SUB-ASSEMBLY
55632B
17.INSTALL NO. 2 INSTRUMENT PANEL UNDER TRAY SUPPORT
55642
18.INSTALL NO. 2 INSTRUMENT PANEL UNDER COVER
55641
19.INSTALL NO. 1 INSTRUMENT PANEL UNDER COVER
55318C
20.INSTALL INSTRUMENT SIDE PANEL LH
55011A
21.INSTALL NO. 1 INSTRUMENT PANEL GARNISH SUB-ASSEMBLY
55631A
22.INSTALL NO. 1 INSTRUMENT PANEL UNDER TRAY STOPPER
62112
23.INSTALL COWL SIDE TRIM BOARD LH
67914B
24.INSTALL FRONT DOOR SCUFF PLATE LH
67912A
25.INSTALL FRONT DOOR OUTSIDE SCUFF PLATE LH
26.CONNECT CABLE TO NEGATIVE BATTERY TERMINAL
for 7GR-FKS:
for 1GD-FTV:
27. INITIALIZATION AFTER RECONNECTING BATTERY TERMINAL
Click hereGeneral>SETUP>WHEN DISCONNECTING OR RECONNECTING BATTERY TERMINAL>WORK PROCEDURE
- HINT:
-
When disconnecting and reconnecting the battery, there is an automatic learning function that completes learning when the respective system is used.
-
Click hereGeneral>SETUP>WHEN DISCONNECTING OR RECONNECTING BATTERY TERMINAL>AUTOMATIC LEARNING CHART
28.PERFORM DIAGNOSTIC SYSTEM CHECK
29.CHECK SRS WARNING LIGHT
30.PERFORM SYSTEM INITIALIZATION AND CALIBRATION