SEAT SEAT RAIL INSTALLATION
CAUTION / NOTICE / HINT
- CAUTION:
- ·
Wear protective gloves. Sharp areas on the parts may injure your hands.
·There is risk of injury.
- HINT:
- ·
Use the same procedure for RHD and LHD vehicles.
·The procedures listed below are for LHD vehicles.
·The procedure listed below is a representative example.
PROCEDURE

 72170A
1.INSTALL REAR OUTER SEAT TRACK ASSEMBLY LH
for Folding Seat Type:
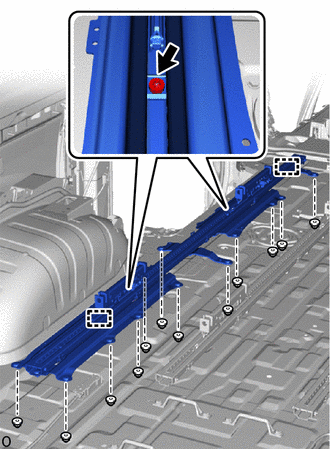
Attach the guide.
Using a T50 "TORX" socket wrench, tighten the 2 "TORX" bolts.
- Torque:
- 39 N*m (398 kgf*cm, 29 ft.*lbf)
Install the rear outer seat track assembly LH by installing the 12 nuts to the bottom of the vehicle.
- Torque:
- 72 N*m (734 kgf*cm, 53 ft.*lbf)
except Folding Seat Type:
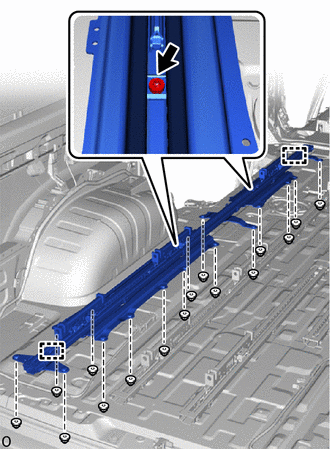
Attach the guide.
Using a T50 "TORX" socket wrench, tighten the 2 "TORX" bolts.
- Torque:
- 39 N*m (398 kgf*cm, 29 ft.*lbf)
Install the rear outer seat track assembly LH by installing the 16 nuts to the bottom of the vehicle.
- Torque:
- 72 N*m (734 kgf*cm, 53 ft.*lbf)
82807
2.INSTALL WIRING HARNESS PROTECTOR SET (w/ Power Supply Unit)
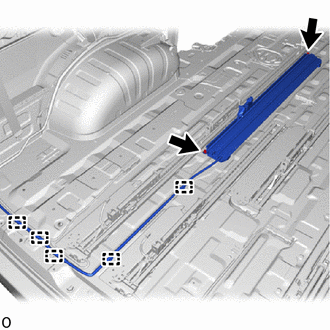
Attach the clamp and install the wiring harness protector set with the 2 nuts.
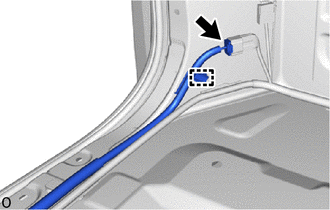
Connect the connector.
Attach the clamp.
72190E
3.INSTALL REAR INNER SEAT TRACK ASSEMBLY LH
for Folding Seat Type:
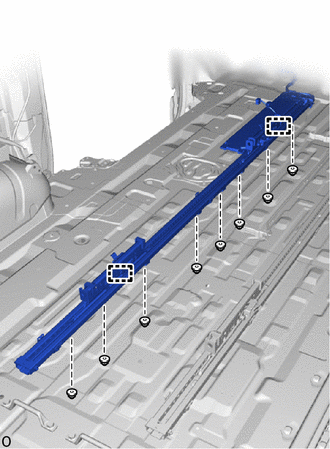
Attach the guide.
Install the rear inner seat track assembly LH by installing the 8 nuts to the bottom of the vehicle.
- Torque:
- 72 N*m (734 kgf*cm, 53 ft.*lbf)
except Folding Seat Type:
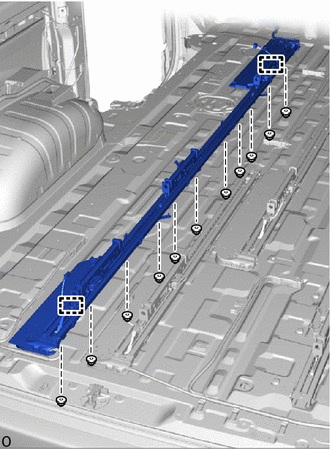
Attach the guide.
Install the rear inner seat track assembly LH by installing the 11 nuts to the bottom of the vehicle.
- Torque:
- 72 N*m (734 kgf*cm, 53 ft.*lbf)
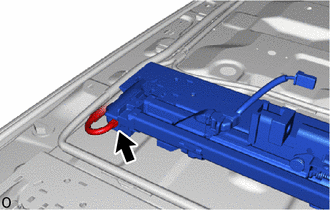
w/ Power Supply Unit:
Connect the connector.
w/o Rear No. 3 Seat:
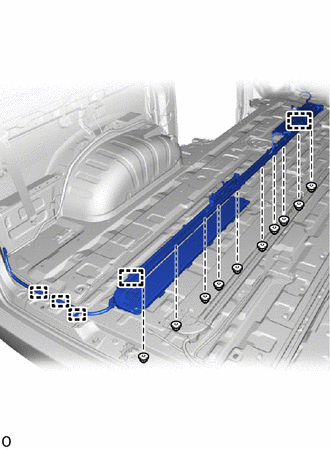
Attach the guide.
Attach the clamp and install the rear inner seat track assembly LH by installing the 10 nuts to the bottom of the vehicle.
- Torque:
- 72 N*m (734 kgf*cm, 53 ft.*lbf)
Connect the connector.
Attach the clamp.
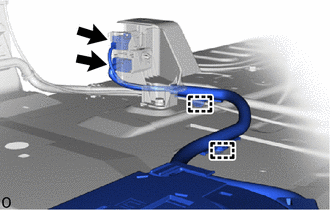
Connect the 2 connectors.
Attach the clamp.
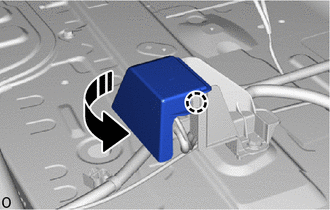

|
Close in this Direction |
Attach the claw and close the cover.
Return the floor carpet to its original position.
72180F
4.INSTALL REAR INNER SEAT TRACK ASSEMBLY RH
for Folding Seat Type:
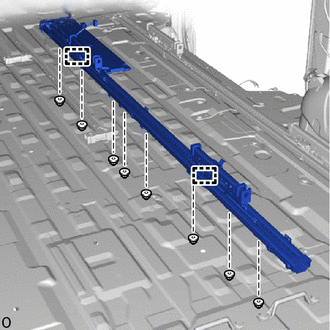
Attach the guide.
Install the rear inner seat track assembly RH by installing the 8 nuts to the bottom of the vehicle.
- Torque:
- 72 N*m (734 kgf*cm, 53 ft.*lbf)
except Folding Seat Type:
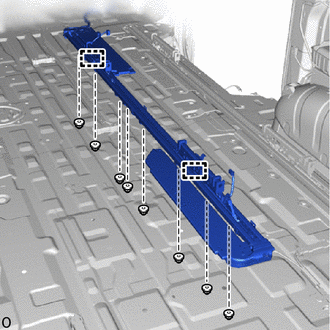
Attach the guide.
Install the rear inner seat track assembly RH by installing the 8 nuts to the bottom of the vehicle.
- Torque:
- 72 N*m (734 kgf*cm, 53 ft.*lbf)
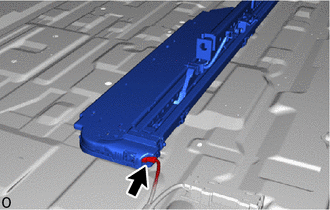
w/ Power Supply Unit:
Connect the connector.
w/o Rear No. 3 Seat:
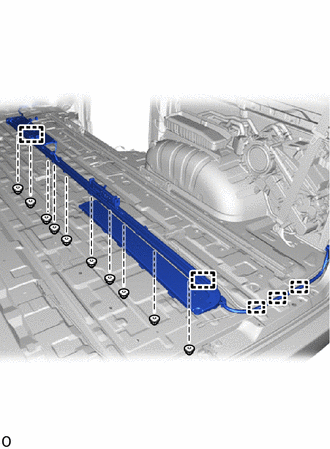
Attach the guide.
Attach the clamp and install the rear inner seat track assembly RH by installing the 10 nuts to the bottom of the vehicle.
- Torque:
- 72 N*m (734 kgf*cm, 53 ft.*lbf)
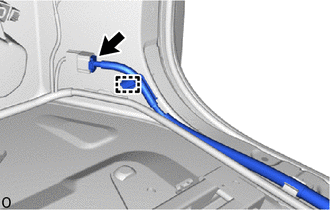
Connect the connector.
Attach the clamp.
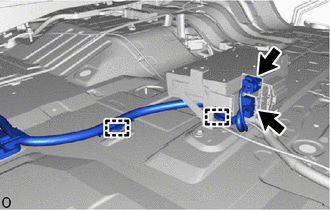
Connect the 2 connectors.
Attach the clamp.
Return the floor carpet to its original position.
72180G
5.INSTALL REAR INNER REAR SEAT TRACK ASSEMBLY RH
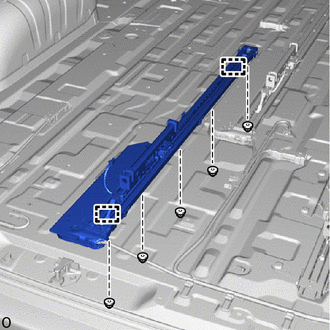
Attach the guide.
Install the rear inner rear seat track assembly RH by installing the 5 nuts to the bottom of the vehicle
- Torque:
- 72 N*m (734 kgf*cm, 53 ft.*lbf)
w/ Power Supply Unit:
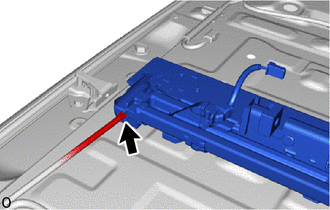
Connect the connector.
72160H
6.INSTALL REAR OUTER SEAT TRACK ASSEMBLY RH
for Folding Seat Type:
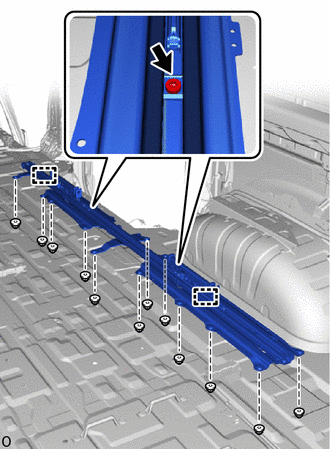
Attach the guide.
Using a T50 "TORX" socket wrench, tighten the 2 "TORX" bolts.
- Torque:
- 39 N*m (398 kgf*cm, 29 ft.*lbf)
Install the rear outer seat track assembly RH by installing the 12 nuts to the bottom of the vehicle
- Torque:
- 72 N*m (734 kgf*cm, 53 ft.*lbf)
except Folding Seat Type:
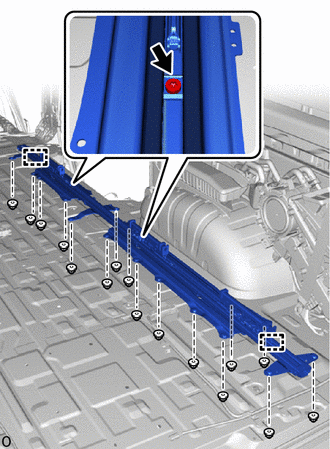
Attach the guide.
Using a T50 "TORX" socket wrench, tighten the 2 "TORX" bolts.
- Torque:
- 39 N*m (398 kgf*cm, 29 ft.*lbf)
Install the rear outer seat track assembly RH by installing the 16 nuts to the bottom of the vehicle
- Torque:
- 72 N*m (734 kgf*cm, 53 ft.*lbf)
58323C
7.INSTALL REAR NO. 3 FLOOR HEAT INSULATOR
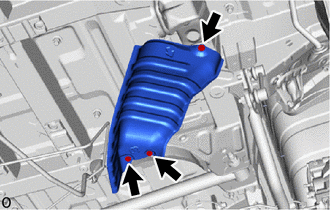
Install the rear No. 3 floor heat insulator with the 3 bolts.
- Torque:
- 5.5 N*m (56 kgf*cm, 49 in.*lbf)
58322B
8.INSTALL REAR NO. 2 FLOOR HEAT INSULATOR
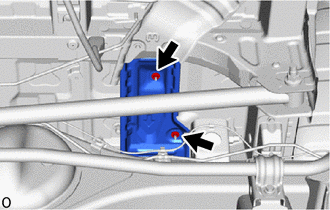
Install the rear No. 2 floor heat insulator with the 2 nuts.
- Torque:
- 5.5 N*m (56 kgf*cm, 49 in.*lbf)
58321B
9.INSTALL REAR NO. 1 FLOOR HEAT INSULATOR
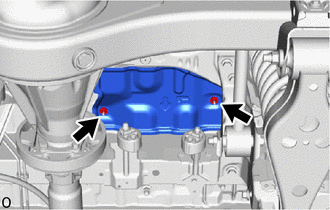
Install the rear No. 1 floor heat insulator with the 2 nuts.
- Torque:
- 5.5 N*m (56 kgf*cm, 49 in.*lbf)
58328B
10.INSTALL LOWER MAIN MUFFLER HEAT INSULATOR
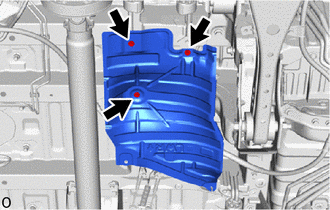
Install the lower main muffler heat insulator with the 3 bolts.
- Torque:
- 5.5 N*m (56 kgf*cm, 49 in.*lbf)
58045
11.INSTALL REAR FLOOR HEAT INSULATOR SUB-ASSEMBLY
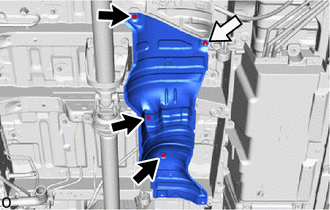

|
Bolt |

|
Nut |
Install the rear floor heat insulator sub-assembly with the 3 bolts and nut.
- Torque:
- 5.5 N*m (56 kgf*cm, 49 in.*lbf)
58155
12.INSTALL FRONT NO. 3 FLOOR HEAT INSULATOR
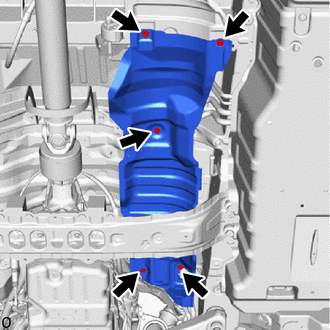
Install the front No. 3 floor heat insulator with the 5 bolts.
- Torque:
- 5.5 N*m (56 kgf*cm, 49 in.*lbf)
58398R
13.INSTALL LOWER BODY BACK COVER LH
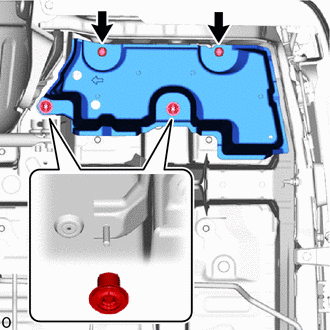
Install the 2 clips.
Press the clip on to the vehicle stud portion, and Install the lower body back cover LH.
14.INSTALL SPARE TIRE
58399D
15.INSTALL NO. 2 FLOOR UNDER COVER
16.INSTALL EXHAUST PIPE ASSEMBLY
for 7GR-FKS:
Click hereEngine / Hybrid System>7GR-FKS (INTAKE / EXHAUST)>EXHAUST PIPE>INSTALLATION
for 1GD-FTV:
Click hereEngine / Hybrid System>1GD-FTV (INTAKE / EXHAUST)>EXHAUST PIPE>INSTALLATION
77100
17.INSTALL FUEL TANK ASSEMBLY
for 7GR-FKS:
Click hereEngine / Hybrid System>1GD-FTV (FUEL)>FUEL TANK>INSTALLATION
for 1GD-FTV:
Click hereEngine / Hybrid System>7GR-FKS (FUEL)>FUEL TANK>INSTALLATION
65638A
18.INSTALL REAR WHEEL HOUSE LINER LH
- HINT:
-
Use the same procedure described for the RH side.
-
Click hereVehicle Interior>HEATING / AIR CONDITIONING>REAR AIR CONDITIONING UNIT>INSTALLATION
65637B
19.INSTALL REAR WHEEL HOUSE LINER RH
76908
20.INSTALL QUARTER PANEL MUDGUARD SUB-ASSEMBLY LH
76907
21.INSTALL QUARTER PANEL MUDGUARD SUB-ASSEMBLY RH
- HINT:
-
Use the same procedure described for the LH side.
65632D
22.INSTALL REAR FRONT WHEEL HOUSE PLATE LH
65631D
23.INSTALL REAR FRONT WHEEL HOUSE PLATE RH
- HINT:
-
Use the same procedure described for the LH side.
24.INSTALL WHEEL ASSEMBLY (Rear LH)
25.INSTALL WHEEL ASSEMBLY (Rear RH)
- HINT:
-
Use the same procedure described for the LH side.
26.INSTALL REAR FLOOR SILENCER
Install each rear floor silencer.
27.INSTALL REAR FLOOR CARPET ASSEMBLY
Install the rear floor carpet assembly.
28.INSTALL SEAT TRACK RAIL PROTECTOR
Attach the claw and install all seat track rail protectors.
- HINT:
-
The procedure is a representative example.
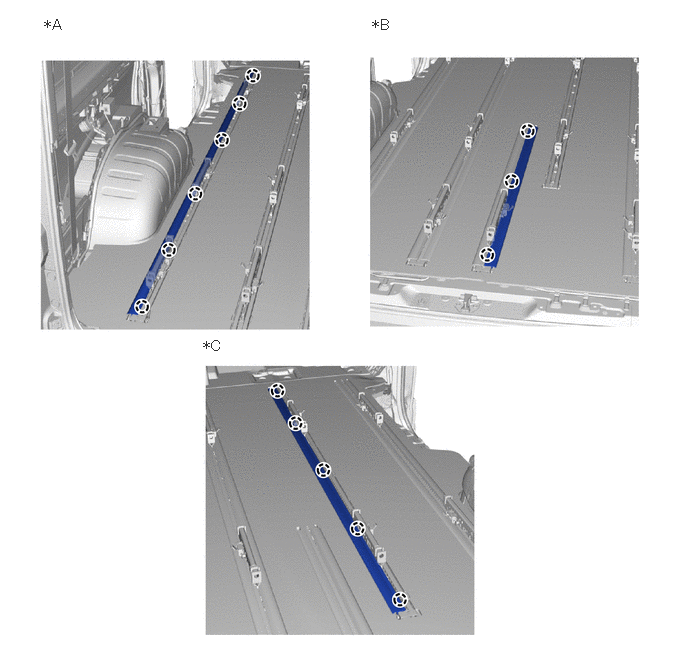
| *A | for Type A | *B | for Type B |
| *C | for Type C | - | - |
29.INSTALL NO. 3 FLOOR NO. 1 CARPET MOULDING
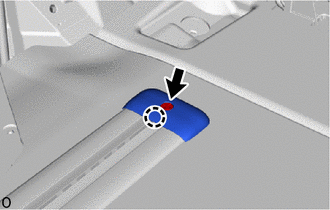
Attach the claw and clip and install each No. 3 floor No. 1 carpet moulding.
30.INSTALL NO. 3 FLOOR NO. 2 CARPET MOULDING
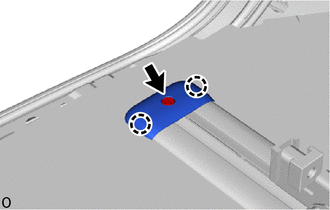
Attach the claw and clip and install each No. 3 floor No. 2 carpet moulding.
31.INSTALL NO. 3 FLOOR NO. 3 CARPET MOULDING (w/ Power Supply Unit)
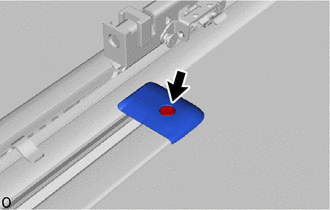
Attach the clip and install the No. 3 floor No. 3 carpet moulding.
32.INSTALL NO. 3 FLOOR NO. 4 CARPET MOULDING (w/ Power Supply Unit)
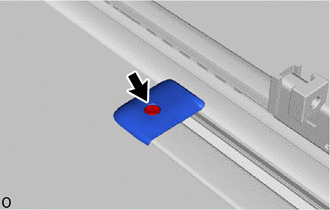
Attach the clip and install the No. 3 floor No. 4 carpet moulding.
33.INSTALL REAR SEAT TRACK SLIDE STOPPER
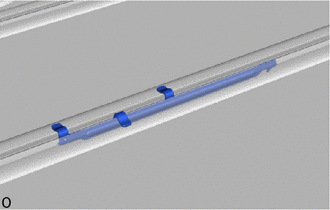
Install each rear seat track slide stopper.
62520B
34.INSTALL QUARTER TRIM PANEL ASSEMBLY LH
62510M
35.INSTALL QUARTER TRIM PANEL ASSEMBLY RH
67872A
36.INSTALL NO. 1 SLIDE DOOR WEATHERSTRIP LH
- HINT:
-
Use the same procedure described for the RH side.
-
Click hereVehicle Exterior>DOOR / HATCH>REAR DOOR OPENING TRIM WEATHERSTRIP (for Wagon)>INSTALLATION
67871E
37.INSTALL NO. 1 SLIDE DOOR WEATHERSTRIP RH
73570A
38.INSTALL NO. 3 SEAT OUTER BELT ASSEMBLY LH (FLOOR ANCHOR) (w/ Seat Belt)
73560A
39.INSTALL NO. 3 SEAT BELT ASSEMBLY OUTER RH (FLOOR ANCHOR) (w/ Seat Belt)
- HINT:
-
Use the same procedure described for the RH side.
67935
40.INSTALL BACK DOOR SCUFF PLATE
62414A
41.INSTALL LOWER CENTER PILLAR GARNISH LH
- HINT:
-
Use the same procedure described for the RH side.
-
Click hereVehicle Interior>INTERIOR PANELS / TRIM>ROOF HEADLINING (for Full-trim)>INSTALLATION
62413A
42.INSTALL LOWER CENTER PILLAR GARNISH RH
74680
43.INSTALL PILLAR ASSIST GRIP ASSEMBLY B
74617A
44.INSTALL ASSIST GRIP PLUG
67872A
45.INSTALL NO. 1 SLIDE DOOR WEATHERSTRIP LH
- HINT:
-
Use the same procedure described for the RH side.
-
Click hereVehicle Exterior>DOOR / HATCH>REAR DOOR OPENING TRIM WEATHERSTRIP (for Wagon)>INSTALLATION
67871E
46.INSTALL NO. 1 SLIDE DOOR WEATHERSTRIP RH
67918D
47.INSTALL REAR DOOR SCUFF PLATE LH
- HINT:
-
Use the same procedure described for the RH side.
-
Click hereVehicle Interior>INTERIOR PANELS / TRIM>ROOF HEADLINING (for Full-trim)>INSTALLATION
67917C
48.INSTALL REAR DOOR SCUFF PLATE RH
73220
49.INSTALL FRONT SEAT OUTER BELT ASSEMBLY LH (FLOOR ANCHOR)
73210
50.INSTALL FRONT SEAT OUTER BELT ASSEMBLY RH (FLOOR ANCHOR)
- HINT:
-
Use the same procedure described for the LH side.
73233
51.INSTALL OUTER LAP BELT ANCHOR COVER (w/ Seat Belt)
52.INSTALL FRONT SEAT ASSEMBLY LH
for Power Seat:
Click hereVehicle Interior>SEAT>FRONT SEAT ASSEMBLY (for Power Seat)>INSTALLATION
for Separate Seat Type:
Click hereVehicle Interior>SEAT>FRONT SEAT ASSEMBLY (for Separate Seat Type)>INSTALLATION
for Sliding Bench Seat Type:
Click hereVehicle Interior>SEAT>FRONT SEAT ASSEMBLY (for Sliding Bench Seat Type)>INSTALLATION
53.INSTALL REAR SEAT ASSEMBLY
for Manual Captain Seat:
Click hereVehicle Interior>SEAT>REAR SEAT ASSEMBLY (for Manual Captain Seat)>INSTALLATION
for Power Captain Seat:
Click hereVehicle Interior>SEAT>REAR SEAT ASSEMBLY (for Power Captain Seat)>INSTALLATION
for 60/40 Split Seat Type 40 Side:
Click hereVehicle Interior>SEAT>REAR SEAT ASSEMBLY (for 60/40 Split Seat Type 40 Side)>INSTALLATION
for 60/40 Split Seat Type 60 Side:
Click hereVehicle Interior>SEAT>REAR SEAT ASSEMBLY (for 60/40 Split Seat Type 60 Side)>INSTALLATION
Folding Type:
Click hereVehicle Interior>SEAT>REAR SEAT ASSEMBLY (for Folding Type)>INSTALLATION
62312B
54.INSTALL FRONT DOOR OPENING TRIM WEATHERSTRIP LH
62311B
55.INSTALL FRONT DOOR OPENING TRIM WEATHERSTRIP RH
- HINT:
-
Use the same procedure described for the LH side.
67914B
56.INSTALL FRONT DOOR SCUFF PLATE LH
67912A
57.INSTALL FRONT DOOR OUTSIDE SCUFF PLATE LH
67913B
58.INSTALL FRONT DOOR SCUFF PLATE RH
- HINT:
-
Use the same procedure described for the LH side.
67911B
59.INSTALL FRONT DOOR OUTSIDE SCUFF PLATE RH
- HINT:
-
Use the same procedure described for the LH side.
60.CONNECT CABLE TO NEGATIVE BATTERY TERMINAL
for 7GR-FKS:
for 1GD-FTV:
61. INITIALIZATION AFTER RECONNECTING BATTERY TERMINAL
Click hereGeneral>SETUP>WHEN DISCONNECTING OR RECONNECTING BATTERY TERMINAL>WORK PROCEDURE
- HINT:
-
When disconnecting and reconnecting the battery, there is an automatic learning function that completes learning when the respective system is used.
-
Click hereGeneral>SETUP>WHEN DISCONNECTING OR RECONNECTING BATTERY TERMINAL>AUTOMATIC LEARNING CHART
62. PERFORM DIAGNOSTIC SYSTEM CHECK
63.CHECK SRS WARNING LIGHT
64.INSPECT SEAT BELT WARNING SYSTEM
65.INSPECT REAR SEAT ASSEMBLY
66.INSPECT SEAT HEATER SYSTEM (w/ Seat Heater System)