1GD-FTV ENGINE MECHANICAL CYLINDER HEAD GASKET REMOVAL
CAUTION / NOTICE / HINT
The necessary procedures (adjustment, calibration, initialization, or registration) that must be performed after parts are removed, installed, or replaced during the cylinder head gasket removal/installation are shown below.
| Replacement Part or Procedure | Necessary Procedures | Effects/Inoperative when not Performed | Link |
|---|---|---|---|
| Battery terminal is disconnected/reconnected | Memorize steering angle neutral point | Parking assist monitor system | ( ) |
| Panoramic view monitor system | ()
|
||
| Replacement of ECM | ·
Learning Values Save ·
Learning Values Write ·
Perform Vehicle Identification Number (VIN) or frame number registration |
DTC P063051 is stored | ·
w/ DPF: ( ·
w/ Urea SCR System: ( ·
w/ EGR Cooler: ( ·
w/o EGR Cooler: ( ·
w/ Exhaust Gas Temperature Sensor for EGR ( |
| ECU communication ID registration | Engine start function | See the Service Bulletin for the registration method. | |
for RC60J:
Performing iMT installation information reset |
·
iMT system ·
DTCs are output |
()
|
|
| Replacement of engine assembly | Clear crank time compensation data | Engine starting | ·
w/ DPF: ( ·
w/ Urea SCR System: ( ·
w/ EGR Cooler: ( ·
w/o EGR Cooler: ( ·
w/ Exhaust Gas Temperature Sensor for EGR ( |
·
Input injector compensation code ·
Pilot quantity learning |
Engine starting | ·
w/ DPF: ( ·
w/ Urea SCR System: ( ·
w/ EGR Cooler: ( ·
w/o EGR Cooler: ( |
|
| Replacement of crankshaft position sensor plate | Clear crank time compensation data | Crank time compensation data compensation amount is same as before replacement, affecting crank time compensation data | ·
w/ DPF: ( ·
w/ Urea SCR System: ( ·
w/ EGR Cooler: ( ·
w/o EGR Cooler: ( ·
w/ Exhaust Gas Temperature Sensor for EGR ( |
w/ DPF, w/ Urea SCR System:
Replacement of air fuel ratio sensor |
Clear A/F sensor learning value data | - | ·
w/ DPF: ( ·
w/ Urea SCR System: ( ·
w/ Exhaust Gas Temperature Sensor for EGR ( |
w/ DPF, w/ Urea SCR System:
Replacement of exhaust manifold converter sub-assembly |
Clear DPF thermal deterioration data | - | ·
w/ DPF: ( ·
w/ Urea SCR System: ( ·
w/ Exhaust Gas Temperature Sensor for EGR ( |
| Replacement of injector assembly | ·
Injector compensation code registration ·
Pilot quantity learning |
Engine starting | ·
w/ DPF: ( ·
w/ Urea SCR System: ( ·
w/ EGR Cooler: ( ·
w/o EGR Cooler: ( |
·
Replacement of diesel throttle body assembly ·
Replacement of electric EGR control valve assembly ·
Replacement of turbocharger nozzle vane control actuator |
Perform initialization | - | ·
w/ DPF: ( ·
w/ Urea SCR System: ( ·
w/ EGR Cooler: ( ·
w/o EGR Cooler: ( ·
w/ Exhaust Gas Temperature Sensor for EGR ( |
w/ Stop and Start System:
Replacement of starter assembly
|
Clear the number of starter operations | Stop and start system | ()
|
w/ Stop and Start System:
·
Replacement of flywheel sub-assembly (for Automatic Transmission) ·
Replacement of flywheel with damper assembly (for Manual Transmission) |
Total number of engine starts reset | ||
for AE60E:
Replacement of automatic transmission assembly |
Reset memory | ·
Large shift shock ·
Engine overruns |
()
|
for AE60E:
Replacement of automatic transmission fluid |
ATF thermal degradation estimate reset | The value of the Data List item "ATF Thermal Degradation Estimate" is not estimated correctly | |
| Front wheel alignment adjustment | ·
Perform reset memory ·
Perform acceleration sensor zero point calibration and store system information memorization. |
·
VSC is disabled or malfunctions ·
DTCs are output ·
Slip indicator light illuminates ·
ABS warning light illuminates |
()
|
| Suspension, tires, etc. | Television camera assembly optical axis (Back camera position setting) | Parking assist monitor system | ()
|
- HINT:
-
When the cable is disconnected / reconnected to the battery terminal, systems temporarily stop operating. However, each system has a function that completes learning the first time the system is used.
- ·
Learning completes when vehicle is driven
Effect/Inoperative when not Performed Necessary Procedures Link Stop and start system Drive the vehicle until stop and start control is permitted (approximately 5 to 60 minutes). ( )
Lane control system Drive the vehicle straight ahead at 15 km/h (10 mph) or more for 1 second or more. ( )
Pre-collision system
·Learning completes when vehicle is operated normally
Effect/Inoperative when not Performed Necessary Procedures Link Power slide door system Fully close the slide door by hand.
- HINT:
-
Initialization is not necessary if the above procedures are performed while the slide door is closed.
( )
Air conditioning system After the ignition switch is turned to ON, the servo motor standard position is recognized. -
- NOTICE:
- ·
When replacing the parts in the following chart (A), replace the No. 1 injection pipe sub-assembly, No. 2 injection pipe sub-assembly and/or fuel inlet pipe sub-assembly with new ones.
Replaced Parts (A) Pipes Requiring New Replacement Injector assembly (including shuffling the injector assemblies between the cylinders) ·No. 1 injection pipe sub-assembly
·No. 2 injection pipe sub-assembly
Supply pump assembly Fuel inlet pipe sub-assembly ·Common rail assembly
·Cylinder block sub-assembly
·Cylinder head sub-assembly
·Cylinder head gasket
·Timing chain case assembly
·No. 1 injection pipe sub-assembly
·No. 2 injection pipe sub-assembly
·Fuel inlet pipe sub-assembly
·After removing the No. 1 injection pipe sub-assembly, No. 2 injection pipe sub-assembly and/or fuel inlet pipe sub-assembly, clean them with a brush and compressed air.
·The injector assembly is a precision instrument. Do not use the injector assembly if it is struck or dropped.
·The supply pump assembly is a precision instrument. Do not use the supply pump assembly if it is struck or dropped.
·The common rail assembly is a precision instrument. Do not use the common rail assembly if it is struck or dropped.
·Hold the supply pump assembly itself during removal and installation. Do not hold the pre-stroke control valve or fuel pipe, etc.
·Hold the common rail assembly itself during removal and installation. Do not hold the pressure discharge valve or fuel pressure sensor, etc.
·Make sure foreign matter does not enter the fuel path.
PROCEDURE

 1.REMOVE CAMSHAFT
w/ EGR Cooler:
Click hereEngine / Hybrid System>1GD-FTV (ENGINE MECHANICAL)>CAMSHAFT (w/ EGR Cooler)>REMOVAL
w/o EGR Cooler:
Click hereEngine / Hybrid System>1GD-FTV (ENGINE MECHANICAL)>CAMSHAFT (w/o EGR Cooler)>REMOVAL
11310
2.REMOVE TIMING CHAIN COVER ASSEMBLY
13801
3.REMOVE NO. 1 VALVE ROCKER ARM SUB-ASSEMBLY
13750
4.REMOVE VALVE LASH ADJUSTER ASSEMBLY
11101
5.REMOVE CYLINDER HEAD SUB-ASSEMBLY
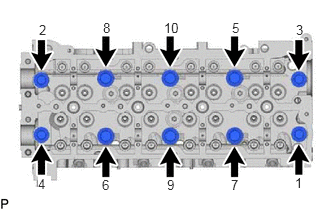
Uniformly loosen the 10 cylinder head set bolts in several passes in the sequence shown in the illustration. Then remove the 10 cylinder head set bolts and 6 cylinder head set bolt spacers.
- NOTICE:
- ·
Cylinder head sub-assembly warpage or cracking could result from removing bolts in the incorrect order.
·Be careful not to drop the cylinder head set bolt spacers into the cylinder head sub-assembly.
Lift the cylinder head sub-assembly from the ring pins on the cylinder block sub-assembly, and place the cylinder head sub-assembly on wooden blocks on a bench.
- NOTICE:
-
Be careful not to damage the contact surfaces of the cylinder head sub-assembly and cylinder block sub-assembly.
- HINT:
-
If the cylinder head sub-assembly is difficult to lift, use a screwdriver to pry between the cylinder head sub-assembly and cylinder block sub-assembly.
11115
6.REMOVE CYLINDER HEAD GASKET
11101A
7.INSPECT CYLINDER HEAD SET BOLT