AC60E AUTOMATIC TRANSMISSION / TRANSAXLE AUTOMATIC TRANSMISSION ASSEMBLY(for 1GD-FTV) INSTALLATION
PROCEDURE

 32000
1.INSTALL TORQUE CONVERTER ASSEMBLY
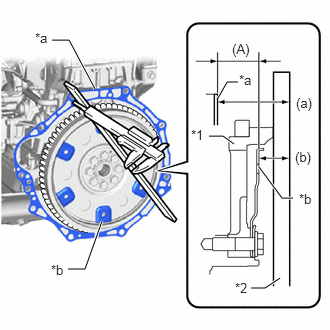
| *1 | Flywheel |
| *2 | Straightedge |
| *a | Engine Assembly Surface |
| *b | Pump impeller drive Plate Surface |
Using a vernier caliper and straightedge, measure the dimension (A) between the automatic transmission assembly contact surface of the engine assembly (*a) and the torque converter assembly contact surface of the pump impeller drive plate (*b).
- Measurement Method:
(a) - (b) = (A)
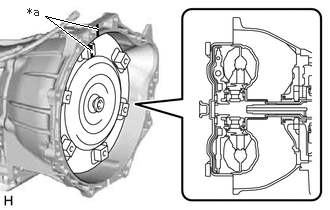
| *a | Matchmark |
Align the matchmark on the automatic transmission case sub-assembly with the one on the torque converter assembly and engage the splines of the input shaft with the turbine runner splines.
- NOTICE:
-
Install the torque converter assembly to the input shaft while keeping it horizontal.
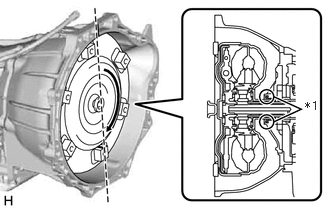
| *1 | Front Oil Pump Oil Seal |
Rotate the torque converter assembly approximately 180° and engage the splines of the stator shaft with the stator assembly.
- NOTICE:
- ·
Do not damage the front oil pump oil seal.
·Install the torque converter assembly to the input shaft while keeping it horizontal.
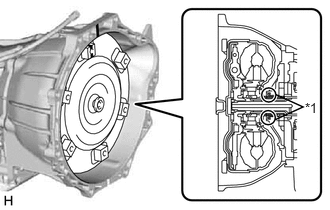
| *1 | Front Oil Pump Oil Seal |
Rotate the torque converter assembly approximately 180° again, align the matchmark on the torque converter assembly with the one on the automatic transmission case sub-assembly and insert the key of the torque converter assembly into the groove of the oil pump drive gear.
- NOTICE:
- ·
Do not push the torque converter assembly excessively when rotating it.
·Do not damage the front oil pump oil seal.
·Install the torque converter assembly to the input shaft while keeping it horizontal.
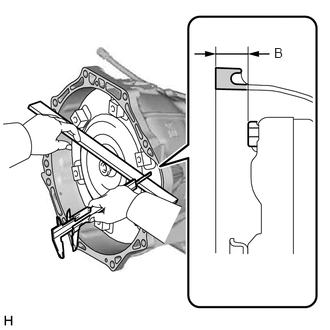
Using a vernier caliper and straightedge, measure the dimension shown in the illustration and check that the dimension is more than the dimension (A), which was measured in the previous step.
- Standard Distance:
B = A + 1 mm (0.0394 in.) or more
- NOTICE:
- ·
Make sure to deduct the thickness of the straightedge.
·If the automatic transmission assembly is installed to the engine assembly with the torque converter assembly not sufficiently inserted, the torque converter assembly may be damaged.
33829E
2.INSTALL TRANSMISSION CONTROL CABLE BRACKET
Install the transmission control cable bracket to the automatic transmission assembly with the 2 bolts.
- Torque:
- 28 N*m (286 kgf*cm, 21 ft.*lbf)
3.INSTALL WIRE HARNESS CLAMP BRACKET
Install the 4 wire harness clamp brackets to the automatic transmission assembly with the 4 bolts.
- Torque:
- 13 N*m (133 kgf*cm, 10 ft.*lbf)
35000
4.INSTALL AUTOMATIC TRANSMISSION ASSEMBLY
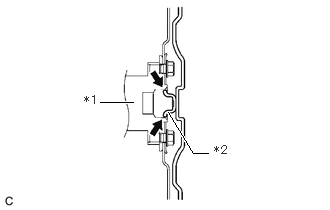
| *1 | Crankshaft |
| *2 | Torque Converter Assembly Centerpiece |

|
Clutch Spline Grease |
Apply clutch spline grease to the surface of the crankshaft that contacts the torque converter assembly centerpiece.
- Clutch Spline Grease:
Toyota Genuine Clutch Spline Grease or equivalent
- Maximum Grease Amount:
Approximately 1 g (0.0353 oz.)
|
|
Knock Pin |

|
Bolt |
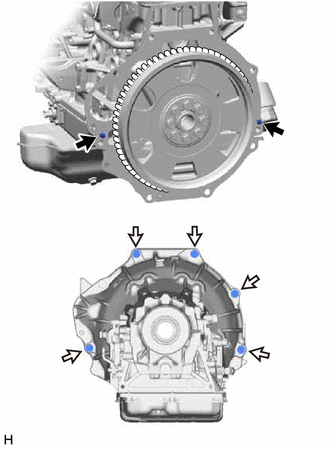
Confirm that the 2 knock pins are installed on the engine assembly and are not damaged.
While keeping the engine assembly and automatic transmission assembly horizontal, align the 2 knock pins with the holes in the automatic transmission assembly and install the 5 bolts.
- Torque:
- 71 N*m (724 kgf*cm, 52 ft.*lbf)
- NOTICE:
- ·
Do not use excessive force when installing the automatic transmission assembly.
·Check that the torque converter assembly rotates.
·Make sure that the wire harness or other similar items are not pinched between the contact surfaces.
·Make sure that the cooling fan and fan shroud do not contact the engine assembly when tilting the automatic transmission assembly.
82121
5.CONNECT ENGINE WIRE
Connect the engine wire and attach the 4 wire harness clamps to the 2 wire harness clamp brackets.

|
Push Up | - | - |
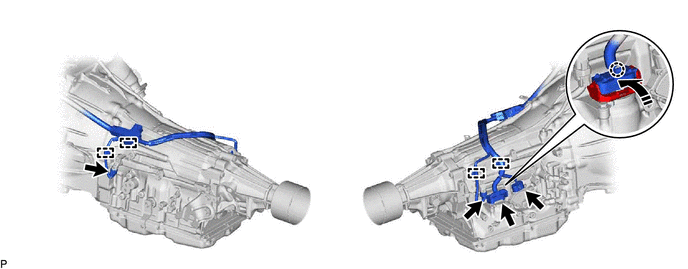
Connect the park/neutral position switch assembly connector, transmission wire connector and 2 transmission revolution sensor connectors.
- HINT:
-
Push up the lever until the claw of the transmission wire connector makes a connection sound.
82122A
6.CONNECT NO. 2 ENGINE WIRE
Attach the 3 clamps.
Install the bolt to the automatic transmission assembly.
- Torque:
- 13 N*m (133 kgf*cm, 10 ft.*lbf)
12380
7.INSTALL REAR ENGINE MOUNTING INSULATOR ASSEMBLY
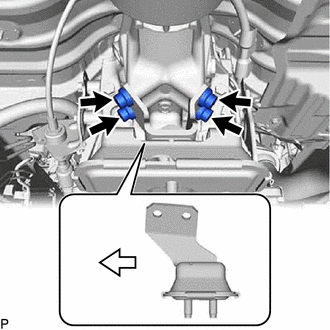
|
|
Front of the Vehicle |
Install the rear engine mounting insulator assembly to the automatic transmission assembly with the 4 bolts.
- Torque:
- 48 N*m (489 kgf*cm, 35 ft.*lbf)
57209B
8.INSTALL REAR ENGINE MOUNTING MEMBER SUB-ASSEMBLY
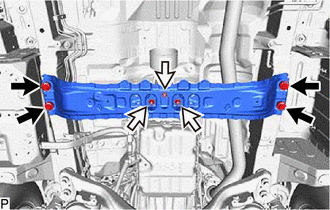
|
|
Bolt |
|
|
Nut |
Install the rear engine mounting member sub-assembly to the vehicle body with the 4 bolts.
- Torque:
- 80 N*m (816 kgf*cm, 59 ft.*lbf)
Install the 3 nuts to the rear engine mounting member sub-assembly.
- Torque:
- 48 N*m (489 kgf*cm, 35 ft.*lbf)
w/ Cover:
Install the step plate cover RH.
Click hereEngine / Hybrid System>1GD-FTV (ENGINE MECHANICAL)>ENGINE ASSEMBLY>INSTALLATION
9.INSTALL DRIVE PLATE AND TORQUE CONVERTER ASSEMBLY SETTING BOLT
Turn the crankshaft to gain access to the installation locations of the 6 drive plate and torque converter assembly setting bolts and install each bolt while holding the crankshaft pulley bolt with a wrench.
- Torque:
- 48 N*m (489 kgf*cm, 35 ft.*lbf)
- NOTICE:
-
Install the black colored bolt first, and then the remaining 5 silver colored bolts.
11356A
10.INSTALL NO. 2 REAR END PLATE
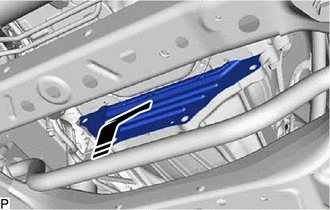
|
|
Install |
Install the No. 2 rear end plate to the automatic transmission assembly.
12584
11.INSTALL NO. 4 CYLINDER BLOCK INSULATOR
Install the No. 4 cylinder block insulator to the engine assembly.
33119B
12.INSTALL STIFFENER PLATE LH (ATM)
Temporarily install the stiffener plate LH (ATM) to the automatic transmission assembly and engine assembly with the 4 bolts.
Tighten the 4 bolts.
- Torque:
- 71 N*m (724 kgf*cm, 52 ft.*lbf)
33118B
13.INSTALL STIFFENER PLATE RH (ATM)
Temporarily install the stiffener plate RH (ATM) and wire harness clamp bracket to the automatic transmission assembly and engine assembly with the 4 bolts.
Tighten the 4 bolts.
- Torque:
- 71 N*m (724 kgf*cm, 52 ft.*lbf)
32921
14.CONNECT NO. 1 OIL COOLER INLET TUBE AND NO. 1 OIL COOLER OUTLET TUBE
3516A
15.INSTALL TRANSMISSION OIL PAN HEAT INSULATOR
Install the transmission oil pan heat insulator to the automatic transmission assembly with the 3 bolts.
- Torque:
- 21 N*m (214 kgf*cm, 15 ft.*lbf)
35979B
16.INSTALL TRANSMISSION INSULATOR RH
Install the transmission insulator RH to the automatic transmission assembly with the 3 bolts.
- Torque:
- 21 N*m (214 kgf*cm, 15 ft.*lbf)
33820B
17.CONNECT TRANSMISSION CONTROL CABLE ASSEMBLY
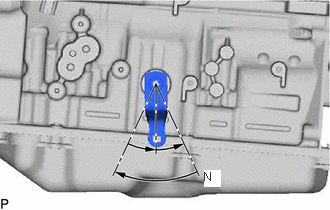
Turn the control shaft lever LH clockwise until it stops, and then return the control shaft lever counterclockwise 2 notches to N.
Move the shift lever to N, and with the cable end lightly pushed toward the front of the vehicle, connect the transmission control cable assembly to the transmission control shaft lever LH with the nut.
- Torque:
- 12 N*m (122 kgf*cm, 9 ft.*lbf)
- HINT:
-
Tighten the nut with no slack in the transmission control cable assembly.
Connect the transmission control cable assembly to the transmission control cable bracket with a new clip.
28100
18.INSTALL STARTER ASSEMBLY
for 2.0 kW Type:
Click hereEngine / Hybrid System>1GD-FTV (STARTING)>STARTER (for 2.0 kW Type)>INSTALLATION
for 3.0 kW Type:
Click hereEngine / Hybrid System>1GD-FTV (STARTING)>STARTER (for 3.0 kW Type)>INSTALLATION
w/ Stop and Start System:
Click hereEngine / Hybrid System>1GD-FTV (STARTING)>STARTER (w/ Stop And Start System)>INSTALLATION
17410
19.INSTALL FRONT EXHAUST PIPE ASSEMBLY
37100
20.INSTALL PROPELLER WITH CENTER BEARING SHAFT ASSEMBLY
for Standard Roof:
Click hereDrivetrain>DRIVE SHAFT / PROPELLER SHAFT>PROPELLER SHAFT ASSEMBLY (for Standard Roof)>INSTALLATION
for High Roof:
Click hereDrivetrain>DRIVE SHAFT / PROPELLER SHAFT>PROPELLER SHAFT ASSEMBLY (for High Roof)>INSTALLATION
21.ADD AUTOMATIC TRANSMISSION FLUID
22.CONNECT CABLE TO NEGATIVE BATTERY TERMINAL
23.INSPECT SHIFT LEVER POSITION
24.ADJUST AUTOMATIC TRANSMISSION FLUID
25.INSPECT FOR EXHAUST GAS LEAK
26.INSPECT FOR OIL LEAK
Start the engine. Make sure that there are no oil leaks from the areas that were worked on.
27. RESET MEMORY
- NOTICE:
-
If automatic transmission parts have been replaced, refer to the Parts Replacement Compensation Table to determine if any additional operations are necessary.