2GR-FKS ENGINE MECHANICAL CAMSHAFT INSTALLATION
PROCEDURE

 1.SET NO. 1 CYLINDER TO TDC (COMPRESSION)
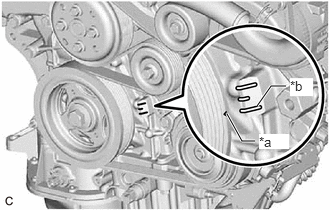
| *a | Timing Mark (Cutout) |
| *b | "0" Timing Mark |
Confirm that the timing mark (cutout) on the crankshaft pulley is aligned with the "0" timing mark of the timing chain cover assembly.
13050
2.SET CAMSHAFT TIMING GEAR ASSEMBLY (for Bank 2)
- HINT:
-
Perform Inspection After Repair after replacing the camshaft timing gear assembly.
-
Click hereEngine / Hybrid System>2GR-FKS (ENGINE CONTROL)>SFI SYSTEM>INITIALIZATION
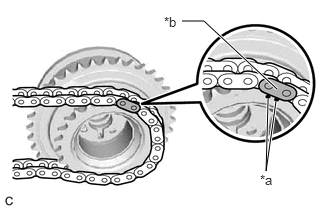
| *a | Timing Mark |
| *b | Mark Plate |
Align the mark plate (yellow) with the timing mark of the camshaft timing gear assembly as shown in the illustration and install the No. 2 chain sub-assembly to the camshaft timing gear assembly.
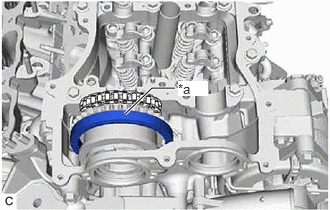
| *a | Place on camshaft timing gear |
Install the chain sub-assembly to the camshaft timing gear assembly, and then set the camshaft timing gear assembly to the camshaft housing sub-assembly.
- HINT:
- ·
Place the chain sub-assembly on the camshaft timing gear assembly but do not engage the teeth of the sprocket and the chain sub-assembly.
·Be sure to install the camshaft timing gear assembly with the timing mark facing upward.
13070A
3.SET CAMSHAFT TIMING EXHAUST GEAR ASSEMBLY (for Bank 2)
- HINT:
-
Perform Inspection After Repair after replacing the camshaft timing exhaust gear assembly.
-
Click hereEngine / Hybrid System>2GR-FKS (ENGINE CONTROL)>SFI SYSTEM>INITIALIZATION
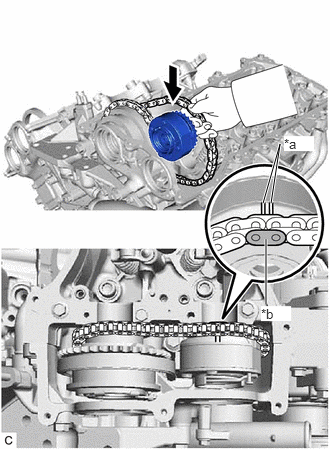
| *a | Timing Mark |
| *b | Mark Plate |
Align the mark plate (yellow) with the timing mark of the camshaft timing exhaust gear assembly as shown in the illustration and install the No. 2 chain sub-assembly to the camshaft timing exhaust gear assembly.
Set the camshaft timing exhaust gear assembly to the camshaft housing sub-assembly LH.
13560A
4.SET NO. 3 CHAIN TENSIONER ASSEMBLY
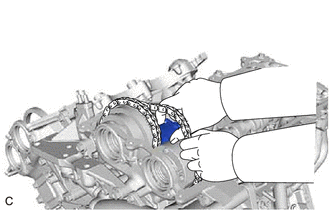
While lifting up the camshaft timing exhaust gear assembly, pass the No. 3 chain tensioner assembly through the No. 2 chain sub-assembly and set it in place.
- NOTICE:
-
Temporarily set the No. 3 chain tensioner assembly only, do not install the bolt.
13053
5.INSTALL NO. 3 CAMSHAFT SUB-ASSEMBLY
- HINT:
-
Perform Inspection After Repair after replacing the No. 3 camshaft sub-assembly.
-
Click hereEngine / Hybrid System>2GR-FKS (ENGINE CONTROL)>SFI SYSTEM>INITIALIZATION
Clean the camshaft housing sub-assembly LH and No. 3 camshaft sub-assembly journals and apply engine oil to them.
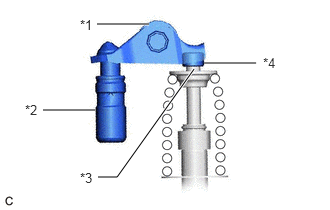
| *1 | No. 1 Valve Rocker Arm Sub-assembly |
| *2 | Valve Lash Adjuster Assembly |
| *3 | Valve Stem |
| *4 | Valve Stem Cap |
Make sure that the No. 1 valve rocker arm sub-assembly is installed as shown in the illustration.
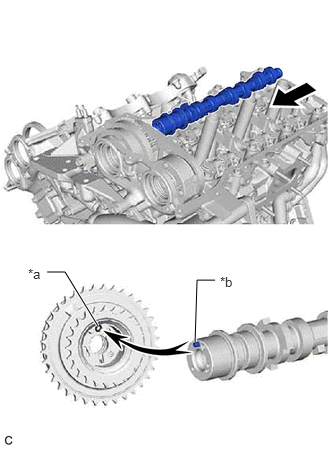
| *a | Pin Hole |
| *b | Straight Pin |
Align the straight pin of the No. 3 camshaft sub-assembly and the pin hole of the camshaft timing gear assembly, and install the No. 3 camshaft sub-assembly to the camshaft timing gear assembly.
- NOTICE:
-
Be careful not to damage the contact surface of the camshaft timing gear assembly with the straight pin of the No. 3 camshaft sub-assembly.
Check that there is no clearance between the camshaft timing gear assembly and No. 3 camshaft sub-assembly flange.
13054
6.INSTALL NO. 4 CAMSHAFT SUB-ASSEMBLY
- HINT:
-
Perform Inspection After Repair after replacing the No. 4 camshaft sub-assembly.
-
Click hereEngine / Hybrid System>2GR-FKS (ENGINE CONTROL)>SFI SYSTEM>INITIALIZATION
Clean the camshaft housing sub-assembly LH and No. 4 camshaft sub-assembly journals and apply engine oil to them.
| *1 | No. 1 Valve Rocker Arm Sub-assembly |
| *2 | Valve Lash Adjuster Assembly |
| *3 | Valve Stem |
| *4 | Valve Stem Cap |
Make sure that the No. 1 valve rocker arm sub-assembly is installed as shown in the illustration.
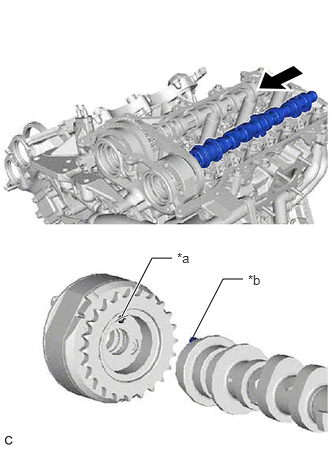
| *a | Pin Hole |
| *b | Straight Pin |
Align the straight pin of the No. 4 camshaft sub-assembly and the pin hole of the camshaft timing exhaust gear assembly, and install the No. 4 camshaft sub-assembly to the camshaft timing exhaust gear assembly.
- NOTICE:
-
Be careful not to damage the contact surface of the camshaft timing exhaust gear assembly with the straight pin of the No. 4 camshaft sub-assembly.
Check that there is no clearance between the camshaft timing gear assembly and No. 4 camshaft sub-assembly flange.
7.SET CAMSHAFT BEARING CAP (for Bank 2)
Clean the camshaft bearing caps and apply engine oil to them.
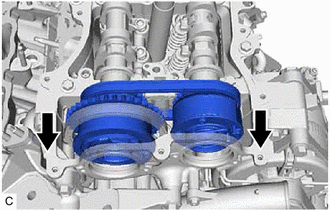
Slide the camshaft timing gear assembly and camshaft timing exhaust gear assembly as shown in the illustration.
- HINT:
-
To ensure there is sufficient space for installing the No. 3 camshaft bearing cap and No. 4 camshaft bearing cap, slide the camshaft timing gear assembly and camshaft timing exhaust gear assembly.
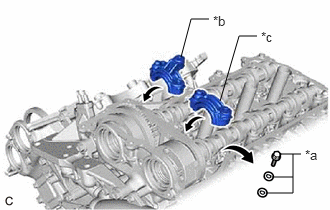
| *a | Replacement Bolt and Washer |
| *b | No. 3 Camshaft Bearing Cap |
| *c | No. 4 Camshaft Bearing Cap |
Remove the replacement bolts and washers (No. 3 camshaft bearing cap and No. 4 camshaft bearing cap side).
- NOTICE:
-
Do not remove any of the replacement bolts and washers other than those on the No. 3 camshaft bearing cap and No. 4 camshaft bearing cap side.
Temporarily set the No. 3 camshaft bearing cap and No. 4 camshaft bearing cap.
- NOTICE:
- ·
Do not install the bolts of the No. 3 camshaft bearing cap and No. 4 camshaft bearing cap.
·Do not install any camshaft bearing caps other than the No. 3 camshaft bearing cap and No. 4 camshaft bearing cap.
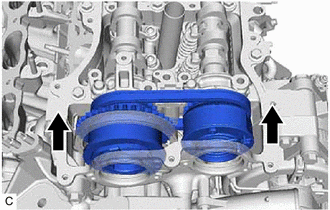
Slide the camshaft timing gear assembly and camshaft timing exhaust gear assembly as shown in the illustration.
- NOTICE:
-
Securely insert the straight pins of the No. 3 camshaft sub-assembly and No. 4 camshaft sub-assembly into the pin holes of the camshaft timing gear assembly and camshaft timing exhaust gear assembly.
8.TEMPORARILY INSTALL CAMSHAFT TIMING GEAR BOLT (for Intake Side of Bank 2)
Check that there is no clearance between the camshaft timing gear assembly and No. 3 camshaft sub-assembly flange.
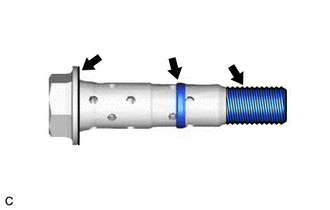
Apply engine oil to the areas of the camshaft timing gear bolt shown in the illustration.
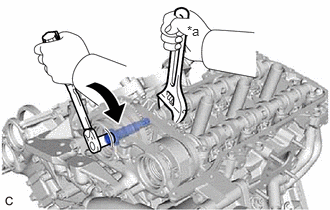
| *a | Hold |

|
Turn |
Use a wrench to hold the hexagonal portion of the No. 3 camshaft sub-assembly.
Temporarily install the camshaft timing gear bolt to the camshaft timing gear assembly.
- Torque:
- 10 N*m (102 kgf*cm, 7 ft.*lbf)
- NOTICE:
- ·
Installing the camshaft timing gear bolt while there is external force applied to the camshaft timing gear assembly could result in damage to the engine, so make sure that the camshaft bearing cap is not installed when temporarily installing the camshaft timing gear bolt.
·Be careful not to damage the No. 3 camshaft sub-assembly, camshaft housing sub-assembly LH or spark plug tube with the wrench.
·Make sure that the flange part of the camshaft timing gear bolt is directly contacting the camshaft timing gear assembly.
9.TEMPORARILY INSTALL CAMSHAFT TIMING GEAR BOLT (for Exhaust Side of Bank 2)
Check that there is no clearance between the camshaft timing exhaust gear assembly and No. 4 camshaft sub-assembly flange.
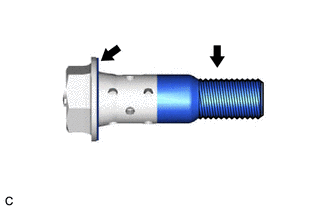
Apply engine oil to the areas of the camshaft timing gear bolt shown in the illustration.
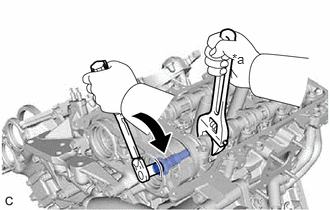
| *a | Hold |
|
|
Turn |
Use a wrench to hold the hexagonal portion of the No. 4 camshaft sub-assembly.
Temporarily install the camshaft timing gear bolt.
- Torque:
- 10 N*m (102 kgf*cm, 7 ft.*lbf)
- NOTICE:
- ·
Installing the camshaft timing gear bolt while there is external force applied to the camshaft timing exhaust gear assembly could result in damage to the engine, so make sure that the camshaft bearing cap is not installed when temporarily installing the camshaft timing gear bolt.
·Be careful not to damage the No. 4 camshaft sub-assembly, camshaft housing sub-assembly LH or spark plug tube with the wrench.
·Make sure that the flange part of the camshaft timing gear bolt is directly contacting the camshaft timing exhaust gear assembly.
10.INSTALL CAMSHAFT BEARING CAP (for Bank 2)
Clean the camshaft bearing caps and apply engine oil to them.
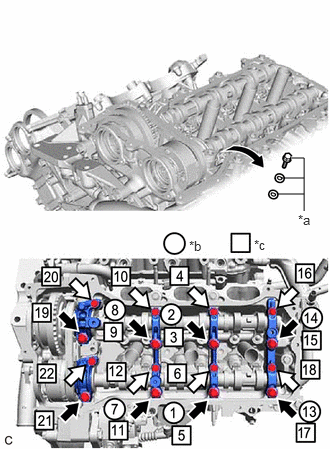
| *a | Replacement Bolt and Washer |
| *b | Replacement Bolt and Washer Removal |
| *c | Part Installation |
|
|
Bolt (A) |

|
Bolt (B) |
Check the marks and numbers on the camshaft bearing caps, and then remove the replacement bolts and washers in the order shown in the illustration. Immediately after removing the replacement bolts and washers in the location for a camshaft bearing cap, install the camshaft bearing cap with the bolts in the order shown in the illustration.
- Torque:
- Bolt (A) : 28 N*m (286 kgf*cm, 21 ft.*lbf)
- Bolt (B) : 16 N*m (163 kgf*cm, 12 ft.*lbf)
- NOTICE:
- ·
Be sure to follow the numerical order when performing this procedure.
·Do not drop replacement bolts and washers into the cylinder head LH.
Check the torque of each bolt again.
11.TIGHTEN CAMSHAFT TIMING GEAR BOLT (for Intake Side of Bank 2)
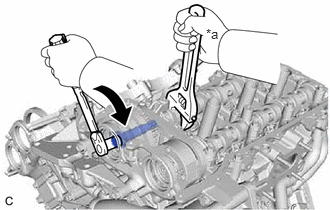
| *a | Hold |
|
|
Turn |
Use a wrench to hold the hexagonal portion of the No. 3 camshaft sub-assembly.
Tighten the camshaft timing gear bolt.
- Torque:
- 95 N*m (969 kgf*cm, 70 ft.*lbf)
- NOTICE:
-
Be careful not to damage the No. 3 camshaft sub-assembly, camshaft housing sub-assembly LH or spark plug tube with the wrench.
12.TIGHTEN CAMSHAFT TIMING GEAR BOLT (for Exhaust Side of Bank 2)
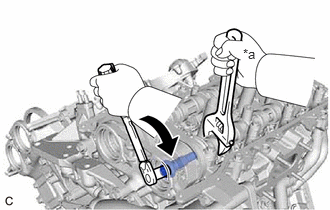
| *a | Hold |
|
|
Turn |
Use a wrench to hold the hexagonal portion of the No. 4 camshaft sub-assembly.
Tighten the camshaft timing gear bolt.
- Torque:
- 95 N*m (969 kgf*cm, 70 ft.*lbf)
- NOTICE:
-
Be careful not to damage the No. 4 camshaft sub-assembly, camshaft housing sub-assembly LH or spark plug tube with the wrench.
13560A
13.INSTALL NO. 3 CHAIN TENSIONER ASSEMBLY
Install the No. 3 chain tensioner assembly with the bolt.
Tighten the bolt.
- Torque:
- 21 N*m (214 kgf*cm, 15 ft.*lbf)
13506
14.CONNECT CHAIN SUB-ASSEMBLY (for Bank 2)
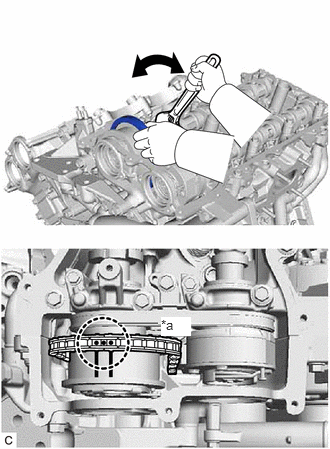
| *a | Paint Mark |
Align the paint marks on the camshaft timing gear assembly and chain sub-assembly and install the chain sub-assembly to the camshaft timing gear assembly.
- HINT:
-
If the paint marks are not aligned, align them by turning the No. 3 camshaft sub-assembly slightly.
13050
15.SET CAMSHAFT TIMING GEAR ASSEMBLY (for Bank 1)
- HINT:
-
Perform Inspection After Repair after replacing camshaft timing gear assembly.
-
Click hereEngine / Hybrid System>2GR-FKS (ENGINE CONTROL)>SFI SYSTEM>INITIALIZATION
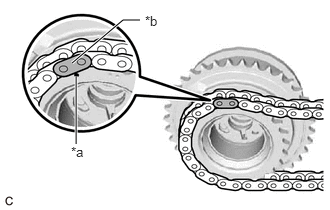
| *a | Timing Mark |
| *b | Mark Plate |
Align the mark plate (yellow) with the timing mark of the camshaft timing gear assembly as shown in the illustration and install the No. 2 chain sub-assembly to the camshaft timing gear assembly.
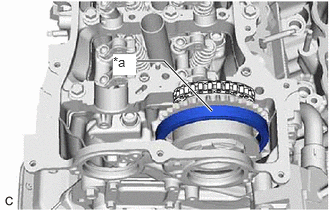
| *a | Place on camshaft timing gear |
Install the chain sub-assembly to the camshaft timing gear assembly, and then set the camshaft timing gear assembly to the camshaft housing sub-assembly.
- HINT:
- ·
Place the chain sub-assembly on the camshaft timing gear assembly but do not engage the teeth of the sprocket and the chain sub-assembly.
·Be sure to install the camshaft timing gear assembly with the timing mark facing upward.
13070A
16.SET CAMSHAFT TIMING EXHAUST GEAR ASSEMBLY (for Bank 1)
- HINT:
-
Perform Inspection After Repair after replacing the camshaft timing exhaust gear assembly.
-
Click hereEngine / Hybrid System>2GR-FKS (ENGINE CONTROL)>SFI SYSTEM>INITIALIZATION
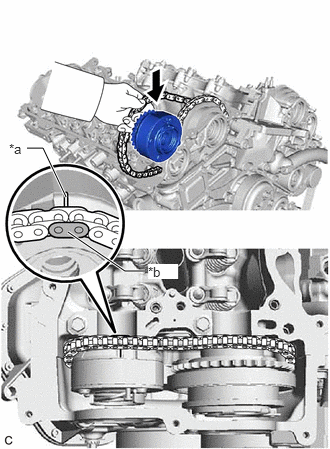
| *a | Timing Mark |
| *b | Mark Plate |
Align the mark plate (yellow) with the timing mark of the camshaft timing exhaust gear assembly as shown in the illustration and install the No. 2 chain sub-assembly to the camshaft timing exhaust gear assembly.
Set the camshaft timing exhaust gear assembly to the camshaft housing sub-assembly.
13550
17.SET NO. 2 CHAIN TENSIONER ASSEMBLY
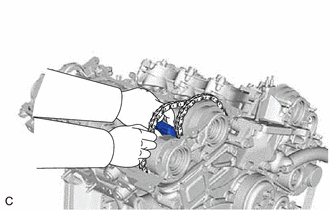
While lifting up the camshaft timing exhaust gear assembly, pass the No. 2 chain tensioner assembly through the No. 2 chain sub-assembly and set it in place.
- NOTICE:
-
Temporarily set the No. 2 chain tensioner assembly only, do not install the bolt.
13511
18.INSTALL CAMSHAFT
- HINT:
-
Perform Inspection After Repair after replacing the camshaft.
-
Click hereEngine / Hybrid System>2GR-FKS (ENGINE CONTROL)>SFI SYSTEM>INITIALIZATION
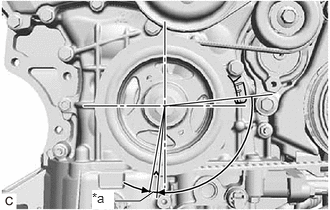
| *a | 5 to 10° |
Turn the crankshaft clockwise until it is in the position shown in the illustration so that the chain sub-assembly can be installed easily.
- HINT:
-
When turning the crankshaft, engine oil may spray out of the oil holes.
Clean the camshaft housing sub-assembly and camshaft journals and apply engine oil to them.
| *1 | No. 1 Valve Rocker Arm Sub-assembly |
| *2 | Valve Lash Adjuster Assembly |
| *3 | Valve Stem |
| *4 | Valve Stem Cap |
Make sure that the No. 1 valve rocker arm sub-assembly is installed as shown in the illustration.
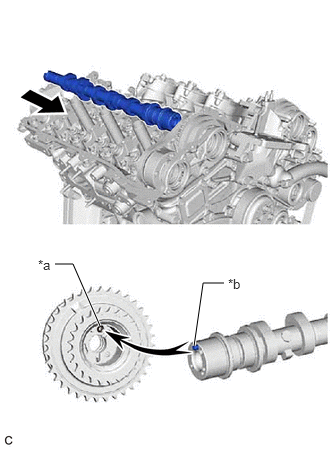
| *a | Pin Hole |
| *b | Straight Pin |
Align the straight pin of the camshaft and the pin hole of the camshaft timing gear assembly, and install the camshaft to the camshaft timing gear assembly.
- NOTICE:
-
Be careful not to damage the contact surface of the camshaft timing gear assembly with the straight pin of the camshaft.
Check that there is no clearance between the camshaft timing gear assembly and camshaft flange.
13512
19.INSTALL NO. 2 CAMSHAFT
- HINT:
-
Perform Inspection After Repair after replacing the No. 2 camshaft.
-
Click hereEngine / Hybrid System>2GR-FKS (ENGINE CONTROL)>SFI SYSTEM>INITIALIZATION
Clean the camshaft housing sub-assembly and No. 2 camshaft journals and apply engine oil to them.
| *1 | No. 1 Valve Rocker Arm Sub-assembly |
| *2 | Valve Lash Adjuster Assembly |
| *3 | Valve Stem |
| *4 | Valve Stem Cap |
Make sure that the No. 1 valve rocker arm sub-assembly is installed as shown in the illustration.
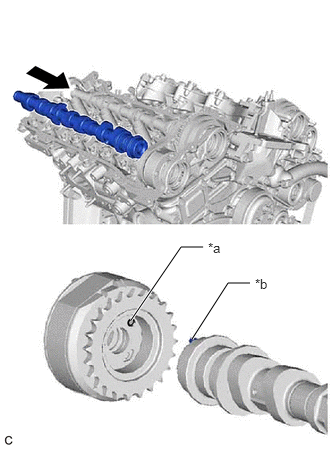
| *a | Pin Hole |
| *b | Straight Pin |
Align the straight pin of the No. 2 camshaft and the pin hole of the camshaft timing exhaust gear assembly, and install the No. 2 camshaft to the camshaft timing exhaust gear assembly.
- NOTICE:
-
Be careful not to damage the contact surface of the camshaft timing exhaust gear assembly with the straight pin of the No. 2 camshaft.
Check that there is no clearance between the camshaft timing gear assembly flange and No. 2 camshaft.
20.SET CAMSHAFT BEARING CAP (for Bank 1)
Clean the camshaft bearing caps and apply engine oil to them.
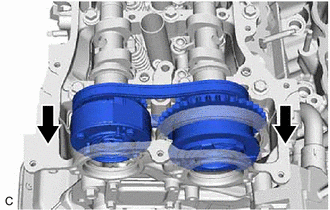
Slide the camshaft timing gear assembly and camshaft timing exhaust gear assembly as shown in the illustration.
- HINT:
-
To ensure there is sufficient space for installing the No. 1 camshaft bearing cap and No. 2 camshaft bearing cap, slide the camshaft timing gear assembly and camshaft timing exhaust gear assembly.
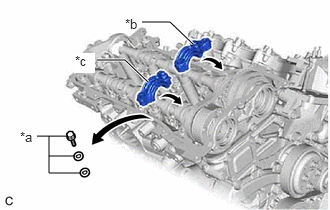
| *a | Replacement Bolt and Washer |
| *b | No. 1 Camshaft Bearing Cap |
| *c | No. 2 Camshaft Bearing Cap |
Remove the replacement bolts and washers (No. 1 camshaft bearing and No. 2 camshaft bearing cap side).
- NOTICE:
-
Do not remove any of the replacement bolts and washers other than those on the No. 1 camshaft bearing cap and No. 2 camshaft bearing cap side.
Temporarily set the No. 1 camshaft bearing cap and No. 2 camshaft bearing cap.
- NOTICE:
- ·
Do not install the bolts of the No. 1 camshaft bearing cap and No. 2 camshaft bearing cap.
·Do not install any camshaft bearing caps other than the No. 1 camshaft bearing cap and No. 2 camshaft bearing cap.
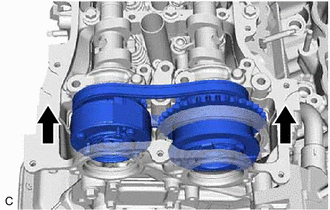
Slide the camshaft timing gear assembly and camshaft timing exhaust gear assembly as shown in the illustration.
- NOTICE:
-
Securely insert the straight pins of the No. 1 camshaft and No. 2 camshaft into the pin holes of the camshaft timing gear assembly and camshaft timing exhaust gear assembly.
21.TEMPORARILY INSTALL CAMSHAFT TIMING GEAR BOLT (for Intake Side of Bank 1)
Check that there is no clearance between the camshaft timing gear assembly and camshaft flange.
Apply engine oil to the areas of the camshaft timing gear bolt shown in the illustration.
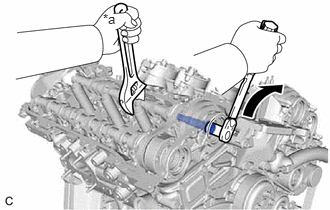
| *a | Hold |
|
|
Turn |
Use a wrench to hold the hexagonal portion of the camshaft.
Temporarily install the camshaft timing gear bolt.
- Torque:
- 10 N*m (102 kgf*cm, 7 ft.*lbf)
- NOTICE:
- ·
Installing the camshaft timing gear bolt while there is external force applied to the camshaft timing gear assembly could result in damage to the engine, so make sure that the camshaft bearing cap is not installed when temporarily installing the camshaft timing gear bolt.
·Be careful not to damage the camshaft, camshaft housing sub-assembly or spark plug tube with the wrench.
·Make sure that the flange part of the camshaft timing gear bolt is directly contacting the camshaft timing gear assembly.
22.TEMPORARILY INSTALL CAMSHAFT TIMING GEAR BOLT (for Exhaust Side of Bank 1)
Check that there is no clearance between the camshaft timing exhaust gear assembly and No. 2 camshaft flange.
Apply engine oil to the areas of the camshaft timing gear bolt shown in the illustration.
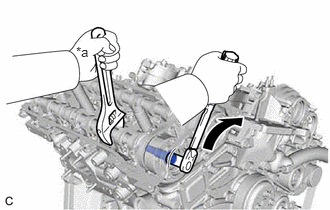
| *a | Hold |
|
|
Turn |
Use a wrench to hold the hexagonal portion of the No. 2 camshaft.
Temporarily install the camshaft timing gear bolt.
- Torque:
- 10 N*m (102 kgf*cm, 7 ft.*lbf)
- NOTICE:
- ·
Installing the camshaft timing gear bolt while there is external force applied to the camshaft timing exhaust gear assembly could result in damage to the engine, so make sure that the camshaft bearing cap is not installed when temporarily installing the camshaft timing gear bolt.
·Be careful not to damage the No. 2 camshaft, camshaft housing sub-assembly or spark plug tube with the wrench.
·Make sure that the flange part of the camshaft timing gear bolt is directly contacting the camshaft timing exhaust gear assembly.
23.INSTALL CAMSHAFT BEARING CAP (for Bank 1)
Clean the camshaft bearing caps and apply engine oil to them.
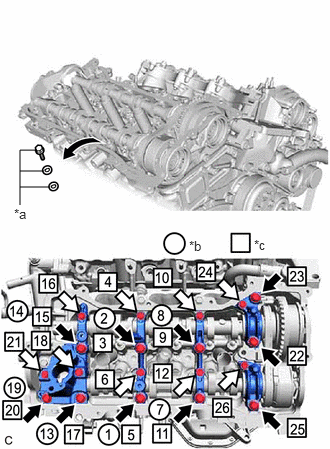
| *a | Replacement Bolt and Washer |
| *b | Replacement Bolt and Washer Removal |
| *c | Part Installation |
|
|
Bolt (A) |
|
|
Bolt (B) |

|
Bolt (C) |
Check the marks and numbers on the camshaft bearing caps, and then remove the replacement bolts and washers in the order shown in the illustration. Immediately after removing the replacement bolts and washers in the location for a camshaft bearing cap, install the camshaft bearing cap with the bolts in the order shown in the illustration.
- Torque:
- Bolt (A) : 28 N*m (286 kgf*cm, 21 ft.*lbf)
- Bolt (B), (C) : 16 N*m (163 kgf*cm, 12 ft.*lbf)
- NOTICE:
- ·
Be sure to follow the numerical order when performing this procedure.
·Do not drop replacement bolts and washers into the cylinder head sub-assembly.
Check the torque of each bolt again.
24.TIGHTEN CAMSHAFT TIMING GEAR BOLT (for Intake Side of Bank 1)
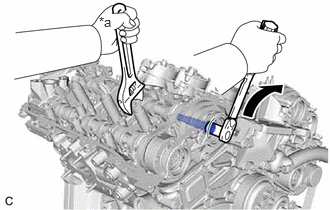
| *a | Hold |
|
|
Turn |
Use a wrench to hold the hexagonal portion of the camshaft.
Tighten the camshaft timing gear bolt.
- Torque:
- 95 N*m (969 kgf*cm, 70 ft.*lbf)
- NOTICE:
-
Be careful not to damage the camshaft, camshaft housing sub-assembly or spark plug tube with the wrench.
25.TIGHTEN CAMSHAFT TIMING GEAR BOLT (for Exhaust Side of Bank 1)
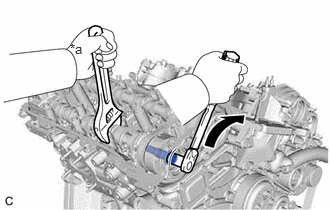
| *a | Hold |
|
|
Turn |
Use a wrench to hold the hexagonal portion of the No. 2 camshaft.
Tighten the camshaft timing gear bolt.
- Torque:
- 95 N*m (969 kgf*cm, 70 ft.*lbf)
- NOTICE:
-
Be careful not to damage the No. 2 camshaft, camshaft housing sub-assembly or spark plug tube with the wrench.
13550
26.INSTALL NO. 2 CHAIN TENSIONER ASSEMBLY
Install the No. 2 chain tensioner assembly with the bolt.
Tighten the bolt.
- Torque:
- 21 N*m (214 kgf*cm, 15 ft.*lbf)
13506
27.CONNECT CHAIN SUB-ASSEMBLY (for Bank 1)
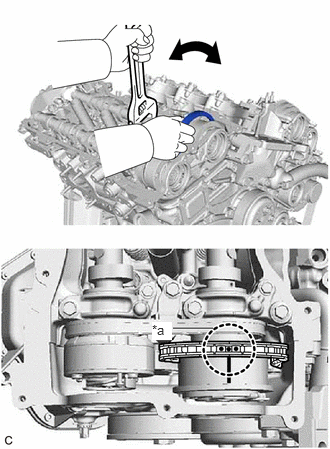
| *a | Paint Mark |
Align the paint marks on the camshaft timing gear assembly and chain sub-assembly and install the chain sub-assembly to the camshaft timing gear assembly.
- HINT:
-
If the paint marks are not aligned, align them by turning the camshaft slightly.
13540
28.INSTALL NO. 1 CHAIN TENSIONER ASSEMBLY
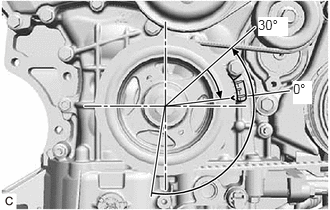
Turn the crankshaft counterclockwise 30° past the "0" timing mark, and then turn it clockwise to align the notch with the "0" timing mark.
Turn the crankshaft slightly to eliminate the slack in the chain sub-assembly.
- HINT:
-
Make sure there is some slack in the chain sub-assembly around the area where the No. 1 chain tensioner assembly is installed.
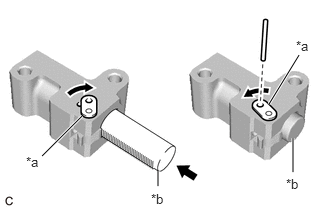
| *a | Stopper Plate |
| *b | Plunger |
Turn the stopper plate clockwise to release the lock, and push the plunger deep into the No. 1 chain tensioner assembly.
Turn the stopper plate counterclockwise to set the lock, and insert a 1.0 mm (0.0394 in.) diameter pin into the hole of the stopper plate.
Install the No. 1 chain tensioner assembly with the 2 bolts.
- Torque:
- 10 N*m (102 kgf*cm, 7 ft.*lbf)
Remove the 1.0 mm (0.0394 in.) diameter pin from the No. 1 chain tensioner assembly.
29.INSPECT VALVE TIMING
Check the camshaft timing marks.
- NOTICE:
- ·
Check each timing mark from a viewpoint directly in line with the center of the camshaft and the timing mark on each camshaft timing gear assembly and each camshaft timing exhaust gear assembly.
·If the timing marks are checked from any other viewpoint, the valve timing may appear misaligned.
Check that each camshaft timing mark is positioned as shown in the illustration.
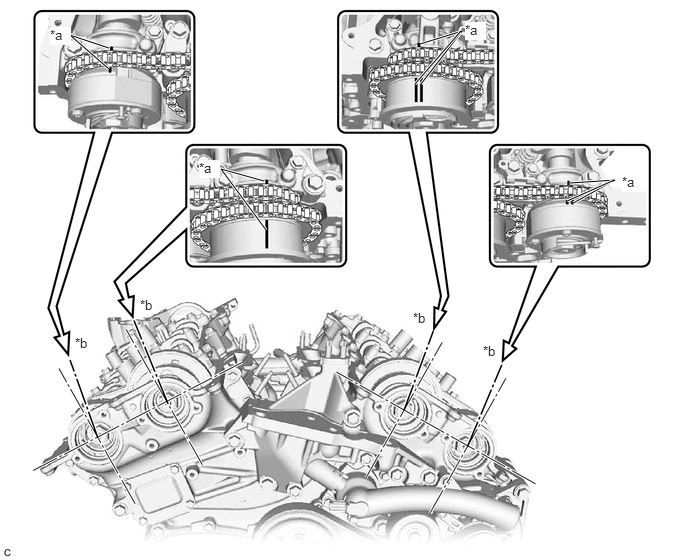
| *a | Timing Mark | *b | Viewpoint |
- HINT:
-
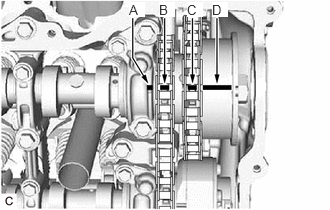 1.344,0.021 1.51,0.177 0.167,0.156 10 true A 1.656,0.021 1.823,0.177 0.167,0.156 10 true B 1.948,0.021 2.115,0.177 0.167,0.156 10 true C 2.208,0.021 2.375,0.177 0.167,0.156 10 true D
-
For the camshaft or No. 3 camshaft sub-assembly:
-
Be sure to check mark (A) at the point where marks (B), (C) and (D) are positioned in line. If the marks are checked from any other viewpoint, they cannot be checked correctly.
If the valve timing is misaligned, reinstall the chain sub-assembly.
Turn the crankshaft 2 revolutions, set the No. 1 cylinder to TDC/compression and check the timing marks again.
11324
30.INSTALL TIMING CHAIN COVER PLATE
11193
31.INSTALL SPARK PLUG TUBE GASKET
11202
32.INSTALL CYLINDER HEAD COVER SUB-ASSEMBLY LH
11201
33.INSTALL CYLINDER HEAD COVER SUB-ASSEMBLY
15370
34.INSTALL CAMSHAFT TIMING OIL CONTROL SOLENOID ASSEMBLY (for Intake Side of Bank 2)
15370
35.INSTALL CAMSHAFT TIMING OIL CONTROL SOLENOID ASSEMBLY (for Exhaust Side of Bank 2)
15370
36.INSTALL CAMSHAFT TIMING OIL CONTROL SOLENOID ASSEMBLY (for Exhaust Side of Bank 1)
15370
37.INSTALL CAMSHAFT TIMING OIL CONTROL SOLENOID ASSEMBLY (for Intake Side of Bank 1)
16587
38.INSTALL RADIATOR PIPE CLAMP
39.INSTALL WIRE HARNESS CLAMP BRACKET
11452
40.INSTALL ENGINE OIL LEVEL DIPSTICK GUIDE
29300
41.INSTALL VACUUM PUMP ASSEMBLY
19500
42.INSTALL IGNITION COIL ASSEMBLY
43.INSTALL ENGINE HANGERS
44.REMOVE ENGINE ASSEMBLY FROM ENGINE STAND