U760E AUTOMATIC TRANSMISSION / TRANSAXLE AUTOMATIC TRANSAXLE ASSEMBLY(When Using the Engine Support Bridge) REMOVAL
CAUTION / NOTICE / HINT
- CAUTION:
-
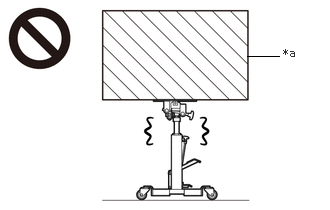 2.573,0.583 2.906,0.583 false 2.948,0.479 3.26,0.677 0.313,0.198 10 false *a
*a Object Exceeding Weight Limit of Transmission Jack
-
The automatic transaxle assembly is very heavy. Be sure to follow the procedure described in the repair manual, or the transmission jack may suddenly drop.
- NOTICE:
-
If automatic transaxle parts are replaced, refer to Parts Replacement Compensation Table to determine if any additional operations are necessary.
-
Click hereDrivetrain>U760E AUTOMATIC TRANSMISSION / TRANSAXLE>AUTOMATIC TRANSAXLE SYSTEM>PRECAUTION
PROCEDURE

 1. PRECAUTION
- NOTICE:
-
After turning the ignition switch off, waiting time may be required before disconnecting the cable from the negative (-) battery terminal. Therefore, make sure to read the disconnecting the cable from the negative (-) battery terminal notices before proceeding with work.
-
Click hereGeneral>INTRODUCTION>REPAIR INSTRUCTION>PRECAUTION
2. ALIGN FRONT WHEELS FACING STRAIGHT AHEAD
3. SECURE STEERING WHEEL
4.DISCONNECT CABLE FROM NEGATIVE BATTERY TERMINAL
- NOTICE:
-
When disconnecting the cable, some systems need to be initialized after the cable is reconnected.
-
Click hereGeneral>INTRODUCTION>REPAIR INSTRUCTION>INITIALIZATION
5.REMOVE FRONT WHEELS
6.REMOVE WINDSHIELD WIPER MOTOR AND LINK ASSEMBLY
7.REMOVE OUTER COWL TOP PANEL SUB-ASSEMBLY
28100
8.REMOVE STARTER ASSEMBLY
47220D
9.SEPARATE BRAKE MASTER CYLINDER RESERVOIR ASSEMBLY
51441
10.REMOVE NO. 1 ENGINE UNDER COVER
51442
11.REMOVE NO. 2 ENGINE UNDER COVER
58166
12.REMOVE FRONT FLOOR COVER LH
53876A
13.SEPARATE FRONT FENDER LINER LH
53875A
14.SEPARATE FRONT FENDER LINER RH
53737B
15.REMOVE FRONT FENDER APRON SEAL LH
53736
16.REMOVE FRONT FENDER APRON SEAL RH
45220
17.SEPARATE STEERING INTERMEDIATE SHAFT ASSEMBLY
18.REMOVE FRONT DRIVE SHAFT ASSEMBLY
17410
19.REMOVE FRONT EXHAUST PIPE ASSEMBLY
12361
20.SEPARATE FRONT ENGINE MOUNTING INSULATOR
12372A
21.SEPARATE ENGINE MOUNTING INSULATOR LH
12362
22.SEPARATE ENGINE MOUNTING INSULATOR RH
23.DISCONNECT WIRE HARNESS
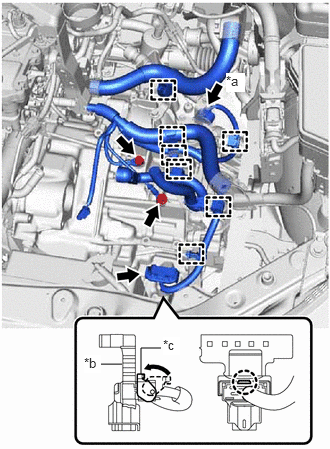
| *a | Park/Neutral Position Switch Assembly Connector |
| *b | Wiring Harness Connector |
| *c | Lever |
Disconnect the park/neutral position switch assembly connector.
Disengage the claw, rotate the lever and disconnect the connector of the wiring harness connector.
Remove the 2 bolts and disengage the 7 clamps to disconnect the wire harness from the automatic transaxle assembly.
32941
24.DISCONNECT INLET NO. 1 OIL COOLER HOSE
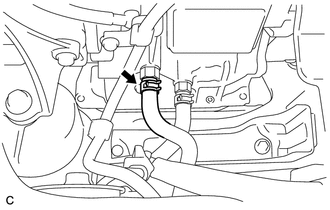
Slide the clip and disconnect the inlet No. 1 oil cooler hose from the automatic transaxle assembly.
32942
25.DISCONNECT OUTLET NO. 1 OIL COOLER HOSE
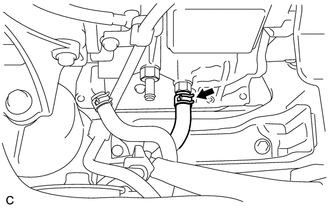
Slide the clip and disconnect the outlet No. 1 oil cooler hose from the automatic transaxle assembly.
12327A
26.REMOVE NO. 2 ENGINE MOUNTING STAY RH
27.INSTALL ENGINE HANGERS
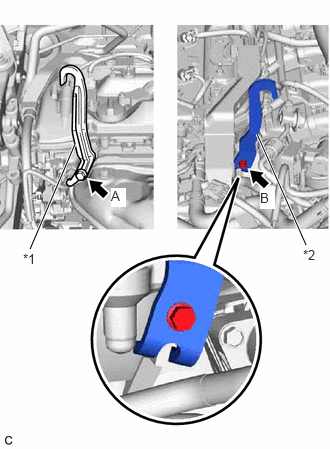
| *1 | No. 1 Engine Hanger |
| *2 | No. 2 Engine Hanger |
Install the No. 1 engine hanger and No. 2 engine hanger with the 2 bolts as shown in the illustration.
| Item | Part No. |
|---|---|
| No. 1 Engine Hanger | 12281-36020 |
| No. 2 Engine Hanger | 12282-36021 |
| Bolt (A) | 91552-81040 |
| Bolt (B) | 91552-81025 |
- Torque:
- 43 N*m (438 kgf*cm, 32 ft.*lbf)
28.INSTALL ENGINE SUPPORT BRIDGE
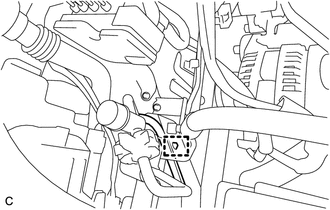
Disengage the wire harness clamp.
Install SST to the vehicle body as shown in the illustration.
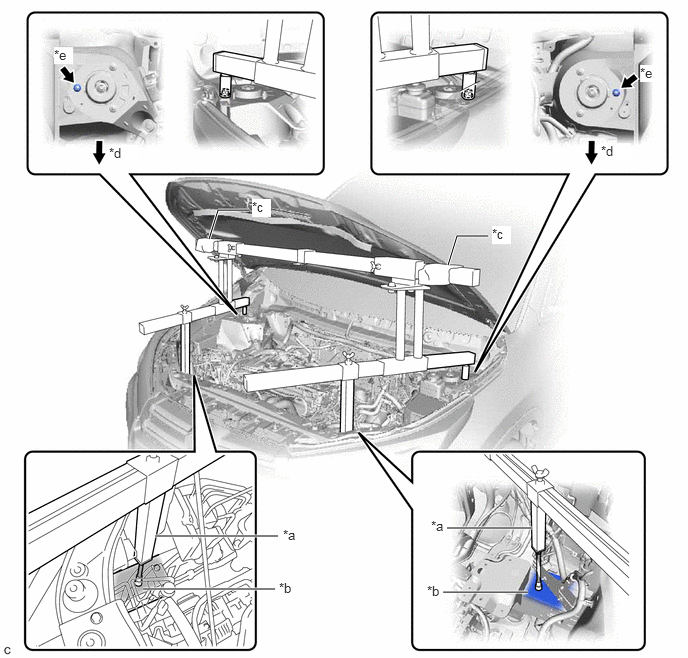
| *a | Support Shaft | *b | Front Side Member |
| *c | Cloth | *d | Front Side |
| *e | Front Suspension Nut | - | - |
- SST
- 09940-10020
- CAUTION:
- ·
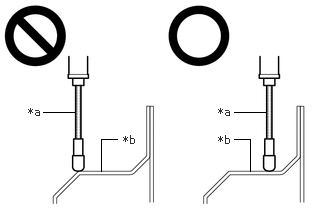 0.448,1.167 0.781,1.167 false 2.438,1.167 2.771,1.167 false 1.052,1.781 1.052,1.448 1.052,1.448 1.219,1.448 false 2.604,1.781 2.604,1.448 2.604,1.448 2.438,1.448 false 0.292,1.094 0.604,1.25 0.313,0.156 10 false *a 2.271,1.094 2.583,1.25 0.313,0.156 10 false *a 1.281,1.385 1.594,1.542 0.313,0.156 10 false *b 2.271,1.385 2.583,1.542 0.313,0.156 10 false *b
*a Support Shaft *b Front Side Member
Make sure that no oil or grease is on the front side member, and set the support shaft on the level surface of the front side member.
·The engine support bridge may fall off if there is any oil or grease on the front side member or it is installed on the unlevel surface.
- NOTICE:
- ·
Prevent SST from contacting the vehicle body exterior and windshield glass.
·To prevent damage to the engine hood, place pieces of cloth between the engine hood and SST.
·Lightly shake SST by hand to make sure it is securely installed before performing work.
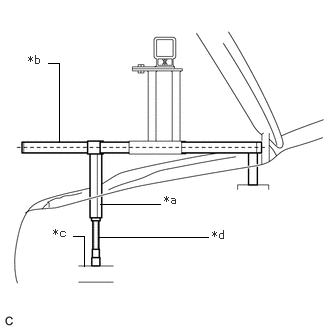
| *a | Support Shaft |
| *b | Sub Beam |
| *c | Front Side Member |
| *d | Threaded Portion |
Turn the threaded portion of each support shaft to adjust its height until the sub beams are parallel to the ground.
Install the chain block assembly to the sling bracket.
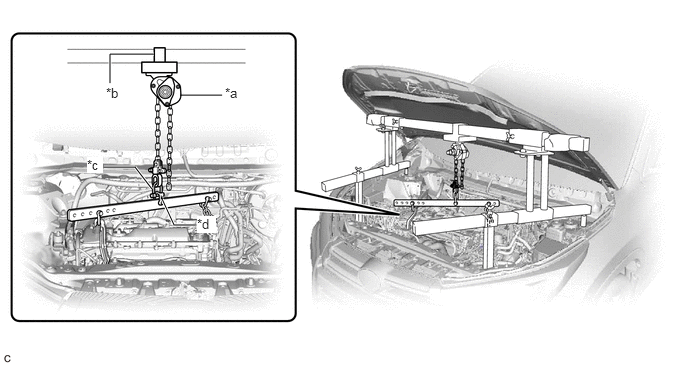
| *a | Chain Block Assembly | *b | Sling Bracket |
| *c | Fuse Shackle | *d | Shackle (A) |
Install the division bar to the chain block with the fuse shackle and shackle (A).
- CAUTION:
- ·
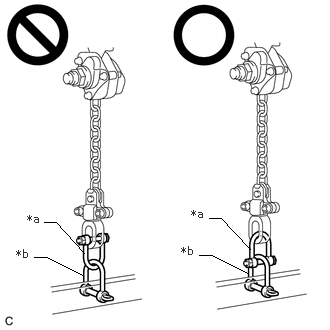 0.458,2.313 0.583,2.313 0.583,2.313 0.875,2.635 false 0.354,2.677 0.479,2.677 0.479,2.677 0.865,2.865 false 2.177,2.271 2.302,2.271 2.302,2.271 2.604,2.594 false 2.073,2.656 2.198,2.656 2.198,2.656 2.583,2.844 false 0.281,2.208 0.604,2.469 0.323,0.26 10 false *a 0.167,2.573 0.51,2.844 0.344,0.271 10 false *b 1.99,2.156 2.313,2.417 0.323,0.26 10 false *a 1.885,2.542 2.229,2.813 0.344,0.271 10 false *b
*a Fuse Shackle *b Shackle (A)
Make sure the fuse shackle is on the chain block side and the shackle (A) is on the division bar side as shown in the illustration so that the fuse bolt is visible and can be checked for deformation easily.
·If the fuse shackle is installed upside down, deformation of the fuse bolt will not be visible and cannot be used to tell if the load capacity of the engine support bridge has been exceeded. If the load capacity is exceeded, it may cause the engine support bridge to damage the vehicle and the engine assembly with automatic transaxle assembly may fall.
·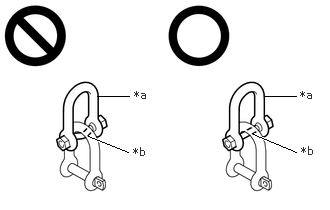 2.75,1 3.083,1 false 1.01,1 1.344,1 false 0.917,1.417 1.333,1.583 true 2.635,1.396 3.083,1.583 true 1.396,0.917 1.708,1.073 0.313,0.156 10 false *a 1.385,1.51 1.698,1.667 0.313,0.156 10 false *b 3.125,0.917 3.354,1.083 0.229,0.167 10 false *a 3.135,1.5 3.354,1.667 0.219,0.167 10 false *b
*a Fuse Shackle *b Fuse Bolt
Make sure that the fuse bolt of the fuse shackle is free of damage, such as deformation or cracks. If damaged, replace the fuse shackle.
·If a deformed fuse bolt is used, it cannot be used to tell if the load capacity of the engine support bridge has been exceeded. If the load capacity is exceeded, it may cause the engine support bridge to damage the vehicle and the engine assembly with transaxle assembly may fall.
Connect the division bar to the No. 1 engine hanger with the shackle (A).
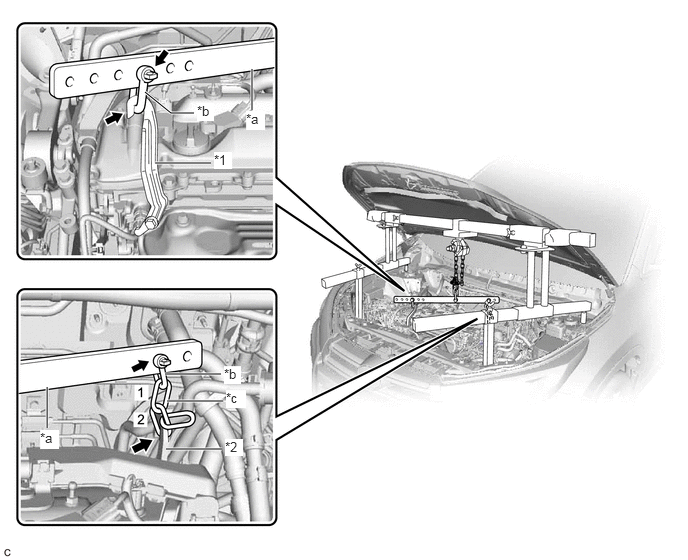
| *1 | No. 1 Engine Hanger | *2 | No. 2 Engine Hanger |
| *a | Division Bar | *b | Shackle (A) |
| *c | Chain | - | - |
Connect the division bar to the No. 2 engine hanger with the shackle (A) and chain.
- NOTICE:
-
Connect the 2nd link of the chain to the No. 2 engine hanger.
Make sure the distance between the chain block assembly and suspension ring is 120 mm (4.72 in.) or more.
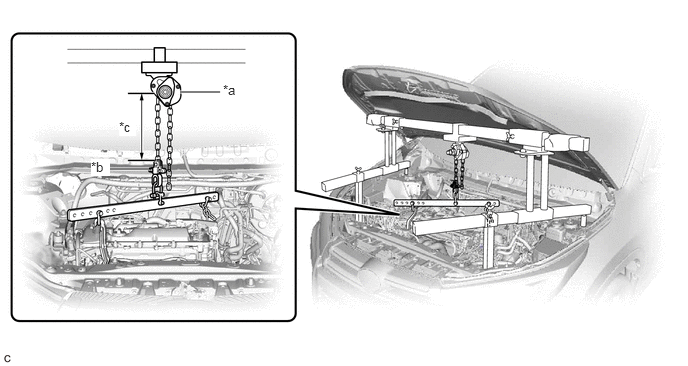
| *a | Chain Block Assembly | *b | Suspension Ring |
| *c | 120 mm or more | - | - |
- HINT:
-
If the suspension height is less than 120 mm (4.72 in.), use a different link of the chain which connects the division bar and engine hanger.
Adjust the position of the chain block assembly so that the chain is perpendicular to the main beam and sub beams as shown in the illustration.
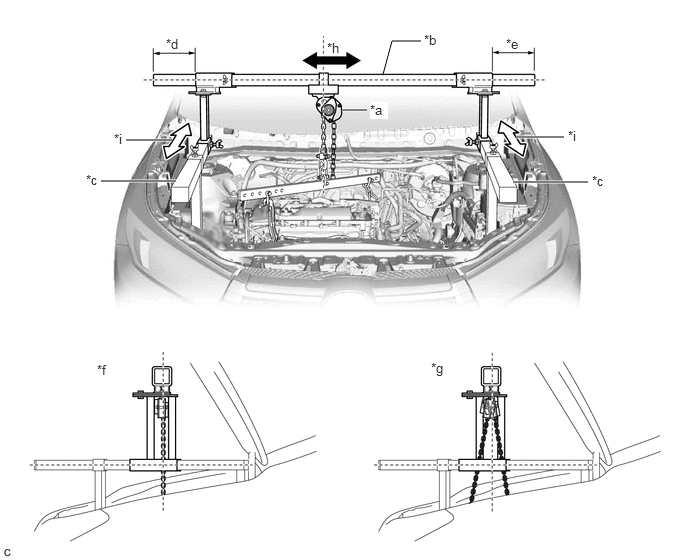
| *a | Chain Block Assembly | *b | Main Beam |
| *c | Sub Beam | *d | Dimension (A) |
| *e | Dimension (B) | *f | Correct |
| *g | Incorrect | *h | Right to Left Adjustment |
| *i | Front to Rear Adjustment | - | - |
- CAUTION:
-
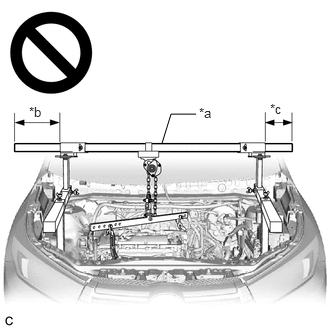 1.688,1.49 1.781,1.188 1.781,1.188 2.042,1.188 false 2.073,1.094 2.385,1.292 0.313,0.198 10 false *a 0.302,1.083 0.615,1.281 0.313,0.198 10 false *b 2.813,1.052 3.125,1.25 0.313,0.198 10 false *c
*a Main Beam *b Dimension (A) *c Dimension (B)
- ·
To prevent the engine assembly with automatic transaxle assembly from falling, make sure that the length of dimension (A) and dimension (B) are equal.
·Do not perform any procedures if the length of dimension (A) and dimension (B) are not equal.
·Performing any procedure when the length of dimension (A) and dimension (B) are not equal may cause the engine assembly with automatic transaxle assembly and engine support bridge to fall, possibly causing serious injury.
Tighten the 6 wing bolts and 2 bolts.
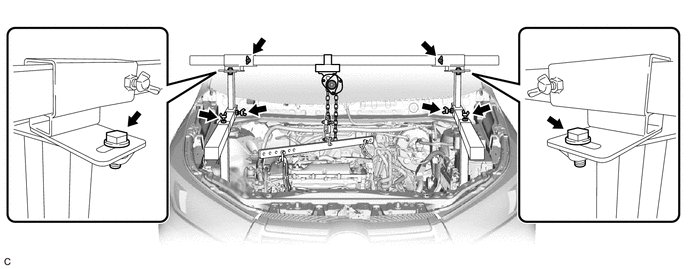
- Torque:
- 30 N*m (306 kgf*cm, 22 ft.*lbf)
- CAUTION:
-
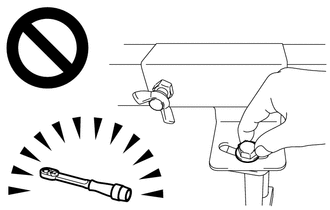
- ·
Do not perform any procedures before tightening the bolts to the specified torque.
·Performing procedures without tightening the bolts to the specified torque, may cause the engine support bridge to fall.
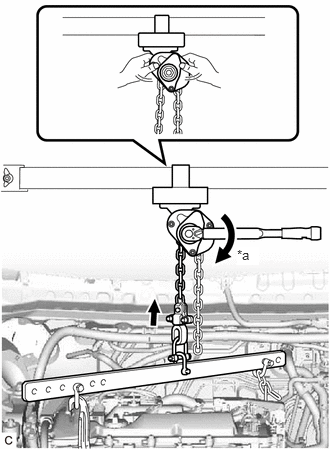
| *a | Turn |
Tighten the chain block assembly until it cannot be moved any further by hand.
- CAUTION:
-
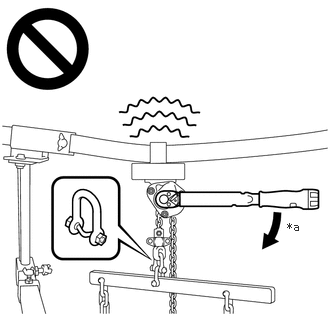 2.99,2.292 3.302,2.448 0.313,0.156 10 false *a
*a 41 N*m (418 kgf*cm, 30 ft.*lbf) or more
- ·
When suspending the engine assembly with automatic transaxle assembly, do not tighten the chain block assembly more than 41 N*m (418 kgf*cm, 30 ft.*lbf).
·Tightening the chain block assembly more than 41 N*m (418 kgf*cm, 30 ft.*lbf) will cause the load capacity (400 kg (881.8 lb)) to be exceeded and may cause damage to the engine support bridge and vehicle body.
11361J
29.REMOVE FLYWHEEL HOUSING UNDER COVER
32101A
30.REMOVE DRIVE PLATE AND TORQUE CONVERTER ASSEMBLY SETTING BOLT
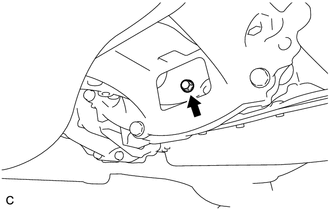
Turn the crankshaft to gain access to the removable locations of the 6 drive plate and torque converter assembly setting bolts and remove each drive plate and torque converter assembly setting bolt while holding the crankshaft pulley bolt with a wrench.
- HINT:
-
There will be one black colored drive plate and torque converter assembly setting bolt.
31.INSTALL BELT

|
Bolt |

|
Nut |
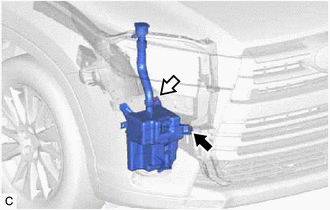
Remove the bolt and nut and disconnect the windshield washer jar assembly from the vehicle body.
Install SST to the vehicle body as shown in the illustration.
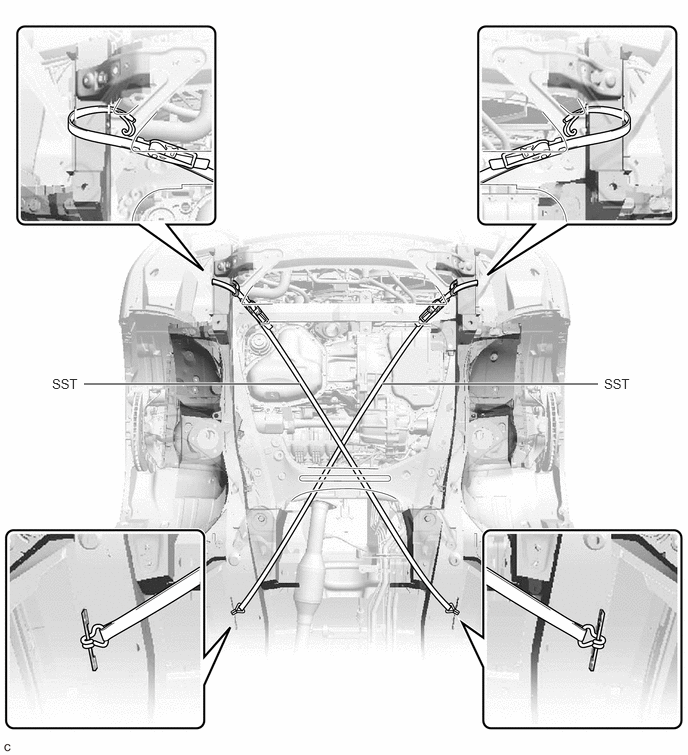
- SST
- 09727-00110
Using the ratchet buckle, tighten the 2 belts until there is no slack.
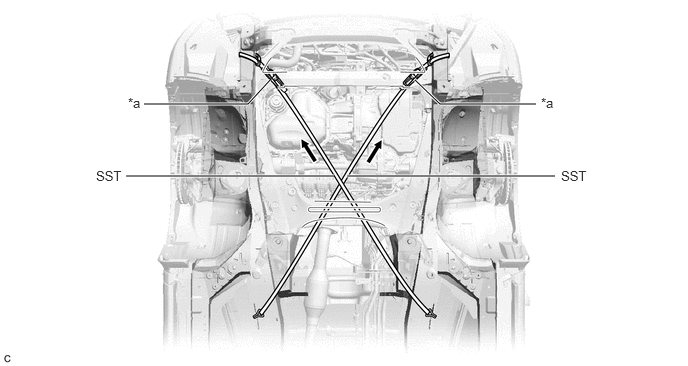
| *a | Ratchet Buckle | - | - |
51100G
32.REMOVE FRONT FRAME ASSEMBLY
12362
33.REMOVE ENGINE MOUNTING INSULATOR RH
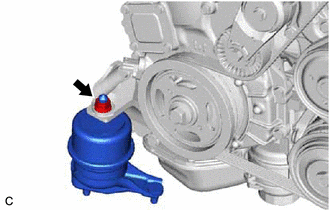
Remove the nut and engine mounting insulator RH from the engine mounting bracket RH.
34.INSTALL ENGINE SUPPORT BAR
Install SST (support bar) to the engine mounting bracket RH with the stud bolt and SST (nut).
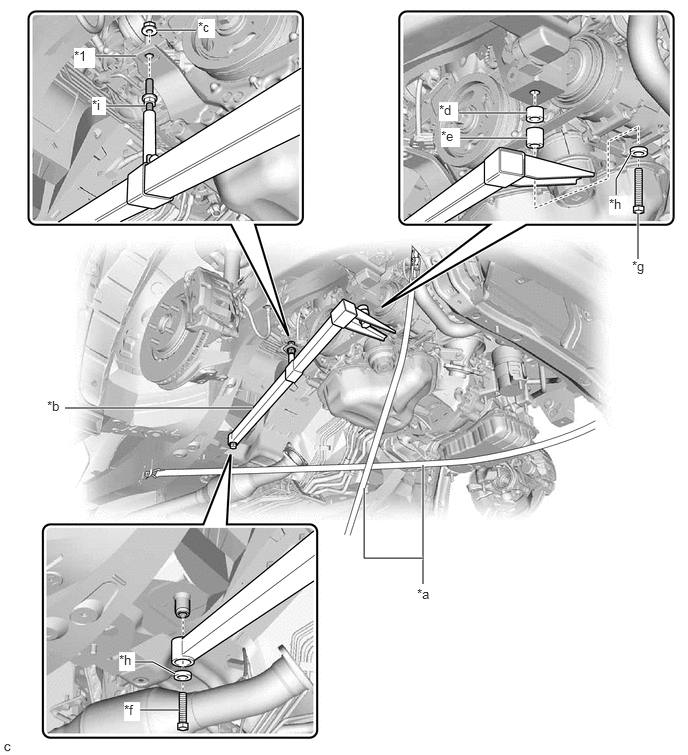
| *1 | Engine Mounting Bracket RH | - | - |
| *a | SST (Belt) | *b | SST (Support Bar) |
| *c | SST (Nut) | *d | SST (Spacer 20) |
| *e | SST (Spacer 30) | *f | SST (Bolt 40) |
| *g | SST (Bolt 90) | *h | SST (Washer) |
| *i | Stud Bolt | - | - |
- SST
- 09940-20011 (09941-02010, 09941-02020, 09941-02030, 09941-02040, 09941-02050, 09941-02060, 09941-02070)
- CAUTION:
-
To prevent the engine assembly with automatic transaxle assembly from falling while servicing, do not remove SST (belt).
- HINT:
-
Tighten SST (nut) by hand.
Install SST (support bar) to the vehicle body with SST (bolt 40), SST (bolt 90) and 2 SST (washer) as shown in the illustration.
- Torque:
- 30 N*m (306 kgf*cm, 22 ft.*lbf)
12360
35.REMOVE FRONT ENGINE MOUNTING INSULATOR ASSEMBLY
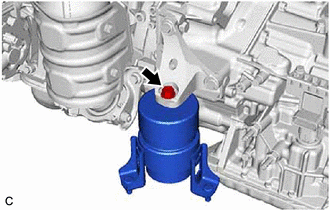
Remove the bolt and front engine mounting insulator assembly from the front engine mounting bracket.
12372A
36.REMOVE ENGINE MOUNTING INSULATOR LH
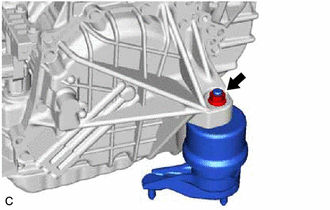
Remove the nut and engine mounting insulator LH from the automatic transaxle assembly.
37.SUPPORT ENGINE ASSEMBLY
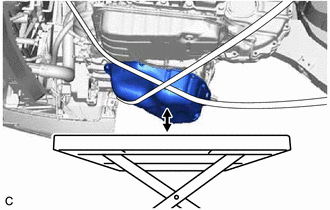
Set an engine lifter.
- CAUTION:
-
To prevent the engine assembly with automatic transaxle assembly from falling while servicing, do not remove SST.
- NOTICE:
-
Make sure that there is clearance between the engine oil pan assembly and engine lifter.
38.REMOVE BELT
Remove SST from the vehicle body.
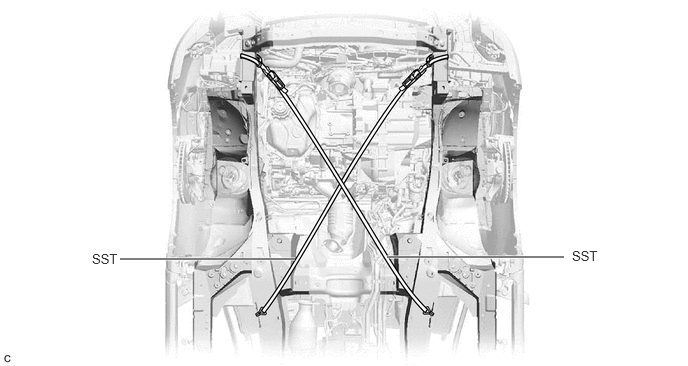
30500
39.REMOVE AUTOMATIC TRANSAXLE ASSEMBLY
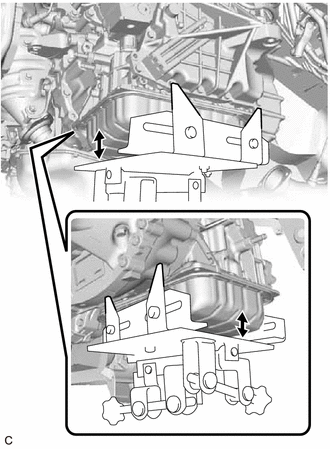
Support the automatic transaxle assembly with a transmission jack.
- NOTICE:
- ·
In order to protect the automatic transaxle oil pan sub-assembly, place attachments on the transmission jack.
·Make sure that the attachments and automatic transaxle oil pan sub-assembly are centered on the transmission jack.
·To prevent the automatic transaxle oil pan sub-assembly from being deformed, do not place any attachments under the automatic transaxle oil pan sub-assembly.
·Secure the automatic transaxle assembly to the transmission jack using a suitable adapter, such as a rope or attachment.
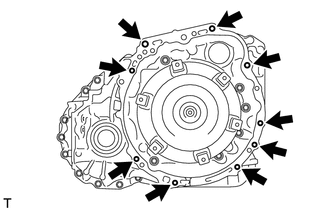
Remove the 9 bolts and automatic transaxle assembly.
- NOTICE:
-
To prevent damage to the knock pins, do not pry between the automatic transaxle assembly and engine assembly.
12311A
40.REMOVE FRONT ENGINE MOUNTING BRACKET
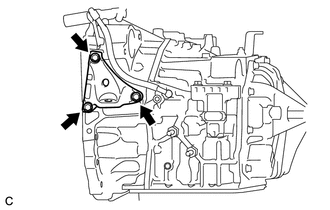
Remove the 3 bolts and front engine mounting bracket from the automatic transaxle assembly.
82824
41.REMOVE WIRING HARNESS CONNECTOR
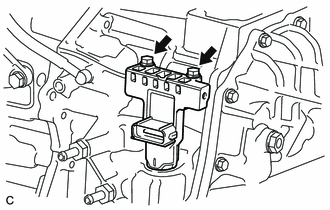
Remove the 2 bolts.
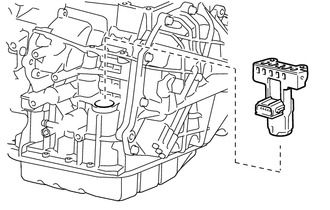
Remove the wiring harness connector from the automatic transaxle assembly.
31406A
42.REMOVE FLEXIBLE HOSE BRACKET SUB-ASSEMBLY
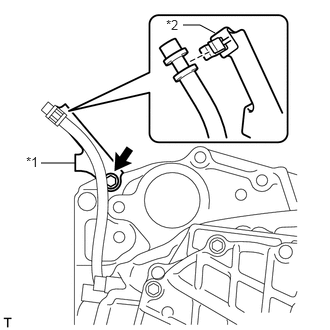
| *1 | Flexible Hose Bracket Sub-assembly |
| *2 | Clamp |
Disconnect the breather plug hose from the flexible hose bracket sub-assembly.
Remove the bolt and flexible hose bracket sub-assembly from the automatic transaxle assembly.
Remove the clamp from the flexible hose bracket sub-assembly.
43.REMOVE WIRE HARNESS CLAMP BRACKET
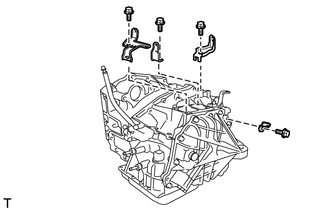
Remove the 4 bolts and 4 wire harness clamp brackets from the automatic transaxle assembly.
33823
44.REMOVE NO. 1 TRANSMISSION CONTROL CABLE BRACKET
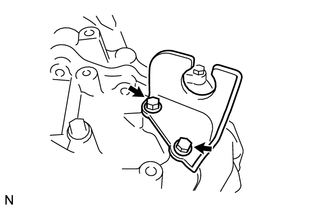
Remove the 2 bolts and No. 1 transmission control cable bracket from the automatic transaxle assembly.
35150
45.REMOVE TRANSMISSION CASE PLUG ASSEMBLY
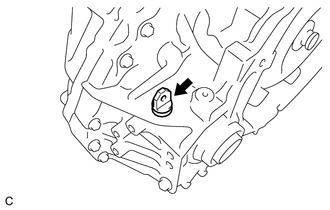
Remove the transmission case plug assembly from the automatic transaxle assembly.
32000
46.REMOVE TORQUE CONVERTER ASSEMBLY
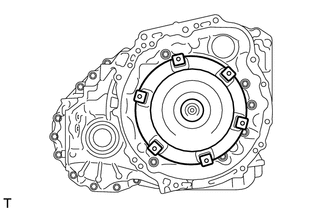
Remove the torque converter assembly from the automatic transaxle assembly.
- NOTICE:
-
Remove the torque converter assembly from the input shaft horizontally.
32000
47.INSPECT TORQUE CONVERTER ASSEMBLY
32101
48.INSPECT DRIVE PLATE AND RING GEAR SUB-ASSEMBLY