REAR SUSPENSION REAR SUSPENSION MEMBER(for 2WD) REMOVAL
PROCEDURE

 1.REMOVE REAR WHEEL
2.DRAIN BRAKE FLUID
- NOTICE:
-
If brake fluid leaks onto any painted surface, immediately wash it off.
17430
3.REMOVE TAIL EXHAUST PIPE ASSEMBLY
for 1AR-FE: Click hereEngine / Hybrid System>1AR-FE INTAKE / EXHAUST>EXHAUST PIPE>REMOVAL
for 2GR-FKS: Click hereEngine / Hybrid System>2GR-FKS (INTAKE / EXHAUST)>EXHAUST PIPE>REMOVAL
89408D
4.REMOVE REAR HEIGHT CONTROL SENSOR SUB-ASSEMBLY (w/ Height Control Sensor)
47319F
5.SEPARATE REAR FLEXIBLE HOSE LH
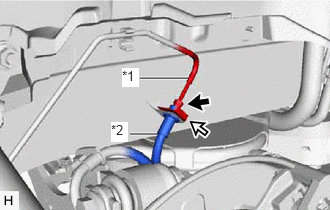
| *1 | Rear No. 4 Brake Tube |
| *2 | Rear Flexible Hose LH |

|
Clip |
Using a union nut wrench, separate the rear flexible hose LH from the rear No. 4 brake tube while holding the rear flexible hose LH with a wrench.
- NOTICE:
- ·
Do not kink or damage the brake line.
·Do not allow any foreign matter such as dirt or dust to enter the brake line from the connecting parts.
Remove the clip and separate the rear flexible hose LH.
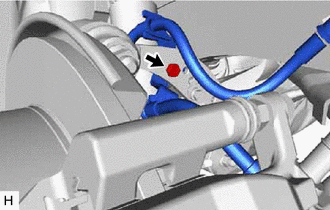
Remove the bolt and separate the rear flexible hose LH from the rear upper control arm assembly LH.
47318F
6.SEPARATE REAR FLEXIBLE HOSE RH
- HINT:
-
Perform the same procedure as for the LH side.
89516B
7.SEPARATE SKID CONTROL SENSOR WIRE LH
89516
8.SEPARATE SKID CONTROL SENSOR WIRE RH
- HINT:
-
Perform the same procedure as for the LH side.
48802
9.REMOVE REAR STABILIZER LINK SUB-ASSEMBLY LH
48802
10.REMOVE REAR STABILIZER LINK SUB-ASSEMBLY RH
- HINT:
-
Perform the same procedure as for the LH side.
48812
11.REMOVE REAR STABILIZER BAR
48740F
12.REMOVE REAR NO. 2 SUSPENSION ARM ASSEMBLY LH
48730F
13.REMOVE REAR NO. 2 SUSPENSION ARM ASSEMBLY RH
- HINT:
-
Perform the same procedure as for the LH side.
14.SEPARATE FRAME WIRE
Remove the bolt and disconnect each connector, and then disengage each clamp to separate the frame wire from the rear suspension member sub-assembly as shown in the illustration.
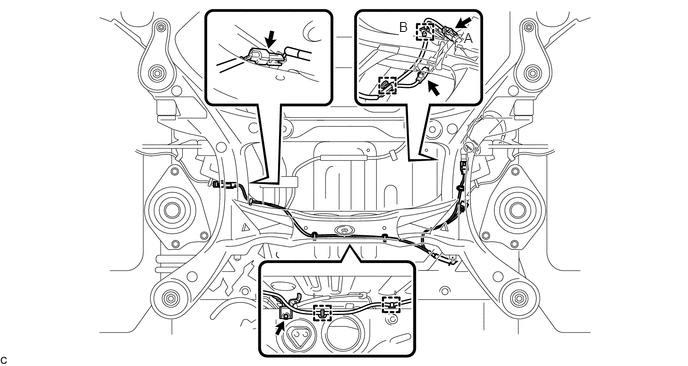
- HINT:
-
The connector (A) and the clamp (B) are only on vehicles with the LED headlight system.
51206A
15.REMOVE REAR SUSPENSION MEMBER SUB-ASSEMBLY
Separate the rear upper control arm assembly LH.
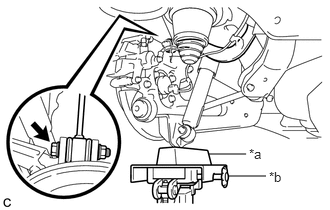
| *a | Wooden Block |
| *b | Jack |
Support the rear axle assembly LH with a jack using a wooden block as shown in the illustration.
- CAUTION:
-
Do not jack up the rear axle assembly LH too high as the vehicle may fall.
- NOTICE:
-
When jacking up the rear axle assembly LH, be sure to jack it up slowly.
Remove the bolt and nut, and separate the rear upper control arm assembly LH from the rear axle carrier sub-assembly LH.
- NOTICE:
-
Because the nut has its own stopper, do not turn the nut. Loosen the bolt with the nut secured.
Slowly lower the rear axle assembly LH.
Separate the rear upper control arm assembly RH.
- HINT:
-
Perform the same procedure as for the LH side.
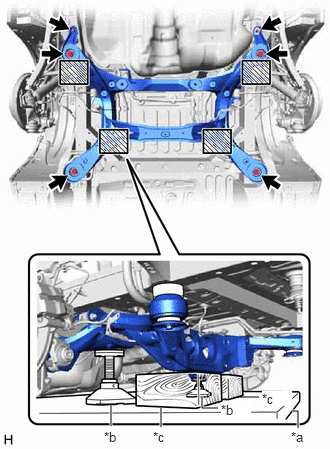
| *a | Engine Lifter |
| *b | Attachment |
| *c | Wooden Block |

|
Attachment placement location |
Support the rear suspension member sub-assembly with an engine lifter using 2 wooden blocks and 2 attachments or equivalent tools as shown in the illustration.
- CAUTION:
-
Make sure to secure the rear suspension member sub-assembly to prevent it from dropping.
- NOTICE:
- ·
Use the attachments to keep the rear suspension member sub-assembly level.
·The rear suspension member sub-assembly is a heavy component. Make sure that it is supported securely.
Remove the 4 bolts, 2 nuts, 2 rear lower suspension braces, rear lower suspension member stopper LH and rear lower suspension member stopper RH.
Remove the rear No. 1 suspension arm assembly LH.
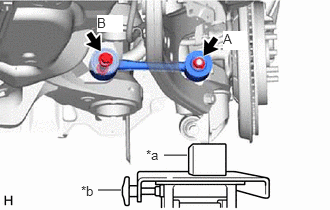
| *a | Wooden Block |
| *b | Jack |
Support the rear axle assembly LH with a jack using a wooden block as shown in the illustration.
- CAUTION:
-
Do not jack up the rear axle assembly LH too high as the vehicle may fall.
- NOTICE:
-
When jacking up the rear axle assembly LH, be sure to jack it up slowly.
Remove the nut (A) and the spacer.
Remove the bolt (B), nut and rear No. 1 suspension arm assembly LH.
- NOTICE:
-
Because the nut has its own stopper, do not turn the nut. Loosen the bolt with the nut secured.
Slowly lower the rear axle assembly LH.
Remove the rear No. 1 suspension arm assembly RH.
- HINT:
-
Perform the same procedure as for the LH side.
Slowly lower the rear suspension member sub-assembly.
- NOTICE:
-
When lowering the rear suspension member sub-assembly, be careful not to damage the vehicle body or other components installed on the vehicle.
52272
16.REMOVE REAR SUSPENSION MEMBER UPPER STOPPER
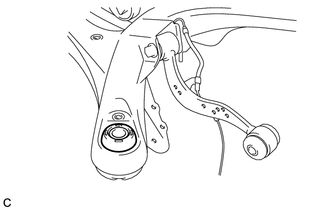
Remove the 2 rear suspension member upper stoppers from the rear suspension member sub-assembly.
52277B
17.REMOVE REAR SUSPENSION MEMBER REAR UPPER STOPPER
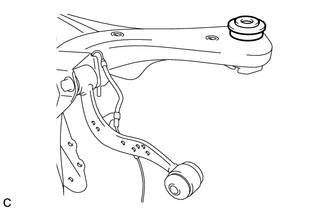
Remove the 2 rear suspension member rear upper stoppers from the rear suspension member sub-assembly.
89516B
18.REMOVE SKID CONTROL SENSOR WIRE LH
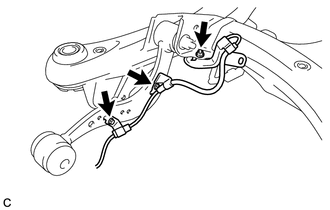
Remove the 2 bolts, nut and skid control sensor wire LH from the rear suspension member sub-assembly.
89516
19.REMOVE SKID CONTROL SENSOR WIRE RH
- HINT:
-
Perform the same procedure as for the LH side.
48790
20.REMOVE REAR UPPER CONTROL ARM ASSEMBLY LH
48770A
21.REMOVE REAR UPPER CONTROL ARM ASSEMBLY RH
- HINT:
-
Perform the same procedure as for the LH side.
52271D
22.REMOVE REAR SUSPENSION MEMBER FRONT BODY MOUNTING CUSHION (for LH Side)
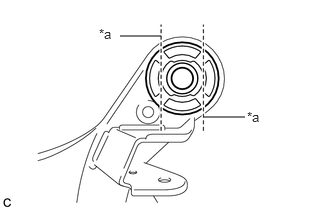
| *a | Bend Portion |
Using a chisel and hammer, bend the 2 portions of the rear suspension member front body mounting cushion rib.
- NOTICE:
-
Make sure to bend the 2 portions of the cushion rib until the claws of SST can fit securely.
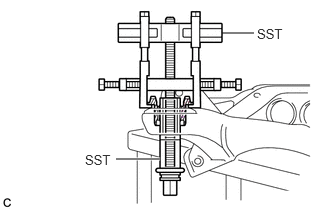
Install SST as shown in the illustration.
- SST
- 09830-10010 (09830-01010, 09830-01040, 09830-01050)
09950-40011 (09951-04020, 09952-04010, 09954-04010, 09955-04051, 09958-04011)
- NOTICE:
-
Apply grease to the threads and tip of the SST center bolt before use.
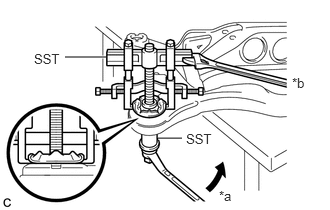
| *a | Turn |
| *b | Hold |
Using SST, remove the rear suspension member front body mounting cushion while applying grease into the clearance between the rear suspension member front body mounting cushion and the rear suspension member sub-assembly.
- SST
- 09830-10010 (09830-01010, 09830-01040, 09830-01050)
09950-40011 (09951-04020, 09952-04010, 09954-04010, 09955-04051, 09958-04011)
- NOTICE:
- ·
Set the claws of SST onto the rear suspension member sub-assembly securely as shown in the illustration.
·Be careful as the rear suspension member front body mounting cushion may fly out.
·The rear suspension member front body mounting cushion cannot be reused.
Remove SST and the rear suspension member front body mounting cushion (LH Side) from the rear suspension member sub-assembly.
52271D
23.REMOVE REAR SUSPENSION MEMBER FRONT BODY MOUNTING CUSHION (for RH Side)
- HINT:
-
Perform the same procedure as for the LH side.
52276A
24.REMOVE REAR SUSPENSION MEMBER REAR BODY MOUNTING CUSHION LH
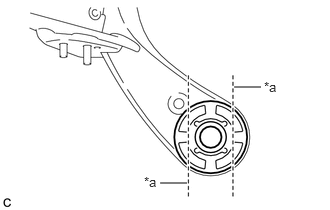
| *a | Bend Portion |
Using a chisel and hammer, bend the 2 portions of the rear suspension member rear body mounting cushion LH rib.
- NOTICE:
-
Make sure to bend the 2 portions of the cushion rib until the claws of SST can fit securely.
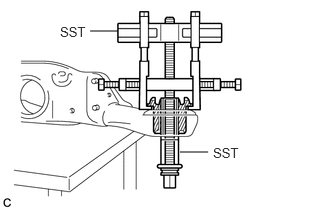
Install SST as shown in the illustration.
- SST
- 09830-10010 (09830-01010, 09830-01040, 09830-01050)
09950-40011 (09951-04020, 09952-04010, 09954-04010, 09955-04051, 09958-04011)
- NOTICE:
-
Apply grease to the threads and tip of the SST center bolt before use.
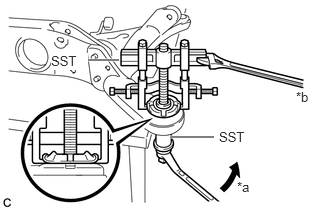
| *a | Turn |
| *b | Hold |
Using SST, remove the rear suspension member rear body mounting cushion LH while applying grease into the clearance between the rear suspension member rear body mounting cushion LH and the rear suspension member sub-assembly.
- SST
- 09830-10010 (09830-01010, 09830-01040, 09830-01050)
09950-40011 (09951-04020, 09952-04010, 09954-04010, 09955-04051, 09958-04011)
- NOTICE:
- ·
Set the claws of SST onto the rear suspension member sub-assembly securely as shown in the illustration.
·Be careful as the rear suspension member rear body mounting cushion LH may fly out.
·The rear suspension member rear body mounting cushion LH cannot be reused.
Remove SST and the rear suspension member rear body mounting cushion LH from the rear suspension member sub-assembly.
52275B
25.REMOVE REAR SUSPENSION MEMBER REAR BODY MOUNTING CUSHION RH
- HINT:
-
Perform the same procedure as for the LH side.
26.REMOVE HOLE PLUG
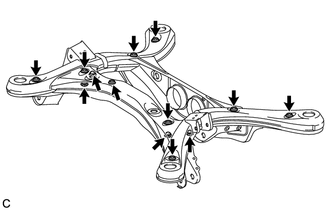
Remove the 13 hole plugs from the rear suspension member sub-assembly as shown in the illustration.