BRAKE SYSTEM (OTHER) BRAKE BOOSTER(for HV Model RHD) INSTALLATION
CAUTION / NOTICE / HINT
- NOTICE:
-
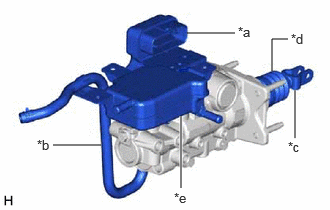 3,0.406 2.833,0.406 2.833,0.406 2.833,0.74 false 1.948,0.344 2.448,0.344 false 0.552,1.51 1.052,1.51 false 3.073,1.438 3.073,0.938 true 1.885,1.208 1.885,1.958 true 2.479,0.25 2.938,0.615 0.458,0.365 10 false *a 0.385,1.427 0.75,1.698 0.365,0.271 10 false *b 3,1.448 3.25,1.698 0.25,0.25 10 false *c 3.031,0.323 3.26,0.542 0.229,0.219 10 false *d 1.813,1.979 2.073,2.146 0.26,0.167 10 false *e
*a No. 1 Skid Control ECU *b No. 1 Reservoir Hose *c Master Cylinder Push Rod Clevis *d Boot *e Reservoir
-
Do not carry the brake booster with master cylinder assembly by the parts shown in the illustration.
PROCEDURE

 47234L
1.INSTALL NO. 1 RESERVOIR HOSE
Install the 2 clips to the No. 1 reservoir hose.
Install the No. 1 reservoir hose, and slide the clip to secure it as shown in the illustration.
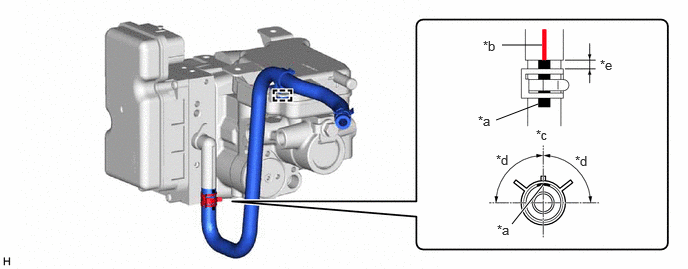
| *a | Paint Mark | *b | Rib |
| *c | Center of Rib | *d | Within 90° |
| *e | 4 +/- 2 mm (0.1575 +/- 0.0787 in.) | - | - |
- NOTICE:
- ·
Make sure to align the paint mark of the reservoir hose with the rib.
·Install the clip within the range shown in the illustration.
Engage the clamp to install the No. 1 reservoir hose.
44785D
2.INSTALL BRAKE MASTER CYLINDER GASKET
Install a new brake master cylinder gasket to the brake booster with master cylinder assembly.
47210L
3.INSTALL BRAKE BOOSTER WITH MASTER CYLINDER ASSEMBLY
Install the brake booster with master cylinder assembly with the 4 nuts.
- Torque:
- 12.7 N*m (130 kgf*cm, 9 ft.*lbf)
- NOTICE:
- ·
Do not apply excessive force to the brake lines.
·Be careful not to allow brake fluid to enter the connector.
·If installing a new brake booster with master cylinder assembly, do not remove the hole plugs before connecting the brake lines because the brake booster with master cylinder assembly is filled with brake fluid.
- HINT:
-
Install the brake booster with master cylinder assembly while avoiding the brake lines etc.
47264A
4.INSTALL PUSH ROD PIN

|
Lithium Soap Base Glycol Grease |
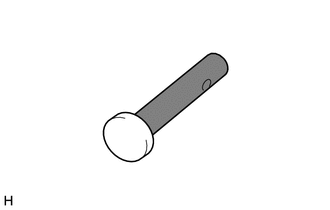
Apply lithium soap base glycol grease to the push rod pin.
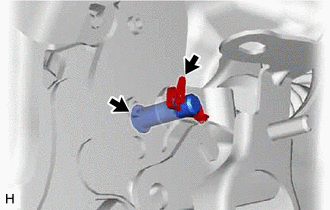
Connect the master cylinder push rod clevis to the brake pedal support assembly with the push rod pin, and install a new clip as shown in the illustration.
- HINT:
-
The push rod pin can be installed in either direction.
47101A
5.INSTALL BRAKE PEDAL RETURN SPRING
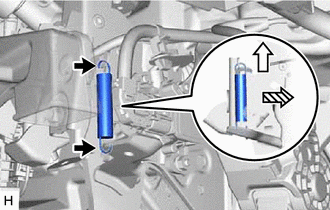

|
Up |

|
Front of the Vehicle |
Install the brake pedal return spring to the brake pedal support assembly.
- NOTICE:
-
Attach the bottom part of the brake pedal return spring first, making sure that the open part of the hook is facing the front of the vehicle. Attach the top part of the brake pedal return spring second, making sure that the open part of the hook is facing the rear of the vehicle.
84340
6.INSTALL STOP LIGHT SWITCH ASSEMBLY
47371B
7.INSTALL NO. 6 BRAKE TUBE CLAMP
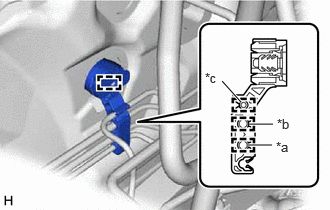
| *a | From 1st Chamber of Brake Booster with Master Cylinder Assembly |
| *b | From 2nd Chamber of Brake Booster with Master Cylinder Assembly |
| *c | To Front Disc Brake Cylinder Assembly RH |
Engage the 4 clamps to install a new No. 6 brake tube clamp.
- NOTICE:
-
Do not kink or damage the brake lines.
47371P
8.INSTALL NO. 14 BRAKE TUBE CLAMP
Engage the clamp to install a new No. 14 brake tube clamp.
9.INSTALL NO. 1 WIRE CLAMP BRACKET
Install the No. 1 wire clamp bracket to the brake booster with master cylinder assembly with the bolt.
- Torque:
- 6.5 N*m (66 kgf*cm, 58 in.*lbf)
Engage the clamp to install the brake line to the No. 14 brake tube clamp.
- NOTICE:
-
Do not kink or damage the brake line.
10.CONNECT BRAKE LINE
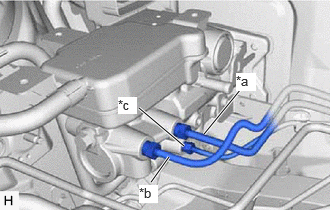
| *a | 1st Chamber of Brake Booster with Master Cylinder Assembly |
| *b | 2nd Chamber of Brake Booster with Master Cylinder Assembly |
| *c | To Brake Booster with Accumulator Pump Assembly |
Temporarily tighten the 3 brake lines to the correct positions on the brake booster with master cylinder assembly as shown in the illustration.
- NOTICE:
- ·
Do not kink or damage the brake lines.
·Do not allow any foreign matter such as dirt or dust to enter the brake lines from the connecting parts.
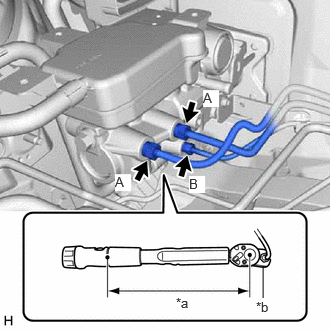
| *a | Torque Wrench Fulcrum Length |
| *b | Union Nut Wrench |
Using a union nut wrench, connect the 3 brake lines to the brake booster with master cylinder assembly.
- Torque:
- Specified tightening torque (A) : 19.5 N*m (199 kgf*cm, 14 ft.*lbf)
- Specified tightening torque (B) : 15.2 N*m (155 kgf*cm, 11 ft.*lbf)
- HINT:
- ·
Calculate the torque wrench reading when changing the fulcrum length of the torque wrench.
Click hereGeneral>INTRODUCTION>REPAIR INSTRUCTION>PRECAUTION
·for Specified Tightening Torque (A):
When using a union nut wrench (fulcrum length of 20 mm (0.787 in.)) + torque wrench (fulcrum length of 162 mm (6.38 in.)):
17.4 N*m (177 kgf*cm, 13 ft.*lbf)
·for Specified Tightening Torque (B):
When using a union nut wrench (fulcrum length of 22 mm (0.866 in.)) + torque wrench (fulcrum length of 162 mm (6.38 in.)):
13.4 N*m (137 kgf*cm, 10 ft.*lbf)
44571A
11.CONNECT NO. 1 BRAKE ACTUATOR HOSE
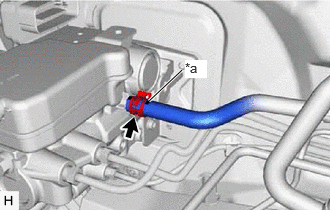
| *a | Paint Mark |
Connect the No. 1 brake actuator hose to the brake booster with master cylinder assembly and slide the clip to secure it.
- NOTICE:
-
Make sure to connect the No. 1 brake actuator hose with its paint mark facing up.
47234L
12.CONNECT NO. 1 RESERVOIR HOSE
Connect the No. 1 reservoir hose to the brake master cylinder reservoir assembly and slide the clip to secure it as shown in the illustration.
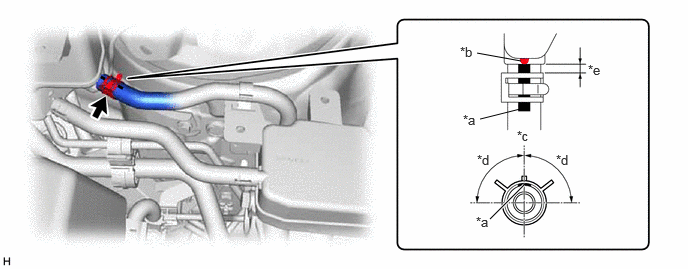
| *a | Paint Mark | *b | Rib |
| *c | Center of Rib | *d | Within 90° |
| *e | 4 +/- 2 mm (0.1575 +/- 0.0787 in.) | - | - |
- NOTICE:
- ·
Make sure to align the paint mark of the reservoir hose with the rib.
·Install the clip within the range shown in the illustration.
47235H
13.CONNECT NO. 2 RESERVOIR HOSE
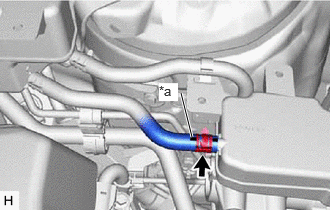
| *a | Paint Mark |
Connect the No. 2 reservoir hose to the brake booster with master cylinder assembly and slide the clip to secure it.
- NOTICE:
-
Make sure to connect the No. 2 reservoir hose with its paint mark facing up.
82111
14.INSTALL ENGINE ROOM MAIN WIRE
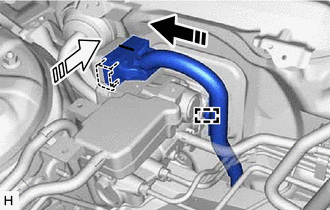

|
Connect the connector |

|
Lock the lock lever |
Engage the clamp to the brake booster with master cylinder assembly.
Connect the engine room main wire to the brake booster with master cylinder assembly and lock the lock lever as shown in the illustration.
- NOTICE:
- ·
Make sure that the connector is locked securely.
·Make sure that the connector can be connected smoothly.
·Do not allow water, oil or dirt to enter the connector.
73900
15.INSTALL LOWER NO. 1 INSTRUMENT PANEL AIRBAG ASSEMBLY
55446A
16.INSTALL NO. 1 SWITCH HOLE BASE
55045
17.INSTALL LOWER INSTRUMENT PANEL FINISH PANEL SUB-ASSEMBLY
53601
18.CONNECT HOOD LOCK CONTROL LEVER SUB-ASSEMBLY
44551C
19.BLEED NO. 1 BRAKE ACTUATOR TUBE
- NOTICE:
-
Make sure to bleed the air from the No. 1 brake actuator tube. If the air remains in the No. 1 brake actuator tube, the air will enter the brake booster with accumulator pump assembly and may damage the brake booster with accumulator pump assembly.
Remove the brake master cylinder reservoir filler cap assembly.
Add brake fluid to the reservoir until the fluid level is between the MAX and MIN lines on the brake fluid reservoir.
- Brake Fluid:
SAE J1703 or FMVSS No. 116 DOT3
SAE J1704 or FMVSS No. 116 DOT4
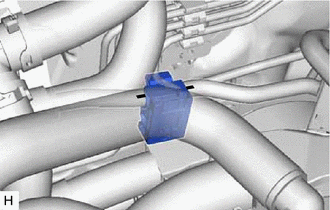
Remove the clamp.
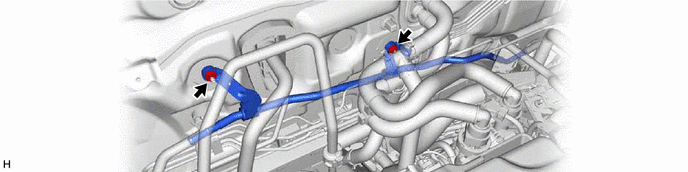
Remove the 2 nuts to separate the No. 1 brake actuator tube.
- HINT:
-
If the No. 1 brake actuator tube has already been separated, it is not necessary to perform this step.
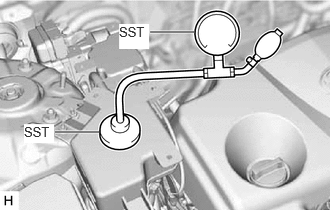
Set SST to the brake fluid reservoir.
- SST
- 09992-00242
09992-00350
Using SST, increase and then maintain the pressure in the brake fluid reservoir for 60 seconds. (*1)
- Standard Pressure:
50 to 80 kPa (0.6 to 0.8 kgf/cm2, 7.3 to 11.6 psi)
Release the pressure in the brake fluid reservoir and wait for 30 seconds. (*2)
Repeat steps *1 to *2, 3 times.
Remove SST.
|
|
Pull up |
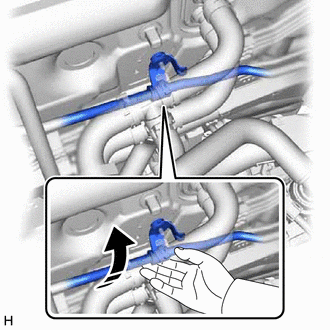
Pull up the No. 1 brake actuator tube as shown in the illustration as high as possible for 10 seconds without damaging the bracket of the No. 1 brake actuator tube. (*3)
- NOTICE:
-
Do not damage the hoses.
- HINT:
-
Elevating the No. 2 brake actuator hose causes any air in the horizontal portion of the hose to flow to the brake fluid reservoir side.
Repeat step *3, 5 times.
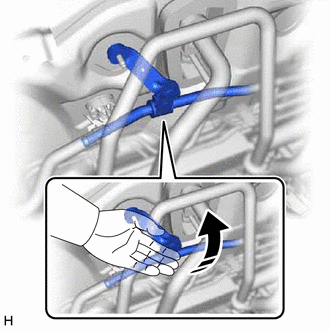
|
|
Pull up |
Elevate the No. 1 brake actuator tube for 10 seconds by lifting the No. 1 brake actuator tube as shown in the illustration. (*4)
- NOTICE:
-
Do not damage the hoses.
- HINT:
-
Elevating the No. 1 brake actuator tube causes any air in the horizontal portion of the tube to flow to the brake fluid reservoir side.
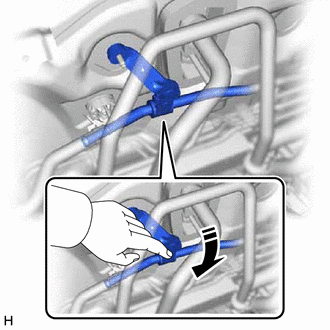
|
|
Press down |
Lower the No. 1 brake actuator tube for 10 seconds as shown in the illustration. (*5)
- NOTICE:
-
Do not damage the hoses.
- HINT:
-
Lowering the No. 1 brake actuator tube causes any air in the No. 1 brake actuator tube to flow to the brake fluid reservoir side.
Repeat steps *4 to *5, 5 times.
Install the No. 1 brake actuator tube with the 2 nuts.
- Torque:
- 8.5 N*m (87 kgf*cm, 75 in.*lbf)
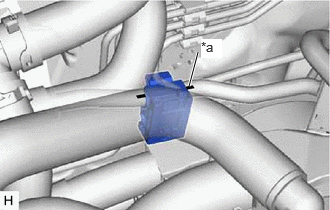
| *a | Paint Mark |
Install a new clamp so that it is at the center of the paint mark as shown in the illustration.
20.CONNECT BRAKE BOOSTER WITH ACCUMULATOR PUMP CONNECTOR
- HINT:
-
Perform this operation only when the accumulator pressure zero down could not be performed using the GTS.
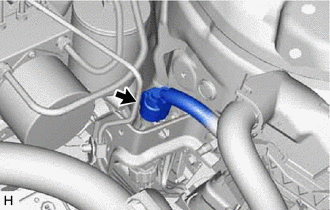
Connect the brake booster with accumulator pump connector.
- NOTICE:
-
Do not allow water, oil or dirt to enter the connector.
21.CONNECT CABLE TO NEGATIVE AUXILIARY BATTERY TERMINAL
Click hereGeneral>MAINTENANCE>A25A-FXS, A25B-FXS AUXILIARY BATTERY>INSTALLATION
- NOTICE:
-
When disconnecting the cable, some systems need to be initialized after the cable is reconnected.
-
Click hereGeneral>INTRODUCTION>REPAIR INSTRUCTION>INITIALIZATION
22.FILL RESERVOIR WITH BRAKE FLUID
23.BLEED BRAKE SYSTEM
24.INSPECT AND ADJUST BRAKE PEDAL
55606
25.INSTALL NO. 1 INSTRUMENT PANEL UNDER COVER SUB-ASSEMBLY
62111A
26.INSTALL COWL SIDE TRIM SUB-ASSEMBLY RH
- HINT:
-
Use the same procedure as for the LH side.
-
Click hereVehicle Interior>INTERIOR PANELS / TRIM>ROOF HEADLINING>INSTALLATION
67913
27.INSTALL FRONT DOOR SCUFF PLATE RH
- HINT:
-
Use the same procedure as for the LH side.
-
Click hereVehicle Interior>INTERIOR PANELS / TRIM>ROOF HEADLINING>INSTALLATION
55704B
28.INSTALL COWL VENTILATOR PANEL SUB-ASSEMBLY
29.INSTALL FRONT UPPER SUSPENSION TO COWL BRACE SUB-ASSEMBLY LH
53607B
30.INSTALL FRONT UPPER SUSPENSION TO COWL BRACE SUB-ASSEMBLY RH
- HINT:
-
Perform the same procedure as for the LH side.
53892C
31.INSTALL FRONT FENDER SPLASH SHIELD SEAL FRONT LH
53891C
32.INSTALL FRONT FENDER SPLASH SHIELD SEAL FRONT RH
- HINT:
-
Perform the same procedure as for the LH side.
53808A
33.INSTALL FENDER SPLASH SHIELD SUB-ASSEMBLY REAR LH
53807A
34.INSTALL FENDER SPLASH SHIELD SUB-ASSEMBLY REAR RH
- HINT:
-
Perform the same procedure as for the LH side.
35.INSTALL WINDSHIELD WIPER MOTOR AND LINK ASSEMBLY
36.PERFORM INITIALIZATION AND CALIBRATION
for Electronically Controlled Brake System: Click hereBrake>BRAKE CONTROL / DYNAMIC CONTROL SYSTEMS>ELECTRONICALLY CONTROLLED BRAKE SYSTEM (for HV Model)>UTILITY
37. CHECK AND CLEAR DTC
38.INSPECT SRS WARNING LIGHT