A25A-FXS, A25B-FXS FUEL FUEL INJECTOR(for Port Injection) INSTALLATION
CAUTION / NOTICE / HINT
- NOTICE:
-
This procedure includes the installation of small-head bolts. Refer to Small-Head Bolts of Basic Repair Hint to identify the small-head bolts.
-
Click hereGeneral>INTRODUCTION>REPAIR INSTRUCTION>PRECAUTION
PROCEDURE

 23250F
1.INSTALL PORT FUEL INJECTOR ASSEMBLY
- HINT:
-
Perform "Inspection After Repair" after replacing a port fuel injector assembly.
-
Click hereEngine / Hybrid System>A25A-FXS, A25B-FXS (ENGINE CONTROL)>SFI SYSTEM>INITIALIZATION
Apply a light coat of spindle oil or gasoline to 4 new O-rings, and install one to each port fuel injector assembly.
- NOTICE:
-
Check that there is no damage or foreign matter on the groove of the port fuel injector assembly when installing the O-ring to each port fuel injector assembly.
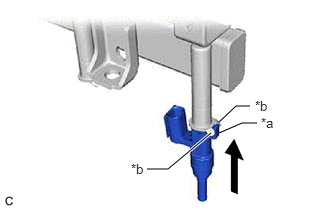
| *a | Stopper |
| *b | Claw |
Install the 4 port fuel injector assemblies to the fuel delivery pipe sub-assembly.
- NOTICE:
- ·
Make sure that the port fuel injector assembly is located within the stopper as shown in the illustration.
·Check that the port fuel injector assembly installation holes of the fuel delivery pipe sub-assembly are not damaged and are free of foreign matter.
·Make sure that the O-ring is not damaged, twisted or moved out of place when installing the port fuel injector assembly.
82125N
2.INSTALL NO. 5 ENGINE WIRE
Engage the 2 clamps to install the No. 5 engine wire to the fuel delivery pipe sub-assembly.
Connect the 4 port fuel injector assembly connectors and No. 2 fuel pressure sensor connector.
23291
3.INSTALL INJECTOR VIBRATION INSULATOR
Install 4 new injector vibration insulators to the cylinder head sub-assembly.
23807V
4.INSTALL NO. 1 DELIVERY PIPE SPACER
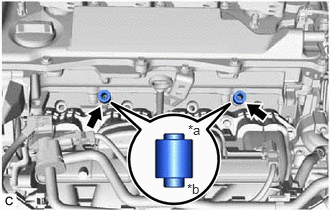
| *a | Fuel Delivery Pipe Sub-assembly Side |
| *b | Cylinder Head Sub-assembly Side |
Install the 2 No. 1 delivery pipe spacers to the cylinder head sub-assembly.
- NOTICE:
-
Install the No. 1 delivery pipe spacers in the correct direction.
23807
5.INSTALL FUEL DELIVERY PIPE SUB-ASSEMBLY
Place the fuel delivery pipe sub-assembly with the 4 port fuel injector assemblies onto the cylinder head sub-assembly.
- NOTICE:
-
Be careful not to drop the port fuel injector assemblies when installing the fuel delivery pipe sub-assembly.
Install the fuel delivery pipe sub-assembly with the port fuel injector assemblies with the 2 bolts.
- Torque:
- 28.5 N*m (291 kgf*cm, 21 ft.*lbf)
Connect the No. 5 engine wire connector.
23100X
6.TEMPORARILY INSTALL FUEL (ENGINE ROOM SIDE) PUMP ASSEMBLY
23801P
7.TEMPORARILY INSTALL NO. 1 FUEL PIPE SUB-ASSEMBLY
- NOTICE:
-
Do not damage the seals of the union nuts of the No. 1 fuel pipe sub-assembly.
for Cylinder Head Cover Sub-assembly Connection Type:
Temporarily install the bolt.
Temporarily install the No. 1 fuel pipe sub-assembly to the fuel delivery pipe and tighten the union nut by hand.
Temporarily install the No. 1 fuel pipe sub-assembly to the fuel pump assembly and tighten the union nut by hand.
23100X
8.INSTALL FUEL (ENGINE ROOM SIDE) PUMP ASSEMBLY
23801P
9.INSTALL NO. 1 FUEL PIPE SUB-ASSEMBLY
for EGR Valve Bracket Connection Type:
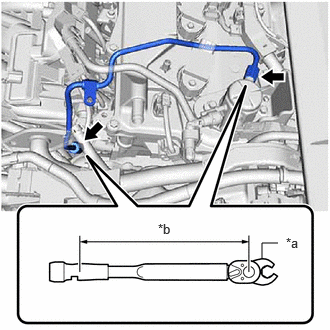
| *a | 17 mm Union Nut Wrench |
| *b | Torque Wrench Fulcrum Length |
Using a 17 mm union nut wrench, tighten the union nut on the fuel delivery pipe side of the No. 1 fuel pipe sub-assembly.
- Torque:
- Specified tightening torque : 35 N*m (357 kgf*cm, 26 ft.*lbf)
- NOTICE:
-
Do not adjust the torque in the loosening direction.
- HINT:
- ·
Calculate the torque wrench reading when changing the fulcrum length of the torque wrench.
Click hereGeneral>INTRODUCTION>REPAIR INSTRUCTION>PRECAUTION
·When using a 17 mm union nut wrench (fulcrum length of 30 mm (1.18 in.)) + torque wrench (fulcrum length of 180 mm (7.09 in.)): 30 N*m (306 kgf*cm, 22 ft.*lbf)
Using a 17 mm union nut wrench, tighten the union nut on the fuel pump assembly side of the No. 1 fuel pipe sub-assembly.
- Torque:
- Specified tightening torque : 35 N*m (357 kgf*cm, 26 ft.*lbf)
- NOTICE:
-
Do not adjust the torque in the loosening direction.
- HINT:
- ·
Calculate the torque wrench reading when changing the fulcrum length of the torque wrench.
Click hereGeneral>INTRODUCTION>REPAIR INSTRUCTION>PRECAUTION
·When using a 17 mm union nut wrench (fulcrum length of 30 mm (1.18 in.)) + torque wrench (fulcrum length of 180 mm (7.09 in.)): 30 N*m (306 kgf*cm, 22 ft.*lbf)
for Cylinder Head Cover Sub-assembly Connection Type:
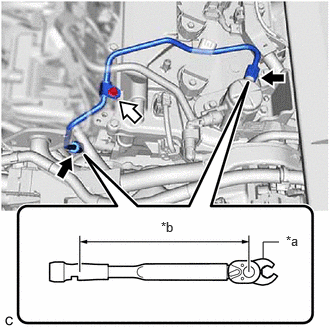
| *a | 17 mm Union Nut Wrench |
| *b | Torque Wrench Fulcrum Length |

|
Union Nut |

|
Bolt |
Using a 17 mm union nut wrench, tighten the union nut on the fuel delivery pipe side of the No. 1 fuel pipe sub-assembly.
- Torque:
- Specified tightening torque : 35 N*m (357 kgf*cm, 26 ft.*lbf)
- NOTICE:
-
Do not adjust the torque in the loosening direction.
- HINT:
- ·
Calculate the torque wrench reading when changing the fulcrum length of the torque wrench.
Click hereGeneral>INTRODUCTION>REPAIR INSTRUCTION>PRECAUTION
·When using a 17 mm union nut wrench (fulcrum length of 30 mm (1.18 in.)) + torque wrench (fulcrum length of 180 mm (7.09 in.)): 30 N*m (306 kgf*cm, 22 ft.*lbf)
Using a 17 mm union nut wrench, tighten the union nut on the fuel pump assembly side of the No. 1 fuel pipe sub-assembly.
- Torque:
- Specified tightening torque : 35 N*m (357 kgf*cm, 26 ft.*lbf)
- NOTICE:
-
Do not adjust the torque in the loosening direction.
- HINT:
- ·
Calculate the torque wrench reading when changing the fulcrum length of the torque wrench.
Click hereGeneral>INTRODUCTION>REPAIR INSTRUCTION>PRECAUTION
·When using a 17 mm union nut wrench (fulcrum length of 30 mm (1.18 in.)) + torque wrench (fulcrum length of 180 mm (7.09 in.)): 30 N*m (306 kgf*cm, 22 ft.*lbf)
Using an 8 mm socket wrench, tighten the bolt.
- Torque:
- 10 N*m (102 kgf*cm, 7 ft.*lbf)
Connect the ignition coil connector.
23910A
10.CONNECT FUEL TUBE SUB-ASSEMBLY
Connect the fuel tube sub-assembly to the fuel pump assembly and fuel delivery pipe sub-assembly.
Click hereEngine / Hybrid System>A25A-FXS, A25B-FXS (FUEL)>FUEL SYSTEM>PRECAUTION
Install the fuel pipe clamp to the fuel tube connector.
16278
11.INSTALL NO. 2 WATER BY-PASS PIPE
25715
12.INSTALL EMISSION CONTROL VALVE BRACKET (w/ Differential Pressure Sensor)
25620
13.INSTALL EGR VALVE ASSEMBLY
22030
14.INSTALL THROTTLE BODY WITH MOTOR ASSEMBLY
15.CONNECT CABLE TO NEGATIVE AUXILIARY BATTERY TERMINAL
58441L
16.INSTALL BATTERY SERVICE HOLE COVER
17.INSPECT FOR FUEL LEAK
18.PERFORM INITIALIZATION
Perform "Inspection After Repair" after replacing a port fuel injector assembly.
Click hereEngine / Hybrid System>A25A-FXS, A25B-FXS (ENGINE CONTROL)>SFI SYSTEM>INITIALIZATION