1GR-FE ENGINE MECHANICAL ENGINE UNIT DISASSEMBLY
PROCEDURE

 1.REMOVE CYLINDER BLOCK WATER DRAIN COCK SUB-ASSEMBLY
Remove the cylinder block water drain cock.
2.REMOVE VVT SENSOR (for Bank 1)
3.REMOVE VVT SENSOR (for Bank 2)
4.REMOVE CAMSHAFT TIMING OIL CONTROL VALVE ASSEMBLY (for Bank 1)
5.REMOVE CAMSHAFT TIMING OIL CONTROL VALVE ASSEMBLY (for Bank 2)
6.REMOVE CRANK POSITION SENSOR
7.REMOVE OIL CONTROL VALVE FILTER
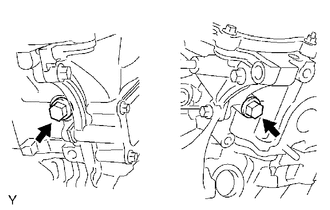
| *A | for Bank 1 |
| *B | for Bank 2 |
Remove the plug, filter and gasket from each cylinder head.
8.REMOVE OIL FILTER SUB-ASSEMBLY
9.REMOVE OIL COOLER ASSEMBLY
10.REMOVE OIL FILTER BRACKET SUB-ASSEMBLY
11.REMOVE PCV VALVE
12.REMOVE SPARK PLUG
13.REMOVE WATER INLET ASSEMBLY
14.REMOVE CYLINDER HEAD COVER SUB-ASSEMBLY
15.REMOVE CYLINDER HEAD COVER SUB-ASSEMBLY LH
16.SET NO. 1 CYLINDER TO TDC/COMPRESSION
17.REMOVE CRANKSHAFT PULLEY
18.REMOVE OIL PAN DRAIN PLUG
Remove the oil pan drain plug and gasket.
19.REMOVE NO. 2 OIL PAN SUB-ASSEMBLY
20.REMOVE OIL STRAINER SUB-ASSEMBLY
21.REMOVE OIL PAN SUB-ASSEMBLY
22.REMOVE TIMING CHAIN COVER SUB-ASSEMBLY
23.REMOVE ENGINE WATER PUMP ASSEMBLY
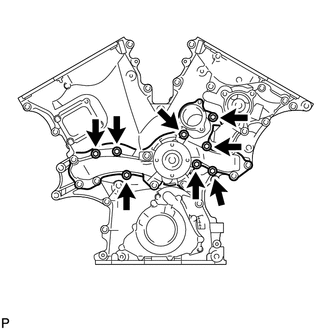
Remove the 8 bolts, engine water pump and gasket.
24.REMOVE FRONT CRANKSHAFT OIL SEAL
25.REMOVE NO. 1 CHAIN TENSIONER ASSEMBLY
- NOTICE:
- ·
Never rotate the crankshaft with the chain tensioner removed.
·Before rotating the camshaft with the timing chain removed, rotate the crankshaft counterclockwise 40° from TDC first.
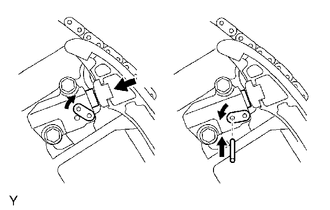
| *1 | Stopper Plate |
| *a | Push |
While rotating the stopper plate of the tensioner upward, push in the plunger of the chain tensioner as shown in the illustration.
While rotating the stopper plate of the tensioner downward, insert a bar with a diameter of 3.5 mm (0.138 in.) into the holes in the stopper plate and tensioner to fix the stopper plate in place.
Remove the 2 bolts and No. 1 chain tensioner.
26.REMOVE CHAIN TENSIONER SLIPPER
27.REMOVE NO. 1 IDLE GEAR SHAFT
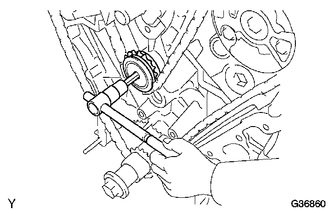
Using a 10 mm hexagon wrench, remove the No. 2 idle gear shaft, No. 1 idle gear and No. 1 idle gear shaft.
28.REMOVE NO. 2 CHAIN VIBRATION DAMPER
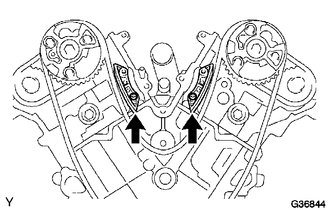
Remove the 2 No. 2 chain vibration dampers.
29.REMOVE CHAIN SUB-ASSEMBLY
30.REMOVE CRANKSHAFT TIMING GEAR OR SPROCKET
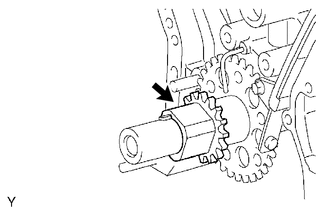
Remove the crankshaft timing gear or sprocket.
31.REMOVE NO. 1 CHAIN VIBRATION DAMPER
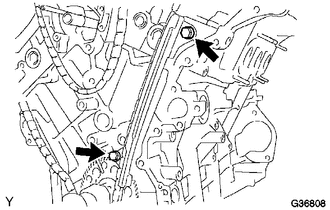
Remove the 2 bolts and No. 1 chain vibration damper.
32.REMOVE CAMSHAFT TIMING GEARS AND NO. 2 CHAIN (for Bank 1)
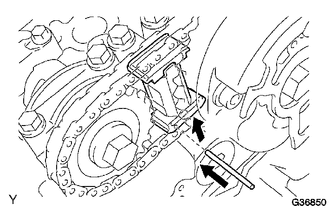
| *a | Raise |
While raising up the No. 2 chain tensioner, insert a pin with a diameter of 1.0 mm (0.0394 in.) into the hole to fix the tensioner in place.
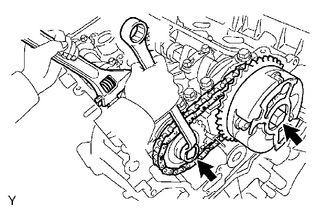
| *a | Hold |
| *b | Loosen |
Hold the hexagonal portion of the camshaft with a wrench and then remove the 2 bolts, the camshaft timing gear, the camshaft timing gear or sprocket and the No. 2 chain.
- NOTICE:
- ·
Be careful not to damage the cylinder head and valve lifter with the wrench.
·Do not disassemble the camshaft timing gear.
33.REMOVE NO. 2 CHAIN TENSIONER ASSEMBLY
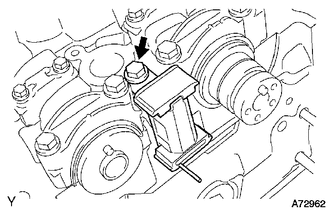
Remove the bolt and No. 2 chain tensioner.
34.REMOVE CAMSHAFT TIMING GEARS AND NO. 2 CHAIN (for Bank 2)
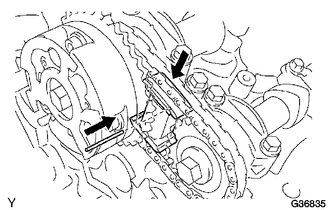
| *a | Push |
While pushing down the No. 3 chain tensioner, insert a pin with a diameter of 1.0 mm (0.0394 in.) into the hole to fix the tensioner in place.
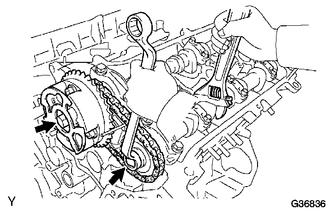
| *a | Hold |
| *b | Loosen |
Hold the hexagonal portion of the camshaft with a wrench and then remove the 2 bolts, the camshaft timing gear, the camshaft timing gear or sprocket and the No. 2 chain.
- NOTICE:
- ·
Be careful not to damage the cylinder head and valve lifter with the wrench.
·Do not disassemble the camshaft timing gear.
35.REMOVE NO. 3 CHAIN TENSIONER ASSEMBLY
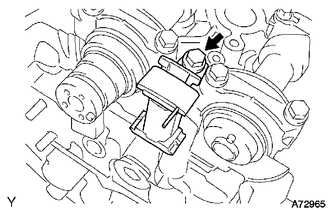
Remove the bolt and No. 3 chain tensioner.
36.REMOVE CAMSHAFT AND NO. 2 CAMSHAFT
- NOTICE:
-
As the thrust clearance of the camshaft is small, the camshaft must be kept level while it is being removed. If the camshaft is not kept level, the portion of the cylinder head which received the shaft thrust may crack or be damaged, causing the camshaft to seize or break. To avoid this, the following steps should be carried out.
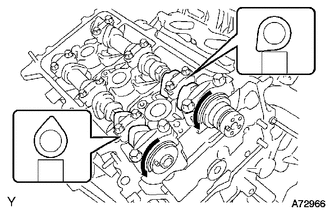
| *A | for Bank 1 |
Remove the camshaft and No. 2 camshaft.
Rotate the camshafts counterclockwise using the hexagonal portion of each camshaft so that the cam lobes of the No. 1 cylinder are oriented as shown in the illustration.
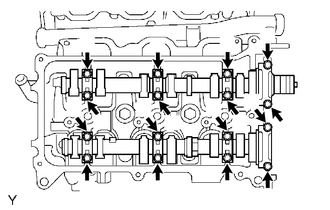
| *A | for Bank 1 |
Uniformly loosen and remove the 16 bearing cap bolts in the sequence shown in the illustration.
Remove the 8 bearing caps and 2 camshafts.
37.REMOVE NO. 1 CAMSHAFT BEARING
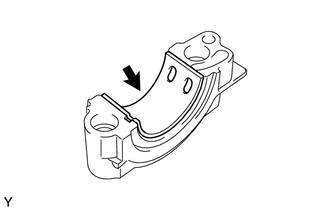
38.REMOVE NO. 2 CAMSHAFT BEARING
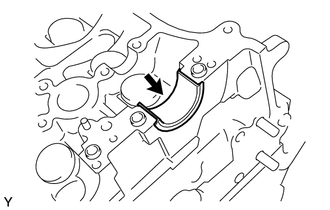
39.REMOVE NO. 3 CAMSHAFT SUB-ASSEMBLY AND NO. 4 CAMSHAFT SUB-ASSEMBLY
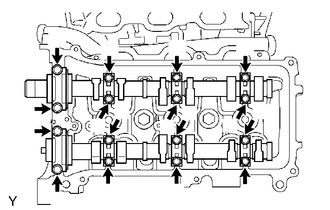
| *A | for Bank 2 |
Remove the No. 3 camshaft and No. 4 camshaft.
Uniformly loosen and remove the 16 bearing cap bolts in the sequence shown in the illustration.
Remove the 8 bearing caps and 2 camshafts.
40.REMOVE REAR WATER BY-PASS JOINT
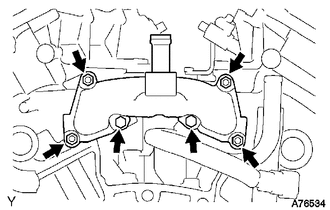
Remove the 2 bolts, 4 nuts, rear water by-pass joint and 2 gaskets.
Remove the O-ring from the No. 1 water outlet pipe.
41.REMOVE CYLINDER HEAD LH
42.REMOVE CYLINDER HEAD SUB-ASSEMBLY
43.REMOVE CYLINDER HEAD GASKET
44.REMOVE NO. 2 CYLINDER HEAD GASKET
45.REMOVE NO. 1 WATER OUTLET PIPE
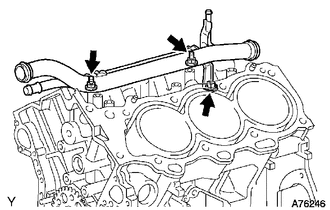
Disconnect the knock control sensor wire.
for Type A:
Remove the 3 bolts and No. 1 water outlet pipe.
for Type B:
Remove the bolt, 2 nuts and No. 1 water outlet pipe.
46.REMOVE KNOCK SENSOR
47.REMOVE REAR ENGINE OIL SEAL RETAINER
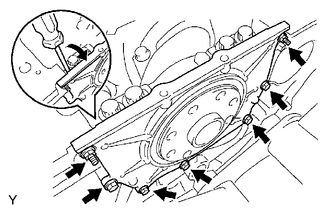
| *a | Pry |
Remove the 5 bolts and 2 nuts.
Using a screwdriver, remove the rear engine oil seal retainer by prying between the rear engine oil seal retainer and crankshaft bearing cap.
- HINT:
-
Tape the screwdriver tip before use.
48.REMOVE REAR CRANKSHAFT OIL SEAL
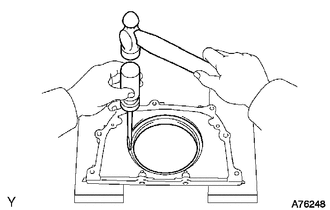
Using a screwdriver and hammer, tap out the rear engine oil seal.
- NOTICE:
-
Be careful not to damage the rear engine oil seal retainer.
49.REMOVE VALVE LIFTER
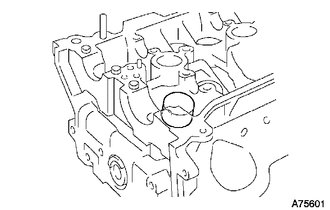
Remove the 24 valve lifters.
- HINT:
-
Arrange the valve lifters in the correct order.
50.REMOVE TAPER SCREW PLUG
- NOTICE:
-
It is not necessary to remove a taper screw plug unless it is being replaced.