1GR-FE ENGINE MECHANICAL ENGINE UNIT REASSEMBLY
PROCEDURE

 1.INSTALL VALVE LIFTER
Apply engine oil to each valve stem and valve lifter, and then install the valve lifters.
Check that the valve lifters rotate smoothly by hand.
2.INSTALL REAR CRANKSHAFT OIL SEAL
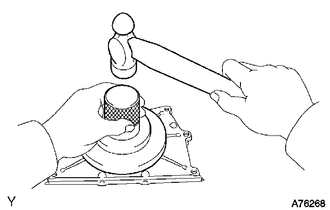
Using SST and a hammer, tap in a new oil seal until its surface is flush with the rear oil seal retainer edge.
- SST
- 09223-78010
Apply MP grease to the lip of the oil seal.
3.INSTALL REAR ENGINE OIL SEAL RETAINER
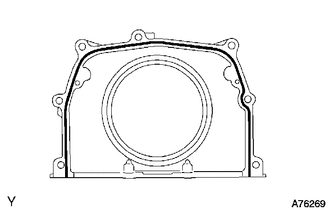
| *1 | Seal Packing |
Remove any old packing (FIPG) material and be careful not to drop any oil on the contact surfaces of the rear engine oil seal retainer and cylinder block.
Apply a continuous line of seal packing to the rear engine oil seal retainer as shown in the illustration.
- Seal packing:
Toyota Genuine Seal Packing Black, Three Bond 1207B or equivalent
- Standard seal diameter:
2.0 to 3.0 mm (0.0787 to 0.118 in.)
- NOTICE:
- ·
Remove any oil from the contact surfaces.
·Install the rear engine oil seal retainer within 3 minutes after applying seal packing.
Install the rear engine oil seal retainer with the 5 bolts and 2 nuts.
- Torque:
- for bolt : 10 N*m (102 kgf*cm, 7 ft.*lbf)
- for nut : 9.0 N*m (92 kgf*cm, 80 in.*lbf)
4.INSTALL KNOCK SENSOR
5.INSTALL NO. 1 WATER OUTLET PIPE
for Type A:
Install the No. 1 water outlet pipe with the 3 bolts.
- Torque:
- 10 N*m (102 kgf*cm, 7 ft.*lbf)
for Type B:
Install the No. 1 water outlet pipe with the bolt and 2 nuts.
- Torque:
- 10 N*m (102 kgf*cm, 7 ft.*lbf)
6.INSTALL NO. 2 CYLINDER HEAD GASKET
7.INSTALL CYLINDER HEAD GASKET
8.INSTALL CYLINDER HEAD SUB-ASSEMBLY
9.INSTALL CYLINDER HEAD LH
10.INSTALL REAR WATER BY-PASS JOINT
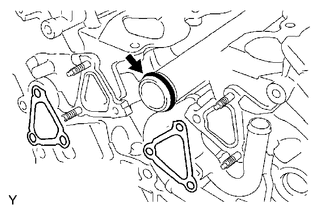
| *1 | New O-Ring |
| *2 | New Gasket |
Apply soapy water to a new O-ring and install it to the No. 1 water outlet pipe. Then install 2 new gaskets to the water ports LH and RH.
Install the rear water by-pass joint with the 2 bolts and 4 nuts.
- Torque:
- for bolt : 10 N*m (102 kgf*cm, 7 ft.*lbf)
- for nut : 9.0 N*m (92 kgf*cm, 80 in.*lbf)
11.INSTALL NO. 1 CAMSHAFT BEARING
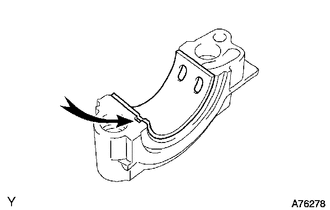
| *1 | Claw |
Align the bearing claw with the groove of the No. 1 camshaft bearing cap and push in the camshaft bearing.
- NOTICE:
- ·
Install the bearing while aligning it with the oil hole in the No. 1 camshaft bearing cap.
·Clean the backside of the bearing and the bearing surface of the No. 1 camshaft bearing cap and do not allow any oil or grease to contact the parts.
12.INSTALL NO. 2 CAMSHAFT BEARING
Install the No. 2 camshaft bearing to the cylinder head.
- NOTICE:
-
Clean the backside of the bearing and the bearing surface of the cylinder head and do not allow any oil or grease to contact the parts.
13.INSTALL CAMSHAFT AND NO. 2 CAMSHAFT
- NOTICE:
-
As the thrust clearance of the camshaft is small, the camshaft must be kept level while it is being installed. If the camshaft is not kept level, the portion of the cylinder head which receives the shaft thrust may crack or be damaged, causing the camshaft to seize or break. To avoid this, the following steps should be carried out.
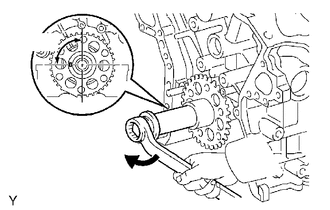
| *1 | Set Key |
| *a | Turn |
Set the crankshaft position.
Using the crankshaft pulley set bolt, turn the crankshaft and set the crankshaft set key to the left horizontal position.
- NOTICE:
-
Having the crankshaft at the wrong angle can cause the piston head and valve head to come into contact with each other when you install the camshaft, causing damage. So always set the crankshaft at the correct angle.
Apply new engine oil to the thrust portion and journals of the camshafts.
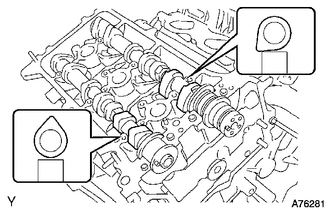
| *A | for Bank 1 |
Place the 2 camshafts onto the cylinder head with the cam lobes of the No. 1 cylinder oriented shown in the illustration.
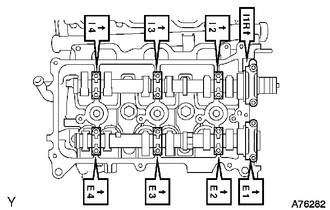
| *A | for Bank 1 |
Set the 8 bearing caps in their proper locations.
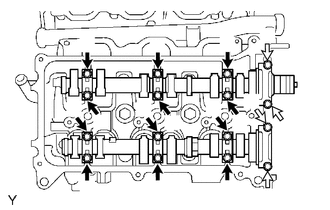
| *A | for Bank 1 |

|
10 mm Head Bolt |

|
12 mm Head Bolt |
Apply a light coat of engine oil to the threads and under the heads of the bearing cap bolts.
Uniformly install the 16 bolts in several steps in the order shown in the illustration.
- Torque:
- for 10 mm head bolt : 9.0 N*m (92 kgf*cm, 80 in.*lbf)
- for 12 mm head bolt : 24 N*m (245 kgf*cm, 18 ft.*lbf)
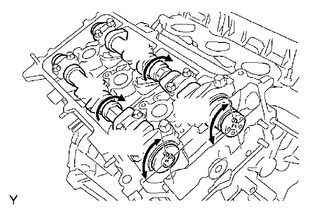
| *A | for Bank 1 |
| *a | Turn |
Using a wrench, turn the camshafts clockwise until the camshaft knock pin is at a position 90° to the cylinder head.
14.INSTALL NO. 3 CAMSHAFT SUB-ASSEMBLY AND NO. 4 CAMSHAFT SUB-ASSEMBLY
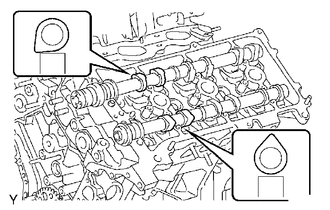
| *A | for Bank 2 |
Place the 2 camshafts onto the cylinder head with the cam lobes of the No. 2 cylinder oriented as shown in the illustration.
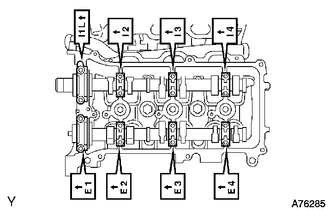
| *A | for Bank 2 |
Set the 8 bearing caps in their proper locations.
Apply a light coat of engine oil to the threads and under the heads of the bearing cap bolts.
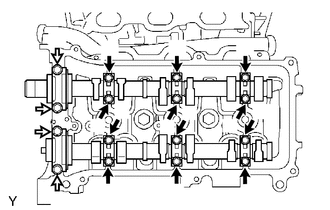
| *A | for Bank 2 |
|
|
10 mm Head Bolt |
|
|
10 mm Head Bolt |
Uniformly install the 16 bolts in several steps in the order shown in the illustration.
- Torque:
- for 10 mm head bolt : 9.0 N*m (92 kgf*cm, 80 in.*lbf)
- for 12 mm head bolt : 24 N*m (245 kgf*cm, 18 ft.*lbf)
15.INSTALL NO. 2 CHAIN TENSIONER ASSEMBLY
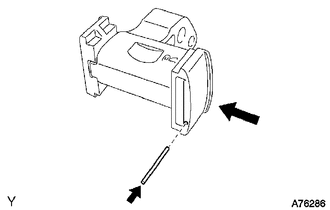
| *a | Push |
While pushing in the tensioner, insert a pin with a diameter of 1.0 mm (0.0394 in.) into the hole to fix the tensioner in place.
Install the No. 2 chain tensioner with the bolt.
- Torque:
- 21 N*m (214 kgf*cm, 15 ft.*lbf)
16.INSTALL CAMSHAFT TIMING GEARS AND NO. 2 CHAIN (for Bank 1)
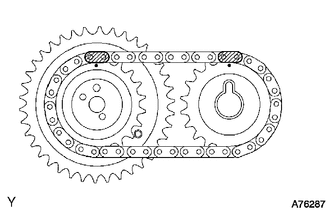
| *1 | Mark Link (Yellow) |
| *2 | Timing Mark |
Align the mark links of the No. 2 chain with the timing marks (1-dot mark) of the camshaft timing gear and sprocket as shown in the illustration.
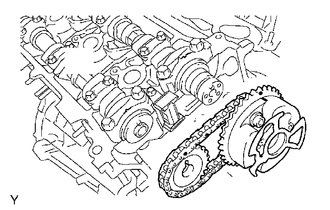
| *1 | Timing Mark |
Align the timing marks on the camshaft timing gear and sprocket with the timing marks on the bearing caps and install the camshaft timing gear and sprocket together with the No. 2 chain to the camshafts.
Temporarily install the 2 camshaft timing gear bolts.
- NOTICE:
-
Do not forcibly push the camshaft timing gear assembly onto the camshaft when installing it.
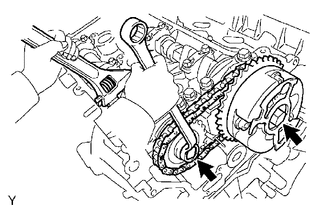
| *1 | Hold |
| *2 | Tighten |
Hold the hexagonal portion of the camshaft with a wrench and tighten the 2 bolts.
- Torque:
- 100 N*m (1020 kgf*cm, 74 ft.*lbf)
Remove the pin from the No. 2 chain tensioner.
17.INSTALL NO. 3 CHAIN TENSIONER ASSEMBLY
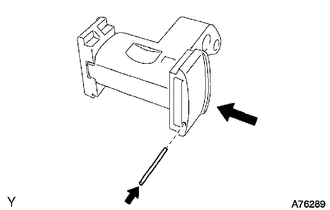
| *a | Push |
While pushing in the tensioner, insert a pin with a diameter of 1.0 mm (0.0394 in.) into the hole to fix the tensioner in place.
Install the No. 3 chain tensioner with the bolt.
- Torque:
- 21 N*m (214 kgf*cm, 15 ft.*lbf)
18.INSTALL CAMSHAFT TIMING GEARS AND NO. 2 CHAIN (for Bank 2)
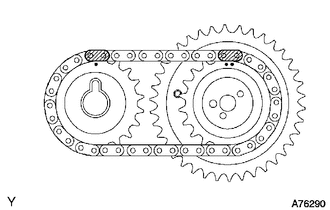
| *1 | Mark Link (Yellow) |
| *2 | Timing Mark |
Align the mark links of the No. 2 chain with the timing marks (1-dot mark and 2-dot mark) of the camshaft timing gear and sprocket as shown in the illustration.
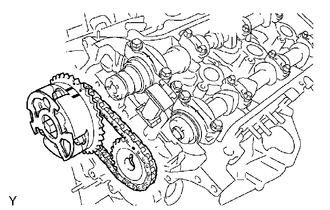
| *1 | Timing Mark |
Align the timing marks on the camshaft timing gear and sprocket with the timing marks on the bearing caps and install the camshaft timing gear and sprocket together with the No. 2 chain to the camshafts.
Temporarily install the 2 camshaft timing gear bolts.
- NOTICE:
-
Do not forcibly push the camshaft timing gear assembly onto the camshaft when installing it.
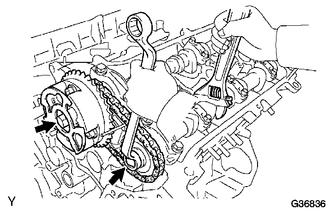
| *a | Hold |
| *b | Tighten |
Hold the hexagonal portion of the camshaft with a wrench and tighten the 2 bolts.
- Torque:
- 100 N*m (1020 kgf*cm, 74 ft.*lbf)
Remove the pin from the No. 3 chain tensioner.
19.INSTALL NO. 1 CHAIN VIBRATION DAMPER
Install the No. 1 chain vibration damper with the 2 bolts.
- Torque:
- 19 N*m (194 kgf*cm, 14 ft.*lbf)
20.INSTALL CRANKSHAFT TIMING GEAR OR SPROCKET
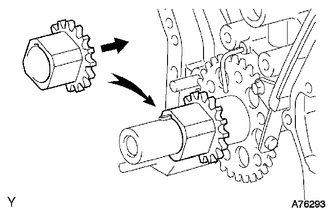
| *a | Inward |
Align the timing gear set key with the key groove of the timing gear.
Install the timing gear to the crankshaft, facing the gear side inward.
21.INSTALL CHAIN TENSIONER SLIPPER
22.INSTALL NO. 1 CHAIN TENSIONER ASSEMBLY
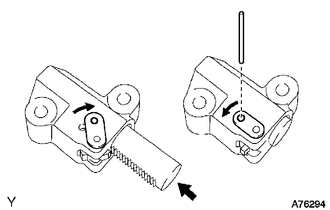
| *1 | Stopper Plate |
| *a | Push |
While turning the stopper plate of the tensioner clockwise, push in the plunger of the tensioner as shown in the illustration.
While turning the stopper plate of the tensioner counterclockwise, insert a bar with a diameter of 3.5 mm (0.138 in.) into the holes in the stopper plate and tensioner to fix the stopper plate in place.
Install the No. 1 chain tensioner with the 2 bolts.
- Torque:
- 10 N*m (102 kgf*cm, 7 ft.*lbf)
23.INSTALL CHAIN SUB-ASSEMBLY
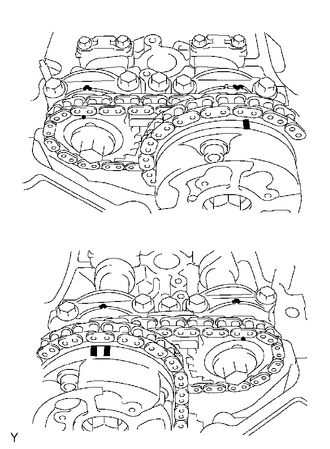
| *A | for Bank 1 |
| *B | for Bank 2 |
| *1 | Timing Mark |
Set the No. 1 cylinder to TDC/compression.
Align the timing marks of the camshaft timing gears and sprockets with the timing marks of the bearing caps.
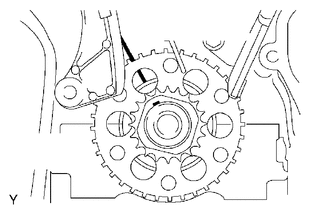
| *1 | Timing Line |
| *2 | Set Key |
Install the crankshaft pulley set bolt and turn the crankshaft to align the crankshaft set key with the timing line of the cylinder block.
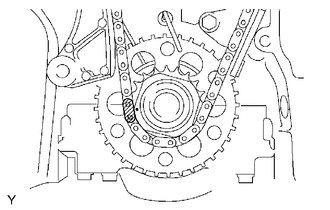
| *1 | Mark Link (Yellow) |
| *2 | Timing Mark |
Align the mark link with the timing mark of the crankshaft timing gear.
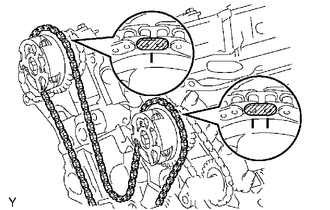
| *1 | Mark Link (Orange) |
| *2 | Timing Mark |
Align the mark links with the timing marks of the camshaft timing gears and install the chain.
24.INSTALL NO. 2 CHAIN VIBRATION DAMPER
Install the 2 No. 2 chain vibration dampers.
25.INSTALL NO. 1 IDLE GEAR SHAFT
Apply a light coat of engine oil to the sliding surface of the No. 1 idle gear shaft.
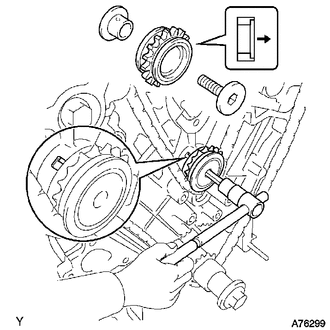
| *1 | Knock Pin |
|
|
Forward |
Temporarily install the No. 1 idle gear shaft and idle gear together with the No. 2 idle gear shaft while aligning the knock pin of the No. 1 idle gear shaft with the knock pin groove of the cylinder block.
- NOTICE:
-
Make sure that the idle gear is installed facing the proper direction.
Using a 10 mm hexagon wrench, tighten the No. 2 idle gear shaft.
- Torque:
- 60 N*m (612 kgf*cm, 44 ft.*lbf)
Remove the bar from the No. 1 chain tensioner.
26.INSTALL ENGINE WATER PUMP ASSEMBLY
Install a new gasket and the engine water pump with the 8 bolts.
- Torque:
- 9.0 N*m (92 kgf*cm, 80 in.*lbf)
27.INSTALL TIMING CHAIN COVER SUB-ASSEMBLY
28.INSTALL FRONT CRANKSHAFT OIL SEAL
29.INSTALL OIL PAN SUB-ASSEMBLY
30.INSTALL OIL STRAINER SUB-ASSEMBLY
31.INSTALL NO. 2 OIL PAN SUB-ASSEMBLY
32.INSTALL OIL PAN DRAIN PLUG
Install the drain plug with a new gasket.
- Torque:
- 40 N*m (408 kgf*cm, 30 ft.*lbf)
33.INSTALL CRANKSHAFT PULLEY
34.SET NO. 1 CYLINDER TO TDC/COMPRESSION
35.INSPECT VALVE CLEARANCE
36.ADJUST VALVE CLEARANCE
37.INSTALL CYLINDER HEAD COVER SUB-ASSEMBLY
38.INSTALL CYLINDER HEAD COVER SUB-ASSEMBLY LH
39.INSTALL WATER INLET ASSEMBLY
40.INSTALL SPARK PLUG
41.INSTALL PCV VALVE
42.INSTALL OIL FILTER BRACKET SUB-ASSEMBLY
43.INSTALL OIL COOLER ASSEMBLY
44.INSTALL OIL FILTER SUB-ASSEMBLY
45.INSTALL OIL CONTROL VALVE FILTER
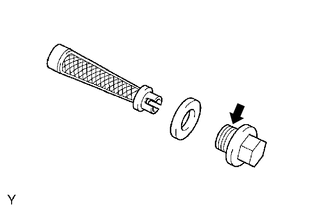
| *1 | Mesh Part |
| *2 | New Gasket |
|
|
Apply Adhesive |
Check that there are no foreign objects on the mesh part of the 2 filters.
Install 2 new gaskets to 2 new plugs.
Insert the filters into the plugs.
Apply adhesive to 2 or 3 threads of the plugs.
- Adhesive:
Toyota Genuine Adhesive 1344, Three Bond 1344 or equivalent
Install the 2 plugs to the cylinder heads.
- Torque:
- 62 N*m (632 kgf*cm, 46 ft.*lbf)
46.INSTALL CRANK POSITION SENSOR
47.INSTALL CAMSHAFT TIMING OIL CONTROL VALVE ASSEMBLY (for Bank 2)
48.INSTALL CAMSHAFT TIMING OIL CONTROL VALVE ASSEMBLY (for Bank 1)
49.INSTALL VVT SENSOR (for Bank 2)
50.INSTALL VVT SENSOR (for Bank 1)
51.INSTALL CYLINDER BLOCK WATER DRAIN COCK SUB-ASSEMBLY
Apply adhesive to 2 or 3 threads at the end of the cylinder block water drain cock.
- Adhesive:
Toyota Genuine Adhesive 1324, Three Bond 1324 or equivalent
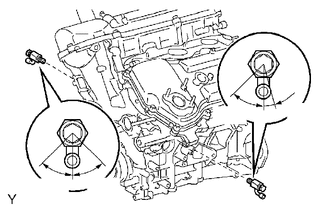
Install the 2 cylinder block water drain cocks.
- Torque:
- 25 N*m (255 kgf*cm, 18 ft.*lbf)
- NOTICE:
- ·
Install the cylinder block water drain cock within 3 minutes after applying adhesive.
·Do not expose the cylinder block water drain cock to coolant within 1 hour after installation.
Rotate the cylinder block water drain cock clockwise as shown in the illustration.
- NOTICE:
- ·
Do not rotate the cylinder block water drain cock by more than 1 revolution (360°) after tightening the cylinder block water drain cock to the specified torque.
·Do not loosen the cylinder block water drain cock after installing it correctly.