R150F /R151F / R156F MANUAL TRANSMISSION / TRANSAXLE MANUAL TRANSMISSION ASSEMBLY REMOVAL
PROCEDURE

 1. PRECAUTION
- NOTICE:
-
After turning the ignition switch off, waiting time may be required before disconnecting the cable from the battery terminal. Therefore, make sure to read the disconnecting the cable from the battery terminal notice before proceeding with work (See page General>INTRODUCTION>REPAIR INSTRUCTION>PRECAUTION)
2.DISCONNECT CABLE FROM NEGATIVE BATTERY TERMINAL
- NOTICE:
-
When disconnecting the cable, some systems need to be initialized after the cable is reconnected (See page General>INTRODUCTION>REPAIR INSTRUCTION>INITIALIZATION).
3.REMOVE CONSOLE BOX ASSEMBLY
4.REMOVE SHIFT LEVER BOOT ASSEMBLY
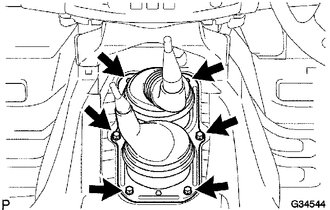
| *1 | Screw |
| *2 | Clip |
Remove the 4 screws, 2 clips and shift lever boot assembly.
5.REMOVE FLOOR SHIFT SHIFT LEVER ASSEMBLY
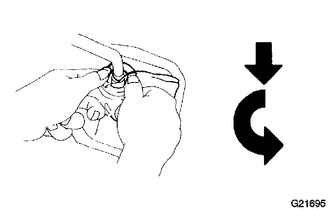
| *1 | Cloth |
| *a | Press down |
| *b | Rotate counterclockwise |
Cover the shift lever cap with a cloth.
Press down on the shift lever cap and rotate it counterclockwise to remove it.
Pull out the shift lever.
6.REMOVE TRANSFER HIGH AND LOW SHIFT LEVER ASSEMBLY
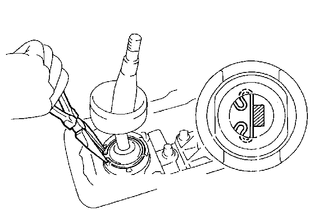
| *1 | Select Return Spring |
| *a | Tip of Shift Lever |
Using needle nose pliers, remove the snap ring and pull out the shift lever.
- HINT:
-
Move the transfer shift lever to the H4 position.
7.REMOVE TRANSFER CASE LOWER PROTECTOR
Remove the 4 bolts and transfer case lower protector.
8.REMOVE NO. 1 ENGINE UNDER COVER
9.REMOVE NO. 2 ENGINE UNDER COVER
10.REMOVE NO. 3 ENGINE UNDER COVER
11.DRAIN MANUAL TRANSMISSION OIL
12.REMOVE PROPELLER WITH CENTER BEARING SHAFT ASSEMBLY
13.REMOVE FRONT PROPELLER SHAFT ASSEMBLY
14.REMOVE FRONT EXHAUST PIPE ASSEMBLY
for 2TR-FE: (See page Engine / Hybrid System>2TR-FE INTAKE / EXHAUST>EXHAUST PIPE>REMOVAL)
for 1KD-FTV w/o DPF: (See page Engine / Hybrid System>1KD-FTV INTAKE / EXHAUST>EXHAUST PIPE(w/o DPF)>REMOVAL)
for 1KD-FTV w/ DPF: (See page Engine / Hybrid System>1KD-FTV INTAKE / EXHAUST>EXHAUST PIPE(w/ DPF)>REMOVAL)
for 2KD-FTV w/o DPF: (See page Engine / Hybrid System>2KD-FTV INTAKE / EXHAUST>EXHAUST PIPE(w/o DPF)>REMOVAL)
for 2KD-FTV w/DPF: (See page Engine / Hybrid System>2KD-FTV INTAKE / EXHAUST>EXHAUST PIPE(w/ DPF)>REMOVAL)
15.DISCONNECT WIRE HARNESS
Transmission side:
Disconnect the back-up light switch connector.
Transfer side:
Disconnect the No. 1, No. 2 and No. 3 transfer indicator switch connectors, and vehicle speed sensor connector.
16.DISCONNECT CLUTCH RELEASE CYLINDER ASSEMBLY
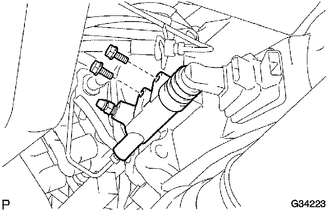
Remove the 2 bolts and disconnect the release cylinder assembly.
17.REMOVE STARTER ASSEMBLY
for 2TR-FE 1.6kW Type: (See pageEngine / Hybrid System>2TR-FE STARTING>STARTER(for 1.6 kW Type)>REMOVAL )
for 2TR-FE 1.7kW Type: (See page Engine / Hybrid System>2TR-FE STARTING>STARTER(for 1.7 kW Type)>REMOVAL)
for 1KD-FTV DENSO made: (See page Engine / Hybrid System>1KD-FTV STARTING>STARTER(for DENSO Made)>REMOVAL)
for 1KD-FTV BOSCH made: (See page Engine / Hybrid System>1KD-FTV STARTING>STARTER(for BOSCH Made)>REMOVAL)
for 2KD-FTV DENSO made: (See page Engine / Hybrid System>2KD-FTV STARTING>STARTER(for DENSO Made)>REMOVAL)
for 2KD-FTV BOSCH made: (See page Engine / Hybrid System>2KD-FTV STARTING>STARTER(for BOSCH Made)>REMOVAL)
for 2TR-FBE: (See page Engine / Hybrid System>2TR-FBE STARTING>STARTER>REMOVAL)
18.REMOVE NO. 3 FRAME CROSSMEMBER SUB-ASSEMBLY
Support the transmission rear side with a support stand.
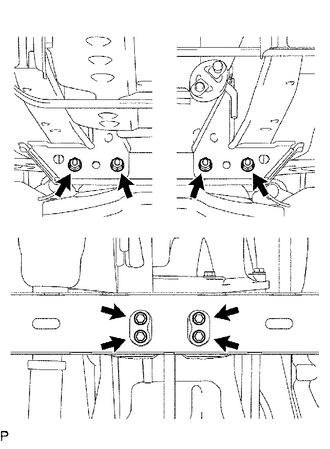
Remove the 4 set bolts of the rear No. 1 engine mounting insulator.
Remove the 4 bolts, 4 nuts and No. 3 frame crossmember sub-assembly.
19.REMOVE REAR NO. 1 ENGINE MOUNTING INSULATOR
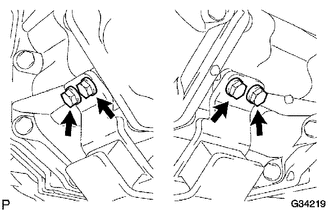
Remove the 4 bolts and mounting insulator.
20.REMOVE MANIFOLD STAY (for TR Series Engine)
21.REMOVE STIFFENER PLATE (for 1KD-FTV, 2KD-FTV)
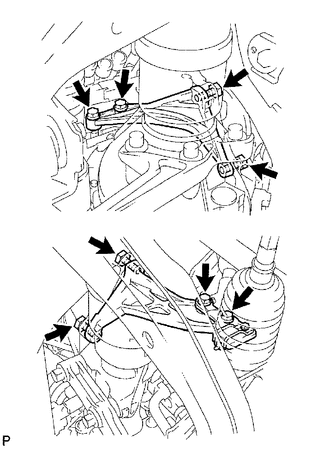
Remove the 4 bolts and stiffener plate RH.
Remove the 4 bolts and stiffener plate LH.
22.REMOVE MANUAL TRANSMISSION UNIT ASSEMBLY
Using a transmission jack, support the transmission.
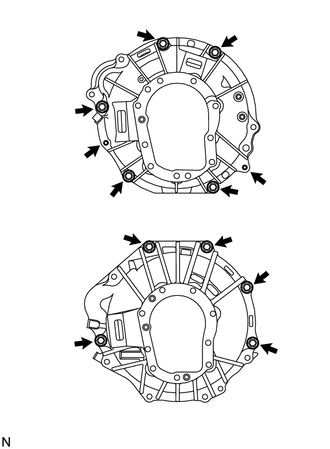
| *A | for 2TR-FE |
| *B | for 1KD-FTV, 2KD-FTV |
Remove the support stand from the transmission.
Remove the 5 bolts and transmission.
23.REMOVE TRANSFER ASSEMBLY