2TR-FE ENGINE MECHANICAL ENGINE ASSEMBLY INSTALLATION
PROCEDURE

 1.INSTALL ENGINE HANGER
12361
2.INSTALL FRONT ENGINE MOUNTING INSULATOR
- HINT:
-
Perform this procedure only when replacement of the front engine mounting insulator is necessary.
Install the 2 front engine mounting insulators to the 2 front engine mounting brackets with the 2 nuts.
- Torque:
- 58 N*m (591 kgf*cm, 43 ft.*lbf)
12391
3.INSTALL FRONT ENGINE MOUNTING HEAT INSULATOR RH
Install the front engine mounting heat insulator RH to the front engine mounting insulator with the bolt.
- Torque:
- 13 N*m (133 kgf*cm, 10 ft.*lbf)
82121
4.INSTALL ENGINE WIRE
Install the engine wire to the engine assembly.
11000
5.REMOVE ENGINE FROM ENGINE STAND
- NOTICE:
- ·
Pay attention to the angle of the sling device as the engine assembly or engine hangers may be damaged or deformed if the angle is incorrect.
·With the exception of installing the engine assembly to an engine stand or removing the engine assembly from an engine stand, do not perform any work on the engine while it is suspended, as doing so is dangerous.
Attach the engine sling device and hang the engine assembly with the chain block.
Remove the engine assembly from the engine stand.
11000
6.INSTALL ENGINE ASSEMBLY
- HINT:
-
Perform "Inspection After Repair" after replacing the engine assembly.
-
Click hereEngine / Hybrid System>2TR-FE ENGINE CONTROL>SFI SYSTEM>INITIALIZATION
Slowly lower the engine assembly into the engine compartment.
Install the engine assembly to the body with the 4 bolts and 4 nuts.
- Torque:
- 42 N*m (428 kgf*cm, 31 ft.*lbf)
- HINT:
-
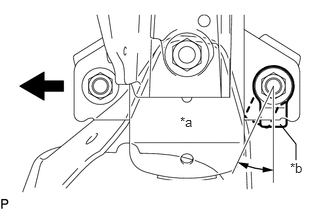 3.083,1.667 3.083,1.5 3.083,1.5 2.917,1.292 false 1.875,1.188 2.188,1.344 0.313,0.156 10 false *a 3.021,1.667 3.25,1.854 0.229,0.188 10 false *b
*a Front Engine Mounting Insulator
(LH Side)*b Claw (Stopper) 
Front
- ·
Make sure to tighten the side with the nut.
·When installing a bolt with a claw (stopper), make sure to install the bolt with the claw (stopper) as shown in the illustration so that a clearance is maintained between the claw (stopper) and the intermediate shaft.
Remove the 2 bolts and 2 engine hangers.
11355
7.INSTALL REAR END PLATE
Install the rear end plate to the cylinder block with the bolt.
- Torque:
- 18 N*m (184 kgf*cm, 13 ft.*lbf)
Connect the No. 1 water by-pass pipe to the rear end plate with the bolt.
- Torque:
- 17.5 N*m (178 kgf*cm, 13 ft.*lbf)
13405
8.INSTALL FLYWHEEL SUB-ASSEMBLY
31250
9.INSTALL CLUTCH DISC ASSEMBLY
31210
10.INSTALL CLUTCH COVER ASSEMBLY
31210
11.INSPECT AND ADJUST CLUTCH COVER ASSEMBLY
12.INSTALL MANUAL TRANSMISSION UNIT ASSEMBLY
41110F
13.INSTALL FRONT DIFFERENTIAL CARRIER ASSEMBLY (for 4WD)
44250
14.INSTALL POWER STEERING LINK ASSEMBLY (for 4WD)
45219
15.CONNECT STEERING SLIDING YOKE (for 4WD)
43410D
16.INSTALL FRONT DRIVE SHAFT HOLE SNAP RING (for 4WD)
43420
17.INSTALL FRONT DRIVE SHAFT ASSEMBLY LH (for 4WD)
43410
18.INSTALL FRONT DRIVE SHAFT ASSEMBLY RH (for 4WD)
- HINT:
-
Use the same procedure described for the LH side.
89543
19.CONNECT FRONT SPEED SENSOR LH (for 4WD)
48069
20.CONNECT FRONT LOWER NO. 1 SUSPENSION ARM ASSEMBLY LH (for 4WD)
21.CONNECT TIE ROD END SUB-ASSEMBLY LH (for 4WD)
43502H
22.INSTALL FRONT AXLE SHAFT NUT (for 4WD)
43514C
23.INSTALL FRONT AXLE HUB GREASE CAP (for 4WD)
37100
24.INSTALL PROPELLER SHAFT WITH CENTER BEARING ASSEMBLY (for 2WD and Pre-Runner)
37100
25.INSTALL PROPELLER SHAFT WITH CENTER BEARING ASSEMBLY (for 4WD)
51569
26.INSTALL PROPELLER SHAFT GUARD
37140
27.INSTALL FRONT PROPELLER SHAFT ASSEMBLY (for 4WD)
51561D
28.INSTALL PROPELLER SHAFT GUARD (for 4WD)
17410
29.INSTALL FRONT EXHAUST PIPE ASSEMBLY
30.CONNECT ENGINE WIRE
Connect the sensor bracket to the right side of the frame with the bolt.
- Torque:
- 30 N*m (306 kgf*cm, 22 ft.*lbf)
Connect the air fuel ratio sensor connector.
Connect the wire clamp to the front engine mounting bracket LH with the bolt.
- Torque:
- 13 N*m (133 kgf*cm, 10 ft.*lbf)
Attach the clamp.
Connect the 2 connectors to the engine room relay block.
Connect the engine wire to the engine room relay block with the nut.
- Torque:
- 12.5 N*m (127 kgf*cm, 9 ft.*lbf)
Attach the 2 claws and install the No. 1 relay block cover side to the engine room relay block.
Attach the 3 claws and install the No. 1 relay block cover upper to the engine room relay block.
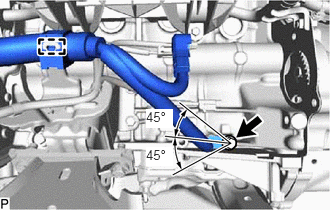
Attach the clamp and install the No. 2 engine wire with the bolt.
- Torque:
- 27 N*m (275 kgf*cm, 20 ft.*lbf)
- HINT:
-
Position the No. 2 engine wire as shown in the illustration.
Attach the 2 clamps and connect the No. 2 engine wire with the 2 bolts.
- Torque:
- 14 N*m (143 kgf*cm, 10 ft.*lbf)
Install the battery tray.
Install the battery.
Install the battery hold down clamp with the 2 nuts.
- Torque:
- 5.4 N*m (55 kgf*cm, 48 in.*lbf)
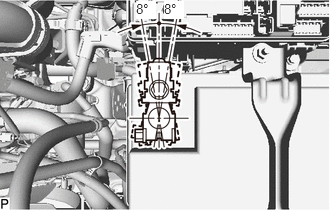
Tighten the nut and install the positive (+) battery terminal.
- Torque:
- 5.4 N*m (55 kgf*cm, 48 in.*lbf)
- HINT:
-
Position the positive (+) battery terminal as shown in the illustration.
Connect the engine room main wire to the positive (+) battery terminal with the nut.
- Torque:
- 7.6 N*m (77 kgf*cm, 67 in.*lbf)
Connect the connector to the engine room main wire.
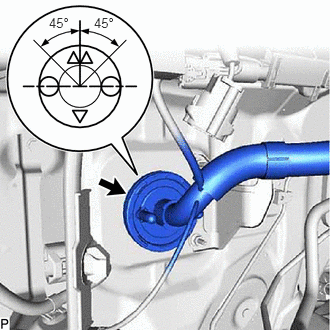
Push the engine wire through the dash panel into the cabin.
- HINT:
-
The wire should be within the range shown in the illustration.
w/ Secondary Air Injection System:
Connect the engine wire to the air injection control bracket with the bolt.
- Torque:
- 8.3 N*m (85 kgf*cm, 73 in.*lbf)
Attach the clamp.
Connect the air injection control driver connector.
w/o Secondary Air Injection System:
Connect the engine wire to the air injection control bracket with the bolt.
- Torque:
- 8.3 N*m (85 kgf*cm, 73 in.*lbf)
Attach the 2 clamps and connect the 3 connectors to the instrument panel wire.
89661
31.INSTALL ECM
55550
32.INSTALL GLOVE COMPARTMENT DOOR ASSEMBLY
23271H
33.CONNECT NO. 1 FUEL HOSE
23273C
34.CONNECT NO. 2 FUEL HOSE
17344
35.CONNECT NO. 4 AIR INJECTION SYSTEM HOSE (w/ Secondary Air Injection System)
44774
36.CONNECT UNION TO CONNECTOR TUBE HOSE
Connect the union to connector tube hose to the intake manifold, and slide the clamp to secure the hose.
37.CONNECT PURGE LINE HOSE
Connect the purge line hose to the purge VSV, and slide the clamp to secure the hose.
28100
38.INSTALL STARTER ASSEMBLY
88320
39.CONNECT COOLER COMPRESSOR ASSEMBLY (w/ Air Conditioning System)
11452
40.INSTALL ENGINE OIL LEVEL DIPSTICK GUIDE
Install a new O-ring and the engine oil level dipstick guide with the bolt.
- Torque:
- 8.0 N*m (82 kgf*cm, 71 in.*lbf)
15301
41.INSTALL ENGINE OIL LEVEL DIPSTICK
44320
42.CONNECT VANE PUMP ASSEMBLY
Connect the vane pump assembly with the 2 bolts.
- Torque:
- 21 N*m (214 kgf*cm, 15 ft.*lbf)
Connect the power steering oil pressure switch connector.
43.CONNECT HEATER HOSE
Connect the heater water outlet hose to the heater radiator unit sub-assembly, and slide the clamp to secure the hose.
Connect the heater water inlet hose to the heater radiator unit sub-assembly, and slide the clamp to secure the hose.
16400
44.INSTALL RADIATOR ASSEMBLY
16711
45.INSTALL FAN SHROUD
16470
46.INSTALL RADIATOR RESERVOIR
17621A
47.CONNECT AIR PUMP INLET (w/ Secondary Air Injection System)
16572
48.INSTALL RADIATOR HOSE OUTLET
16571
49.INSTALL RADIATOR HOSE INLET
16593
50.INSTALL NO. 1 RADIATOR AIR GUIDE
53294C
51.INSTALL RADIATOR SIDE DEFLECTOR LH
53293C
52.INSTALL RADIATOR SIDE DEFLECTOR RH
- HINT:
-
Use the same procedure described for the LH side.
17861
53.INSTALL INTAKE AIR CONNECTOR
17701
54.INSTALL AIR CLEANER CASE SUB-ASSEMBLY
Install the air cleaner case sub-assembly with the 3 bolts.
- Torque:
- 6.0 N*m (61 kgf*cm, 53 in.*lbf)
Attach the 3 wire harness clamps.
17801
55.INSTALL AIR CLEANER FILTER ELEMENT SUB-ASSEMBLY
Install the air cleaner filter element sub-assembly to the air cleaner cap sub-assembly.
17705
56.INSTALL AIR CLEANER CAP SUB-ASSEMBLY WITH NO. 1 AIR CLEANER HOSE
Install the air cleaner cap sub-assembly with air cleaner hose and tighten the hose clamp.
- Torque:
- 4.0 N*m (41 kgf*cm, 35 in.*lbf)
Attach the 4 clamps.
Connect the intake mass air flow meter connector and attach the 2 wire harness clamps.
53301
57.INSTALL HOOD SUB-ASSEMBLY
Install the hood sub-assembly to the 2 hood hinge assemblies with the 4 bolts.
- Torque:
- 13 N*m (133 kgf*cm, 10 ft.*lbf)
Connect the washer nozzle hose to the hood sub-assembly.
58.CONNECT CABLE TO NEGATIVE BATTERY TERMINAL
- NOTICE:
-
When disconnecting the cable, some systems need to be initialized after the cable is reconnected.
-
Click hereGeneral>INTRODUCTION>REPAIR INSTRUCTION>INITIALIZATION
59.ADD ENGINE OIL
60.ADD ENGINE COOLANT
61.ADD MANUAL TRANSMISSION OIL
for R151F:
Click hereDrivetrain>R151F MANUAL TRANSMISSION / TRANSAXLE>MANUAL TRANSMISSION OIL>REPLACEMENT
62.ADD DIFFERENTIAL OIL (for 4WD)
63.INSPECT FOR FUEL LEAK
64.INSPECT FOR OIL LEAK
65.INSPECT FOR COOLANT LEAK
66.INSPECT FOR EXHAUST GAS LEAK
67.INSPECT IGNITION TIMING
68.INSPECT ENGINE IDLE SPEED
69.CHECK CO/HC
22030
70.CHECK THROTTLE BODY WITH MOTOR ASSEMBLY
53882F
71.INSTALL FRONT FENDER SEAL LH
for 2WD:
Install the front fender seal LH with 5 new clips.
for 4WD and Pre-Runner:
Install the front fender seal LH with 6 new clips.
53882F
72.INSTALL FRONT FENDER SEAL RH
for 2WD:
Install the front fender seal RH with 5 new clips.
for 4WD and Pre-Runner:
Install the front fender seal RH with 6 new clips.
53737B
73.INSTALL FRONT UPPER FENDER APRON SEAL LH
Install the front upper fender apron seal LH with 6 new clips.
53736
74.INSTALL FRONT UPPER FENDER APRON SEAL RH
w/ Secondary Air Injection System:
for Pre-Runner:
Install the front upper fender apron seal RH with 5 new clips.
w/o Secondary Air Injection System:
for 2WD:
Install the front upper fender apron seal RH with 6 new clips.
for 4WD and Pre-Runner:
Install the front upper fender apron seal RH with 6 new clips.
51407A
75.INSTALL NO. 3 ENGINE UNDER COVER SUB-ASSEMBLY (for 4WD and Pre-Runner)
- Torque:
- 28 N*m (286 kgf*cm, 21 ft.*lbf)
51442
76.INSTALL NO. 2 ENGINE UNDER COVER (for 4WD and Pre-Runner)
- Torque:
- 28 N*m (286 kgf*cm, 21 ft.*lbf)
51410
77.INSTALL NO. 1 ENGINE UNDER COVER ASSEMBLY (for 4WD and Pre-Runner)
- Torque:
- for M6 bolt : 11.5 N*m (117 kgf*cm, 8 ft.*lbf)
- for M8 bolt : 28 N*m (286 kgf*cm, 21 ft.*lbf)
78.CHECK ABS SPEED SENSOR SIGNAL (for 4WD)