"CHK" message(s) are displayed on the SIGNAL CHECK screen.
Circuit diagnosis · Vehicles built Aug 2013 – Jul 2014
Versions by build date: Aug 2013 – Jul 2014 from Aug 2014
DESCRIPTION
On the SIGNAL CHECK screen, it is possible to check if the signals sent to the parking assist ECU are normal (Click here).- HINT:
- On the SIGNAL CHECK screen, "OK" (blue) is displayed for items with a normal inspection result or input state.
- On the SIGNAL CHECK screen, "CHK" (red) is displayed for items with an abnormal inspection result or input state.
- Displayed items may differ depending on vehicle specifications.
- On the SIGNAL CHECK screen, "OK" (blue) is displayed for items with a normal inspection result or input state.
| Item |
Signal Input Method |
Detail |
DTC Output when Abnormal Result is Displayed |
Signal Receiver |
| CAN |
CAN communication |
CAN communication signal |
DTC is output |
Related ECUs |
| CAMERA SW |
Vehicle wire harness |
Steering pad switch assembly (wide view front and side monitor switch) signal input |
DTC is not output |
Steering pad switch assembly (wide view front and side monitor switch) |
| MIRROR SW |
Vehicle wire harness |
Outer rear view mirror retract signal input |
DTC is not output |
Main body ECU (Multiplex network body ECU) |
| SHIFT |
Vehicle wire harness |
Shift signal input |
DTC is output |
Park/neutral position switch assembly |
| HANDLE |
CAN communication |
Steering position signal input |
DTC is output |
ECM |
| BODY |
CAN communication |
Body size signal |
DTC is output |
ECM |
| DEST |
CAN communication |
Destination information signal input |
DTC is output |
ECM |
| D-CAM SET |
Vehicle wire harness |
Driver side television camera feedback signal |
DTC is output |
Individual setting |
| T/M |
CAN communication |
Transmission type signal |
DTC is output |
ECM |
WIRING DIAGRAM
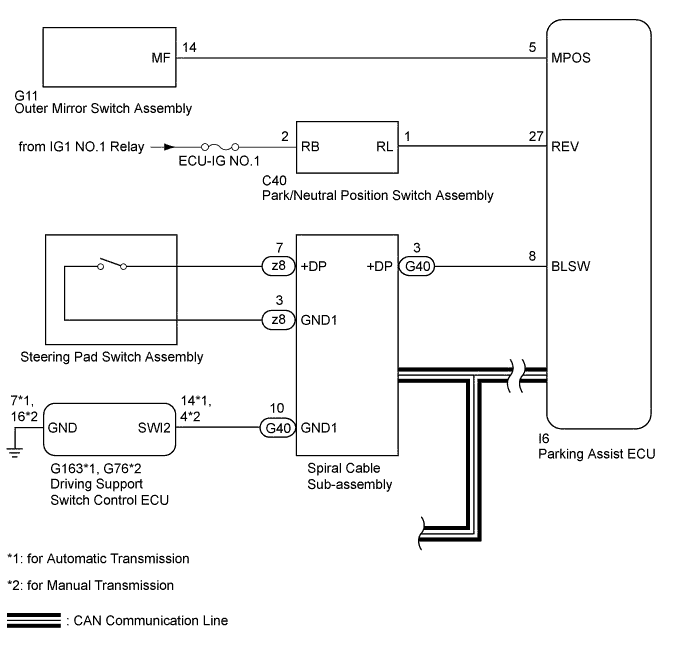

INSPECTION PROCEDURE
- NOTICE:
- When "System initializing" is displayed on the navigation receiver assembly*1 or radio and display receiver assembly*2 after the battery cable is disconnected, correct the steering angle neutral point (Click here).
- Depending on the parts that are replaced or operations that are performed during vehicle inspection or maintenance, calibration of other systems as well as the parking assist monitor system may be needed (Click here).
- When "System initializing" is displayed on the navigation receiver assembly*1 or radio and display receiver assembly*2 after the battery cable is disconnected, correct the steering angle neutral point (Click here).
- *1: for Navigation Receiver Type
- *2: for Radio and Display Type
| 1. CHECK DISPLAY CHECK MODE |

Check which items display on the SIGNAL CHECK screen.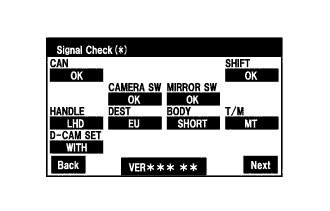
Result Result
Proceed to
"CAMERA SW" displays "CHK" (red)
A
"SHIFT" displays "CHK" (red)
B
"MIRROR SW" displays "CHK" (red)
C
"CAN" displays "CHK" (red)
D
"HANDLE", "BODY", "DEST", "T/M" or "D-CAM SET" displays unmatched information
D
|
|
||||
|
|
||||
|
|
||||


| A | |
 |
| 2. INSPECT STEERING PAD SWITCH ASSEMBLY (WIDE VIEW FRONT AND SIDE MONITOR SWITCH) |
Remove the steering pad switch assembly (Click here).
Inspect the steering pad switch assembly (Click here).
|
|
||||
| OK | |
|
| 3. INSPECT SPIRAL CABLE SUB-ASSEMBLY |
Remove the spiral cable sub-assembly (Click here).
Inspect the spiral cable sub-assembly (Click here).
|
|
||||
| OK | |
|
| 4. CHECK HARNESS AND CONNECTOR (SPIRAL CABLE SUB-ASSEMBLY - PARKING ASSIST ECU) |
Disconnect the G40 spiral cable sub-assembly connector.
Disconnect the I6 parking assist ECU connector.
Measure the resistance according to the value(s) in the table below.
- Standard Resistance:
Tester Connection
Condition
Specified Condition
G40-3 (+DP) - I6-8 (BLSW)
Always
Below 1 Ω
G40-3 (+DP) - Body ground
Always
10 kΩ or higher
|
|
||||
| OK | |
|
| 5. CHECK HARNESS AND CONNECTOR (DRIVING SUPPORT SWITCH CONTROL ECU - SPIRAL CABLE SUB-ASSEMBLY AND BODY GROUND) |
for Automatic Transmission:
Disconnect the G163 driving support switch control ECU connector.
Disconnect the G40 spiral cable sub-assembly connector.
Measure the resistance according to the value(s) in the table below.
- Standard Resistance:
Tester Connection
Condition
Specified Condition
G163-14 (SWI2) - G40-10 (GND1)
Always
Below 1 Ω
G163-14 (SWI2) - Body ground
Always
10 kΩ or higher
G163-7 (GND) - Body ground
Always
Below 1 Ω
for Manual Transmission:
Disconnect the G76 driving support switch control ECU connector.
Disconnect the G40 spiral cable sub-assembly connector.
Measure the resistance according to the value(s) in the table below.
- Standard Resistance:
Tester Connection
Condition
Specified Condition
G76-4 (SWI2) - G40-10 (GND1)
Always
Below 1 Ω
G76-4 (SWI2) - Body ground
Always
10 kΩ or higher
G76-16 (GND) - Body ground
Always
Below 1 Ω
|
|
||||
| OK | |
|
| 6. REPLACE DRIVING SUPPORT SWITCH CONTROL ECU |
Replace the driving support switch control ECU with a new or normally functioning one (Click here).
Check that "CAMERA SW" displays "OK" on the SIGNAL CHECK screen.
- OK:
- "CAMERA SW" displays "OK".
|
|
||||
| OK | ||
 |
||
| ||
| 7. INSPECT PARK/NEUTRAL POSITION SWITCH ASSEMBLY |
Remove the park/neutral position switch assembly (Click here).
Inspect the park/neutral position switch assembly (Click here).
|
|
||||
| OK | |
|
| 8. CHECK HARNESS AND CONNECTOR (PARK/NEUTRAL POSITION SWITCH ASSEMBLY - PARKING ASSIST ECU AND BATTERY) |
Disconnect the C40 park/neutral position switch assembly connector.
Disconnect the I6 parking assist ECU connector.
Measure the voltage according to the value(s) in the table below.
- Standard Voltage:
Tester Connection
Switch Condition
Specified Condition
C40-2 (RB) - Body ground
Engine switch on (IG)
11 to 14 V
Measure the resistance according to the value(s) in the table below.
- Standard Resistance:
Tester Connection
Condition
Specified Condition
C40-1 (RL) - I6-27 (REV)
Always
Below 1 Ω
C40-1 (RL) - Body ground
Always
10 kΩ or higher
| Proceed to |
Result |
| OK (for LHD) |
A |
| OK (for RHD) |
B |
| NG |
C |
|
|
||||
|
|
||||
| A | ||
|
||
| ||
| 9. INSPECT OUTER MIRROR SWITCH ASSEMBLY |
Remove the outer mirror switch assembly (Click here).
Inspect the outer mirror switch assembly (Click here).
|
|
||||
| OK | |
|
| 10. CHECK HARNESS AND CONNECTOR (OUTER MIRROR SWITCH ASSEMBLY - PARKING ASSIST ECU) |
Disconnect the G11 outer mirror switch assembly connector.
Disconnect the I6 parking assist ECU connector.
Measure the resistance according to the value(s) in the table below.
- Standard Resistance:
Tester Connection
Condition
Specified Condition
G11-14 (MF) - I6-5 (MPOS)
Always
Below 1 Ω
G11-14 (MF) - Body ground
Always
10 kΩ or higher
| Proceed to |
Result |
| OK (for LHD) |
A |
| OK (for RHD) |
B |
| NG |
C |
|
|
||||
|
|
||||
| A | ||
|
||
| ||