DOOR / HATCH FUEL LID LOCK CONTROL CABLE ASSEMBLY(for 5 Door) INSTALLATION
CAUTION / NOTICE / HINT
- HINT:
-
A bolt without a torque specification is shown in the standard bolt chart.
-
Click hereGeneral>SPECIFICATIONS>STANDARD BOLT>SPECIFIED TORQUE FOR STANDARD BOLTS
PROCEDURE

 77035
1.INSTALL FUEL LID LOCK CONTROL CABLE SUB-ASSEMBLY
for LHD:
Attach the 14 clamps to install the fuel lid lock control cable sub-assembly.
for RHD:
Attach the 17 clamps to install the fuel lid lock control cable sub-assembly.
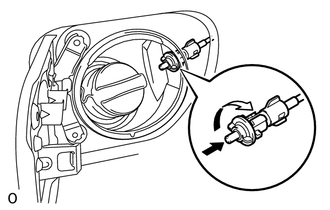
Install the lock retainer and turn it clockwise.
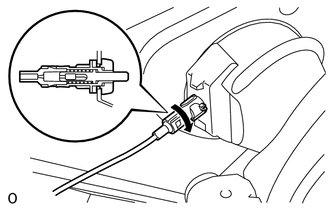
Install the fuel lid lock control cable sub-assembly and turn it clockwise as shown in the illustration.
58510D
2.INSTALL FRONT FLOOR CARPET ASSEMBLY
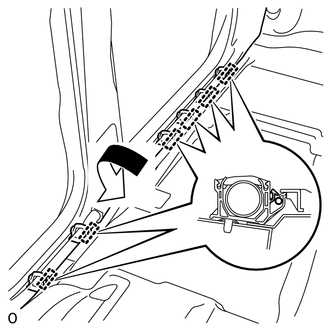
for LHD:
Return the front floor carpet assembly to its original position and attach the 6 clamps.
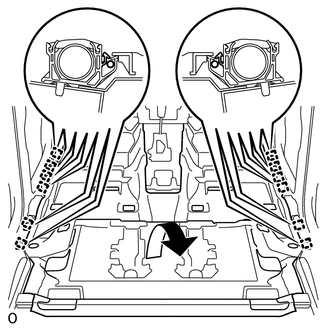
for RHD:
Return the front floor carpet assembly to its original position and attach the 12 clamps.
77306
3.INSTALL FUEL LID LOCK OPEN LEVER SUB-ASSEMBLY
Connect the fuel lid lock control cable assembly to the fuel lid lock open lever sub-assembly.
Attach the 3 claws to install the fuel lid lock open lever sub-assembly.
67920
4.INSTALL DOOR SCUFF PLATE ASSEMBLY LH
67910
5.INSTALL DOOR SCUFF PLATE ASSEMBLY RH (for RHD)
62640P
6.INSTALL REAR QUARTER TRIM PANEL ASSEMBLY LH
64740C
7.INSTALL DECK TRIM SIDE PANEL ASSEMBLY LH
74603C
8.INSTALL ASSIST GRIP SUB-ASSEMBLY (w/ Rear No. 2 Seat)
74617A
9.INSTALL ASSIST GRIP PLUG (w/ Rear No. 2 Seat)
64712F
10.INSTALL FRONT DECK SIDE TRIM COVER (w/ Tonneau Cover)
64937A
11.INSTALL NO. 1 TONNEAU COVER HOLDER CAP (w/o Tonneau Cover)
64725D
12.INSTALL NO. 1 LUGGAGE COMPARTMENT TRIM HOOK
73233A
13.INSTALL REAR NO. 1 SEAT OUTER LAP BELT ANCHOR COVER
58570C
14.INSTALL REAR FLOOR CARPET ASSEMBLY (w/o Rear No. 2 Seat)
57412C
15.INSTALL FLOOR SIDE RAIL LH (w/ Deck Rail)
57411D
16.INSTALL FLOOR SIDE RAIL RH (w/ Deck Rail)
- HINT:
-
Use the same procedure described for the LH side.
58574A
17.INSTALL REAR FLOOR MAT REAR SUPPORT PLATE (w/o Rear No. 2 Seat)
58401A
18.INSTALL NO. 1 DECK BOARD SUB-ASSEMBLY (w/o Rear No. 2 Seat)
64717A
19.INSTALL FRONT LUGGAGE COMPARTMENT TRIM COVER (w/o Rear No. 2 Seat)
64910M
20.INSTALL TONNEAU COVER ASSEMBLY (w/ Tonneau Cover)
62332C
21.INSTALL REAR DOOR OPENING TRIM WEATHERSTRIP LH
67918D
22.INSTALL REAR DOOR SCUFF PLATE LH
67917C
23.INSTALL REAR DOOR SCUFF PLATE RH (for RHD)
- HINT:
-
Use the same procedure described for the LH side.
67934
24.INSTALL QUARTER SCUFF PLATE LH (w/ Rear No. 2 Seat)
67933
25.INSTALL QUARTER SCUFF PLATE RH (for RHD, w/ Rear No. 2 Seat)
- HINT:
-
Use the same procedure described for the LH side.
58371F
26.INSTALL REAR NO. 1 FLOOR STEP COVER (w/ Rear No. 2 Seat)
27.INSTALL REAR NO. 1 SEATBACK ASSEMBLY (w/ Rear No. 1 Seat)
for 60/40 Split Double-folding Seat Type LH Side:
for 60/40 Split Double-folding Seat Type RH Side:
28.INSTALL REAR NO. 1 SEAT ASSEMBLY (w/ Rear No. 1 Seat)
for 60/40 Split Slide Walk-in Seat Type LH Side:
for 60/40 Split Slide Walk-in Seat Type RH Side:
29.INSTALL REAR NO. 2 SEAT ASSEMBLY (w/ Rear No. 2 Seat)
for Manual Seat Type:
Click hereVehicle Interior>SEAT>REAR NO. 2 SEAT ASSEMBLY (for Manual Seat Type LH Side)>INSTALLATION
for Power Seat Type:
Click hereVehicle Interior>SEAT>REAR NO. 2 SEAT ASSEMBLY (for Power Seat Type LH Side)>INSTALLATION
for Face to Face Seat Type:
Click hereVehicle Interior>SEAT>REAR NO. 2 SEAT ASSEMBLY(for Face to Face Seat Type)>INSTALLATION
58810J
30.INSTALL CONSOLE BOX ASSEMBLY
for Automatic Transmission:
Click hereVehicle Interior>INTERIOR PANELS / TRIM>FRONT CONSOLE BOX(for Automatic Transmission)>INSTALLATION
for Manual Transmission:
Click hereVehicle Interior>INTERIOR PANELS / TRIM>FRONT CONSOLE BOX(for Manual Transmission)>INSTALLATION
w/ Refrigerated Cool Box:
Click hereVehicle Interior>INTERIOR PANELS / TRIM>FRONT CONSOLE BOX (w/ Refrigerated Cool Box)>INSTALLATION
31.INSTALL FRONT SEAT ASSEMBLY
for Manual Seat:
Click hereVehicle Interior>SEAT>FRONT SEAT ASSEMBLY (for Manual Seat)>INSTALLATION
for Power Seat:
Click hereVehicle Interior>SEAT>FRONT SEAT ASSEMBLY (for Power Seat)>INSTALLATION
32.CONNECT CABLE TO NEGATIVE BATTERY TERMINAL
- NOTICE:
-
When disconnecting the cable, some systems need to be initialized after the cable is reconnected.
-
Click hereGeneral>INTRODUCTION>REPAIR INSTRUCTION>INITIALIZATION