1GD-FTV ENGINE MECHANICAL ENGINE UNIT REASSEMBLY
PROCEDURE

 1.INSTALL STRAIGHT PIN
- NOTICE:
-
It is not necessary to remove the straight pin unless it is being replaced.
for Timing Chain Cover Sub-assembly Side:
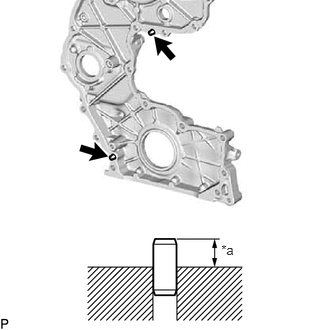
Using a plastic-faced hammer, tap in 2 new straight pins to the timing chain cover sub-assembly.
- Standard protrusion height:
5.0 to 7.0 mm (0.197 to 0.276 in.)
| *a | Protrusion Height |
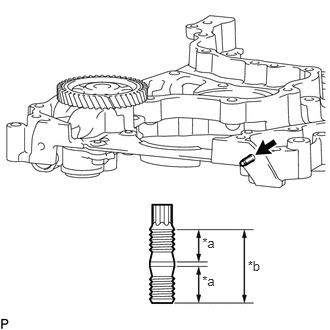
for Timing Chain Case Assembly Side:
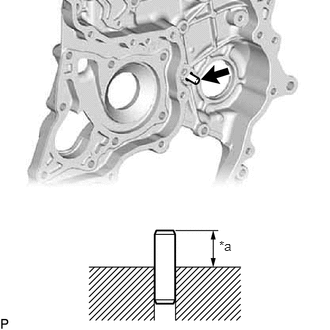
Using a plastic-faced hammer, tap in a new straight pin to the timing chain case assembly.
- Standard protrusion height:
18 to 20 mm (0.709 to 0.787 in.)
| *a | Protrusion Height |
2.INSTALL STUD BOLT
- NOTICE:
-
If a stud bolt is deformed or its threads are damaged, replace it.
for Timing Chain Cover Sub-assembly Side:
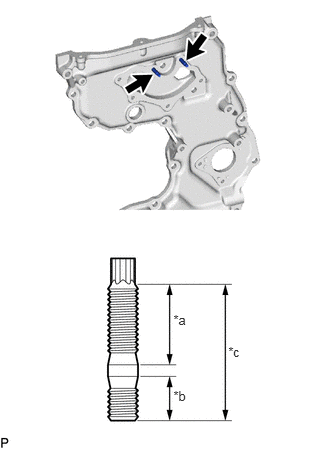
Using an E6 "TORX" socket wrench, install the stud bolts to the timing chain cover sub-assembly.
- Torque:
- 6.0 N*m (61 kgf*cm, 53 in.*lbf)
| *a | 16 mm (0.630 in.) |
| *b | 9.0 mm (0.354 in.) |
| *c | 27 mm (1.06 in.) |
for Timing Chain Case Assembly Side:
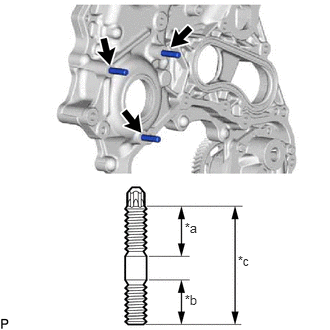
Using an E8 "TORX" socket wrench, install the stud bolts to the timing chain case assembly.
- Torque:
- 10 N*m (102 kgf*cm, 7 ft.*lbf)
| *a | 19 mm (0.748 in.) |
| *b | 16 mm (0.630 in.) |
| *c | 44 mm (1.73 in.) |
Using an E6 "TORX" socket wrench, install the stud bolt to the timing chain case assembly.
- Torque:
- 6.0 N*m (61 kgf*cm, 53 in.*lbf)
| *a | 9.0 mm (0.354 in.) |
| *b | 19 mm (0.748 in.) |
for Oil Pan Sub-assembly Side:
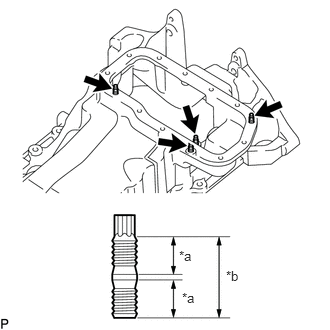
| *a | 9.0 mm (0.354 in.) |
| *b | 19 mm (0.748 in.) |
Using an E6 "TORX" socket wrench, install the 4 stud bolts to the oil pan sub-assembly.
- Torque:
- 6.0 N*m (61 kgf*cm, 53 in.*lbf)
13577D
3.INSTALL LOCK PLATE
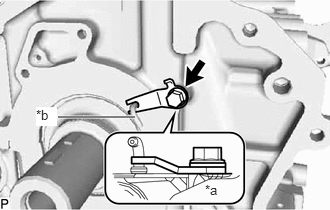
Install the lock plate to the cylinder block sub-assembly with the bolt.
- Torque:
- 10 N*m (102 kgf*cm, 7 ft.*lbf)
| *a | Cylinder Block Sub-assembly Side |
| *b | Oil Jet |
- HINT:
- ·
Make sure the lock plate is facing the direction shown in the illustration.
·Make sure the end of the lock plate is holding the oil jet as shown in the illustration.
11115
4.INSTALL CYLINDER HEAD GASKET
11101
5.INSTALL CYLINDER HEAD SUB-ASSEMBLY
13750
6.INSTALL VALVE LASH ADJUSTER ASSEMBLY
Install the 16 valve lash adjuster assemblies to the cylinder head sub-assembly.
13801
7.INSTALL NO. 1 VALVE ROCKER ARM SUB-ASSEMBLY
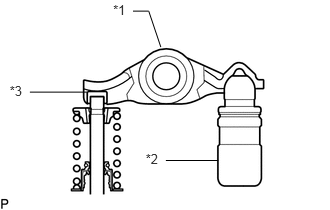
Check that the No. 1 valve rocker arm sub-assembly is firmly set to the valve lash adjuster assembly.
| *1 | No. 1 Valve Rocker Arm Sub-assembly |
| *2 | Valve Stem Cap |
| *3 | Valve Lash adjuster assembly |
Apply a light coat of engine oil to the camshaft journals of the cylinder head sub-assembly and the thrust portion of the camshaft.
Install the 16 No. 1 valve rocker arm sub-assemblies to the 16 valve lash adjuster assemblies.
13512
8.INSTALL NO. 2 CAMSHAFT
- HINT:
-
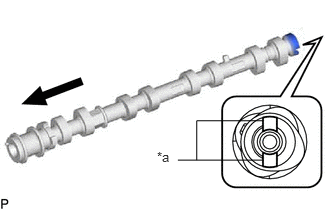 1.635,1.552 1.820,1.707 0.185,0.155 10 *a 2.739,1.668 1.852,1.668 false 2.739,1.257 2.049,1.257 2.049,1.257 2.049,1.668 false
-
The glove is at the rear end of the No. 2 camshaft.
| *a | Glove |

|
Engine Front Side |
Clean the No. 2 camshaft journals.
Apply a light coat of engine oil to the No. 2 camshaft journals of the cylinder head sub-assembly and the thrust portion of the No. 2 camshaft.
13511
9.INSTALL CAMSHAFT
Clean the camshaft journals.
Apply a light coat of engine oil to the camshaft journals of the cylinder head sub-assembly and the thrust portion of the camshaft.
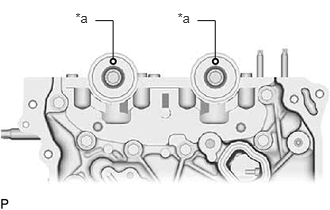
Make sure the knock pins of the camshaft and No. 2 camshaft are facing the direction shown in the illustration.
| *a | Knock Pin |
10.INSTALL NO. 1 AND NO. 2 CAMSHAFT BEARING CAP
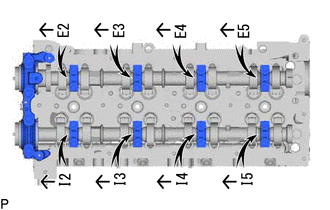
Set the No. 1 camshaft bearing cap and 8 No. 2 camshaft bearing caps to the cylinder head sub-assembly as shown in the illustration.
Temporarily install the 20 camshaft bearing cap bolts.
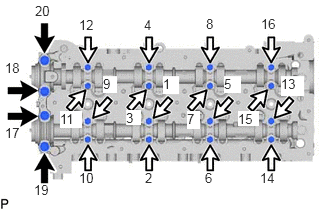
Uniformly tighten the 20 camshaft bearing cap bolts in several steps in the order shown in the illustration.
- Torque:
- for camshaft bearing cap bolt A (No. 1 camshaft bearing) : 21 N*m (214 kgf*cm, 15 ft.*lbf)
- for camshaft bearing cap bolt B (No. 2 camshaft bearing) : 10 N*m (102 kgf*cm, 7 ft.*lbf)
|
|
Camshaft Bearing Cap Bolt A |

|
Camshaft Bearing Cap Bolt B |
11.INSTALL NO. 3 CAMSHAFT BEARING CAP
Clean and degrease the contact surfaces of the No. 3 camshaft bearing cap and cylinder head sub-assembly.
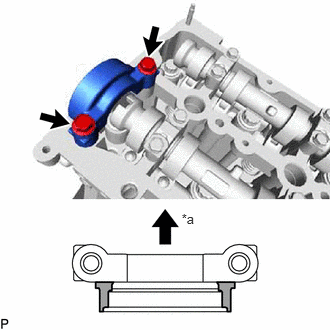
Apply seal packing to the No. 3 camshaft bearing cap in the areas indicated in the illustration.
- Seal packing:
Toyota Genuine Seal Packing Black, Three Bond 1207B or equivalent
- Standard seal diameter:
3.0 mm (0.118 in.)
| *a | Engine Front Side |

|
Seal Packing Application Area |
- NOTICE:
- ·
Install the No. 3 camshaft bearing cap within 3 minutes and tighten the camshaft bearing cap bolts within 15 minutes after applying seal packing.
·Do not add engine oil within 2 hours of installation.
·Do not start the engine for at least 2 hours after the installation.
Install the No. 3 camshaft bearing cap to the cylinder head sub-assembly with the 2 camshaft bearing cap bolts.
- Torque:
- 21 N*m (214 kgf*cm, 15 ft.*lbf)
Wipe off excess seal packing from between No. 3 camshaft bearing cap and cylinder head sub-assembly.
11310
12.INSTALL TIMING CHAIN CASE ASSEMBLY AND ENGINE WATER PUMP ASSEMBLY
22815A
13.INSTALL INJECTION PUMP INSULATOR
Install the injection pump insulator to the cylinder block sub-assembly.
22100
14.INSTALL SUPPLY PUMP ASSEMBLY
- NOTICE:
-
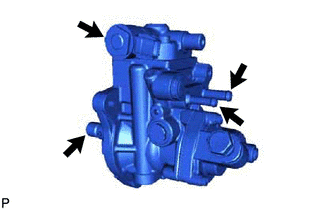
-
Do not hold the supply pump assembly by the parts indicated by the arrows in the illustration.
Install a new O-ring to the supply pump assembly.
Install the supply pump assembly to the timing chain case assembly with the 3 nuts.
- Torque:
- 21 N*m (214 kgf*cm, 15 ft.*lbf)
Install the No. 1 fuel pump bracket to the cylinder block sub-assembly and supply pump assembly with the 2 bolts.
- Torque:
- 21 N*m (214 kgf*cm, 15 ft.*lbf)
13559
15.INSTALL NO. 1 CHAIN TENSIONER SLIPPER
Install the No. 1 chain tensioner slipper to the straight pin.
13561
16.TEMPORARILY INSTALL NO. 1 CHAIN VIBRATION DAMPER
Temporarily install the No. 1 chain vibration damper to the cylinder block sub-assembly with the bolt.
13506
17.INSTALL CRANKSHAFT TIMING SPROCKET, INJECTION PUMP DRIVE GEAR WITH NO. 1 CHAIN SUB-ASSEMBLY
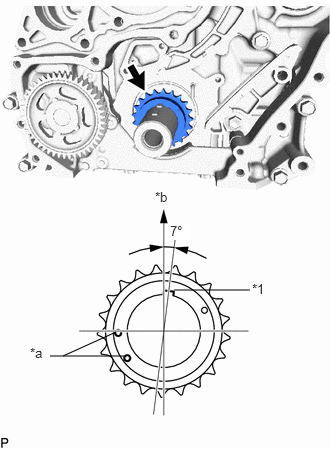
Install the crankshaft timing sprocket to the crankshaft.
| *1 | Crankshaft Pulley Set Key |
| *a | Timing Mark |
| *b | Upper Side |
Align the crankshaft pulley set key as shown in the illustration.
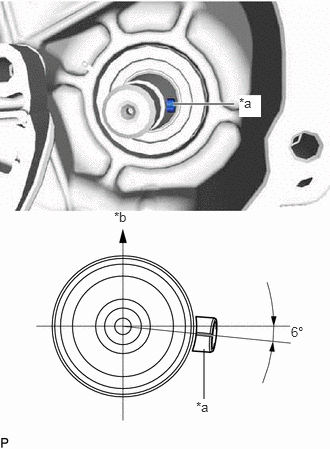
Align the supply pump shaft key as shown in the illustration.
| *a | Supply Pump Shaft Key |
| *b | Upper Side |
Remove the crankshaft timing sprocket from the crankshaft.
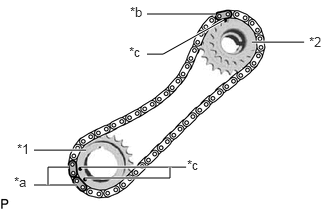
Align the 2 mark plates (pink) of the No. 1 chain sub-assembly with the 2 timing marks of the crankshaft timing sprocket and install the No. 1 chain sub-assembly to the crankshaft timing sprocket as shown in the illustration.
| *1 | Crankshaft Timing Sprocket |
| *2 | Injection Pump Drive Gear |
| *a | Mark Plate (Pink) |
| *b | Mark Plate (Yellow) |
| *c | Timing Mark |
Align the mark plate (yellow) of the No. 1 chain sub-assembly with the timing mark of the injection pump drive gear and install the No. 1 chain sub-assembly to the injection pump drive gear as shown in the illustration.
Install the crankshaft timing sprocket, injection pump drive gear and No. 1 chain sub-assembly to the crankshaft and supply pump shaft together.
13561
18.TIGHTEN NO. 1 CHAIN VIBRATION DAMPER
Tighten the No. 1 chain vibration damper to the cylinder block sub-assembly with the bolt.
- Torque:
- 21 N*m (214 kgf*cm, 15 ft.*lbf)
13540
19.INSTALL NO. 1 CHAIN TENSIONER ASSEMBLY
- NOTICE:
- ·
When the pin is removed from the No. 1 chain tensioner assembly, the plunger and spring may come off of the No. 1 chain tensioner assembly body, but this is not a malfunction.
·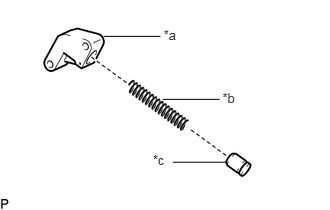 1.704,0.281 1.889,0.436 0.185,0.155 10 *a 2.317,0.935 2.502,1.090 0.185,0.155 10 *b 1.593,1.582 1.778,1.737 0.185,0.155 10 *c 1.079,0.379 1.672,0.379 false 1.694,1.035 2.287,1.035 false 1.802,1.69 2.36,1.69 false
Before installing the plunger and spring to the No. 1 chain tensioner assembly body, check that they are free of foreign matter and not damaged.
| *a | No. 1 Chain Tensioner Assembly Body |
| *b | Spring |
| *c | Plunger |
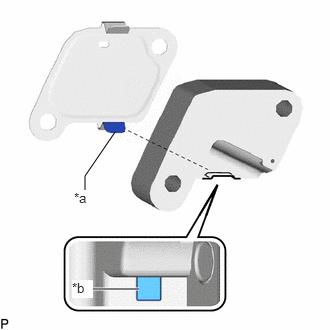
Install a new gasket and No. 1 chain tensioner assembly to the cylinder block sub-assembly with the 2 bolts.
- Torque:
- 10 N*m (102 kgf*cm, 7 ft.*lbf)
| *a | Claw (Lower Side) |
| *b | Groove |
- HINT:
-
Align the claw (lower side) of the gasket with the groove of the No. 1 chain tensioner assembly body to install the No. 1 chain tensioner assembly as shown in the illustration.
20.INSTALL SUPPLY PUMP SHAFT NUT
Temporarily install the crankshaft pulley and crankshaft pulley set bolt to the crankshaft.
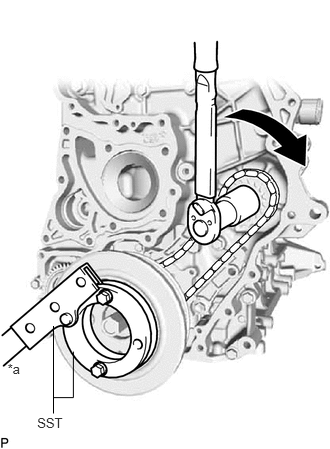
Using SST, hold the crankshaft pulley and install the supply pump shaft nut to the supply pump shaft.
- SST
- 09213-58014 (91551-80840)
09330-00021
- Torque:
- 137 N*m (1397 kgf*cm, 101 ft.*lbf)
| *a | Hold |
|
|
Turn |
- NOTICE:
-
If the supply pump shaft nut is tightened with torque higher than the specified torque, the No. 1 chain sub-assembly may break.
Remove the crankshaft pulley set bolt and crankshaft pulley from the crankshaft.
Make sure that the timing marks of the crankshaft timing sprocket and injection pump drive gear are aligned with the mark plates of the No. 1 chain sub-assembly as shown in the illustration.
| *1 | Crankshaft Timing Sprocket |
| *2 | Injection Pump Drive Gear |
| *a | Mark Plate (Pink) |
| *b | Mark Plate (Yellow) |
| *c | Timing Mark |
Remove the pin from the No. 1 chain tensioner assembly.
13523
21.INSTALL CAMSHAFT TIMING SPROCKET
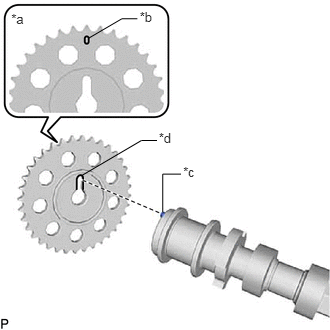
Temporarily install the 2 camshaft timing sprockets to the camshaft and No. 2 camshaft with the 2 camshaft timing sprocket bolts.
| *a | Engine Front Side |
| *b | Timing Mark |
| *c | Knock Pin |
| *d | Cutout |
- NOTICE:
-
Make sure that the timing mark of the camshaft timing sprocket faces the front side of the engine.
- HINT:
-
Align the knock pins of the camshaft and No. 2 camshaft with the cutout of the camshaft timing sprocket to install the camshaft timing sprocket.
for Intake Side:
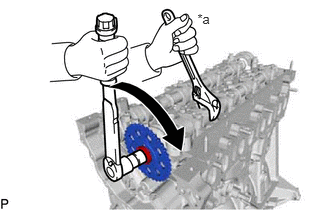
Using a wrench to hold the hexagonal portion of the camshaft, install the camshaft timing sprocket bolt to the camshaft.
- Torque:
- 81 N*m (826 kgf*cm, 60 ft.*lbf)
| *a | Hold |
|
|
Turn |
- NOTICE:
-
Be careful not to damage the camshaft or cylinder head sub-assembly with the wrench.
for Exhaust Side:
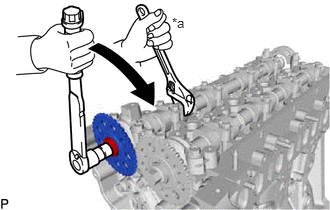
Using a wrench to hold the hexagonal portion of the No. 2 camshaft, install the camshaft timing sprocket bolt to the No. 2 camshaft.
- Torque:
- 81 N*m (826 kgf*cm, 60 ft.*lbf)
| *a | Hold |
|
|
Turn |
- NOTICE:
-
Be careful not to damage the No. 2 camshaft or cylinder head sub-assembly with the wrench.
13562
22.INSTALL NO. 2 CHAIN VIBRATION DAMPER
Install the No. 2 chain vibration damper to the timing chain case assembly with the 2 bolts.
- Torque:
- 21 N*m (214 kgf*cm, 15 ft.*lbf)
13507
23.INSTALL NO. 2 CHAIN SUB-ASSEMBLY
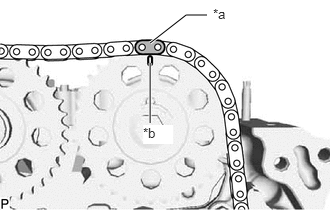
Align the mark plate (orange) of the No. 2 chain sub-assembly with the timing mark of the camshaft timing sprocket (intake side) and install the No. 2 chain sub-assembly to the camshaft timing sprocket (intake side) as shown in the illustration.
| *a | Mark Plate (Orange) |
| *b | Timing Mark |
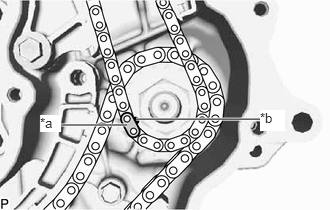
Align the mark plate (yellow) of the No. 2 chain sub-assembly with the timing mark of the injection pump drive gear and install the No. 2 chain sub-assembly to the injection pump drive gear as shown in the illustration.
| *a | Mark Plate (Yellow) |
| *b | Timing Mark |
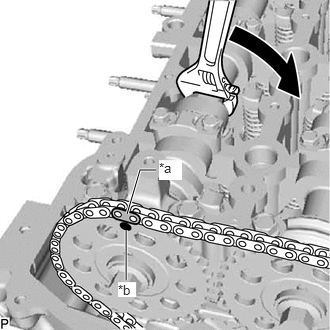
Using a wrench, turn the hexagonal portion of the No. 2 camshaft clockwise and align the mark plate (orange) of the No. 2 chain sub-assembly with the timing mark of the camshaft timing sprocket (exhaust side) to install the No. 2 chain sub-assembly to the camshaft timing sprocket (exhaust side).
| *a | Mark Plate (Orange) |
| *a | Timing Mark |
|
|
Turn |
24.INSTALL NO. 2 CHAIN TENSIONER SLIPPER
Install the No. 2 chain tensioner slipper to the timing chain case assembly with the bolt.
- Torque:
- 21 N*m (214 kgf*cm, 15 ft.*lbf)
13550
25.INSTALL NO. 2 CHAIN TENSIONER ASSEMBLY
Install the No. 2 chain tensioner assembly to the timing chain case assembly with the 2 bolts.
- Torque:
- 10 N*m (102 kgf*cm, 7 ft.*lbf)
Remove the pin from the No. 2 chain tensioner assembly.
13566B
26.INSTALL TIMING CHAIN GUIDE
27.CHECK NO. 1 CYLINDER TO TDC/COMPRESSION
Make sure that the timing marks of the camshaft timing sprocket (exhaust side), camshaft timing sprocket (intake side), injection pump drive gear and crankshaft timing sprocket are at the positions shown in the illustration.
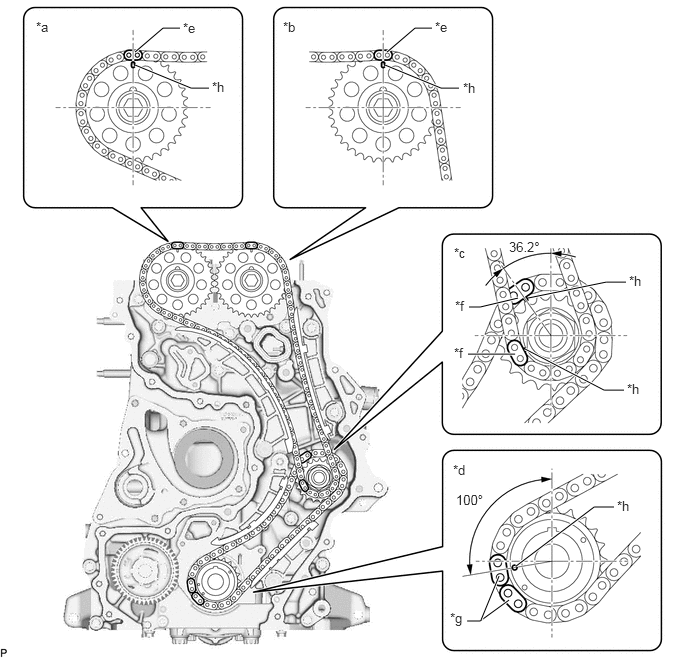
| *a | Camshaft Timing Sprocket (Exhaust Side) | *b | Camshaft Timing Sprocket (Intake Side) |
| *c | Injection Pump Drive Gear | *d | Crankshaft Timing Sprocket |
| *e | Mark Plate (Orange) | *f | Mark Plate (Yellow) |
| *g | Mark Plate (Pink) | *h | Timing Mark |
13620B
28.INSTALL ENGINE BALANCER ASSEMBLY
Set the engine balancer assembly to the cylinder block sub-assembly.
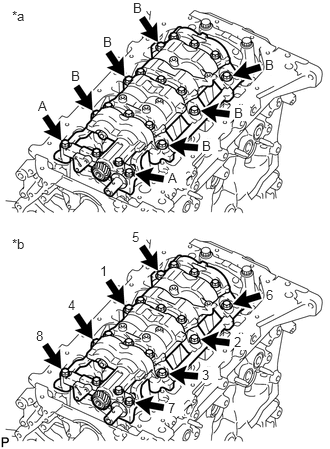
Install the engine balancer assembly to the cylinder block sub-assembly with the 8 bolts and tighten the bolts in the sequence shown in the illustration.
- Torque:
- for bolt A : 21 N*m (214 kgf*cm, 15 ft.*lbf)
- for bolt B : 43 N*m (438 kgf*cm, 32 ft.*lbf)
- Bolt Length:
Item Specified Condition Bolt A 50 mm (1.97 in.) Bolt B 55 mm (2.17 in.)
| *a | Bolt Type |
| *b | Tightening Order |
13639
29.INSTALL BALANCE SHAFT TIMING SPROCKET, BALANCE SHAFT GEAR SUB-ASSEMBLY WITH NO. 3 CHAIN SUB-ASSEMBLY
- HINT:
-
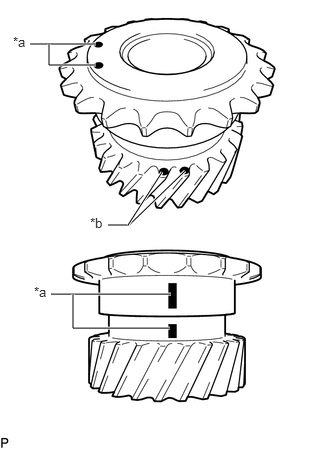 0.313,0.458 1,0.458 true 1.125,2.344 1.344,2.344 1.344,2.344 1.927,1.781 true 1.333,2.344 1.688,1.792 true 0.531,3.063 1.781,3.063 true 0.51,0.458 0.51,0.677 0.51,0.677 1,0.677 true 0.76,3.063 0.76,3.417 0.76,3.417 1.771,3.417 true 0.135,0.354 0.448,0.552 0.313,0.198 10 false *a 0.938,2.24 1.25,2.438 0.313,0.198 10 false *b 0.354,2.958 0.667,3.156 0.313,0.198 10 false *a
-
Before installing the balance shaft gear sub-assembly, make sure to confirm the positions of the timing marks and paint marks (pink).
| *a | Timing Mark |
| *b | Paint Mark (Pink) |
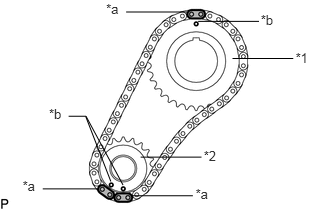
Align the mark plate (yellow) of the No. 3 chain sub-assembly with the timing mark of the balance shaft timing sprocket and install the No. 3 chain sub-assembly to the balance shaft timing sprocket as shown in the illustration.
| *1 | Balance Shaft Timing Sprocket |
| *2 | Balance Shaft Gear Sub-assembly |
| *a | Mark Plate (Yellow) |
| *b | Timing Mark |
- NOTICE:
-
Make sure that the timing plate of the No. 3 chain sub-assembly faces the front side of the engine.
Align the 2 mark plates (yellow) of the No. 3 chain sub-assembly with the 2 timing marks of the balance shaft timing gear sub-assembly and install the No. 3 chain sub-assembly to the balance shaft timing gear sub-assembly as shown in the illustration.
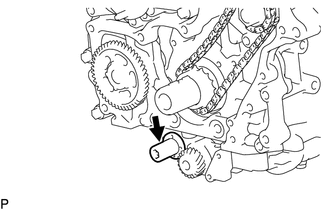
Apply engine oil to the position shown in the illustration.
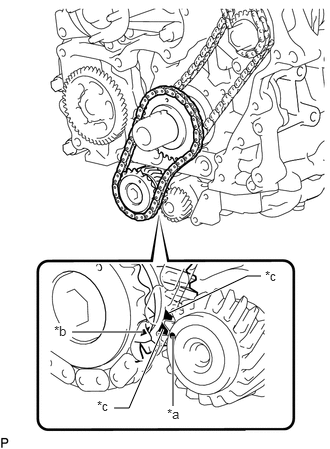
Align the timing mark of the engine balancer assembly with the 2 paint marks (pink) and timing mark of the balance shaft gear sub-assembly, and then install the balance shaft timing sprocket, balance shaft gear sub-assembly with No. 3 chain sub-assembly to the crankshaft and engine balancer assembly as shown in the illustration.
| *a | Timing Mark (Engine Balancer Assembly Side) |
| *b | Timing Mark (Balance Shaft Gear Sub-assembly Side) |
| *c | Paint Mark (Pink)
(Balance Shaft Gear Sub-assembly Side) |
Make sure that the timing marks of the balance shaft timing sprocket and balance shaft gear sub-assembly are aligned with the mark plates of the No. 3 chain sub-assembly as shown in the illustration.
| *1 | Balance Shaft Timing Sprocket |
| *2 | Balance Shaft Gear Sub-assembly |
| *a | Mark Plate (Yellow) |
| *b | Timing Mark |
11991A
30.INSTALL NO. 1 BALANCE SHAFT THRUST PLATE
Apply engine oil to the front and rear surfaces of the No. 1 balance shaft thrust plate.
Install the No. 1 balance shaft thrust plate to the crankshaft with the bolt.
- Torque:
- 21 N*m (214 kgf*cm, 15 ft.*lbf)
13560A
31.INSTALL NO. 3 CHAIN TENSIONER ASSEMBLY
- NOTICE:
- ·
When the pin is removed from the No. 3 chain tensioner assembly, the plunger and 2 springs may come off of the No. 3 chain tensioner assembly body, but this is not a malfunction.
·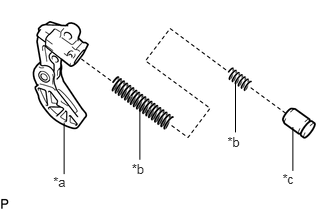 0.554,1.812 0.739,1.967 0.185,0.155 10 *a 1.372,1.682 1.557,1.837 0.185,0.155 10 *b 2.942,1.784 3.127,1.939 0.185,0.155 10 *c 0.667,1.277 0.667,1.814 false 1.457,1.127 1.457,1.664 false 2.368,1.397 2.552,1.551 0.185,0.155 10 *b 2.453,0.842 2.453,1.379 false 3.051,1.323 3.051,1.78 false
Before installing the plunger and 2 springs to the No. 3 chain tensioner assembly body, check that they are free of foreign matter and not damaged.
| *a | No. 3 Chain Tensioner Assembly Body |
| *b | Spring |
| *c | Plunger |
Install the No. 3 chain tensioner assembly to the engine balancer assembly with the 2 bolts.
- Torque:
- 10 N*m (102 kgf*cm, 7 ft.*lbf)
Remove the pin from the No. 3 chain tensioner assembly.
13519
32.INSTALL OIL PUMP DRIVE GEAR
15133B
33.INSTALL OIL PUMP RELIEF VALVE PLUG
Install a new gasket and oil pump relief valve plug to the timing chain cover sub-assembly.
- Torque:
- 46 N*m (469 kgf*cm, 34 ft.*lbf)
11324
34.INSTALL TIMING CHAIN COVER PLATE
11302
35.INSTALL TIMING CHAIN COVER SUB-ASSEMBLY
11303A
36.INSTALL FRONT CRANKSHAFT OIL SEAL
11381
37.INSTALL REAR ENGINE OIL SEAL RETAINER
Clean and degrease the contact surfaces of the rear engine oil seal retainer and cylinder block sub-assembly.
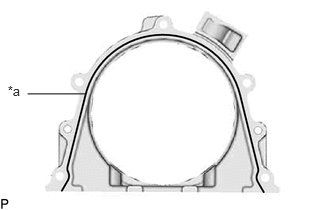
Apply seal packing to the rear engine oil seal retainer in the areas indicated in the illustration.
- Seal packing:
Toyota Genuine Seal Packing Black, Three Bond 1207B or equivalent
- Standard seal diameter:
3.0 to 4.0 mm (0.118 to 0.157 in.)
| *a | Seal Packing |
- NOTICE:
- ·
Remove any engine oil from the contact surface.
·Install the rear engine oil seal retainer within 3 minutes and tighten the bolts within 10 minutes after applying seal packing.
·Do not add engine oil within 2 hours of installation.
·Do not start the engine for at least 2 hours after the installation.
Install the rear engine oil seal retainer to the cylinder block sub-assembly, and then install the 5 bolts.
- Torque:
- 10 N*m (102 kgf*cm, 7 ft.*lbf)
11381A
38.INSTALL REAR ENGINE OIL SEAL
15104
39.INSTALL OIL STRAINER SUB-ASSEMBLY
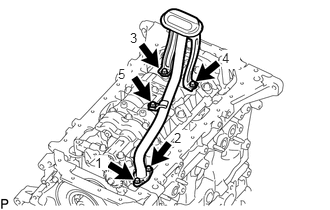
Install a new gasket and oil strainer sub-assembly to the cylinder block sub-assembly with the 5 bolts in several steps in the sequence shown in the illustration.
- Torque:
- 12 N*m (122 kgf*cm, 9 ft.*lbf)
- HINT:
-
Make sure that the claw of the gasket faces the oil strainer sub-assembly.
12101
40.INSTALL OIL PAN SUB-ASSEMBLY
89491
41.INSTALL ENGINE OIL LEVEL SENSOR
12102A
42.INSTALL NO. 2 OIL PAN SUB-ASSEMBLY
11401G
43.INSTALL CRANKSHAFT POSITION SENSOR
44.INSTALL CRANKSHAFT POSITION SENSOR HARNESS BRACKET
Install the crankshaft position sensor harness bracket to the cylinder block sub-assembly with the bolt.
- Torque:
- 10 N*m (102 kgf*cm, 7 ft.*lbf)
Connect the crankshaft position sensor connector.
12581A
45.INSTALL NO. 1 CYLINDER BLOCK INSULATOR
Install the No. 1 cylinder block insulator to the cylinder block sub-assembly.
12585
46.INSTALL NO. 5 CYLINDER BLOCK INSULATOR
Install the No. 5 cylinder block insulator to the cylinder block sub-assembly.
11201
47.INSTALL CYLINDER HEAD COVER SUB-ASSEMBLY
12108A
48.INSTALL OIL FILLER CAP GASKET
Install the oil filler cap gasket to the oil filler cap sub-assembly.
12108
49.INSTALL OIL FILLER CAP SUB-ASSEMBLY
Install the oil filler cap sub-assembly to the cylinder head cover sub-assembly.
23682
50.INSTALL NOZZLE HOLDER GASKET
23670
51.TEMPORARILY INSTALL INJECTOR ASSEMBLY
23760
52.INSTALL NOZZLE LEAKAGE PIPE ASSEMBLY
15677
53.INSTALL OIL FILTER BRACKET
Install 2 new O-rings to the cylinder block sub-assembly.
Install the oil filter bracket to the cylinder block sub-assembly with the 2 nuts and bolt.
- Torque:
- 21 N*m (214 kgf*cm, 15 ft.*lbf)
15600A
54.INSTALL OIL FILTER UNION
Using a 27 mm deep socket wrench, install the oil filter union to the oil filter bracket.
- Torque:
- 29 N*m (300 kgf*cm, 22 ft.*lbf)
15601
55.INSTALL OIL FILTER SUB-ASSEMBLY
15710
56.INSTALL OIL COOLER ASSEMBLY
83530
57.INSTALL ENGINE OIL PRESSURE SWITCH ASSEMBLY
12311
58.INSTALL FRONT NO. 1 ENGINE MOUNTING BRACKET RH
Install the front No. 1 engine mounting bracket RH to the cylinder block sub-assembly with the 4 bolts.
- Torque:
- 68 N*m (693 kgf*cm, 50 ft.*lbf)
16331A
59.INSTALL THERMOSTAT
16321
60.INSTALL WATER INLET
12501
61.INSTALL GENERATOR BRACKET SUB-ASSEMBLY
Install the generator bracket sub-assembly to the cylinder head sub-assembly and timing chain case assembly with the 4 bolts.
- Torque:
- 21 N*m (214 kgf*cm, 15 ft.*lbf)
12583A
62.INSTALL NO. 3 CYLINDER BLOCK INSULATOR
Install the No. 3 cylinder block insulator to the cylinder block sub-assembly.
63.INSTALL FRONT NO. 1 ENGINE MOUNTING BRACKET LH
Install the front No. 1 engine mounting bracket LH to the cylinder block sub-assembly with the 4 bolts.
- Torque:
- 68 N*m (693 kgf*cm, 50 ft.*lbf)
12582
64.INSTALL NO. 2 CYLINDER BLOCK INSULATOR
Install the No. 2 cylinder block insulator to the front No. 1 engine mounting bracket LH.
12281A
65.INSTALL NO. 1 ENGINE HANGER
Install the No. 1 engine hanger to the cylinder head sub-assembly with the 2 bolts.
- Torque:
- 26 N*m (265 kgf*cm, 19 ft.*lbf)
11382C
66.INSTALL CAMSHAFT OIL SEAL RETAINER
- NOTICE:
-
If the camshaft oil seal retainer is dropped, replace it with a new one.
Before installing a new camshaft oil seal retainer, clean the installation surface of the No. 3 camshaft bearing cap and cylinder head sub-assembly and remove any foreign matter.
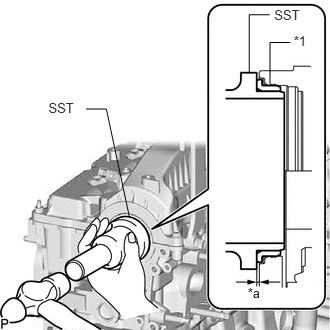
Using SST and a hammer, tap in a new camshaft oil seal retainer to the No. 3 camshaft bearing cap and cylinder head sub-assembly as shown in the illustration.
- SST
- 09223-46011
- Standard depth:
0 to 0.8 mm (0 to 0.0315 in.)
| *1 | Camshaft Oil Seal Retainer |
| *a | Depth |
29300
67.INSTALL VACUUM PUMP ASSEMBLY
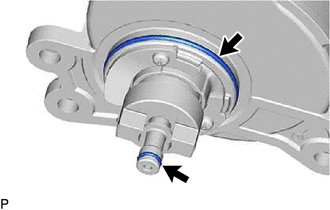
Coat 2 new O-rings with engine oil, and install them to the vacuum pump assembly.
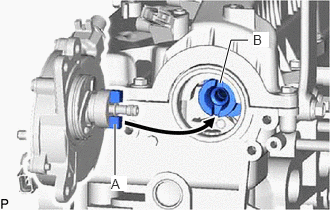
Install the vacuum pump assembly so that the coupling teeth of the vacuum pump assembly labeled A and the groove of the No. 2 camshaft labeled B can engage.
Install the vacuum pump assembly to the cylinder head sub-assembly with the 3 bolts.
- Torque:
- 21 N*m (214 kgf*cm, 15 ft.*lbf)