Brake Warning Light Remains ON
Circuit diagnosis · Vehicles built Sep 2011 – Dec 2011
Versions by build date: Sep 2011 – Dec 2011 from Jan 2012
DESCRIPTION
The BRAKE warning light comes on when brake fluid is insufficient, the parking brake is applied or the EBD is defective.WIRING DIAGRAM
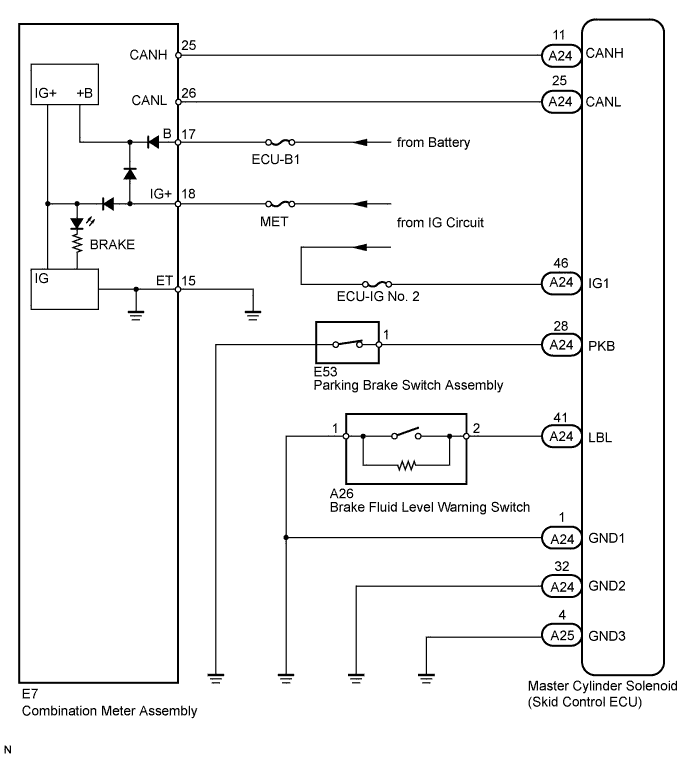

INSPECTION PROCEDURE
- NOTICE:
- When replacing the master cylinder solenoid, perform zero point calibration (Click here).
| 1. CHECK DTC |
 |
Check for DTCs (Click here).
Result
Result
|
Proceed to
|
DTC is not output
|
A
|
DTC is output
|
B
|
|
B |
 |
|
| REPAIR CIRCUIT INDICATED BY OUTPUT DTC (Click here)
|
|
|
| A |
|
 |
|
| 2. INSPECT IF SKID CONTROL ECU CONNECTOR IS SECURELY CONNECTED |
|
Check the skid control ECU connector connection.
- OK:
- The connector is securely connected.
|
NG |
|
|
| CONNECT CONNECTOR TO ECU CORRECTLY |
|
|
| OK |
|
|
|
| 3. INSPECT BATTERY |
|
Check the battery voltage.
- Standard voltage:
- 11 to 14 V
Result
Result
|
Proceed to
|
OK
|
A
|
NG
|
1GR-FE
|
B
|
2UZ-FE
|
C
|
1VD-FTV
|
D
|
|
B |
|
|
| GO TO CHARGING SYSTEM (ON-VEHICLE INSPECTION) (Click here)
|
|
|
|
C |
|
|
| GO TO CHARGING SYSTEM (ON-VEHICLE INSPECTION) (Click here)
|
|
|
|
D |
|
|
| GO TO CHARGING SYSTEM (ON-VEHICLE INSPECTION) (Click here)
|
|
|
| A |
|
|
|
| 4. CHECK CAN COMMUNICATION LINE |
|
Turn the ignition switch off.
Connect the intelligent tester to the DLC3.
Turn the ignition switch to ON and the intelligent tester on.
Select "Bus Check" from the System Selection Menu screen, and follow the prompts on the screen to inspect the CAN Bus.
- OK:
- "Bus Check" indicates no malfunctions in CAN communication.
Result
Result
|
Proceed to
|
OK
|
A
|
NG
|
LHD
|
B
|
RHD
|
C
|
|
B |
|
|
| GO TO CAN COMMUNICATION SYSTEM (HOW TO PROCEED WITH TROUBLESHOOTING) (Click here)
|
|
|
|
C |
|
|
| GO TO CAN COMMUNICATION SYSTEM (HOW TO PROCEED WITH TROUBLESHOOTING) (Click here)
|
|
|
| A |
|
|
|
| 5. CHECK DTC (CAN COMMUNICATION SYSTEM) |
|
Turn the ignition switch off.
Connect the intelligent tester to the DLC3.
Turn the ignition switch to ON and the intelligent tester on.
Check for DTCs (LHD: Click here/RHD: Click here).
Result
Result
|
Proceed to
|
CAN system DTC is not output
|
A
|
CAN system DTC is output
|
LHD
|
B
|
RHD
|
C
|
|
B |
|
|
| GO TO CAN COMMUNICATION SYSTEM (HOW TO PROCEED WITH TROUBLESHOOTING) (Click here)
|
|
|
|
C |
|
|
| GO TO CAN COMMUNICATION SYSTEM (HOW TO PROCEED WITH TROUBLESHOOTING) (Click here)
|
|
|
| A |
|
|
|
| 6. CHECK OPERATION OF BRAKE WARNING LIGHT (ACTIVE TEST) |
|
Turn the ignition switch off.
Connect the intelligent tester to the DLC3.
Turn the ignition switch to ON and the intelligent tester on.
Enter the following menus: Body Electrical / Combination Meter / Active Test.
Check the condition of the brake warning light by operating the intelligent tester.
Combination Meter
Tester Display
|
Test Part
|
Control Range
|
Diagnostic Note
|
Indicat. Lamp Brake
|
Brake Warning Light
|
Warning light ON/OFF
|
-
|
- OK:
- The warning light turns on when operating the intelligent tester.
Result
Result
|
Proceed to
|
OK
|
A
|
NG
|
w/ Multi-information Display
|
B
|
w/o Multi-information Display
|
C
|
|
B |
|
|
|
|
|
C |
|
|
|
|
| A |
|
|
|
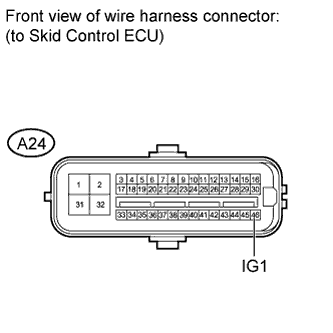
| 7. INSPECT SKID CONTROL ECU (IG1 TERMINAL) |
|
- Disconnect the A24 skid control ECU connector.
Measure the voltage according to the value(s) in the table below.
- Standard Voltage:
Tester Connection
|
Switch Condition
|
Specified Condition
|
A24-46 (IG1) - Body ground
|
Ignition switch ON
|
11 to 14 V
|
|
NG |
|
|
| REPAIR OR REPLACE HARNESS OR CONNECTOR |
|
|
| OK |
|
|
|
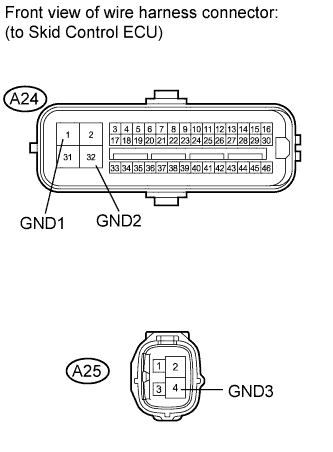
| 8. INSPECT SKID CONTROL ECU (GND TERMINAL) |
|
- Disconnect the A24 and A25 skid control ECU connectors.
Measure the resistance according to the value(s) in the table below.
- Standard Resistance:
Tester Connection
|
Condition
|
Specified Condition
|
A24-1 (GND1) - Body ground
|
Always
|
Below 1 Ω
|
A24-32 (GND2) - Body ground
|
Always
|
Below 1 Ω
|
A25-4 (GND3) - Body ground
|
Always
|
Below 1 Ω
|
|
NG |
|
|
| REPAIR OR REPLACE HARNESS OR CONNECTOR |
|
|
| OK |
|
|
|
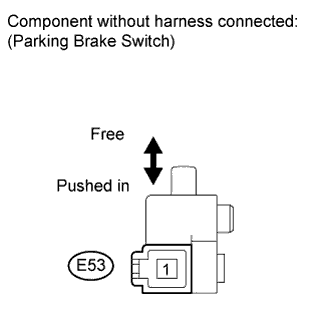
| 9. INSPECT PARKING BRAKE SWITCH |
|
- Disconnect the E53 parking brake switch connector.
Measure the resistance according to the value(s) in the table below.
- Standard Resistance:
Tester Connection
|
Switch Condition
|
Specified Condition
|
1 - Body ground
|
Parking brake switch on
(Switch pin free)
|
Below 1 Ω
|
1 - Body ground
|
Parking brake switch off
(Switch pin pushed in)
|
10 kΩ or higher
|
|
NG |
|
|
| REPLACE PARKING BRAKE SWITCH ASSEMBLY (Click here)
|
|
|
| OK |
|
|
|
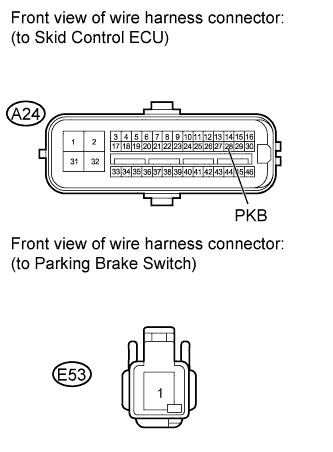
| 10. CHECK HARNESS AND CONNECTOR (SKID CONTROL ECU - PARKING BRAKE SWITCH) |
|
- Measure the resistance according to the value(s) in the table below.
- Standard Resistance:
Tester Connection
|
Condition
|
Specified Condition
|
A24-28 (PKB) - E53-1
|
Always
|
Below 1 Ω
|
A24-28 (PKB) - Body ground
|
Always
|
10 kΩ or higher
|
Result
Result
|
Proceed to
|
NG
|
A
|
OK
|
LHD
|
B
|
RHD
|
C
|
|
B |
|
|
|
|
|
C |
|
|
|
|
| A |
|
 |
|
| REPAIR OR REPLACE HARNESS OR CONNECTOR |
|